 谷粒商城—分布式基础第三部分
# 14. 递归树形结构获取数据
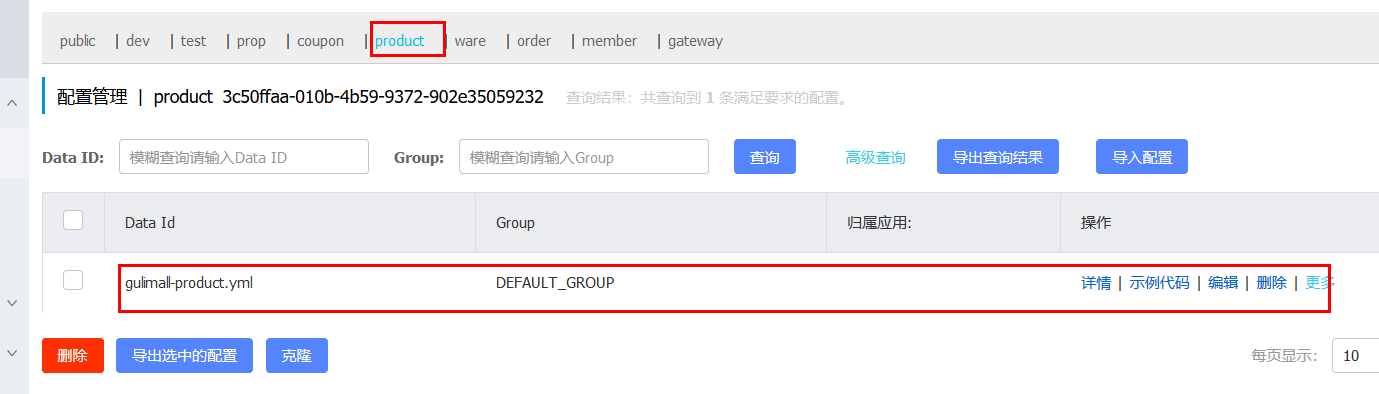
在注册中心中“product”命名空间中,创建“gulimall-product.yml”配置文件:
将“application.yml”内容拷贝到该配置文件中
server:
  port: 10000

spring:
  datasource:
    #MySQL配置
    driverClassName: com.mysql.cj.jdbc.Driver
    url: jdbc:mysql://192.168.137.14:3306/gulimall_pms?useUnicode=true&characterEncoding=UTF-8&useSSL=false
    username: root
    password: root
  application:
    name: gulimall-product
  cloud:
    nacos:
      discovery:
        server-addr: 192.168.137.14:8848


mybatis-plus:
  global-config:
    db-config:
      id-type: auto
  mapper-locations: classpath:/mapper/**/*.xml
2
3
4
5
6
7
8
9
10
11
12
13
14
15
16
17
18
19
20
21
22
23
24
25
在本地创建“bootstrap.properties”文件,指明配置中心的位置和使用到的配置文件:
spring.application.name=gulimall-product
spring.cloud.nacos.config.server-addr=192.168.137.14:8848
spring.cloud.nacos.config.namespace=3c50ffaa-010b-4b59-9372-902e35059232
spring.cloud.nacos.config.extension-configs[0].data-id=gulimall-product.yml
spring.cloud.nacos.config.extension-configs[0].group=DEFAULT_GROUP
spring.cloud.nacos.config.extension-configs[0].refresh=true
2
3
4
5
6
然后启动gulimall-product,查看到该服务已经出现在了nacos的注册中心中了
修改“com.bigdata.gulimall.product.service.CategoryService”类,添加如下代码:
    /**
     * 列表
     */
    @RequestMapping("/list/tree")
    public List<CategoryEntity> list(){
        List<CategoryEntity> categoryEntities = categoryService.listWithTree();

        return categoryEntities;
    }
2
3
4
5
6
7
8
9
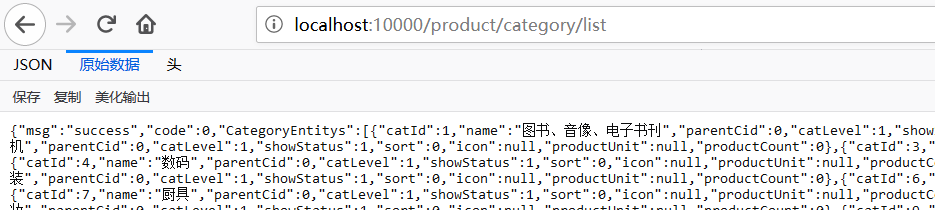
测试:http://localhost:10000/product/category/list/tree
如何区别是哪种分类级别?
答:可以通过分类的parent_cid来进行判断,如果是一级分类,其值为0.
     /**
     * 列表
     */
    @RequestMapping("/list/tree")
    public List<CategoryEntity> list(){
        List<CategoryEntity> categoryEntities = categoryService.listWithTree();
        //找到所有的一级分类
        List<CategoryEntity> level1Menus = categoryEntities.stream()
                .filter(item -> item.getParentCid() == 0)
                .map(menu->{
                    menu.setChildCategoryEntity(getChildrens(menu,categoryEntities));
                    return menu;
                })
                .sorted((menu1, menu2) -> {

                  return (menu1.getSort() ==null ? 0:menu1.getSort())- (menu2.getSort()==null?0:menu2.getSort());

                })
                .collect(Collectors.toList());


        return level1Menus;
    }

    public List<CategoryEntity> getChildrens(CategoryEntity root,List<CategoryEntity> all){

        List<CategoryEntity> childrens = all.stream().filter(item -> {
            return item.getParentCid() == root.getCatId();
        }).map(item -> {
            item.setChildCategoryEntity(getChildrens(item, all));
            return item;
        }).sorted((menu1, menu2) -> {
            return (menu1.getSort() ==null ? 0:menu1.getSort())- (menu2.getSort()==null?0:menu2.getSort());
        }).collect(Collectors.toList());

        return childrens;
    }
2
3
4
5
6
7
8
9
10
11
12
13
14
15
16
17
18
19
20
21
22
23
24
25
26
27
28
29
30
31
32
33
34
35
36
37
38
39
下面是得到的部分JSON数据
[
  {
    "catId": 1,
    "name": "图书、音像、电子书刊",
    "parentCid": 0,
    "catLevel": 1,
    "showStatus": 1,
    "sort": 0,
    "icon": null,
    "productUnit": null,
    "productCount": 0,
    "childCategoryEntity": [
      {
        "catId": 22,
        "name": "电子书刊",
        "parentCid": 1,
        "catLevel": 2,
        "showStatus": 1,
        "sort": 0,
        "icon": null,
        "productUnit": null,
        "productCount": 0,
        "childCategoryEntity": [
          {
            "catId": 165,
            "name": "电子书",
            "parentCid": 22,
            "catLevel": 3,
            "showStatus": 1,
            "sort": 0,
            "icon": null,
            "productUnit": null,
            "productCount": 0,
            "childCategoryEntity": []
          },
          {
            "catId": 166,
            "name": "网络原创",
            "parentCid": 22,
            "catLevel": 3,
            "showStatus": 1,
            "sort": 0,
            "icon": null,
            "productUnit": null,
            "productCount": 0,
            "childCategoryEntity": []
          },
          {
            "catId": 167,
            "name": "数字杂志",
            "parentCid": 22,
            "catLevel": 3,
            "showStatus": 1,
            "sort": 0,
            "icon": null,
            "productUnit": null,
            "productCount": 0,
            "childCategoryEntity": []
          },
          {
            "catId": 168,
            "name": "多媒体图书",
            "parentCid": 22,
            "catLevel": 3,
            "showStatus": 1,
            "sort": 0,
            "icon": null,
            "productUnit": null,
            "productCount": 0,
            "childCategoryEntity": []
          }
        ]
      },
      {
        "catId": 23,
        "name": "音像",
        "parentCid": 1,
        "catLevel": 2,
        "showStatus": 1,
        "sort": 0,
        "icon": null,
        "productUnit": null,
        "productCount": 0,
        "childCategoryEntity": [
          {
            "catId": 169,
            "name": "音乐",
            "parentCid": 23,
            "catLevel": 3,
            "showStatus": 1,
            "sort": 0,
            "icon": null,
            "productUnit": null,
            "productCount": 0,
            "childCategoryEntity": []
          },
          {
            "catId": 170,
            "name": "影视",
            "parentCid": 23,
            "catLevel": 3,
            "showStatus": 1,
            "sort": 0,
            "icon": null,
            "productUnit": null,
            "productCount": 0,
            "childCategoryEntity": []
          },
          {
            "catId": 171,
            "name": "教育音像",
            "parentCid": 23,
            "catLevel": 3,
            "showStatus": 1,
            "sort": 0,
            "icon": null,
            "productUnit": null,
            "productCount": 0,
            "childCategoryEntity": []
          }
        ]
      },
      {
2
3
4
5
6
7
8
9
10
11
12
13
14
15
16
17
18
19
20
21
22
23
24
25
26
27
28
29
30
31
32
33
34
35
36
37
38
39
40
41
42
43
44
45
46
47
48
49
50
51
52
53
54
55
56
57
58
59
60
61
62
63
64
65
66
67
68
69
70
71
72
73
74
75
76
77
78
79
80
81
82
83
84
85
86
87
88
89
90
91
92
93
94
95
96
97
98
99
100
101
102
103
104
105
106
107
108
109
110
111
112
113
114
115
116
117
118
119
120
121
122
123
启动后端项目renren-fast
启动前端项目renren-fast-vue:
npm run dev
访问: http://localhost:8001/#/login
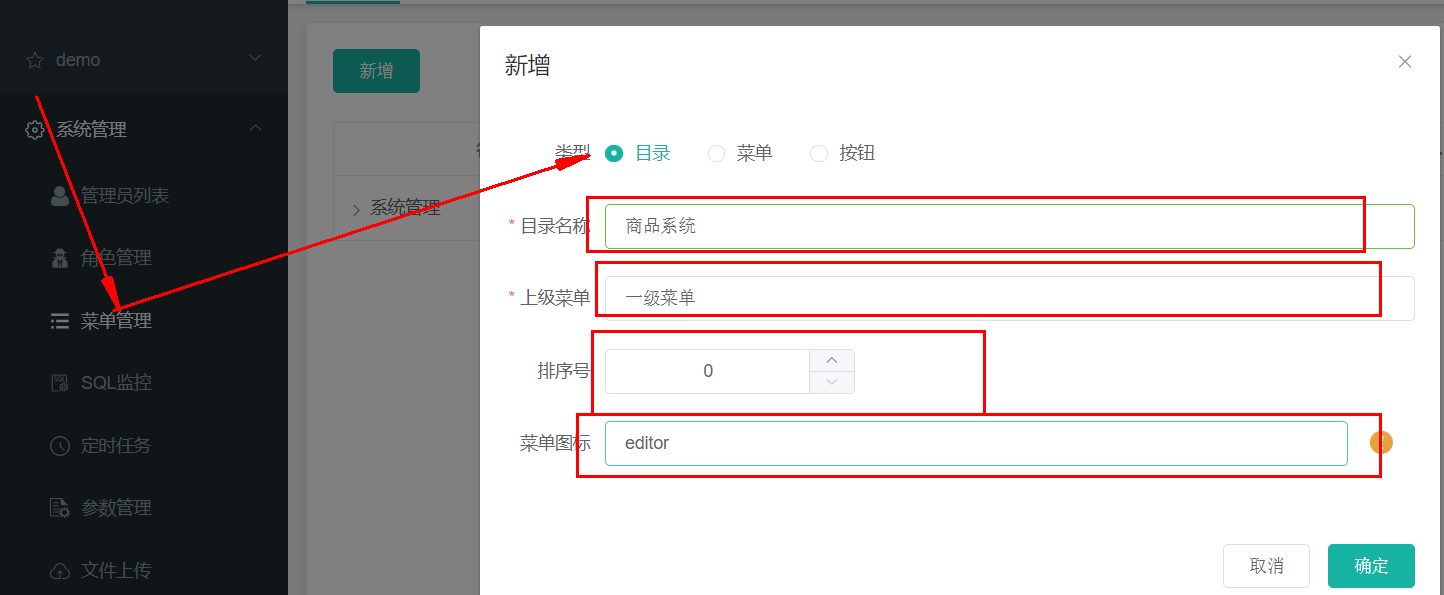
创建一级菜单:
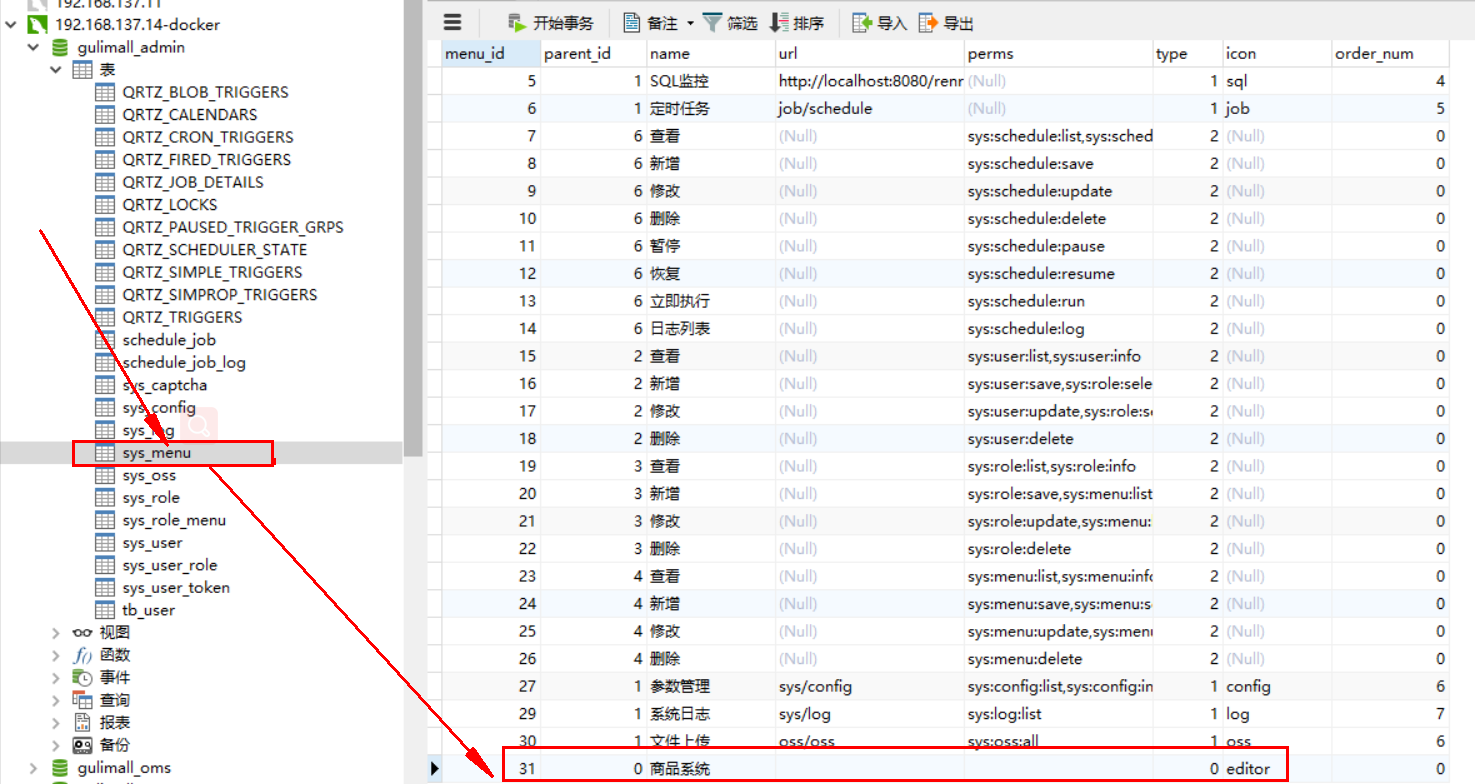
创建完成后,在后台的管理系统中会创建一条记录:
然后创建子菜单:
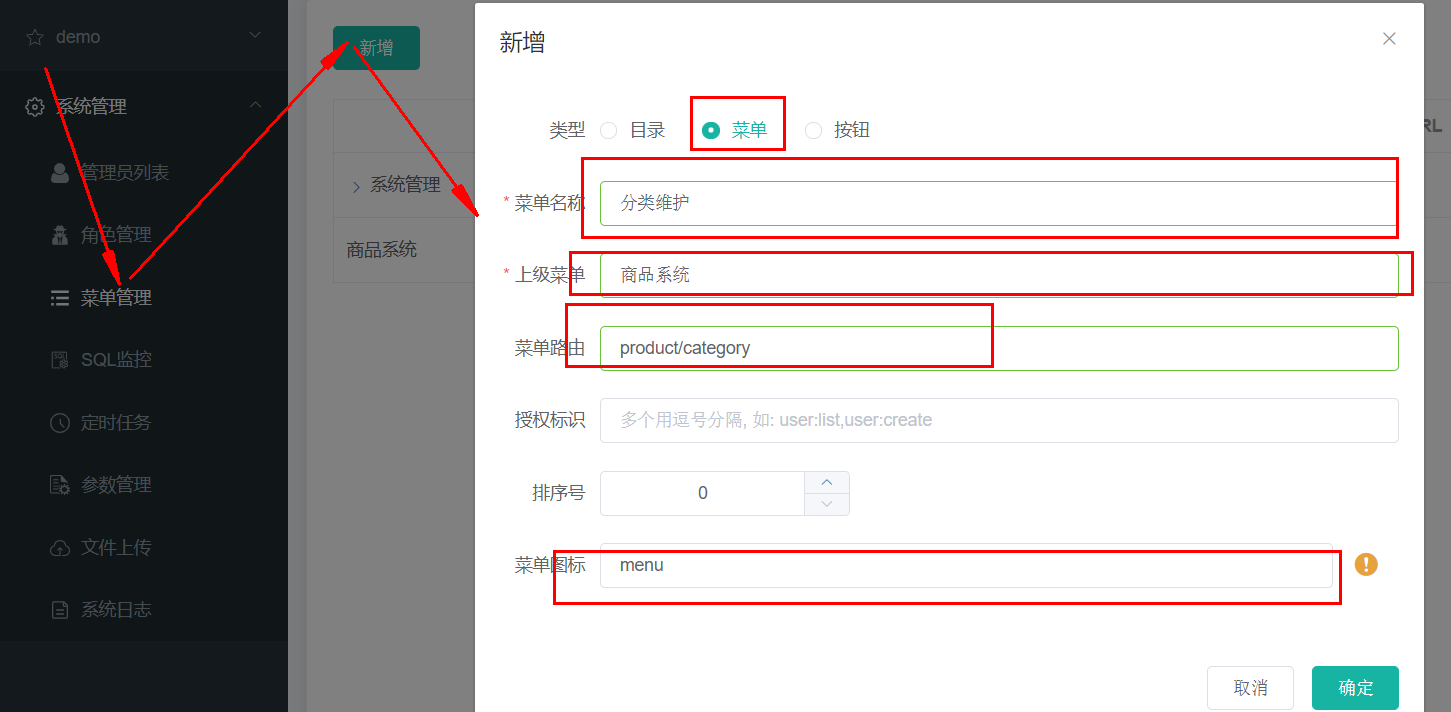
创建renren-fast-vue\src\views\modules\product目录,子所以是这样来创建,是因为product/category,对应于product-category
在该目录下,新建“category.vue”文件:
刷新页面出现404异常,查看请求发现,请求的是“http://localhost:8080/renren-fast/product/category/list/tree”
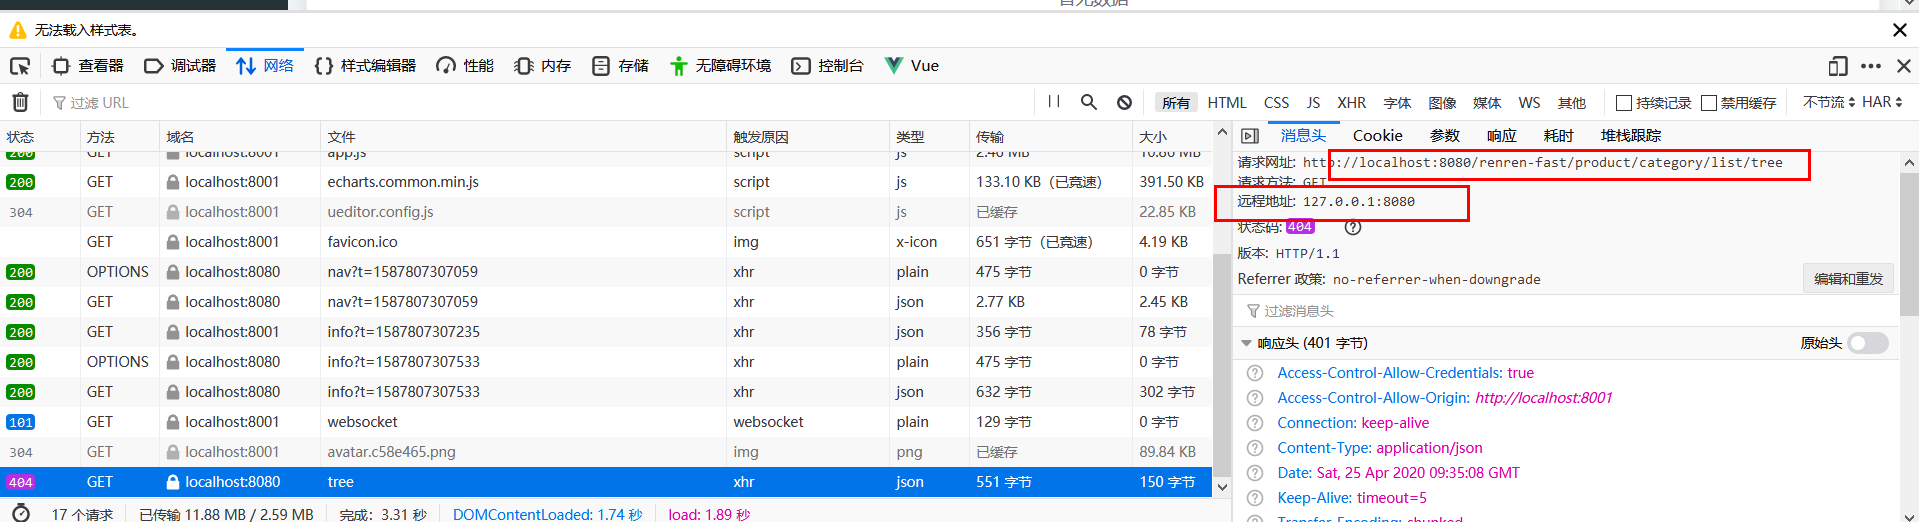
这个请求是不正确的,正确的请求是:http://localhost:10000/product/category/list/tree,
修正这个问题:
替换“static\config\index.js”文件中的“window.SITE_CONFIG['baseUrl']”
替换前:
window.SITE_CONFIG['baseUrl'] = 'http://localhost:8080/renren-fast';
替换后:
window.SITE_CONFIG['baseUrl'] = 'http://localhost:88/api';
http://localhost:88,这个地址是我们网关微服务的接口。
这里我们需要通过网关来完成路径的映射,因此将renren-fast注册到nacos注册中心中,并添加配置中心
application:
    name: renren-fast
  cloud:
    nacos:
      discovery:
        server-addr: 192.168.137.14:8848

      config:
        name: renren-fast
        server-addr: 192.168.137.8848
        namespace: ee409c3f-3206-4a3b-ba65-7376922a886d
2
3
4
5
6
7
8
9
10
11
配置网关路由,前台的所有请求都是经由“http://localhost:88/api”来转发的,在“gulimall-gateway”中添加路由规则:
        - id: admin_route
          uri: lb://renren-fast
          predicates:
            - Path=/api/**
2
3
4
但是这样做也引入了另外的一个问题,再次访问:http://localhost:8001/#/login,发现验证码不再显示:
分析原因:
- 现在的验证码请求路径为,http://localhost:88/api/captcha.jpg?uuid=69c79f02-d15b-478a-8465-a07fd09001e6
- 原始的验证码请求路径:http://localhost:8001/renren-fast/captcha.jpg?uuid=69c79f02-d15b-478a-8465-a07fd09001e6
在admin_route的路由规则下,在访问路径中包含了“api”,因此它会将它转发到renren-fast,网关在转发的时候,会使用网关的前缀信息,为了能够正常的取得验证码,我们需要对请求路径进行重写
关于请求路径重写:
6.16. The RewritePath GatewayFilter Factory (opens new window)
The RewritePath GatewayFilter factory takes a path regexp parameter and a replacement parameter. This uses Java regular expressions for a flexible way to rewrite the request path. The following listing configures a RewritePath GatewayFilter:
Example 41. application.yml
spring:
  cloud:
    gateway:
      routes:
      - id: rewritepath_route
        uri: https://example.org
        predicates:
        - Path=/foo/**
        filters:
        - RewritePath=/red(?<segment>/?.*), $\{segment}
2
3
4
5
6
7
8
9
10
For a request path of /red/blue, this sets the path to /blue before making the downstream request. Note that the $ should be replaced with $\ because of the YAML specification.
修改“admin_route”路由规则:
        - id: admin_route
          uri: lb://renren-fast
          predicates:
            - Path=/api/**
          filters:
            - RewritePath=/api/(?<segment>/?.*), /renren-fast/$\{segment}
2
3
4
5
6
再次访问:http://localhost:8001/#/login,验证码能够正常的加载了。
但是很不幸新的问题又产生了,访问被拒绝了

问题描述:已拦截跨源请求:同源策略禁止读取位于 http://localhost:88/api/sys/login 的远程资源。(原因:CORS 头缺少 'Access-Control-Allow-Origin')。
问题分析:这是一种跨域问题。访问的域名和端口和原来的请求不同,请求就会被限制
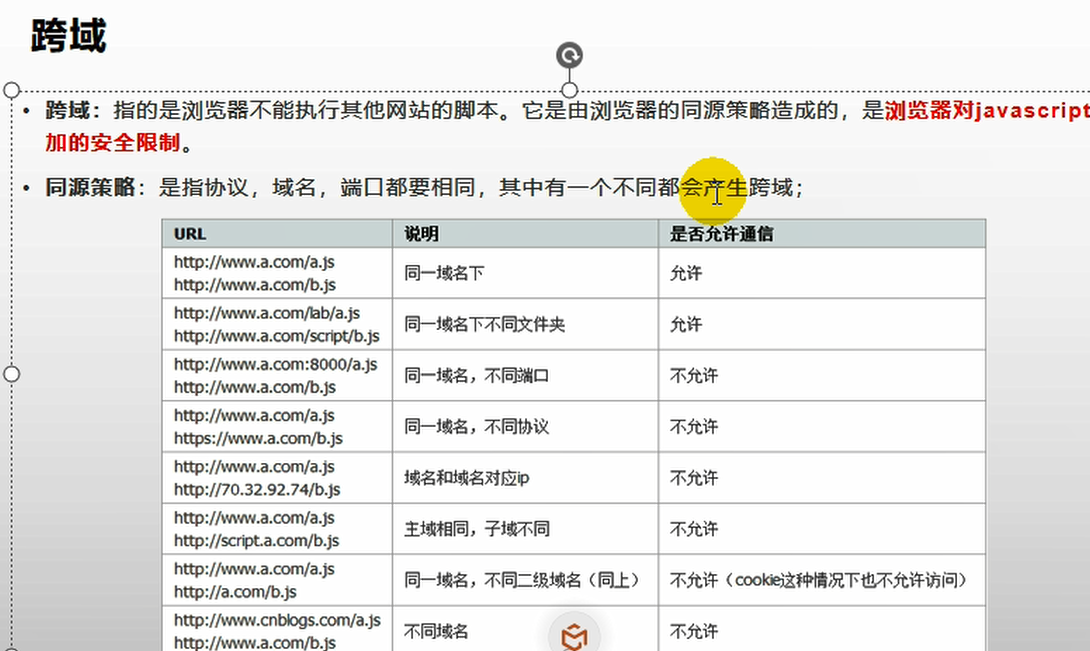
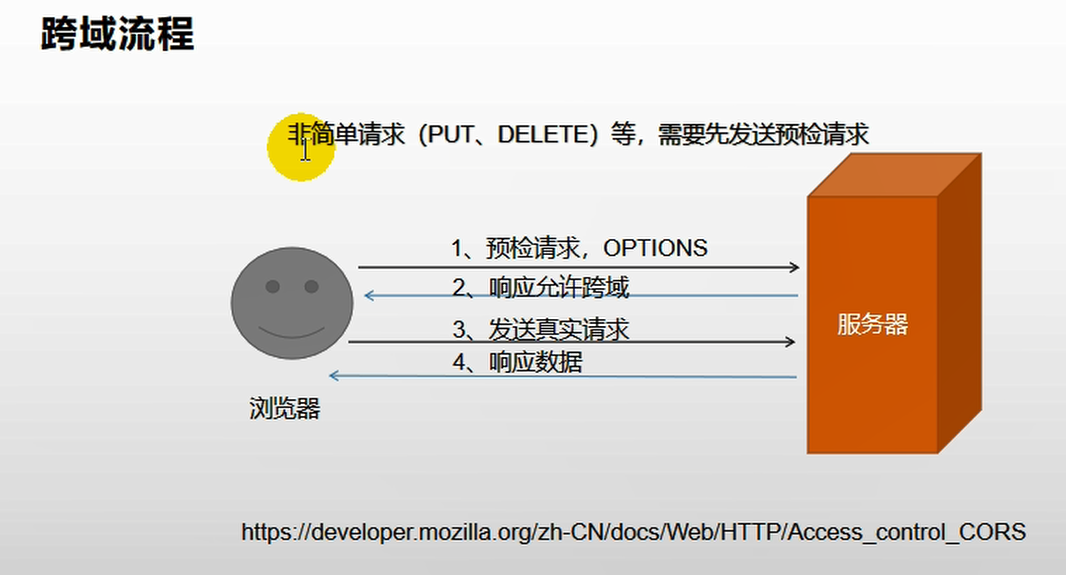
跨域流程:
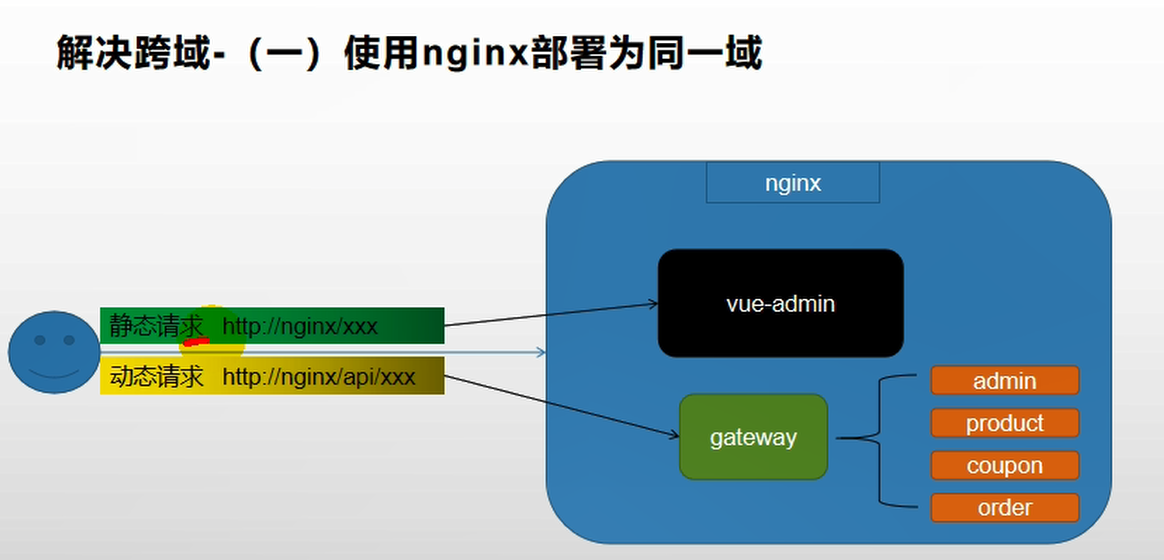
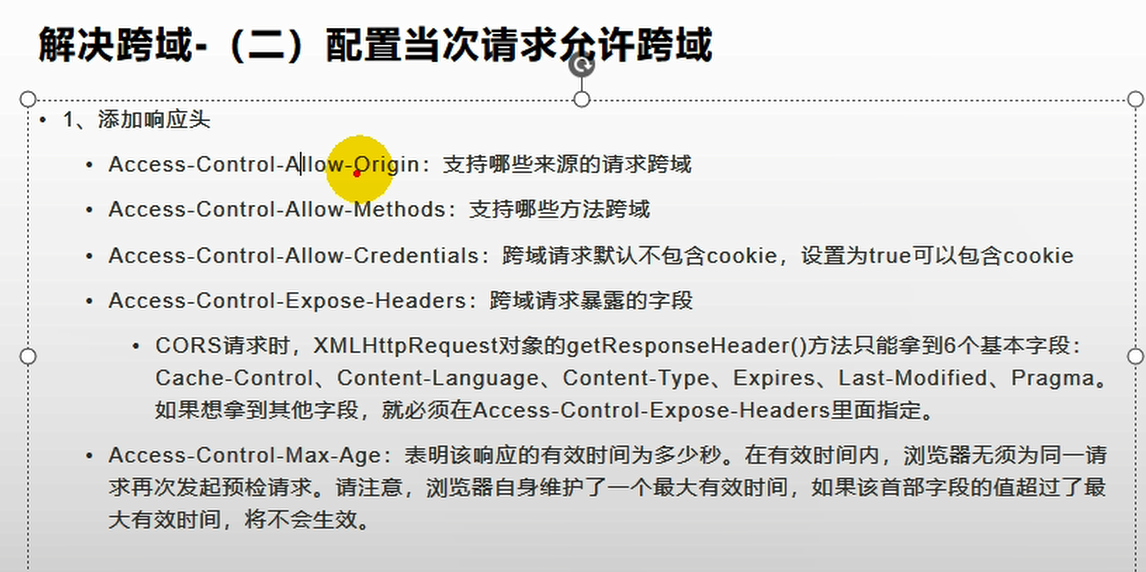
解决方法:在网关中定义“GulimallCorsConfiguration”类,该类用来做过滤,允许所有的请求跨域。
@Configuration
public class GulimallCorsConfiguration {

    @Bean
    public CorsWebFilter corsWebFilter(){
        UrlBasedCorsConfigurationSource source=new UrlBasedCorsConfigurationSource();
        CorsConfiguration corsConfiguration = new CorsConfiguration();
        corsConfiguration.addAllowedHeader("*");
        corsConfiguration.addAllowedMethod("*");
        corsConfiguration.addAllowedOrigin("*");
        corsConfiguration.setAllowCredentials(true);

        source.registerCorsConfiguration("/**",corsConfiguration);
        return new CorsWebFilter(source);
    }
}
2
3
4
5
6
7
8
9
10
11
12
13
14
15
16
再次访问:http://localhost:8001/#/login
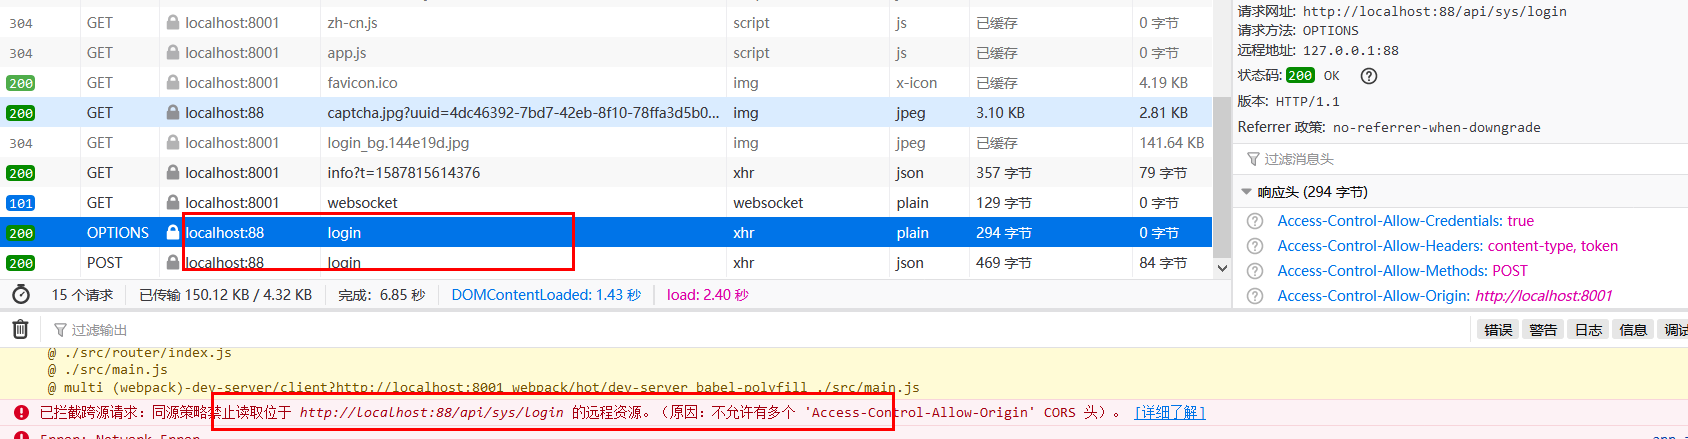
http://localhost:8001/renre已拦截跨源请求:同源策略禁止读取位于 http://localhost:88/api/sys/login 的远程资源。(原因:不允许有多个 'Access-Control-Allow-Origin' CORS 头)n-fast/captcha.jpg?uuid=69c79f02-d15b-478a-8465-a07fd09001e6
出现了多个请求,并且也存在多个跨源请求。
为了解决这个问题,需要修改renren-fast项目,注释掉“io.renren.config.CorsConfig”类。然后再次进行访问。
在显示分类信息的时候,出现了404异常,请求的http://localhost:88/api/product/category/list/tree不存在

这是因为网关上所做的路径映射不正确,映射后的路径为http://localhost:8001/renren-fast/product/category/list/tree
但是只有通过http://localhost:10000/product/category/list/tree路径才能够正常访问,所以会报404异常。
解决方法就是定义一个product路由规则,进行路径重写:
        - id: product_route
          uri: lb://gulimall-product
          predicates:
            - Path=/api/product/**
          filters:
            - RewritePath=/api/(?<segment>/?.*),/$\{segment}
2
3
4
5
6
在路由规则的顺序上,将精确的路由规则放置到模糊的路由规则的前面,否则的话,精确的路由规则将不会被匹配到,类似于异常体系中try catch子句中异常的处理顺序。
# 15. 删除数据
添加delete和append标识,并且增加复选框
 <el-tree
    :data="menus"
    show-checkbox  //显示复选框
    :props="defaultProps"
    :expand-on-click-node="false" //设置节点点击时不展开
    node-key="catId"
  >
    <span class="custom-tree-node" slot-scope="{ node, data }">
      <span>{{ node.label }}</span>
      <span>
        <el-button v-if="node.level <= 2" type="text" size="mini" @click="() => append(data)">Append</el-button>
        <el-button
          v-if="node.childNodes.length == 0"
          type="text"
          size="mini"
          @click="() => remove(node, data)"
        >Delete</el-button>
      </span>
    </span>
  </el-tree>
2
3
4
5
6
7
8
9
10
11
12
13
14
15
16
17
18
19
20
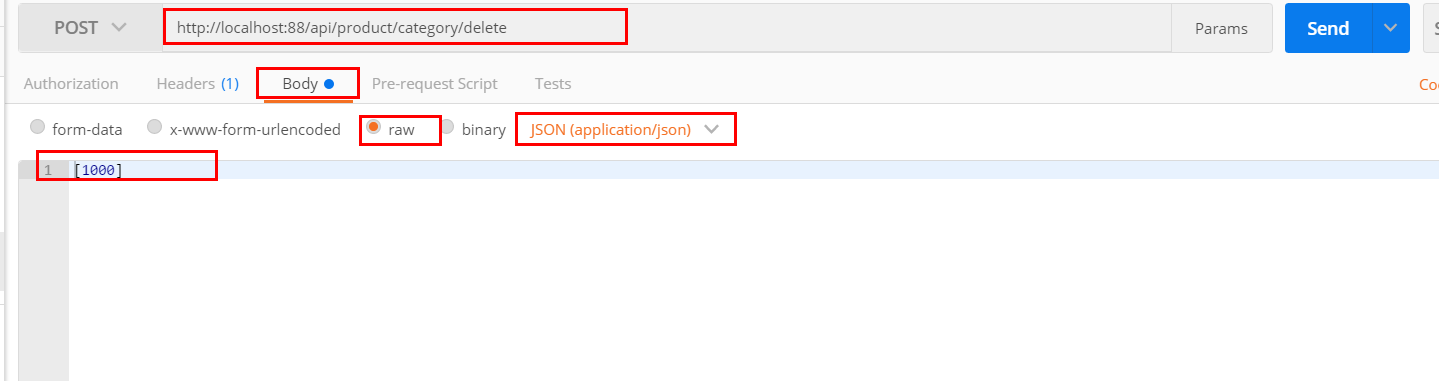
测试删除数据,打开postman输入“ http://localhost:88/api/product/category/delete ”,请求方式设置为POST,为了比对效果,可以在删除之前查询数据库的pms_category表:

由于delete请求接收的是一个数组,所以这里使用JSON方式,传入了一个数组:
再次查询数据库能够看到cat_id为1000的数据已经被删除了。
修改“com.bigdata.gulimall.product.controller.CategoryController”类,添加如下代码:
 @RequestMapping("/delete")
    public R delete(@RequestBody Long[] catIds){
        //删除之前需要判断待删除的菜单那是否被别的地方所引用。
//		categoryService.removeByIds(Arrays.asList(catIds));

        categoryService.removeMenuByIds(Arrays.asList(catIds));
        return R.ok();
    }
2
3
4
5
6
7
8
com.bigdata.gulimall.product.service.impl.CategoryServiceImpl
    @Override
    public   void removeMenuByIds(List<Long> asList) {
        //TODO 检查当前的菜单是否被别的地方所引用
        categoryDao.deleteBatchIds(asList);
    }
2
3
4
5
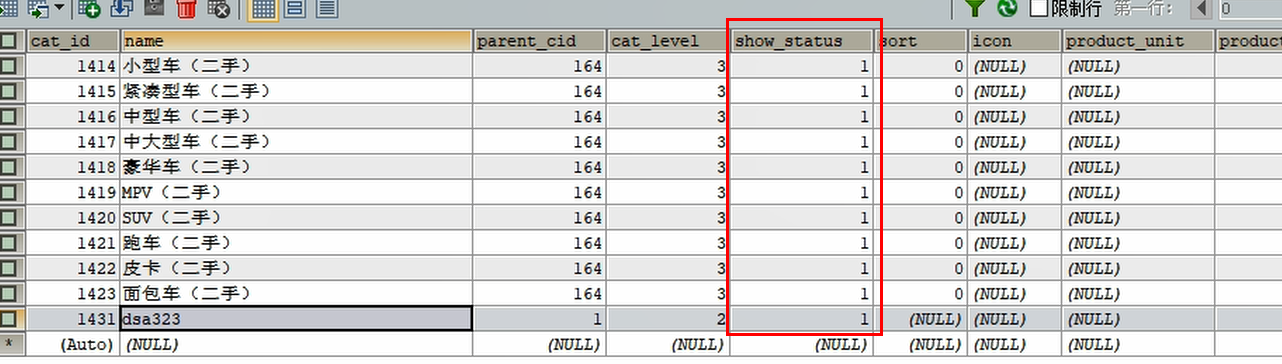
然而多数时候,我们并不希望删除数据,而是标记它被删除了,这就是逻辑删除;
可以设置show_status为0,标记它已经被删除。
mybatis-plus的逻辑删除:
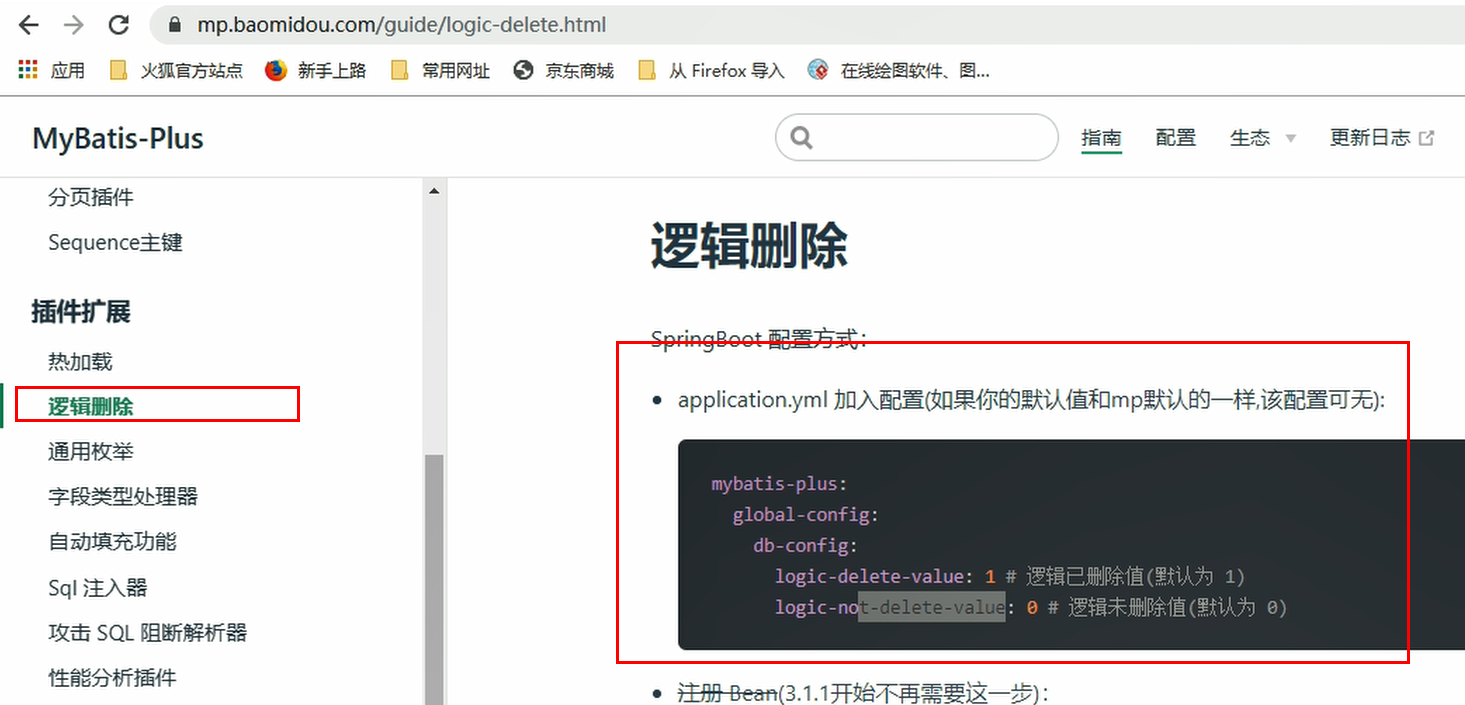
配置全局的逻辑删除规则,在“src/main/resources/application.yml”文件中添加如下内容:
mybatis-plus:
  global-config:
    db-config:
      id-type: auto
      logic-delete-value: 1
      logic-not-delete-value: 0
2
3
4
5
6
修改“com.bigdata.gulimall.product.entity.CategoryEntity”类,添加上@TableLogic,表明使用逻辑删除:
	/**
	 * 是否显示[0-不显示,1显示]
	 */
	@TableLogic(value = "1",delval = "0")
	private Integer showStatus;
2
3
4
5
然后在POSTMan中测试一下是否能够满足需要。另外在“src/main/resources/application.yml”文件中,设置日志级别,打印出SQL语句:
logging:
  level:
    com.bigdata.gulimall.product: debug
2
3
打印的日志:
 ==>  Preparing: UPDATE pms_category SET show_status=0 WHERE cat_id IN ( ? ) AND show_status=1
 ==> Parameters: 1431(Long)
 <==    Updates: 1
 get changedGroupKeys:[]
2
3
4