 谷粒商城—高可用集群
# 1、K8s快速入门
# 1)简介
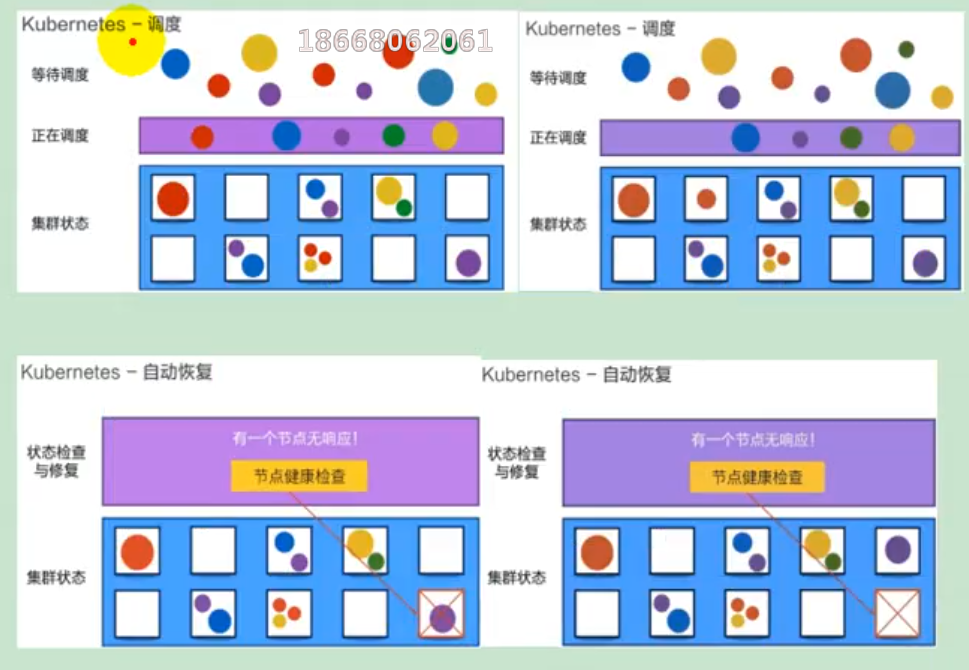
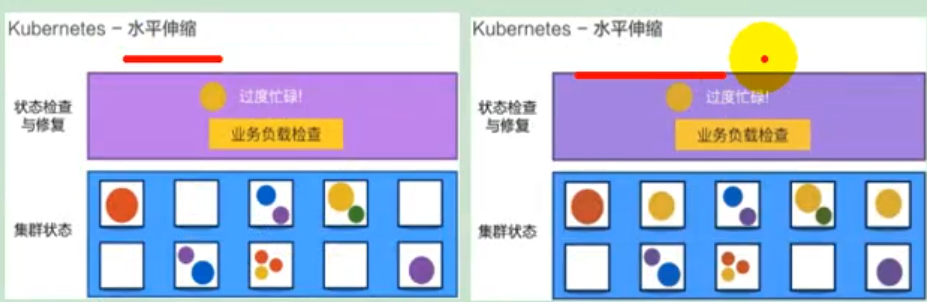
kubernetes简称k8s。是用于自动部署,扩展和管理容器化应用程序的开源系统。 中文官网:https://kubernetes.io/Zh/ 中文社区:https://www.kubernetes.org.cn/ 官方文档:https://kubernetes.io/zh/docs/home/ 社区文档:https://docs.kubernetes.org.cn/
部署方式的进化:

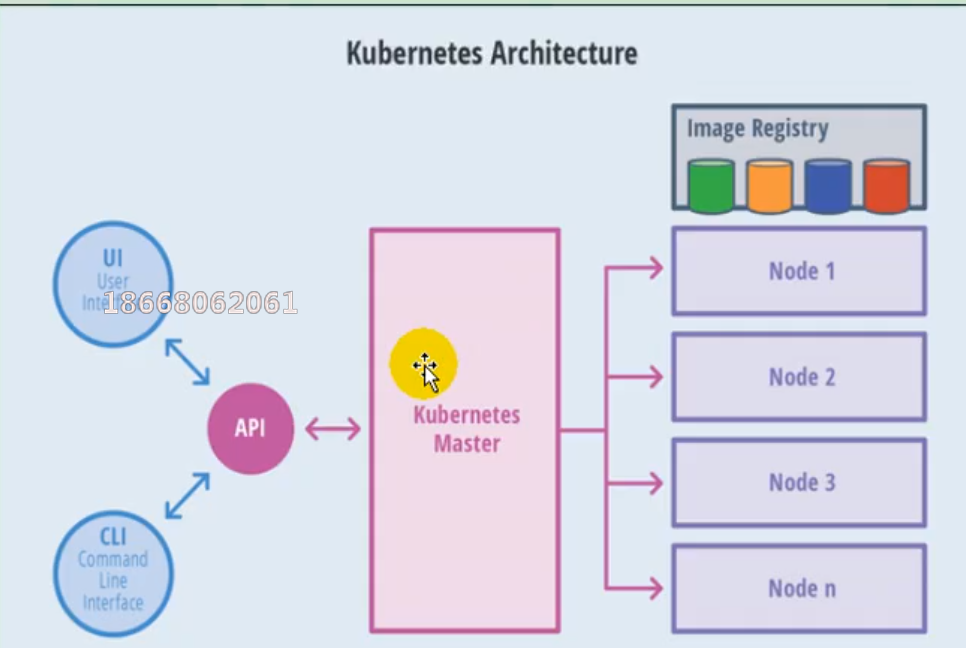
# 2)架构
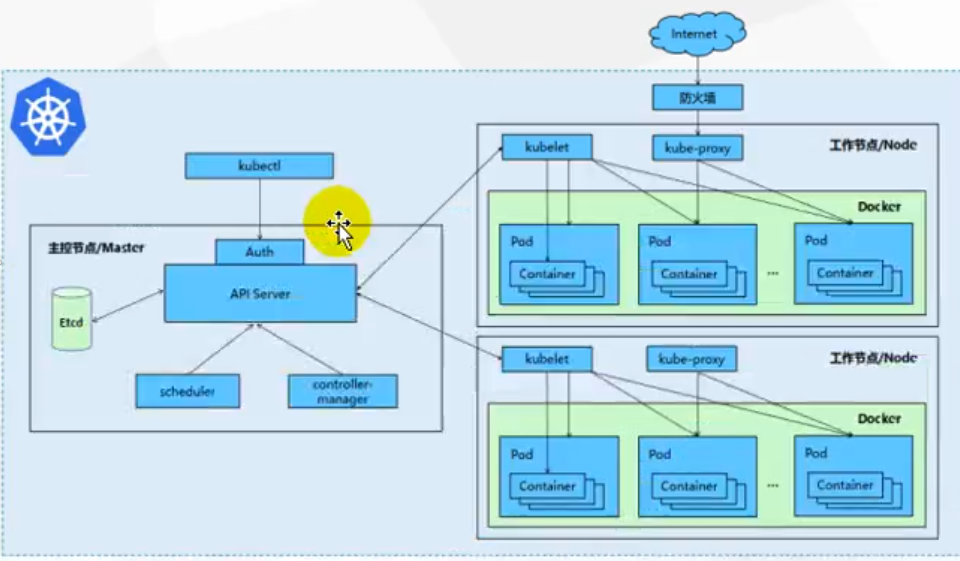
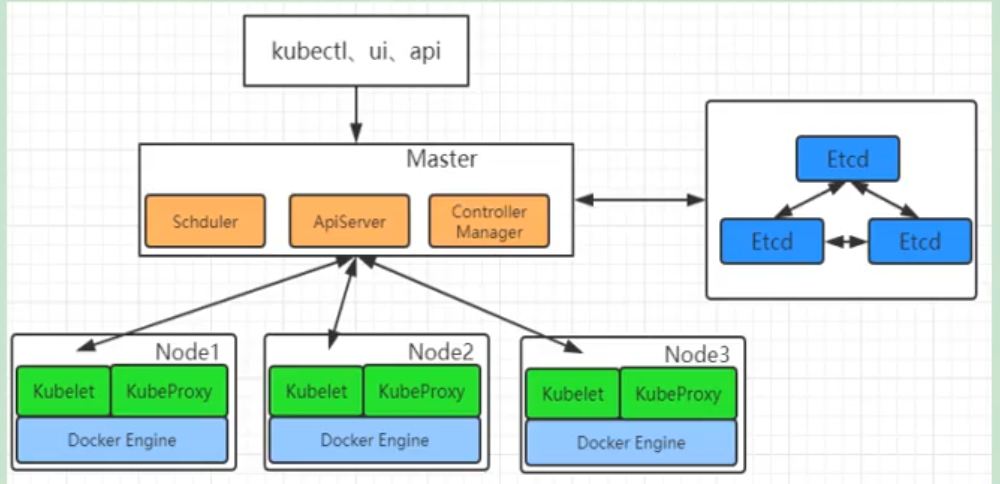
# (1)整体主从方式

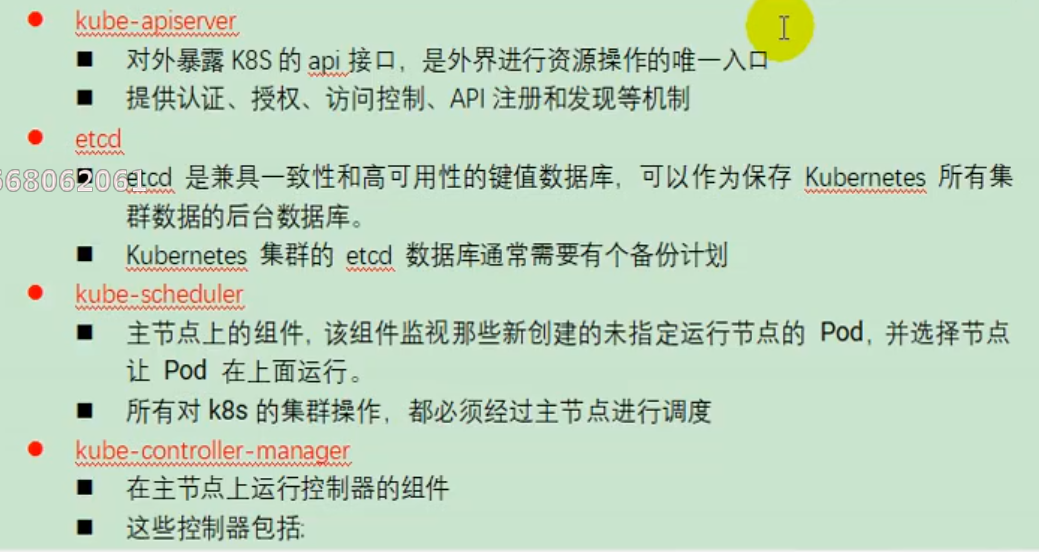
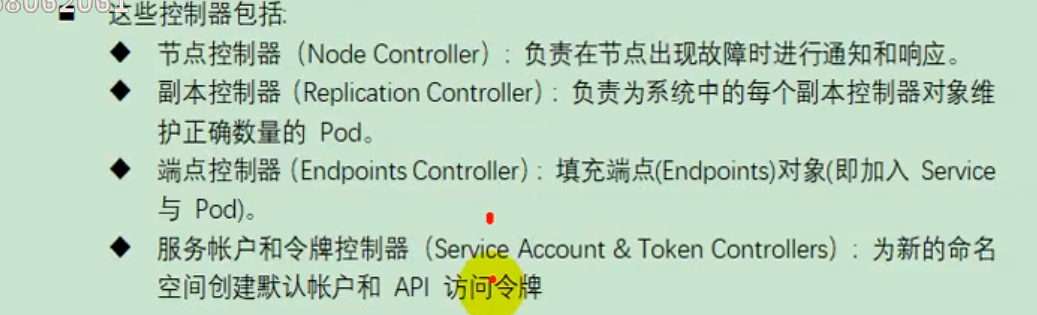
# (2)master节点架构

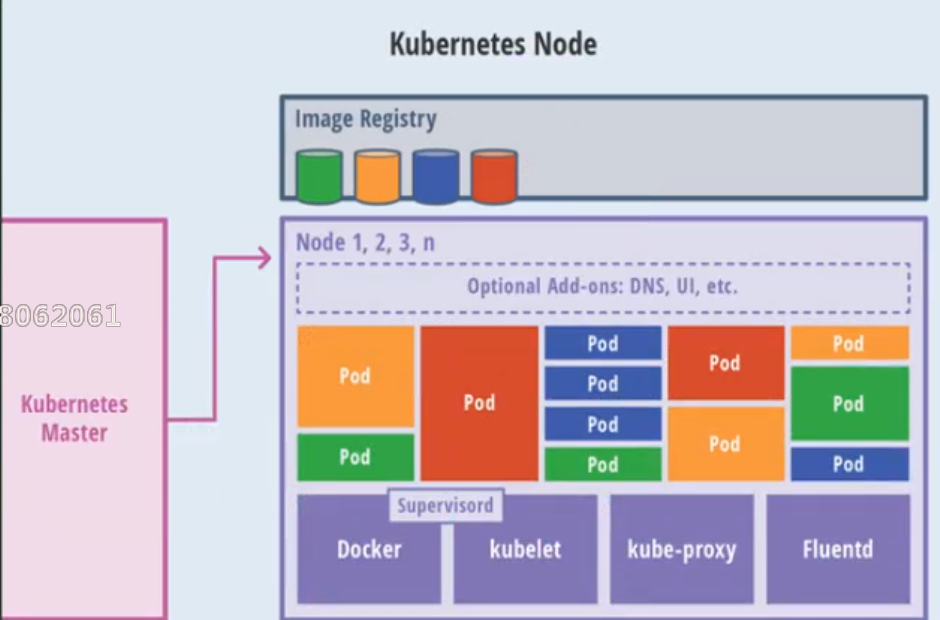
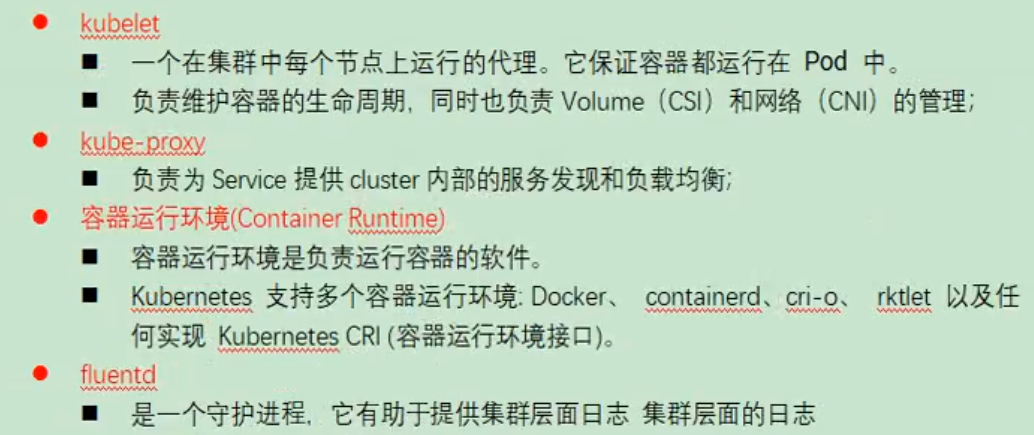
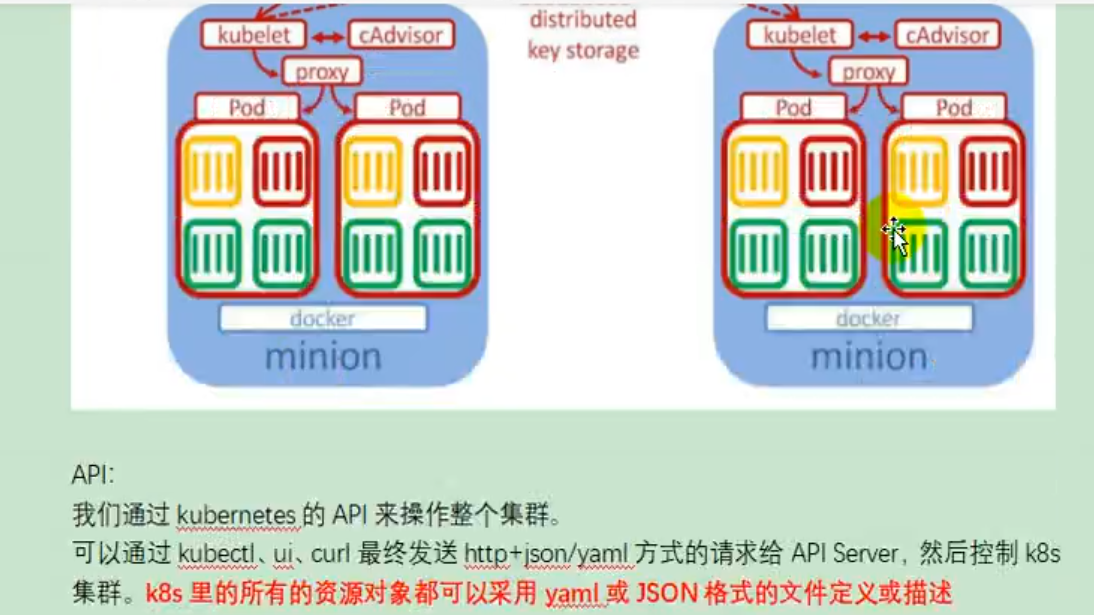
# (3)Node节点架构
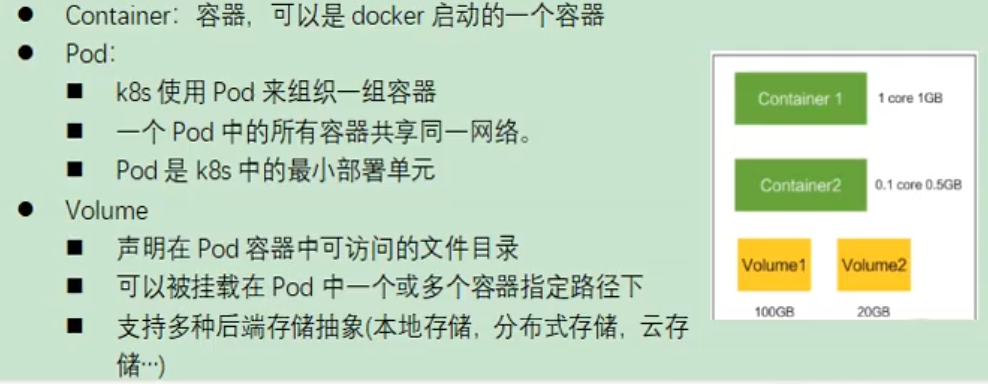
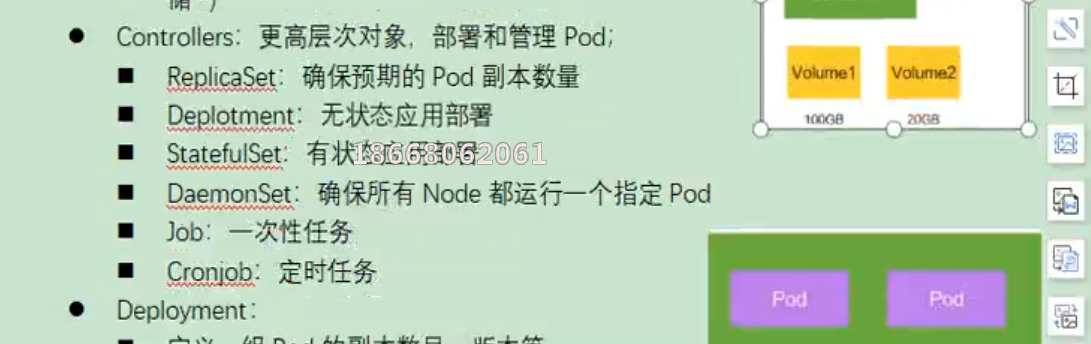
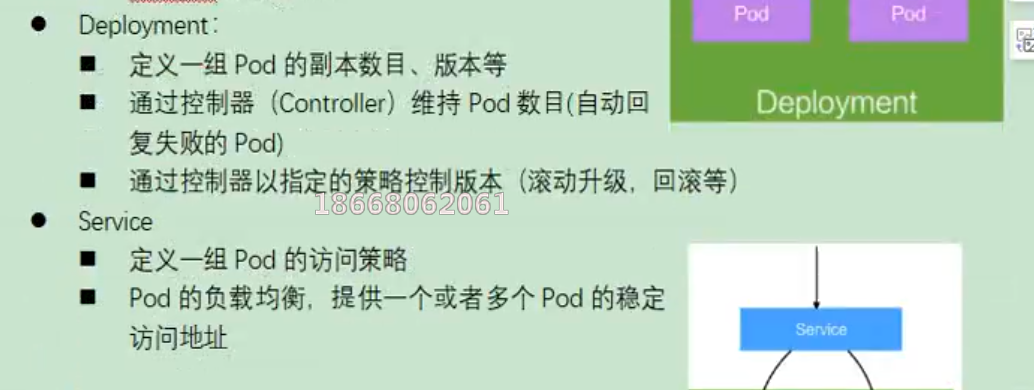
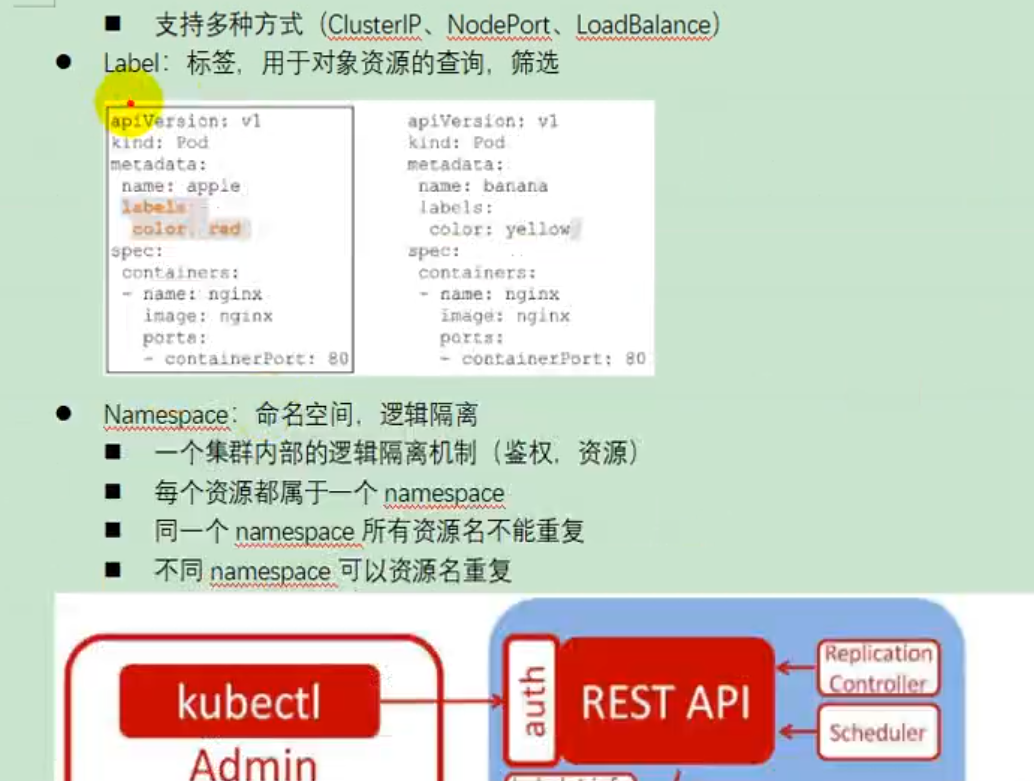
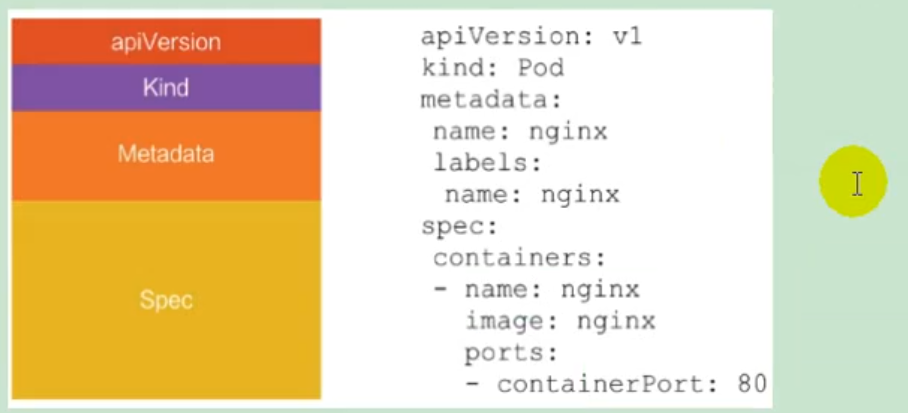
# 3)概念
# 4)快速体验
# (1)安装minikube
https://github.com/kubernetes/minikube/releases 下载minikuber-windows-amd64.exe 改名为minikube.exe 打开virtualBox,打开cmd 运行 minikube start --vm-driver=virtualbox --registry-mirror=https://registry.docker-cn.com 等待20分钟即可。
# (2)体验nginx部署升级
提交一个nginx deployment kubectl apply -f https://k8s.io/examples/application/deployment.yaml
升级 nginx deployment kubectl apply -f https://k8s.io/examples/application/deployment-update.yaml
扩容 nginx deployment
# 2、K8s集群安装
# 1)kubeadm
kubeadm是官方社区推出的一个用于快速部署kuberneters集群的工具。 这个工具能通过两条指令完成一个kuberneters集群的部署
创建一个master节点
$ kuberneters init
将一个node节点加入到当前集群中
$ kubeadm join <Master节点的IP和端口>
# 2)前置要求
一台或多台机器,操作系统Centos7.x-86_x64 硬件配置:2GB或更多RAM,2个CPU或更多CPU,硬盘30GB或更多 集群中所有的机器之间网络互通 可以访问外网,需要拉取镜像 禁止Swap分区
# 3)部署步骤
- 在所有的节点上安装Docker和kubeadm
- 不是Kubernetes Master
- 部署容器网络插件
- 部署Kubernetes Node,将节点加入Kubernetes集群中
- 部署DashBoard web页面,可视化查看Kubernetes资源
# 4)环境准备
# (1)准备工作
- 我们可以使用vagrant快速创建三个虚拟机。虚拟机启动前先设置virtualbox的主机网络。现在全部统一为192.168.56.1,以后所有虚拟机都是56.x的ip地址。

- 在全局设定中,找到一个空间比较大的磁盘用用来存放镜像。

# (2)启动三个虚拟机
- 使用我们提供的vagrant文件,复制到非中文无空格目录下,运行vagrant up启动三个虚拟机。其实vagrant完全可以一键部署全部K8s集群 https://github.com/rootsongjc/kubernetes-vagrant-centos-cluster http://github.com/davidkbainbridge/k8s-playground
下面是vagrantfile,使用它来创建三个虚拟机,分别为k8s-node1,k8s-node2和k8s-node3.
Vagrant.configure("2") do |config|
   (1..3).each do |i|
        config.vm.define "k8s-node#{i}" do |node|
            # 设置虚拟机的Box
            node.vm.box = "centos/7"

            # 设置虚拟机的主机名
            node.vm.hostname="k8s-node#{i}"

            # 设置虚拟机的IP
            node.vm.network "private_network", ip: "192.168.56.#{99+i}", netmask: "255.255.255.0"

            # 设置主机与虚拟机的共享目录
            # node.vm.synced_folder "~/Documents/vagrant/share", "/home/vagrant/share"

            # VirtaulBox相关配置
            node.vm.provider "virtualbox" do |v|
                # 设置虚拟机的名称
                v.name = "k8s-node#{i}"
                # 设置虚拟机的内存大小
                v.memory = 4096
                # 设置虚拟机的CPU个数
                v.cpus = 4
            end
        end
   end
end
2
3
4
5
6
7
8
9
10
11
12
13
14
15
16
17
18
19
20
21
22
23
24
25
26
27
- 进入到三个虚拟机,开启root的密码访问权限
Vagrant ssh xxx进入到系统后

su root 密码为vagrant

vi /etc/ssh/sshd_config

修改
PermitRootLogin yes
PasswordAuthentication yes

所有的虚拟机设为4核4G
2
3
4
5
6
7
8
9
10
11
关于在"网络地址转换"的连接方式下,三个节点的eth0,IP地址相同的问题。
**问题描述:**查看k8s-node1的路由表:
[root@k8s-node1 ~]# ip route show
default via 10.0.2.2 dev eth0 proto dhcp metric 100
10.0.2.0/24 dev eth0 proto kernel scope link src 10.0.2.15 metric 100
192.168.56.0/24 dev eth1 proto kernel scope link src 192.168.56.100 metric 101
[root@k8s-node1 ~
2
3
4
5
能够看到路由表中记录的是,通过端口eth0进行数据包的收发。
分别查看k8s-node1,k8s-node2和k8s-node3的eth0所绑定的IP地址,发现它们都是相同的,全都是10.0.2.15,这些地址是供kubernetes集群通信用的,区别于eth1上的IP地址,是通远程管理使用的。
[root@k8s-node1 ~]# ip addr
...
2: eth0: <BROADCAST,MULTICAST,UP,LOWER_UP> mtu 1500 qdisc pfifo_fast state UP group default qlen 1000
    link/ether 52:54:00:8a:fe:e6 brd ff:ff:ff:ff:ff:ff
    inet 10.0.2.15/24 brd 10.0.2.255 scope global noprefixroute dynamic eth0
       valid_lft 84418sec preferred_lft 84418sec
    inet6 fe80::5054:ff:fe8a:fee6/64 scope link
       valid_lft forever preferred_lft forever
3: eth1: <BROADCAST,MULTICAST,UP,LOWER_UP> mtu 1500 qdisc pfifo_fast state UP group default qlen 1000
    link/ether 08:00:27:a3:ca:c0 brd ff:ff:ff:ff:ff:ff
    inet 192.168.56.100/24 brd 192.168.56.255 scope global noprefixroute eth1
       valid_lft forever preferred_lft forever
    inet6 fe80::a00:27ff:fea3:cac0/64 scope link
       valid_lft forever preferred_lft forever
[root@k8s-node1 ~]#
2
3
4
5
6
7
8
9
10
11
12
13
14
15
**原因分析:**这是因为它们使用是端口转发规则,使用同一个地址,通过不同的端口来区分。但是这种端口转发规则在以后的使用中会产生很多不必要的问题,所以需要修改为NAT网络类型。

解决方法:
- 选择三个节点,然后执行“管理”->"全局设定"->“网络”,添加一个NAT网络。

- 分别修改每台设备的网络类型,并刷新重新生成MAC地址。

- 再次查看三个节点的IP

# (3)设置Linux环境(三个节点都执行)
- 关闭防火墙
systemctl stop firewalld
systemctl disable firewalld
2
- 关闭Linux
sed -i 's/enforcing/disabled/' /etc/selinux/config
setenforce 0
2
- 关闭swap
swapoff -a #临时关闭
sed -ri 's/.*swap.*/#&/' /etc/fstab #永久关闭
free -g #验证,swap必须为0
2
3
- 添加主机名与IP对应关系:
查看主机名:
hostname
如果主机名不正确,可以通过“hostnamectl set-hostname <newhostname> :指定新的hostname”命令来进行修改。
vi /etc/hosts
10.0.2.15 k8s-node1
10.0.2.4 k8s-node2
10.0.2.5 k8s-node3
2
3
4
将桥接的IPV4流量传递到iptables的链:
cat > /etc/sysctl.d/k8s.conf <<EOF

net.bridge.bridge-nf-call-ip6tables = 1

net.bridge.bridge-nf-call-iptables = 1

EOF
2
3
4
5
6
7
应用规则:
sysctl --system
疑难问题:遇见提示是只读的文件系统,运行如下命令
mount -o remount rw /
- date 查看时间(可选)
yum -y install ntpupdate

ntpupdate time.window.com #同步最新时间
2
3
# 5)所有节点安装docker、kubeadm、kubelet、kubectl
Kubenetes默认CRI(容器运行时)为Docker,因此先安装Docker。
# (1)安装Docker
1、卸载之前的docker
$ sudo yum remove docker \
                  docker-client \
                  docker-client-latest \
                  docker-common \
                  docker-latest \
                  docker-latest-logrotate \
                  docker-logrotate \
                  docker-engine
2
3
4
5
6
7
8
2、安装Docker -CE
$ sudo yum install -y yum-utils

$ sudo yum-config-manager \
    --add-repo \
    https://download.docker.com/linux/centos/docker-ce.repo

$ sudo yum -y install docker-ce docker-ce-cli containerd.io
2
3
4
5
6
7
3、配置镜像加速
sudo mkdir -p /etc/docker
sudo tee /etc/docker/daemon.json <<-'EOF'
{
  "registry-mirrors": ["https://ke9h1pt4.mirror.aliyuncs.com"]
}
EOF
sudo systemctl daemon-reload
sudo systemctl restart docker
2
3
4
5
6
7
8
4、启动Docker && 设置docker开机启动
systemctl enable docker
基础环境准备好,可以给三个虚拟机备份一下;

# (2)添加阿里与Yum源
cat <<EOF > /etc/yum.repos.d/kubernetes.repo
[kubernetes]
name=Kubernetes
baseurl=https://mirrors.aliyun.com/kubernetes/yum/repos/kubernetes-el7-x86_64/
enabled=1
gpgcheck=1
repo_gpgcheck=1
gpgkey=https://mirrors.aliyun.com/kubernetes/yum/doc/yum-key.gpg https://mirrors.aliyun.com/kubernetes/yum/doc/rpm-package-key.gpg
EOF
2
3
4
5
6
7
8
9
更多详情见: https://developer.aliyun.com/mirror/kubernetes
# (3)安装kubeadm,kubelet和kubectl
yum list|grep kube
安装
yum install -y kubelet-1.17.3 kubeadm-1.17.3 kubectl-1.17.3
开机启动
systemctl enable kubelet && systemctl start kubelet
查看kubelet的状态:
systemctl status kubelet
查看kubelet版本:
[root@k8s-node2 ~]# kubelet --version
Kubernetes v1.17.3
2
# 6)部署k8s-master
# (1)master节点初始化
在Master节点上,创建并执行master_images.sh
#!/bin/bash

images=(
	kube-apiserver:v1.17.3
    kube-proxy:v1.17.3
	kube-controller-manager:v1.17.3
	kube-scheduler:v1.17.3
	coredns:1.6.5
	etcd:3.4.3-0
    pause:3.1
)

for imageName in ${images[@]} ; do
    docker pull registry.cn-hangzhou.aliyuncs.com/google_containers/$imageName
#   docker tag registry.cn-hangzhou.aliyuncs.com/google_containers/$imageName  k8s.gcr.io/$imageName
done
2
3
4
5
6
7
8
9
10
11
12
13
14
15
16
初始化kubeadm
$ kubeadm init \
--apiserver-advertise-address=10.0.2.15 \
--image-repository registry.cn-hangzhou.aliyuncs.com/google_containers \
--kubernetes-version   v1.17.3 \
--service-cidr=10.96.0.0/16  \
--pod-network-cidr=10.244.0.0/16
2
3
4
5
6
注:
- --apiserver-advertise-address=10.0.2.21 :这里的IP地址是master主机的地址,为上面的eth0网卡的地址;
执行结果:
[root@k8s-node1 opt]# kubeadm init \
> --apiserver-advertise-address=10.0.2.15 \
> --image-repository registry.cn-hangzhou.aliyuncs.com/google_containers \
> --kubernetes-version   v1.17.3 \
> --service-cidr=10.96.0.0/16  \
> --pod-network-cidr=10.244.0.0/16
W0503 14:07:12.594252   10124 configset.go:202] WARNING: kubeadm cannot validate component configs for API groups [kubelet.config.k8s.io kubeproxy.config.k8s.io]
[init] Using Kubernetes version: v1.17.3
[preflight] Running pre-flight checks
        [WARNING IsDockerSystemdCheck]: detected "cgroupfs" as the Docker cgroup driver. The recommended driver is "systemd". Please follow the guide at https://kubernetes.io/docs/setup/cri/
[preflight] Pulling images required for setting up a Kubernetes cluster
[preflight] This might take a minute or two, depending on the speed of your internet connection
[preflight] You can also perform this action in beforehand using 'kubeadm config images pull'
[kubelet-start] Writing kubelet environment file with flags to file "/var/lib/kubelet/kubeadm-flags.env"
[kubelet-start] Writing kubelet configuration to file "/var/lib/kubelet/config.yaml"
[kubelet-start] Starting the kubelet
[certs] Using certificateDir folder "/etc/kubernetes/pki"
[certs] Generating "ca" certificate and key
[certs] Generating "apiserver" certificate and key
[certs] apiserver serving cert is signed for DNS names [k8s-node1 kubernetes kubernetes.default kubernetes.default.svc kubernetes.default.svc.cluster.local] and IPs [10.96.0.1 10.0.2.15]
[certs] Generating "apiserver-kubelet-client" certificate and key
[certs] Generating "front-proxy-ca" certificate and key
[certs] Generating "front-proxy-client" certificate and key
[certs] Generating "etcd/ca" certificate and key
[certs] Generating "etcd/server" certificate and key
[certs] etcd/server serving cert is signed for DNS names [k8s-node1 localhost] and IPs [10.0.2.15 127.0.0.1 ::1]
[certs] Generating "etcd/peer" certificate and key
[certs] etcd/peer serving cert is signed for DNS names [k8s-node1 localhost] and IPs [10.0.2.15 127.0.0.1 ::1]
[certs] Generating "etcd/healthcheck-client" certificate and key
[certs] Generating "apiserver-etcd-client" certificate and key
[certs] Generating "sa" key and public key
[kubeconfig] Using kubeconfig folder "/etc/kubernetes"
[kubeconfig] Writing "admin.conf" kubeconfig file
[kubeconfig] Writing "kubelet.conf" kubeconfig file
[kubeconfig] Writing "controller-manager.conf" kubeconfig file
[kubeconfig] Writing "scheduler.conf" kubeconfig file
[control-plane] Using manifest folder "/etc/kubernetes/manifests"
[control-plane] Creating static Pod manifest for "kube-apiserver"
[control-plane] Creating static Pod manifest for "kube-controller-manager"
W0503 14:07:30.908642   10124 manifests.go:225] the default kube-apiserver authorization-mode is "Node,RBAC"; using "Node,RBAC"
[control-plane] Creating static Pod manifest for "kube-scheduler"
W0503 14:07:30.911330   10124 manifests.go:225] the default kube-apiserver authorization-mode is "Node,RBAC"; using "Node,RBAC"
[etcd] Creating static Pod manifest for local etcd in "/etc/kubernetes/manifests"
[wait-control-plane] Waiting for the kubelet to boot up the control plane as static Pods from directory "/etc/kubernetes/manifests". This can take up to 4m0s
[apiclient] All control plane components are healthy after 22.506521 seconds
[upload-config] Storing the configuration used in ConfigMap "kubeadm-config" in the "kube-system" Namespace
[kubelet] Creating a ConfigMap "kubelet-config-1.18" in namespace kube-system with the configuration for the kubelets in the cluster
[upload-certs] Skipping phase. Please see --upload-certs
[mark-control-plane] Marking the node k8s-node1 as control-plane by adding the label "node-role.kubernetes.io/master=''"
[mark-control-plane] Marking the node k8s-node1 as control-plane by adding the taints [node-role.kubernetes.io/master:NoSchedule]
[bootstrap-token] Using token: sg47f3.4asffoi6ijb8ljhq
[bootstrap-token] Configuring bootstrap tokens, cluster-info ConfigMap, RBAC Roles
[bootstrap-token] configured RBAC rules to allow Node Bootstrap tokens to get nodes
[bootstrap-token] configured RBAC rules to allow Node Bootstrap tokens to post CSRs in order for nodes to get long term certificate credentials
[bootstrap-token] configured RBAC rules to allow the csrapprover controller automatically approve CSRs from a Node Bootstrap Token
[bootstrap-token] configured RBAC rules to allow certificate rotation for all node client certificates in the cluster
[bootstrap-token] Creating the "cluster-info" ConfigMap in the "kube-public" namespace
[kubelet-finalize] Updating "/etc/kubernetes/kubelet.conf" to point to a rotatable kubelet client certificate and key
[addons] Applied essential addon: CoreDNS
[addons] Applied essential addon: kube-proxy
#表示kubernetes已经初始化成功了
Your Kubernetes control-plane has initialized successfully!

To start using your cluster, you need to run the following as a regular user:

  mkdir -p $HOME/.kube
  sudo cp -i /etc/kubernetes/admin.conf $HOME/.kube/config
  sudo chown $(id -u):$(id -g) $HOME/.kube/config

You should now deploy a pod network to the cluster.
Run "kubectl apply -f [podnetwork].yaml" with one of the options listed at:
  https://kubernetes.io/docs/concepts/cluster-administration/addons/

Then you can join any number of worker nodes by running the following on each as root:

kubeadm join 10.0.2.15:6443 --token sg47f3.4asffoi6ijb8ljhq \
    --discovery-token-ca-cert-hash sha256:81fccdd29970cbc1b7dc7f171ac0234d53825bdf9b05428fc9e6767436991bfb
[root@k8s-node1 opt]#
2
3
4
5
6
7
8
9
10
11
12
13
14
15
16
17
18
19
20
21
22
23
24
25
26
27
28
29
30
31
32
33
34
35
36
37
38
39
40
41
42
43
44
45
46
47
48
49
50
51
52
53
54
55
56
57
58
59
60
61
62
63
64
65
66
67
68
69
70
71
72
73
74
75
76
77
78
由于默认拉取镜像地址k8s.cr.io国内无法访问,这里指定阿里云仓库地址。可以手动按照我们的images.sh先拉取镜像。
地址变为:registry.aliyuncs.com/googole_containers也可以。 科普:无类别域间路由(Classless Inter-Domain Routing 、CIDR)是一个用于给用户分配IP地址以及在互联网上有效第路由IP数据包的对IP地址进行归类的方法。 拉取可能失败,需要下载镜像。
运行完成提前复制:加入集群的令牌。
# (2)测试Kubectl(主节点执行)
mkdir -p $HOME/.kube
sudo cp -i /etc/kubernetes/admin.conf $HOME/.kube/config
sudo chown $(id -u):$(id -g) $HOME/.kube/config
2
3
详细部署文档:https://kubernetes.io/docs/concepts/cluster-administration/addons/
$ kubectl get nodes #获取所有节点
目前Master状态为notready。等待网络加入完成即可。
$ journalctl -u kubelet #查看kubelet日志
kubeadm join 10.0.2.15:6443 --token sg47f3.4asffoi6ijb8ljhq \
    --discovery-token-ca-cert-hash sha256:81fccdd29970cbc1b7dc7f171ac0234d53825bdf9b05428fc9e6767436991bfb
2
# 7)安装POD网络插件(CNI)
在master节点上执行按照POD网络插件
kubectl apply -f \
https://raw.githubusercontent.com/coreos/flanne/master/Documentation/kube-flannel.yml
2
以上地址可能被墙,可以直接获取本地已经下载的flannel.yml运行即可,如:
[root@k8s-node1 k8s]# kubectl apply -f  kube-flannel.yml
podsecuritypolicy.policy/psp.flannel.unprivileged created
clusterrole.rbac.authorization.k8s.io/flannel created
clusterrolebinding.rbac.authorization.k8s.io/flannel created
serviceaccount/flannel created
configmap/kube-flannel-cfg created
daemonset.apps/kube-flannel-ds-amd64 created
daemonset.apps/kube-flannel-ds-arm64 created
daemonset.apps/kube-flannel-ds-arm created
daemonset.apps/kube-flannel-ds-ppc64le created
daemonset.apps/kube-flannel-ds-s390x created
[root@k8s-node1 k8s]#
2
3
4
5
6
7
8
9
10
11
12
同时flannel.yml中指定的images访问不到可以去docker hub找一个wget yml地址 vi 修改yml 所有amd64的地址修改了即可 等待大约3分钟 kubectl get pods -n kube-system 查看指定名称空间的pods kubectl get pods -all-namespace 查看所有名称空间的pods
$ ip link set cni0 down 如果网络出现问题,关闭cni0,重启虚拟机继续测试 执行watch kubectl get pod -n kube-system -o wide 监控pod进度 等待3-10分钟,完全都是running以后继续
查看命名空间:
[root@k8s-node1 k8s]# kubectl get ns
NAME              STATUS   AGE
default           Active   30m
kube-node-lease   Active   30m
kube-public       Active   30m
kube-system       Active   30m
[root@k8s-node1 k8s]#
2
3
4
5
6
7
[root@k8s-node1 k8s]# kubectl get pods --all-namespaces
NAMESPACE     NAME                                READY   STATUS    RESTARTS   AGE
kube-system   coredns-546565776c-9sbmk            0/1     Pending   0          31m
kube-system   coredns-546565776c-t68mr            0/1     Pending   0          31m
kube-system   etcd-k8s-node1                      1/1     Running   0          31m
kube-system   kube-apiserver-k8s-node1            1/1     Running   0          31m
kube-system   kube-controller-manager-k8s-node1   1/1     Running   0          31m
kube-system   kube-flannel-ds-amd64-6xwth         1/1     Running   0          2m50s
kube-system   kube-proxy-sz2vz                    1/1     Running   0          31m
kube-system   kube-scheduler-k8s-node1            1/1     Running   0          31m
[root@k8s-node1 k8s]#
2
3
4
5
6
7
8
9
10
11
查看master上的节点信息:
[root@k8s-node1 k8s]# kubectl get nodes
NAME        STATUS   ROLES    AGE   VERSION
k8s-node1   Ready    master   34m   v1.17.3   #status为ready才能够执行下面的命令
[root@k8s-node1 k8s]#
2
3
4
最后再次执行,并且分别在“k8s-node2”和“k8s-node3”上也执行这里命令:
kubeadm join 10.0.2.15:6443 --token sg47f3.4asffoi6ijb8ljhq \
    --discovery-token-ca-cert-hash sha256:81fccdd29970cbc1b7dc7f171ac0234d53825bdf9b05428fc9e6767436991bfb
2
[root@k8s-node1 opt]# kubectl get nodes;
NAME        STATUS     ROLES    AGE   VERSION
k8s-node1   Ready      master   47m   v1.17.3
k8s-node2   NotReady   <none>   75s   v1.17.3
k8s-node3   NotReady   <none>   76s   v1.17.3
[root@k8s-node1 opt]#
2
3
4
5
6
监控pod进度
watch kubectl get pod -n kube-system -o wide
等到所有的status都变为running状态后,再次查看节点信息:
[root@k8s-node1 ~]#  kubectl get nodes;
NAME        STATUS   ROLES    AGE     VERSION
k8s-node1   Ready    master   3h50m   v1.17.3
k8s-node2   Ready    <none>   3h3m    v1.17.3
k8s-node3   Ready    <none>   3h3m    v1.17.3
[root@k8s-node1 ~]#
2
3
4
5
6
# 8)加入kubenetes的Node节点
在node节点中执行,向集群中添加新的节点,执行在kubeadm init 输出的kubeadm join命令; 确保node节点成功: token过期怎么办 kubeadm token create --print-join-command
# 9)入门操作kubernetes集群
1、在主节点上部署一个tomcat
kubectl create deployment tomcat6 --image=tomcat:6.0.53-jre8
获取所有的资源:
[root@k8s-node1 k8s]# kubectl get all
NAME                           READY   STATUS              RESTARTS   AGE
pod/tomcat6-7b84fb5fdc-cfd8g   0/1     ContainerCreating   0          41s

NAME                 TYPE        CLUSTER-IP   EXTERNAL-IP   PORT(S)   AGE
service/kubernetes   ClusterIP   10.96.0.1    <none>        443/TCP   70m

NAME                      READY   UP-TO-DATE   AVAILABLE   AGE
deployment.apps/tomcat6   0/1     1            0           41s

NAME                                 DESIRED   CURRENT   READY   AGE
replicaset.apps/tomcat6-7b84fb5fdc   1         1         0       41s
[root@k8s-node1 k8s]#
2
3
4
5
6
7
8
9
10
11
12
13
kubectl get pods -o wide 可以获取到tomcat部署信息,能够看到它被部署到了k8s-node2上了
[root@k8s-node1 k8s]# kubectl get all -o wide
NAME                           READY   STATUS    RESTARTS   AGE    IP           NODE        NOMINATED NODE   READINESS GATES
pod/tomcat6-7b84fb5fdc-cfd8g   1/1     Running   0          114s   10.244.2.2   k8s-node2   <none>           <none>

NAME                 TYPE        CLUSTER-IP   EXTERNAL-IP   PORT(S)   AGE   SELECTOR
service/kubernetes   ClusterIP   10.96.0.1    <none>        443/TCP   71m   <none>

NAME                      READY   UP-TO-DATE   AVAILABLE   AGE    CONTAINERS   IMAGES               SELECTOR
deployment.apps/tomcat6   1/1     1            1           114s   tomcat       tomcat:6.0.53-jre8   app=tomcat6

NAME                                 DESIRED   CURRENT   READY   AGE    CONTAINERS   IMAGES               SELECTOR
replicaset.apps/tomcat6-7b84fb5fdc   1         1         1       114s   tomcat       tomcat:6.0.53-jre8   app=tomcat6,pod-template-hash=7b84fb5fdc
[root@k8s-node1 k8s]#
2
3
4
5
6
7
8
9
10
11
12
13
查看node2节点上,下载了哪些镜像:
[root@k8s-node2 opt]# docker images
REPOSITORY                                                       TAG                 IMAGE ID            CREATED             SIZE
registry.cn-hangzhou.aliyuncs.com/google_containers/kube-proxy   v1.17.3             0d40868643c6        2 weeks ago         117MB
registry.cn-hangzhou.aliyuncs.com/google_containers/pause        3.2                 80d28bedfe5d        2 months ago        683kB
quay.io/coreos/flannel                                           v0.11.0-amd64       ff281650a721        15 months ago       52.6MB
tomcat                                                           6.0.53-jre8         49ab0583115a        2 years ago         290MB
[root@k8s-node2 opt]#
2
3
4
5
6
7
查看Node2节点上,正在运行的容器:
[root@k8s-node2 opt]# docker ps
CONTAINER ID        IMAGE                                                            COMMAND                  CREATED             STATUS              PORTS               NAMES
9194cc4f0b7a        tomcat                                                           "catalina.sh run"        2 minutes ago       Up 2 minutes                            k8s_tomcat_tomcat6-7b84fb5fdc-cfd8g_default_0c9ebba2-992d-4c0e-99ef-3c4c3294bc59_0
f44af0c7c345        registry.cn-hangzhou.aliyuncs.com/google_containers/pause:3.2    "/pause"                 3 minutes ago       Up 3 minutes                            k8s_POD_tomcat6-7b84fb5fdc-cfd8g_default_0c9ebba2-992d-4c0e-99ef-3c4c3294bc59_0
ef74c90491e4        ff281650a721                                                     "/opt/bin/flanneld -…"   20 minutes ago      Up 20 minutes                           k8s_kube-flannel_kube-flannel-ds-amd64-5xs5j_kube-system_11a94346-316d-470b-9668-c15ce183abec_0
c8a524e5a193        registry.cn-hangzhou.aliyuncs.com/google_containers/kube-proxy   "/usr/local/bin/kube…"   25 minutes ago      Up 25 minutes                           k8s_kube-proxy_kube-proxy-mvlnk_kube-system_519de79a-e8d8-4b1c-a74e-94634cebabce_0
4590685c519a        registry.cn-hangzhou.aliyuncs.com/google_containers/pause:3.2    "/pause"                 26 minutes ago      Up 26 minutes                           k8s_POD_kube-flannel-ds-amd64-5xs5j_kube-system_11a94346-316d-470b-9668-c15ce183abec_0
54e00af5cde4        registry.cn-hangzhou.aliyuncs.com/google_containers/pause:3.2    "/pause"                 26 minutes ago      Up 26 minutes                           k8s_POD_kube-proxy-mvlnk_kube-system_519de79a-e8d8-4b1c-a74e-94634cebabce_0
[root@k8s-node2 opt]#
2
3
4
5
6
7
8
9
在node1上执行:
[root@k8s-node1 k8s]# kubectl get pods
NAME                       READY   STATUS    RESTARTS   AGE
tomcat6-7b84fb5fdc-cfd8g   1/1     Running   0          5m35s

[root@k8s-node1 k8s]# kubectl get pods --all-namespaces
NAMESPACE     NAME                                READY   STATUS    RESTARTS   AGE
default       tomcat6-7b84fb5fdc-cfd8g            1/1     Running   0          163m
kube-system   coredns-546565776c-9sbmk            1/1     Running   0          3h52m
kube-system   coredns-546565776c-t68mr            1/1     Running   0          3h52m
kube-system   etcd-k8s-node1                      1/1     Running   0          3h52m
kube-system   kube-apiserver-k8s-node1            1/1     Running   0          3h52m
kube-system   kube-controller-manager-k8s-node1   1/1     Running   0          3h52m
kube-system   kube-flannel-ds-amd64-5xs5j         1/1     Running   0          3h6m
kube-system   kube-flannel-ds-amd64-6xwth         1/1     Running   0          3h24m
kube-system   kube-flannel-ds-amd64-fvnvx         1/1     Running   0          3h6m
kube-system   kube-proxy-7tkvl                    1/1     Running   0          3h6m
kube-system   kube-proxy-mvlnk                    1/1     Running   0          3h6m
kube-system   kube-proxy-sz2vz                    1/1     Running   0          3h52m
kube-system   kube-scheduler-k8s-node1            1/1     Running   0          3h52m
[root@k8s-node1 ~]#
2
3
4
5
6
7
8
9
10
11
12
13
14
15
16
17
18
19
20
从前面看到tomcat部署在Node2上,现在模拟因为各种原因宕机的情况,将node2关闭电源,观察情况。
[root@k8s-node1 ~]# kubectl get nodes
NAME        STATUS     ROLES    AGE     VERSION
k8s-node1   Ready      master   4h4m    v1.17.3
k8s-node2   NotReady   <none>   3h18m   v1.17.3
k8s-node3   Ready      <none>   3h18m   v1.17.3
[root@k8s-node1 ~]#
2
3
4
5
6
[root@k8s-node1 ~]# kubectl get pods -o wide
NAME                       READY   STATUS    RESTARTS   AGE    IP           NODE        NOMINATED NODE   READINESS GATES
tomcat6-7b84fb5fdc-cfd8g   1/1     Running   0          177m   10.244.2.2   k8s-node2   <none>           <none>
[root@k8s-node1 ~]#
2
3
4

2、暴露nginx访问
在master上执行
kubectl expose deployment tomcat6 --port=80 --target-port=8080 --type=NodePort
pod的80映射容器的8080;server会带来pod的80
查看服务:
[root@k8s-node1 ~]# kubectl get svc
NAME         TYPE        CLUSTER-IP     EXTERNAL-IP   PORT(S)        AGE
kubernetes   ClusterIP   10.96.0.1      <none>        443/TCP        12h
tomcat6      NodePort    10.96.24.191   <none>        80:30526/TCP   49s
[root@k8s-node1 ~]#
2
3
4
5
[root@k8s-node1 ~]# kubectl get svc -o wide
NAME         TYPE        CLUSTER-IP     EXTERNAL-IP   PORT(S)        AGE     SELECTOR
kubernetes   ClusterIP   10.96.0.1      <none>        443/TCP        12h     <none>
tomcat6      NodePort    10.96.24.191   <none>        80:30526/TCP   3m30s   app=tomcat6
[root@k8s-node1 ~]#
2
3
4
5
http://192.168.56.100:30526/

[root@k8s-node1 ~]# kubectl get all
NAME                           READY   STATUS    RESTARTS   AGE
pod/tomcat6-7b84fb5fdc-qt5jm   1/1     Running   0          13m

NAME                 TYPE        CLUSTER-IP     EXTERNAL-IP   PORT(S)        AGE
service/kubernetes   ClusterIP   10.96.0.1      <none>        443/TCP        12h
service/tomcat6      NodePort    10.96.24.191   <none>        80:30526/TCP   9m50s

NAME                      READY   UP-TO-DATE   AVAILABLE   AGE
deployment.apps/tomcat6   1/1     1            1           11h

NAME                                 DESIRED   CURRENT   READY   AGE
replicaset.apps/tomcat6-7b84fb5fdc   1         1         1       11h
[root@k8s-node1 ~]#
2
3
4
5
6
7
8
9
10
11
12
13
14
3、动态扩容测试
kubectl get deployment
[root@k8s-node1 ~]# kubectl get deployment
NAME      READY   UP-TO-DATE   AVAILABLE   AGE
tomcat6   2/2     2            2           11h
[root@k8s-node1 ~]#
2
3
4
应用升级: kubectl set image (--help查看帮助) 扩容:kubectl scale --replicas=3 deployment tomcat6
[root@k8s-node1 ~]# kubectl scale --replicas=3 deployment tomcat6
deployment.apps/tomcat6 scaled
[root@k8s-node1 ~]#

[root@k8s-node1 ~]# kubectl get pods -o wide
NAME                       READY   STATUS    RESTARTS   AGE   IP           NODE        NOMINATED NODE   READINESS GATES
tomcat6-7b84fb5fdc-hdgmc   1/1     Running   0          61s   10.244.2.5   k8s-node2   <none>           <none>
tomcat6-7b84fb5fdc-qt5jm   1/1     Running   0          19m   10.244.1.2   k8s-node3   <none>           <none>
tomcat6-7b84fb5fdc-vlrh6   1/1     Running   0          61s   10.244.2.4   k8s-node2   <none>           <none>
[root@k8s-node1 ~]# kubectl get svc -o wide
NAME         TYPE        CLUSTER-IP     EXTERNAL-IP   PORT(S)        AGE   SELECTOR
kubernetes   ClusterIP   10.96.0.1      <none>        443/TCP        13h   <none>
tomcat6      NodePort    10.96.24.191   <none>        80:30526/TCP   16m   app=tomcat6
[root@k8s-node1 ~]#
2
3
4
5
6
7
8
9
10
11
12
13
14
扩容了多份,所有无论访问哪个node的指定端口,都可以访问到tomcat6
http://192.168.56.101:30526/

http://192.168.56.102:30526/

缩容:kubectl scale --replicas=2 deployment tomcat6
[root@k8s-node1 ~]#  kubectl scale --replicas=2 deployment tomcat6
deployment.apps/tomcat6 scaled
[root@k8s-node1 ~]# kubectl get pods -o wide
NAME                       READY   STATUS        RESTARTS   AGE     IP           NODE        NOMINATED NODE   READINESS GATES
tomcat6-7b84fb5fdc-hdgmc   0/1     Terminating   0          4m47s   <none>       k8s-node2   <none>           <none>
tomcat6-7b84fb5fdc-qt5jm   1/1     Running       0          22m     10.244.1.2   k8s-node3   <none>           <none>
tomcat6-7b84fb5fdc-vlrh6   1/1     Running       0          4m47s   10.244.2.4   k8s-node2   <none>           <none>
[root@k8s-node1 ~]#
2
3
4
5
6
7
8
4、以上操作的yaml获取 参照k8s细节
5、删除 kubectl get all
#查看所有资源
[root@k8s-node1 ~]# kubectl get all
NAME                           READY   STATUS    RESTARTS   AGE
pod/tomcat6-7b84fb5fdc-qt5jm   1/1     Running   0          26m
pod/tomcat6-7b84fb5fdc-vlrh6   1/1     Running   0          8m16s

NAME                 TYPE        CLUSTER-IP     EXTERNAL-IP   PORT(S)        AGE
service/kubernetes   ClusterIP   10.96.0.1      <none>        443/TCP        13h
service/tomcat6      NodePort    10.96.24.191   <none>        80:30526/TCP   22m

NAME                      READY   UP-TO-DATE   AVAILABLE   AGE
deployment.apps/tomcat6   2/2     2            2           11h

NAME                                 DESIRED   CURRENT   READY   AGE
replicaset.apps/tomcat6-7b84fb5fdc   2         2         2       11h
[root@k8s-node1 ~]#
#删除deployment.apps/tomcat6
[root@k8s-node1 ~]# kubectl delete  deployment.apps/tomcat6
deployment.apps "tomcat6" deleted

#查看剩余的资源
[root@k8s-node1 ~]# kubectl get all
NAME                 TYPE        CLUSTER-IP     EXTERNAL-IP   PORT(S)        AGE
service/kubernetes   ClusterIP   10.96.0.1      <none>        443/TCP        13h
service/tomcat6      NodePort    10.96.24.191   <none>        80:30526/TCP   30m
[root@k8s-node1 ~]#
[root@k8s-node1 ~]#
#删除service/tomcat6
[root@k8s-node1 ~]# kubectl delete service/tomcat6
service "tomcat6" deleted
[root@k8s-node1 ~]# kubectl get all
NAME                 TYPE        CLUSTER-IP   EXTERNAL-IP   PORT(S)   AGE
service/kubernetes   ClusterIP   10.96.0.1    <none>        443/TCP   13h
[root@k8s-node1 ~]#
2
3
4
5
6
7
8
9
10
11
12
13
14
15
16
17
18
19
20
21
22
23
24
25
26
27
28
29
30
31
32
33
34
35
kubectl delete deploye/nginx kubectl delete service/nginx-service
# 3、K8s细节
# 1、kubectl文档
https://kubernetes.io/zh/docs/reference/kubectl/overview/
# 2、资源类型
https://kubernetes.io/zh/docs/reference/kubectl/overview/#%e8%b5%84%e6%ba%90%e7%b1%bb%e5%9e%8b
# 3、格式化输出
https://kubernetes.io/zh/docs/reference/kubectl/overview/
所有
kubectl命令的默认输出格式都是人类可读的纯文本格式。要以特定格式向终端窗口输出详细信息,可以将-o或--output参数添加到受支持的kubectl命令中。# 语法
kubectl [command] [TYPE] [NAME] -o=<output_format>1根据
kubectl操作,支持以下输出格式:
Output format Description -o custom-columns=使用逗号分隔的自定义列 (opens new window)列表打印表。 -o custom-columns-file=使用 `` 文件中的自定义列 (opens new window)模板打印表。 -o json输出 JSON 格式的 API 对象 `-o jsonpath= 打印 jsonpath (opens new window) 表达式定义的字段 -o jsonpath-file=打印 `` 文件中 jsonpath (opens new window) 表达式定义的字段。 -o name仅打印资源名称而不打印任何其他内容。 -o wide以纯文本格式输出,包含任何附加信息。对于 pod 包含节点名。 -o yaml输出 YAML 格式的 API 对象。 # 示例
在此示例中,以下命令将单个 pod 的详细信息输出为 YAML 格式的对象:
kubectl get pod web-pod-13je7 -o yaml1请记住:有关每个命令支持哪种输出格式的详细信息,请参阅 kubectl (opens new window) 参考文档。
--dry-run:
--dry-run='none': Must be "none", "server", or "client". If client strategy, only print the object that would be
sent, without sending it. If server strategy, submit server-side request without persisting the resource.
值必须为none,server或client。如果是客户端策略,则只打印该发送对象,但不发送它。如果服务器策略,提交服务器端请求而不持久化资源。
也就是说,通过--dry-run选项,并不会真正的执行这条命令。
[root@k8s-node1 ~]# kubectl create deployment tomcat6 --image=tomcat:6.0.53-jre8 --dry-run -o yaml
W0504 03:39:08.389369    8107 helpers.go:535] --dry-run is deprecated and can be replaced with --dry-run=client.
apiVersion: apps/v1
kind: Deployment
metadata:
  creationTimestamp: null
  labels:
    app: tomcat6
  name: tomcat6
spec:
  replicas: 1
  selector:
    matchLabels:
      app: tomcat6
  strategy: {}
  template:
    metadata:
      creationTimestamp: null
      labels:
        app: tomcat6
    spec:
      containers:
      - image: tomcat:6.0.53-jre8
        name: tomcat
        resources: {}
status: {}
[root@k8s-node1 ~]#
2
3
4
5
6
7
8
9
10
11
12
13
14
15
16
17
18
19
20
21
22
23
24
25
26
27
实际上我们也可以将这个yaml输出到文件,然后使用kubectl apply -f来应用它
#输出到tomcat6.yaml
[root@k8s-node1 ~]# kubectl create deployment tomcat6 --image=tomcat:6.0.53-jre8 --dry-run -o yaml >tomcat6.yaml
W0504 03:46:18.180366   11151 helpers.go:535] --dry-run is deprecated and can be replaced with --dry-run=client.

#修改副本数为3
[root@k8s-node1 ~]# cat tomcat6.yaml
apiVersion: apps/v1
kind: Deployment
metadata:
  creationTimestamp: null
  labels:
    app: tomcat6
  name: tomcat6
spec:
  replicas: 3     #修改副本数为3
  selector:
    matchLabels:
      app: tomcat6
  strategy: {}
  template:
    metadata:
      creationTimestamp: null
      labels:
        app: tomcat6
    spec:
      containers:
      - image: tomcat:6.0.53-jre8
        name: tomcat
        resources: {}
status: {}

#应用tomcat6.yaml
[root@k8s-node1 ~]# kubectl apply -f tomcat6.yaml
deployment.apps/tomcat6 created
[root@k8s-node1 ~]#
2
3
4
5
6
7
8
9
10
11
12
13
14
15
16
17
18
19
20
21
22
23
24
25
26
27
28
29
30
31
32
33
34
35
查看pods:
[root@k8s-node1 ~]# kubectl get pods
NAME                       READY   STATUS    RESTARTS   AGE
tomcat6-7b84fb5fdc-5jh6t   1/1     Running   0          8s
tomcat6-7b84fb5fdc-8lhwv   1/1     Running   0          8s
tomcat6-7b84fb5fdc-j4qmh   1/1     Running   0          8s
[root@k8s-node1 ~]#
2
3
4
5
6
查看某个pod的具体信息:
[root@k8s-node1 ~]# kubectl get pods tomcat6-7b84fb5fdc-5jh6t -o yaml
apiVersion: v1
kind: Pod
metadata:
  creationTimestamp: "2020-05-04T03:50:47Z"
  generateName: tomcat6-7b84fb5fdc-
  labels:
    app: tomcat6
    pod-template-hash: 7b84fb5fdc
  managedFields:
  - apiVersion: v1
    fieldsType: FieldsV1
    fieldsV1:
      f:metadata:
        f:generateName: {}
        f:labels:
          .: {}
          f:app: {}
          f:pod-template-hash: {}
        f:ownerReferences:
          .: {}
          k:{"uid":"292bfe3b-dd63-442e-95ce-c796ab5bdcc1"}:
            .: {}
            f:apiVersion: {}
            f:blockOwnerDeletion: {}
            f:controller: {}
            f:kind: {}
            f:name: {}
            f:uid: {}
      f:spec:
        f:containers:
          k:{"name":"tomcat"}:
            .: {}
            f:image: {}
            f:imagePullPolicy: {}
            f:name: {}
            f:resources: {}
            f:terminationMessagePath: {}
            f:terminationMessagePolicy: {}
        f:dnsPolicy: {}
        f:enableServiceLinks: {}
        f:restartPolicy: {}
        f:schedulerName: {}
        f:securityContext: {}
        f:terminationGracePeriodSeconds: {}
    manager: kube-controller-manager
    operation: Update
    time: "2020-05-04T03:50:47Z"
  - apiVersion: v1
    fieldsType: FieldsV1
    fieldsV1:
      f:status:
        f:conditions:
          k:{"type":"ContainersReady"}:
            .: {}
            f:lastProbeTime: {}
            f:lastTransitionTime: {}
            f:status: {}
            f:type: {}
          k:{"type":"Initialized"}:
            .: {}
            f:lastProbeTime: {}
            f:lastTransitionTime: {}
            f:status: {}
            f:type: {}
          k:{"type":"Ready"}:
            .: {}
            f:lastProbeTime: {}
            f:lastTransitionTime: {}
            f:status: {}
            f:type: {}
        f:containerStatuses: {}
        f:hostIP: {}
        f:phase: {}
        f:podIP: {}
        f:podIPs:
          .: {}
          k:{"ip":"10.244.2.7"}:
            .: {}
            f:ip: {}
        f:startTime: {}
    manager: kubelet
    operation: Update
    time: "2020-05-04T03:50:49Z"
  name: tomcat6-7b84fb5fdc-5jh6t
  namespace: default
  ownerReferences:
  - apiVersion: apps/v1
    blockOwnerDeletion: true
    controller: true
    kind: ReplicaSet
    name: tomcat6-7b84fb5fdc
    uid: 292bfe3b-dd63-442e-95ce-c796ab5bdcc1
  resourceVersion: "46229"
  selfLink: /api/v1/namespaces/default/pods/tomcat6-7b84fb5fdc-5jh6t
  uid: 2f661212-3b03-47e4-bcb8-79782d5c7578
spec:
  containers:
  - image: tomcat:6.0.53-jre8
    imagePullPolicy: IfNotPresent
    name: tomcat
    resources: {}
    terminationMessagePath: /dev/termination-log
    terminationMessagePolicy: File
    volumeMounts:
    - mountPath: /var/run/secrets/kubernetes.io/serviceaccount
      name: default-token-bxqtw
      readOnly: true
  dnsPolicy: ClusterFirst
  enableServiceLinks: true
  nodeName: k8s-node2
  priority: 0
  restartPolicy: Always
  schedulerName: default-scheduler
  securityContext: {}
  serviceAccount: default
  serviceAccountName: default
  terminationGracePeriodSeconds: 30
  tolerations:
  - effect: NoExecute
    key: node.kubernetes.io/not-ready
    operator: Exists
    tolerationSeconds: 300
  - effect: NoExecute
    key: node.kubernetes.io/unreachable
    operator: Exists
    tolerationSeconds: 300
  volumes:
  - name: default-token-bxqtw
    secret:
      defaultMode: 420
      secretName: default-token-bxqtw
status:
  conditions:
  - lastProbeTime: null
    lastTransitionTime: "2020-05-04T03:50:47Z"
    status: "True"
    type: Initialized
  - lastProbeTime: null
    lastTransitionTime: "2020-05-04T03:50:49Z"
    status: "True"
    type: Ready
  - lastProbeTime: null
    lastTransitionTime: "2020-05-04T03:50:49Z"
    status: "True"
    type: ContainersReady
  - lastProbeTime: null
    lastTransitionTime: "2020-05-04T03:50:47Z"
    status: "True"
    type: PodScheduled
  containerStatuses:
  - containerID: docker://18eb0798384ea44ff68712cda9be94b6fb96265206c554a15cee28c288879304
    image: tomcat:6.0.53-jre8
    imageID: docker-pullable://tomcat@sha256:8c643303012290f89c6f6852fa133b7c36ea6fbb8eb8b8c9588a432beb24dc5d
    lastState: {}
    name: tomcat
    ready: true
    restartCount: 0
    started: true
    state:
      running:
        startedAt: "2020-05-04T03:50:49Z"
  hostIP: 10.0.2.4
  phase: Running
  podIP: 10.244.2.7
  podIPs:
  - ip: 10.244.2.7
  qosClass: BestEffort
  startTime: "2020-05-04T03:50:47Z"
2
3
4
5
6
7
8
9
10
11
12
13
14
15
16
17
18
19
20
21
22
23
24
25
26
27
28
29
30
31
32
33
34
35
36
37
38
39
40
41
42
43
44
45
46
47
48
49
50
51
52
53
54
55
56
57
58
59
60
61
62
63
64
65
66
67
68
69
70
71
72
73
74
75
76
77
78
79
80
81
82
83
84
85
86
87
88
89
90
91
92
93
94
95
96
97
98
99
100
101
102
103
104
105
106
107
108
109
110
111
112
113
114
115
116
117
118
119
120
121
122
123
124
125
126
127
128
129
130
131
132
133
134
135
136
137
138
139
140
141
142
143
144
145
146
147
148
149
150
151
152
153
154
155
156
157
158
159
160
161
162
163
164
165
166
167
168
169
# 命令参考

# service的意义

前面我们通过命令行的方式,部署和暴露了tomcat,实际上也可以通过yaml的方式来完成这些操作。
#这些操作实际上是为了获取Deployment的yaml模板
[root@k8s-node1 ~]#  kubectl create deployment tomcat6 --image=tomcat:6.0.53-jre8 --dry-run -o yaml >tomcat6-deployment.yaml
W0504 04:13:28.265432   24263 helpers.go:535] --dry-run is deprecated and can be replaced with --dry-run=client.
[root@k8s-node1 ~]# ls tomcat6-deployment.yaml
tomcat6-deployment.yaml
[root@k8s-node1 ~]#
2
3
4
5
6
修改“tomcat6-deployment.yaml”内容如下:
apiVersion: apps/v1
kind: Deployment
metadata:
  labels:
    app: tomcat6
  name: tomcat6
spec:
  replicas: 3
  selector:
    matchLabels:
      app: tomcat6
  template:
    metadata:
      labels:
        app: tomcat6
    spec:
      containers:
      - image: tomcat:6.0.53-jre8
        name: tomcat
2
3
4
5
6
7
8
9
10
11
12
13
14
15
16
17
18
19
#部署
[root@k8s-node1 ~]# kubectl apply -f tomcat6-deployment.yaml
deployment.apps/tomcat6 configured


#查看资源
[root@k8s-node1 ~]# kubectl get all
NAME                           READY   STATUS    RESTARTS   AGE
pod/tomcat6-7b84fb5fdc-5jh6t   1/1     Running   0          27m
pod/tomcat6-7b84fb5fdc-8lhwv   1/1     Running   0          27m
pod/tomcat6-7b84fb5fdc-j4qmh   1/1     Running   0          27m

NAME                 TYPE        CLUSTER-IP   EXTERNAL-IP   PORT(S)   AGE
service/kubernetes   ClusterIP   10.96.0.1    <none>        443/TCP   14h

NAME                      READY   UP-TO-DATE   AVAILABLE   AGE
deployment.apps/tomcat6   3/3     3            3           27m

NAME                                 DESIRED   CURRENT   READY   AGE
replicaset.apps/tomcat6-7b84fb5fdc   3         3         3       27m
[root@k8s-node1 ~]#
2
3
4
5
6
7
8
9
10
11
12
13
14
15
16
17
18
19
20
21
kubectl expose deployment tomcat6 --port=80 --target-port=8080 --type=NodePort --dry-run -o yaml
apiVersion: v1
kind: Service
metadata:
  creationTimestamp: null
  labels:
    app: tomcat6
  name: tomcat6
spec:
  ports:
  - port: 80
    protocol: TCP
    targetPort: 8080
  selector:
    app: tomcat6
  type: NodePort
status:
  loadBalancer: {}
2
3
4
5
6
7
8
9
10
11
12
13
14
15
16
17
将这段输出和“tomcat6-deployment.yaml”进行拼接,表示部署完毕并进行暴露服务:
apiVersion: apps/v1
kind: Deployment
metadata:
  labels:
    app: tomcat6
  name: tomcat6
spec:
  replicas: 3
  selector:
    matchLabels:
      app: tomcat6
  template:
    metadata:
      labels:
        app: tomcat6
    spec:
      containers:
      - image: tomcat:6.0.53-jre8
        name: tomcat
---
apiVersion: v1
kind: Service
metadata:
  creationTimestamp: null
  labels:
    app: tomcat6
  name: tomcat6
spec:
  ports:
  - port: 80
    protocol: TCP
    targetPort: 8080
  selector:
    app: tomcat6
  type: NodePort
2
3
4
5
6
7
8
9
10
11
12
13
14
15
16
17
18
19
20
21
22
23
24
25
26
27
28
29
30
31
32
33
34
35
部署并暴露服务
[root@k8s-node1 ~]# kubectl apply -f tomcat6-deployment.yaml
deployment.apps/tomcat6 created
service/tomcat6 created
2
3
查看服务和部署信息
[root@k8s-node1 ~]# kubectl get all
NAME                           READY   STATUS    RESTARTS   AGE
pod/tomcat6-7b84fb5fdc-dsqmb   1/1     Running   0          4s
pod/tomcat6-7b84fb5fdc-gbmxc   1/1     Running   0          5s
pod/tomcat6-7b84fb5fdc-kjlc6   1/1     Running   0          4s

NAME                 TYPE        CLUSTER-IP      EXTERNAL-IP   PORT(S)        AGE
service/kubernetes   ClusterIP   10.96.0.1       <none>        443/TCP        14h
service/tomcat6      NodePort    10.96.147.210   <none>        80:30172/TCP   4s

NAME                      READY   UP-TO-DATE   AVAILABLE   AGE
deployment.apps/tomcat6   3/3     3            3           5s

NAME                                 DESIRED   CURRENT   READY   AGE
replicaset.apps/tomcat6-7b84fb5fdc   3         3         3       5s
[root@k8s-node1 ~]#
2
3
4
5
6
7
8
9
10
11
12
13
14
15
16
访问node1,node1和node3的30172端口:
[root@k8s-node1 ~]# curl -I http://192.168.56.{100,101,102}:30172/
HTTP/1.1 200 OK
Server: Apache-Coyote/1.1
Accept-Ranges: bytes
ETag: W/"7454-1491118183000"
Last-Modified: Sun, 02 Apr 2017 07:29:43 GMT
Content-Type: text/html
Content-Length: 7454
Date: Mon, 04 May 2020 04:35:35 GMT

HTTP/1.1 200 OK
Server: Apache-Coyote/1.1
Accept-Ranges: bytes
ETag: W/"7454-1491118183000"
Last-Modified: Sun, 02 Apr 2017 07:29:43 GMT
Content-Type: text/html
Content-Length: 7454
Date: Mon, 04 May 2020 04:35:35 GMT

HTTP/1.1 200 OK
Server: Apache-Coyote/1.1
Accept-Ranges: bytes
ETag: W/"7454-1491118183000"
Last-Modified: Sun, 02 Apr 2017 07:29:43 GMT
Content-Type: text/html
Content-Length: 7454
Date: Mon, 04 May 2020 04:35:35 GMT

[root@k8s-node1 ~]#
2
3
4
5
6
7
8
9
10
11
12
13
14
15
16
17
18
19
20
21
22
23
24
25
26
27
28
29
# Ingress
通过Ingress发现pod进行关联。基于域名访问 通过Ingress controller实现POD负载均衡 支持TCP/UDP 4层负载均衡和HTTP 7层负载均衡

步骤: (1)部署Ingress controller
执行“k8s/ingress-controller.yaml”
[root@k8s-node1 k8s]# kubectl apply -f ingress-controller.yaml
namespace/ingress-nginx created
configmap/nginx-configuration created
configmap/tcp-services created
configmap/udp-services created
serviceaccount/nginx-ingress-serviceaccount created
clusterrole.rbac.authorization.k8s.io/nginx-ingress-clusterrole created
role.rbac.authorization.k8s.io/nginx-ingress-role created
rolebinding.rbac.authorization.k8s.io/nginx-ingress-role-nisa-binding created
clusterrolebinding.rbac.authorization.k8s.io/nginx-ingress-clusterrole-nisa-binding created
daemonset.apps/nginx-ingress-controller created
service/ingress-nginx created
[root@k8s-node1 k8s]#
2
3
4
5
6
7
8
9
10
11
12
13
查看
[root@k8s-node1 k8s]# kubectl get pods --all-namespaces
NAMESPACE       NAME                                READY   STATUS              RESTARTS   AGE
default         tomcat6-7b84fb5fdc-dsqmb            1/1     Running             0          16m
default         tomcat6-7b84fb5fdc-gbmxc            1/1     Running             0          16m
default         tomcat6-7b84fb5fdc-kjlc6            1/1     Running             0          16m
ingress-nginx   nginx-ingress-controller-9q6cs      0/1     ContainerCreating   0          40s
ingress-nginx   nginx-ingress-controller-qx572      0/1     ContainerCreating   0          40s
kube-system     coredns-546565776c-9sbmk            1/1     Running             1          14h
kube-system     coredns-546565776c-t68mr            1/1     Running             1          14h
kube-system     etcd-k8s-node1                      1/1     Running             1          14h
kube-system     kube-apiserver-k8s-node1            1/1     Running             1          14h
kube-system     kube-controller-manager-k8s-node1   1/1     Running             1          14h
kube-system     kube-flannel-ds-amd64-5xs5j         1/1     Running             2          13h
kube-system     kube-flannel-ds-amd64-6xwth         1/1     Running             2          14h
kube-system     kube-flannel-ds-amd64-fvnvx         1/1     Running             1          13h
kube-system     kube-proxy-7tkvl                    1/1     Running             1          13h
kube-system     kube-proxy-mvlnk                    1/1     Running             2          13h
kube-system     kube-proxy-sz2vz                    1/1     Running             1          14h
kube-system     kube-scheduler-k8s-node1            1/1     Running             1          14h
[root@k8s-node1 k8s]#
2
3
4
5
6
7
8
9
10
11
12
13
14
15
16
17
18
19
20
这里master节点负责调度,具体执行交给node2和node3来完成,能够看到它们正在下载镜像

(2)创建Ingress规则
apiVersion: extensions/v1beta1
kind: Ingress
metadata:
  name: web
spec:
  rules:
  - host: tomcat6.kubenetes.com
    http:
       paths:
          - backend:
              serviceName: tomcat6
              servicePort: 80
2
3
4
5
6
7
8
9
10
11
12
[root@k8s-node1 k8s]# touch ingress-tomcat6.yaml
#将上面的规则,添加到ingress-tomcat6.yaml文件中
[root@k8s-node1 k8s]# vi  ingress-tomcat6.yaml

[root@k8s-node1 k8s]# kubectl apply -f ingress-tomcat6.yaml
ingress.extensions/web created
[root@k8s-node1 k8s]#
2
3
4
5
6
7
修改本机的hosts文件,添加如下的域名转换规则:
192.168.56.102 tomcat6.kubenetes.com
测试: http://tomcat6.kubenetes.com/

并且集群中即便有一个节点不可用,也不影响整体的运行。
# 安装kubernetes可视化界面——DashBoard
1、部署DashBoard
$ kubectl appy -f kubernetes-dashboard.yaml
文件在“k8s”源码目录提供
2、暴露DashBoard为公共访问
默认DashBoard只能集群内部访问,修改Service为NodePort类型,暴露到外部
kind: Service
apiVersion: v1
metadata:
  labels:
    k8s-app: kubernetes-dashboard
  name: kubernetes-dashboard
  namespace: kube-system
spec:
  type: NodePort
  ports:
    - port: 443
      targetPort: 8443
      nodePort: 3001
  selector:
    k8s-app: kubernetes-dashboard
2
3
4
5
6
7
8
9
10
11
12
13
14
15
访问地址:http://NodeIP:30001
3、创建授权账号
$ kubectl create serviceaccount dashboar-admin -n kube-sysem
$ kubectl create clusterrolebinding dashboar-admin --clusterrole=cluter-admin --serviceaccount=kube-system:dashboard-admin
$ kubectl describe secrets -n kube-system $( kubectl -n kube-system get secret |awk '/dashboard-admin/{print $1}' )
使用输出的token登录dashboard

# kubesphere
默认的dashboard没啥用,我们用kubesphere可以打通全部的devops链路,kubesphere集成了很多套件,集群要求比较高 https://kubesphere.io
kuboard也很不错,集群要求不高 https://kuboard.cn/support/
# 1、简洁
kubesphere是一款面向云原声设计的开源项目,在目前主流容器调度平台kubernets智商构建的分布式多用户容器管理平台,提供简单易用的操作界面以及向导式操作方式,在降低用户使用容器调度平台学习成本的同时,极大降低开发、测试、运维的日常工作的复杂度。
# 2、安装前提提交
# 1、安装helm(master节点执行)
helm是kubernetes的包管理器。包管理器类似于在Ubuntu中使用的apt,centos中的yum或者python中的pip一样,能够快速查找,下载和安装软件包。Helm有客户端组件helm和服务端组件Tiller组成,能够将一组K8S资源打包统一管理,是查找、共享和使用为Kubernetes构建的软件的最佳方式。
1)安装
curl -L https://git.io/get_helm.sh|bash
由于被墙的原因,使用我们给定的get_helm.sh。
[root@k8s-node1 k8s]# ll
total 68
-rw-r--r-- 1 root root  7149 Feb 27 01:58 get_helm.sh
-rw-r--r-- 1 root root  6310 Feb 28 05:16 ingress-controller.yaml
-rw-r--r-- 1 root root   209 Feb 28 13:18 ingress-demo.yml
-rw-r--r-- 1 root root   236 May  4 05:09 ingress-tomcat6.yaml
-rwxr--r-- 1 root root 15016 Feb 26 15:05 kube-flannel.yml
-rw-r--r-- 1 root root  4737 Feb 26 15:38 kubernetes-dashboard.yaml
-rw-r--r-- 1 root root  3841 Feb 27 01:09 kubesphere-complete-setup.yaml
-rw-r--r-- 1 root root   392 Feb 28 11:33 master_images.sh
-rw-r--r-- 1 root root   283 Feb 28 11:34 node_images.sh
-rw-r--r-- 1 root root  1053 Feb 28 03:53 product.yaml
-rw-r--r-- 1 root root   931 May  3 10:08 Vagrantfile
[root@k8s-node1 k8s]# sh get_helm.sh
Downloading https://get.helm.sh/helm-v2.16.6-linux-amd64.tar.gz
Preparing to install helm and tiller into /usr/local/bin
helm installed into /usr/local/bin/helm
tiller installed into /usr/local/bin/tiller
Run 'helm init' to configure helm.
[root@k8s-node1 k8s]#
2
3
4
5
6
7
8
9
10
11
12
13
14
15
16
17
18
19
20
2)验证版本
helm version
3)创建权限(master执行)
创建helm-rbac.yaml,写入如下内容
apiVersion: v1
kind: ServiceAccount
metadata:
  name: tiller
  namespace: kube-system
---
apiVersion: rbac.authorization.k8s.io/v1
kind: ClusterRoleBinding
metadata:
  name: tiller
roleRef:
  apiGroup: rbac.authorization.k8s.io
  kind: ClusterRole
  name: cluster-admin
subjects:
  - kind: ServiceAccount
    name: kubernetes-dashboard
    namespace: kube-system
2
3
4
5
6
7
8
9
10
11
12
13
14
15
16
17
18
应用配置:
[root@k8s-node1 k8s]#  kubectl apply -f helm-rbac.yaml
serviceaccount/tiller created
clusterrolebinding.rbac.authorization.k8s.io/tiller created
[root@k8s-node1 k8s]#
2
3
4
# 2、安装Tilller(Master执行)
1、初始化
[root@k8s-node1 k8s]# helm init --service-account=tiller --tiller-image=sapcc/tiller:v2.16.3 --history-max 300
Creating /root/.helm
Creating /root/.helm/repository
Creating /root/.helm/repository/cache
Creating /root/.helm/repository/local
Creating /root/.helm/plugins
Creating /root/.helm/starters
Creating /root/.helm/cache/archive
Creating /root/.helm/repository/repositories.yaml
Adding stable repo with URL: https://kubernetes-charts.storage.googleapis.com
Adding local repo with URL: http://127.0.0.1:8879/charts
$HELM_HOME has been configured at /root/.helm.

Tiller (the Helm server-side component) has been installed into your Kubernetes Cluster.

Please note: by default, Tiller is deployed with an insecure 'allow unauthenticated users' policy.
To prevent this, run `helm init` with the --tiller-tls-verify flag.
For more information on securing your installation see: https://v2.helm.sh/docs/securing_installation/
[root@k8s-node1 k8s]#
2
3
4
5
6
7
8
9
10
11
12
13
14
15
16
17
18
19
--tiller-image 指定镜像,否则会被墙,等待节点上部署的tiller完成即可。
[root@k8s-node1 k8s]#  kubectl get pods -n kube-system
NAME                                   READY   STATUS             RESTARTS   AGE
coredns-546565776c-9sbmk               1/1     Running            3          23h
coredns-546565776c-t68mr               1/1     Running            3          23h
etcd-k8s-node1                         1/1     Running            3          23h
kube-apiserver-k8s-node1               1/1     Running            3          23h
kube-controller-manager-k8s-node1      1/1     Running            3          23h
kube-flannel-ds-amd64-5xs5j            1/1     Running            4          22h
kube-flannel-ds-amd64-6xwth            1/1     Running            5          23h
kube-flannel-ds-amd64-fvnvx            1/1     Running            4          22h
kube-proxy-7tkvl                       1/1     Running            3          22h
kube-proxy-mvlnk                       1/1     Running            4          22h
kube-proxy-sz2vz                       1/1     Running            3          23h
kube-scheduler-k8s-node1               1/1     Running            3          23h
kubernetes-dashboard-975499656-jxczv   0/1     ImagePullBackOff   0          7h45m
tiller-deploy-8cc566858-67bxb          1/1     Running            0          31s
[root@k8s-node1 k8s]#
2
3
4
5
6
7
8
9
10
11
12
13
14
15
16
17
查看集群的所有节点信息:
kubectl get node -o wide
[root@k8s-node1 k8s]#  kubectl get node -o wide
NAME        STATUS   ROLES    AGE   VERSION   INTERNAL-IP   EXTERNAL-IP   OS-IMAGE                KERNEL-VERSION               CONTAINER-RUNTIME
k8s-node1   Ready    master   23h   v1.17.3   10.0.2.15     <none>        CentOS Linux 7 (Core)   3.10.0-957.12.2.el7.x86_64   docker://19.3.8
k8s-node2   Ready    <none>   22h   v1.17.3   10.0.2.4      <none>        CentOS Linux 7 (Core)   3.10.0-957.12.2.el7.x86_64   docker://19.3.8
k8s-node3   Ready    <none>   22h   v1.17.3   10.0.2.5      <none>        CentOS Linux 7 (Core)   3.10.0-957.12.2.el7.x86_64   docker://19.3.8
[root@k8s-node1 k8s]#
2
3
4
5
6
7
2、测试
helm install stable/nginx-ingress --name nginx-ingress
最小化安装 KubeSphere
若集群可用 CPU > 1 Core 且可用内存 > 2 G,可以使用以下命令最小化安装 KubeSphere:
kubectl apply -f https://raw.githubusercontent.com/kubesphere/ks-installer/master/kubesphere-minimal.yaml
提示:若您的服务器提示无法访问 GitHub,可将 kubesphere-minimal.yaml (opens new window) 或 kubesphere-complete-setup.yaml (opens new window) 文件保存到本地作为本地的静态文件,再参考上述命令进行安装。
- 查看滚动刷新的安装日志,请耐心等待安装成功。
$ kubectl logs -n kubesphere-system $(kubectl get pod -n kubesphere-system -l app=ks-install -o jsonpath='{.items[0].metadata.name}') -f
说明:安装过程中若遇到问题,也可以通过以上日志命令来排查问题。