04.Spring Boot 韩顺平
韩顺平 Spring Boot (轻松创建基于 Spring 的应用程序)
# 1 SpringBoot 基本介绍
# 1.1 官方文档
# 1.1.1 官网: https://spring.io/projects/spring-boot
# 1.1.2 学习文档: https://docs.spring.io/spring-boot/docs/current/reference/html/
# 1.1.3 离线文档: spring-boot-reference.pdf
# 1.1.4 在线 API: https://docs.spring.io/spring-boot/docs/current/api/
# 1.2 Spring Boot 是什么?
# 1.2.1 第一句话: Spring Boot 可以轻松创建独立的、生产级的基于 Spring 的应用程序
# 1.2.2 第二句话: Spring Boot 直接嵌入 Tomcat、Jetty 或 Undertow ,可以"直接运行" Spring
Boot 应用程序
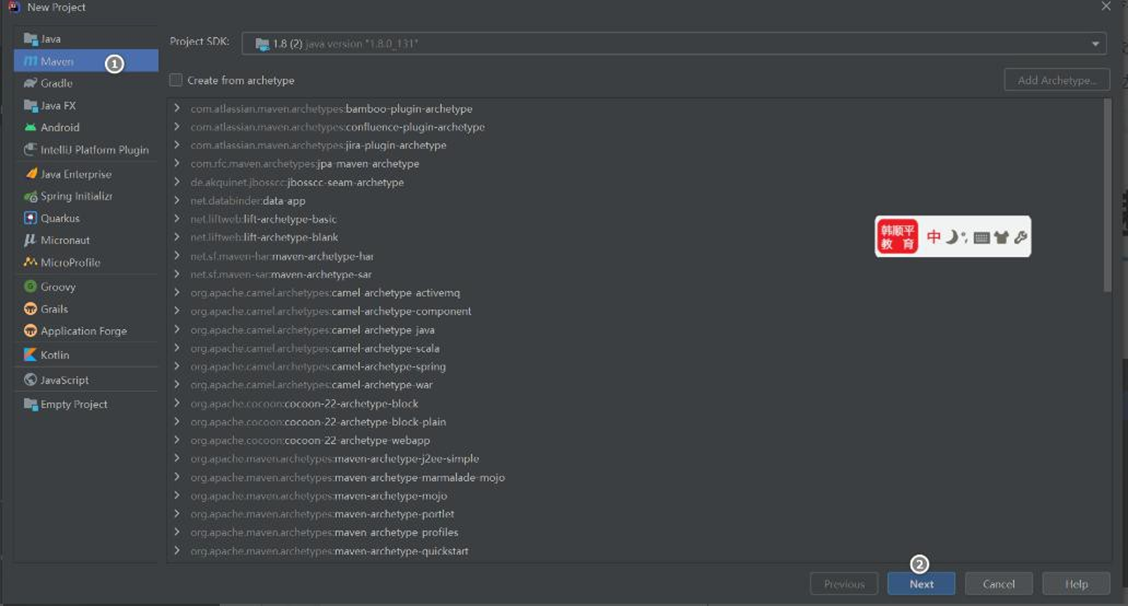
# 1.3 SpringBoot 快速入门
# 1.3.1 需求/图解说明
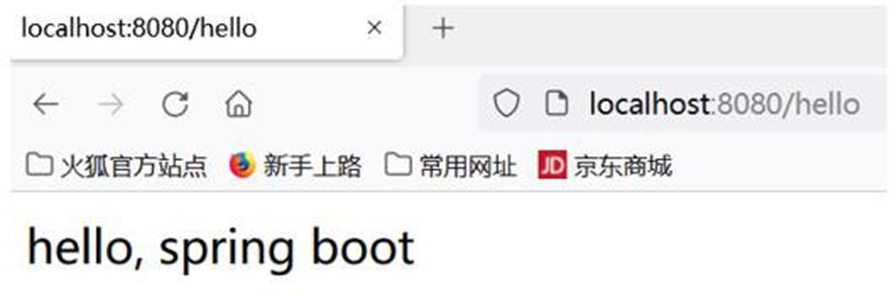
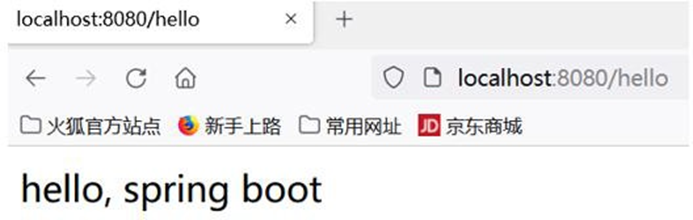
● 构建一个 SpringBoot 项目,浏览器发送/hello 请求 [http://localhost:8080/hello],响应
Hello,SpringBoot
# 1.3.2 完成步骤
- 确认开发环境是 jdk 8 或以上,maven 在 3.5+

- 创建 maven 项目
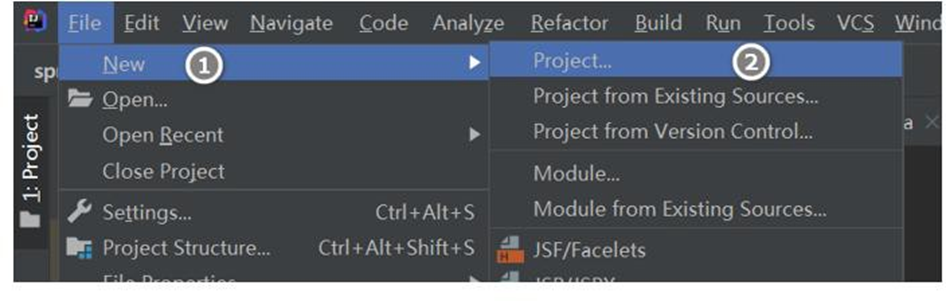
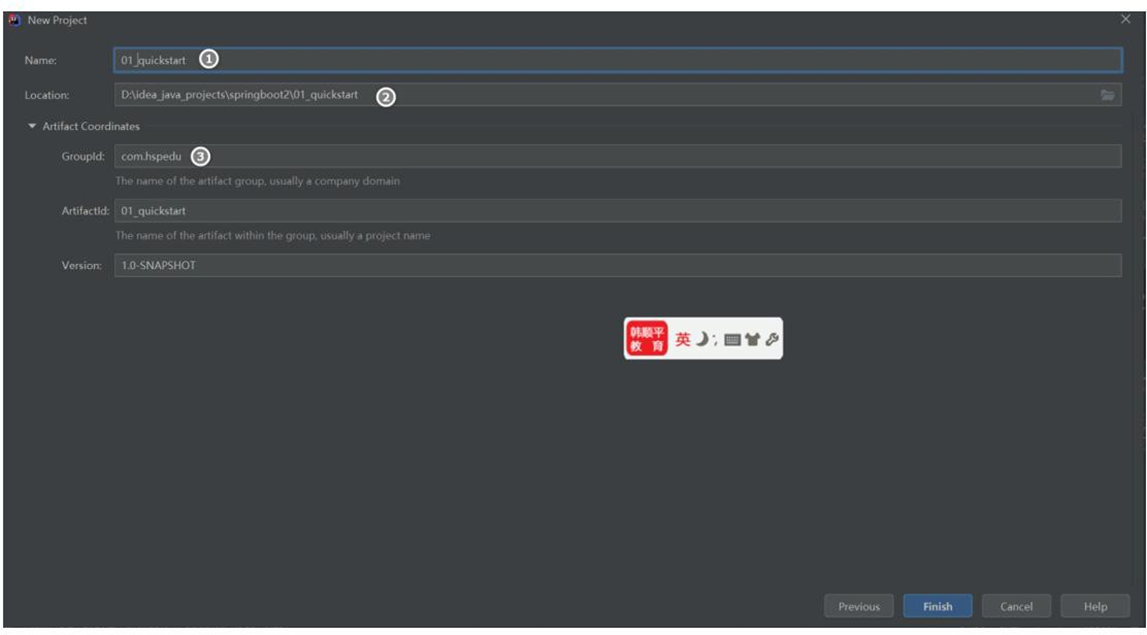
- 在 springboot2\01_quickstart\pom.xml 引入 SpringBoot 父工程和 web 项目场景启动器
<groupId>com.hspedu</groupId>
<artifactId>01_quickstart</artifactId>
<version>1.0-SNAPSHOT</version>
<!-- 导入springboot 父工程,规定的写法-->
<parent>
    <groupId>org.springframework.boot</groupId>
    <artifactId>spring-boot-starter-parent</artifactId>
    <version>2.5.3</version>
</parent>
<!-- 导入web 项目场景启动器,会自动导入和web 开发相关依赖,非常方便-->
<dependencies>
    <dependency>
        <groupId>org.springframework.boot</groupId>
        <artifactId>spring-boot-starter-web</artifactId>
    </dependency>
</dependencies>
2
3
4
5
6
7
8
9
10
11
12
13
14
15
16
17
- 创 建 springboot2\01_quickstart\src\main\java\com\hspedu\springboot\MainApp.java
SpringBoot 应用主程序
package com.hspedu.springboot;
import com.hspedu.springboot.bean.A;
import com.hspedu.springboot.bean.Cat;
import com.hspedu.springboot.bean.Dog;
import com.hspedu.springboot.bean.Monster;
import com.hspedu.springboot.config.BeanConfig;
import org.junit.Test;
import org.springframework.boot.SpringApplication;
import org.springframework.boot.SpringBootConfiguration;
import org.springframework.boot.autoconfigure.EnableAutoConfiguration;
import org.springframework.boot.autoconfigure.SpringBootApplication;
import org.springframework.context.ConfigurableApplicationContext;
import org.springframework.context.annotation.ComponentScan;
/**

* @author 韩顺平

* @version 1.0

*/
/**

* 1. @SpringBootApplication 表示是一个springboot 应用
*/
@SpringBootApplication
public class MainApp {
    public static void main(String[] args) {
        //启动SpringBoot 应用程序
        SpringApplication.run(MainApp.class, args);
    }
}
2
3
4
5
6
7
8
9
10
11
12
13
14
15
16
17
18
19
20
21
22
23
24
25
26
27
28
29
30
31
32
- 创建springboot2\01_quickstart\src\main\java\com\hspedu\springboot\controller\HelloController.java 控制器
package com.hspedu.springboot.controller;
import com.hspedu.springboot.bean.Furn;
import lombok.extern.slf4j.Slf4j;
import org.springframework.beans.factory.annotation.Autowired;
import org.springframework.stereotype.Controller;
import org.springframework.web.bind.annotation.RequestMapping;
import org.springframework.web.bind.annotation.ResponseBody;
/**
* @author 韩顺平

* @version 1.0

*/
@Controller
public class HelloController {
    @RequestMapping("/hello")
    @ResponseBody
    public String hello() {
        return "hello, spring boot";
    }
}
2
3
4
5
6
7
8
9
10
11
12
13
14
15
16
17
18
19
20
21
22
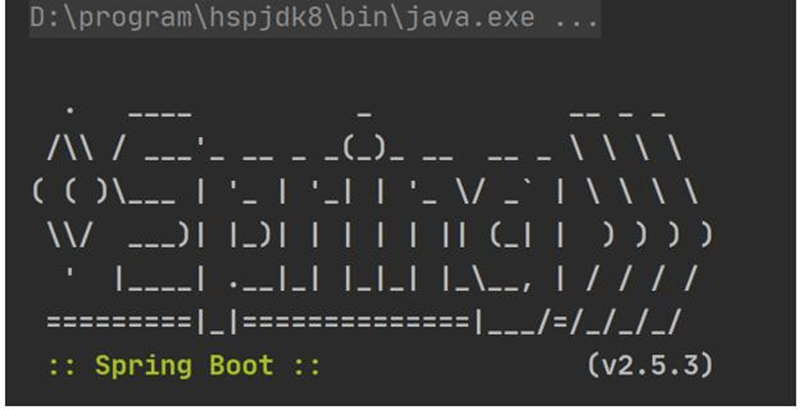
- 运行 MainApp.java 完成测试, 浏览器 http://localhost:8080/hello
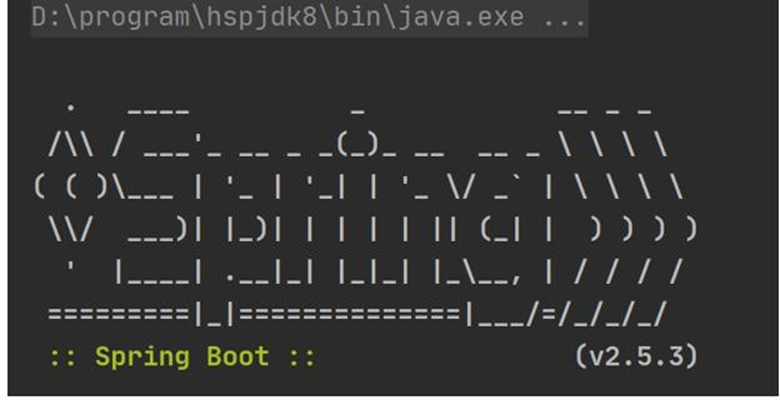
# 1.3.3 快速入门小结
SpringBoot 比较传统的 SSM 开发, 简化整合步骤, 提高开发效率
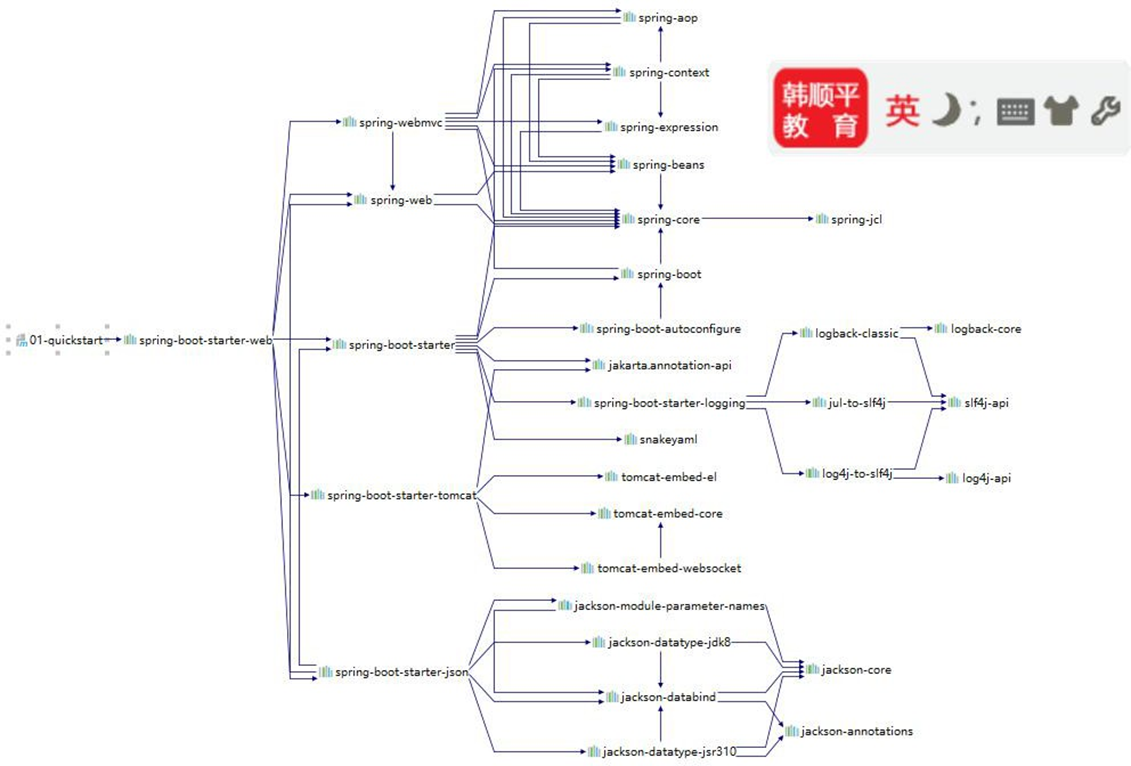
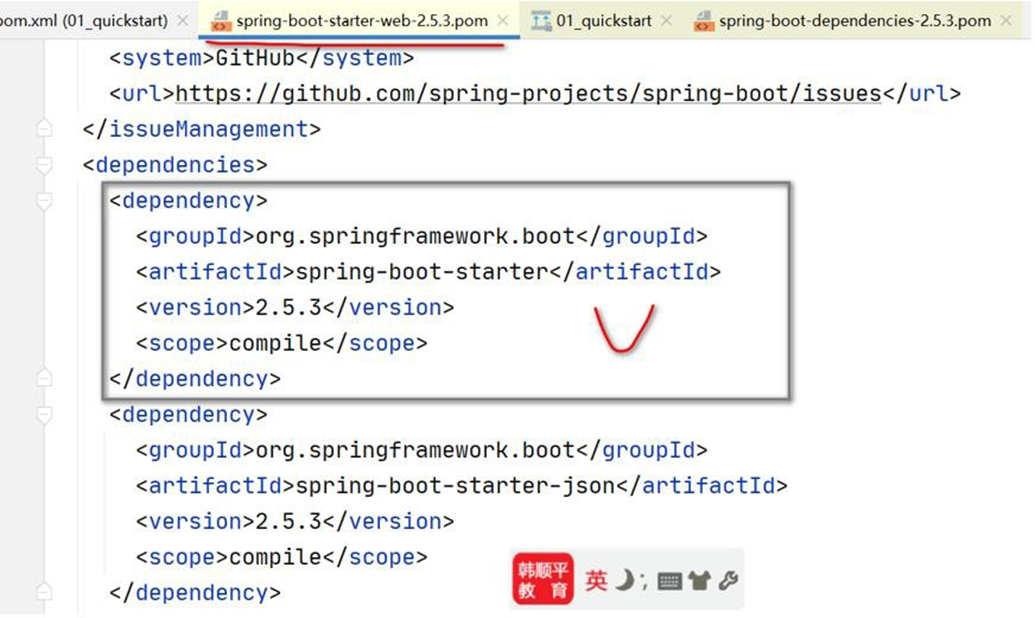
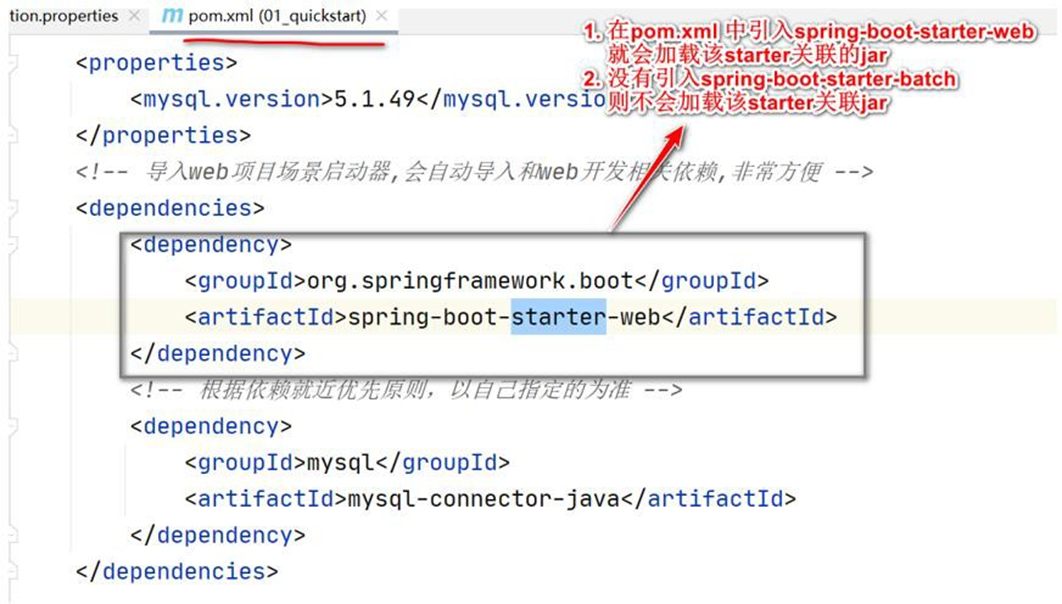
简化了Maven 项目的 pom.xml 依赖导入, 可以说是一键导入, 如图.
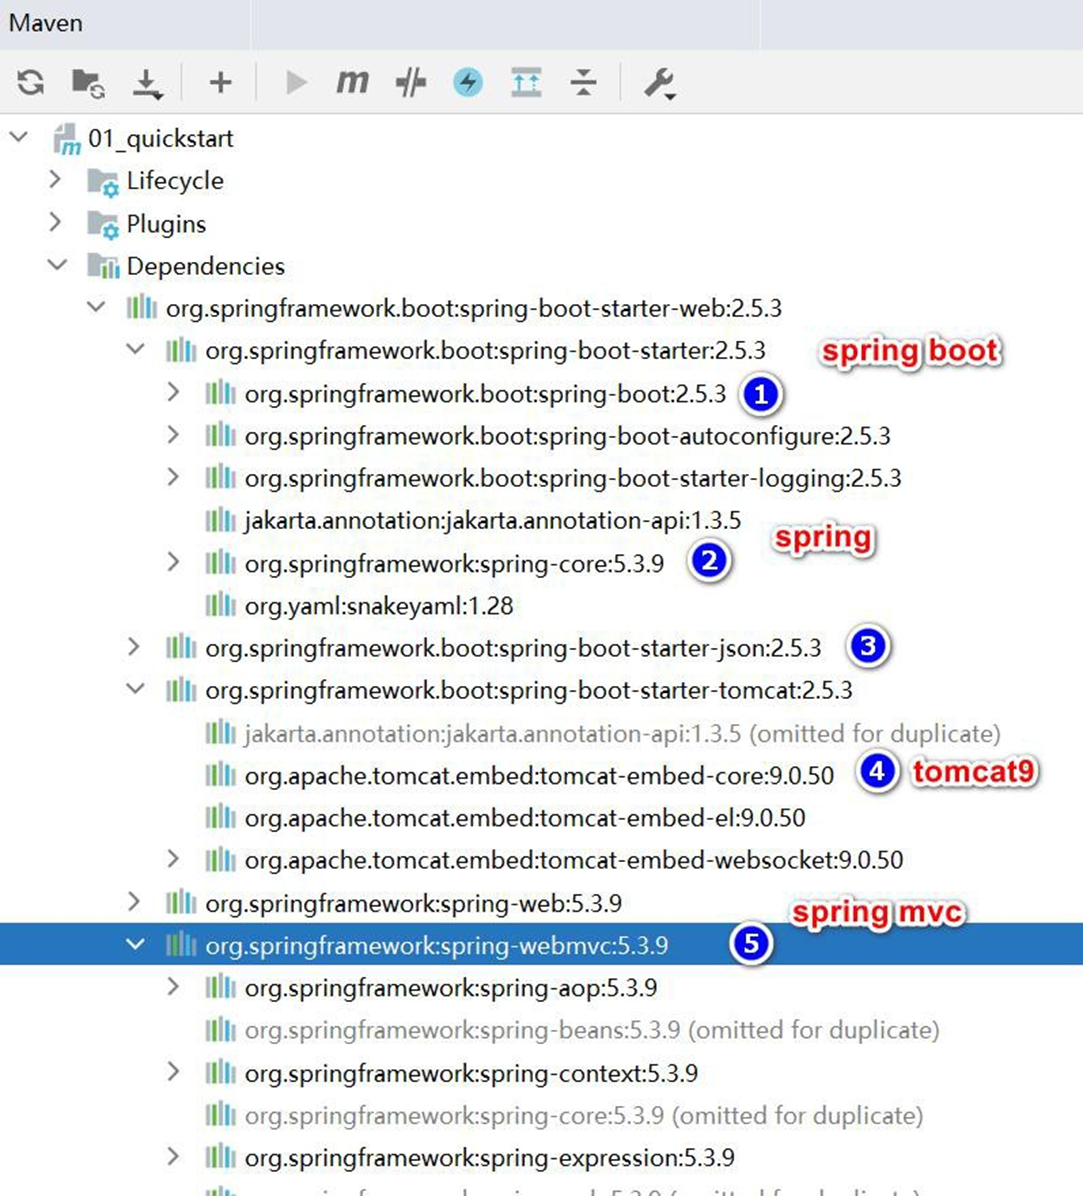
- 引入一个 spring-boot-starter-web, 到底发生了什么? 一图胜千言
内置 Tomcat , 简化服务器的配置
当然 SpringBoot 还有很多优势,后面老韩逐步深入讲解

# 1.4 Spring SpringMVC SpringBoot 的关系
# 1.4.1 梳理关系
他们的关系大概是: Spring Boot > Spring > Spring MVC
Spring MVC 只是 Spring 处理 WEB 层 请 求 的 一 个 模 块 / 组 件 , Spring MVC 的基石是
Servlet
Spring 的核心是 IOC 和 AOP, IOC 提供了依赖注入的容器 , AOP 解决了面向切面编程
Spring Boot 是为了简化开发, 推出的封神框架(约定优于配置[COC],简化了 Spring 项目
的配置流程), SpringBoot 包含很多组件/框架,Spring 就是最核心的内容之一,也包含 Spring
MVC
- Spring 家族,有众多衍生框架和组件例如 boot、security、jpa 等, 他们的基础都是 Spring
# 1.4.2 如何理解 -约定优于配置
1、约定优于配置(Convention over Configuration/COC),又称按约定编程,是一种软件设计
规范, 本质上是对系统、类库或框架中一些东西假定一个大众化合理的默认值(缺省值)
2、例如在模型中存在一个名为 User 的类,那么对应到数据库会存在一个名为user 的表,
只有在偏离这个约定时才需要做相关的配置 (例如你想将表名命名为 t_user 等非user 时才
需要写关于这个名字的配置)
3、简单来说就是假如你所期待的配置与约定的配置一致,那么就可以不做任何配置,约
定不符合期待时, 才需要对约定进行替换配置
4、约定优于配置理念【老韩解读:为什么要搞一个约定优于配置】
约定其实就是一种规范,遵循了规范,那么就存在通用性,存在通用性,那么事情就会变
得相对简单,程序员之间的沟通成本会降低,工作效率会提升,合作也会变得更加简单
- 生活中,这样的情况,大量存在..
# 2 依赖管理和自动配置
# 2.1 依赖管理
# 2.1.1 什么是依赖管理
spring-boot-starter-parent 还有父项目, 声明了开发中常用的依赖的版本号
并且进行 自动版本仲裁 , 即如果程序员没有指定某个依赖 jar 的版本,则以父项目指
定的版本为准

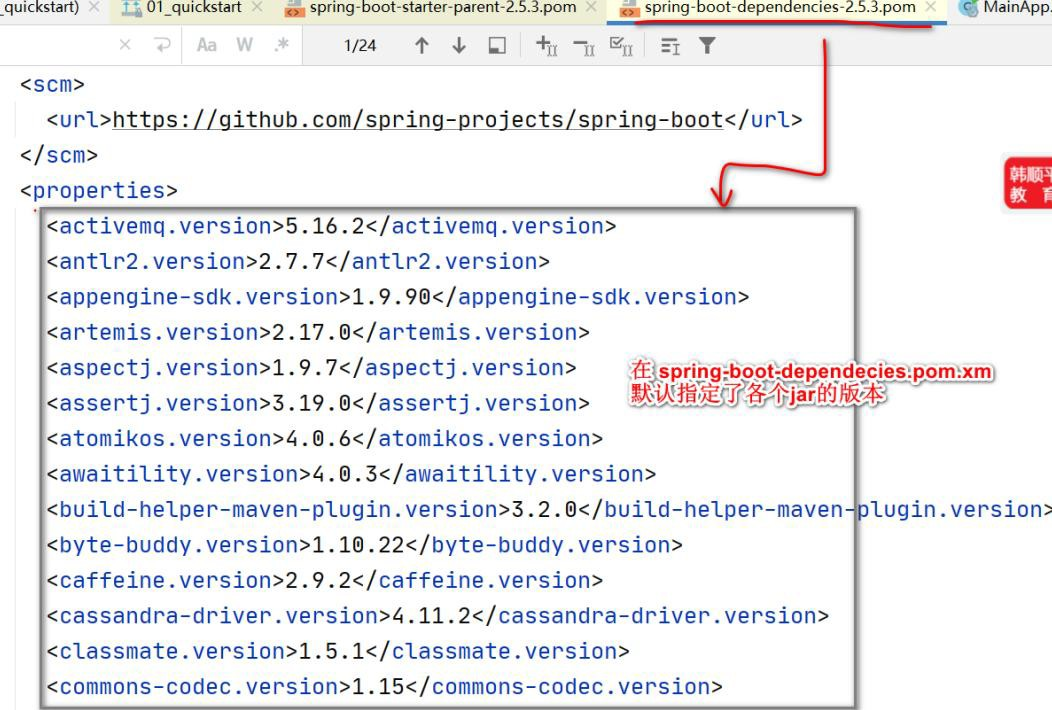
# 2.1.2 修改自动仲裁/默认版本号
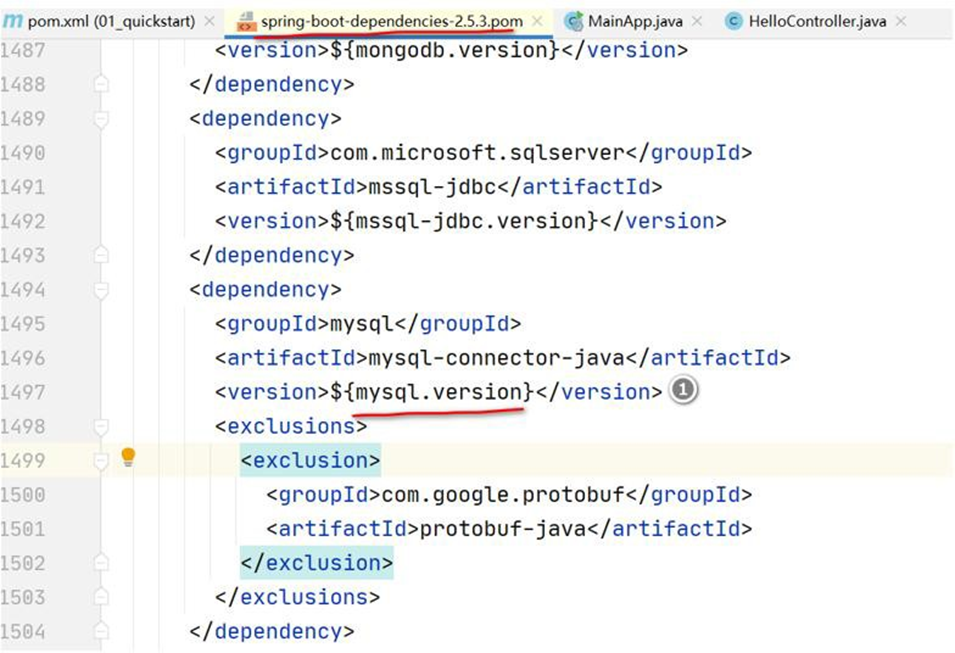
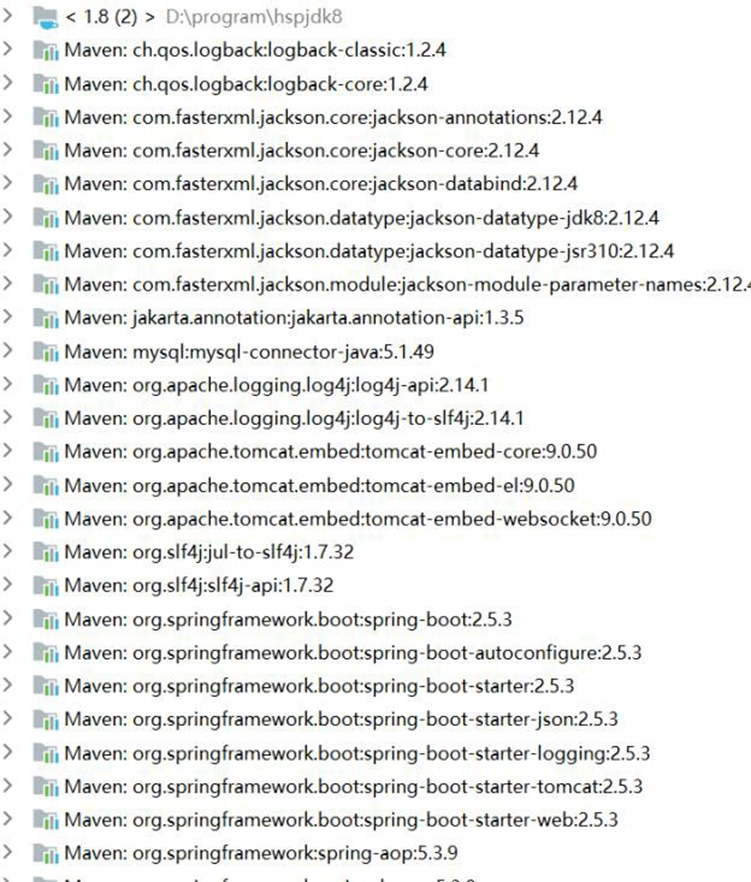
- 需求说明: 将 SpringBoot mysql 驱动修改成 5.1.49

- 查看 spring-boot-dependencies.pom 里面规定当前依赖的版本 对应的 key , 这里是
mysql.version
- 修改 springboot2\01_quickstart\pom.xml 重写配置, 当更新 Maven 时,就依赖到新的
mysql 驱动.
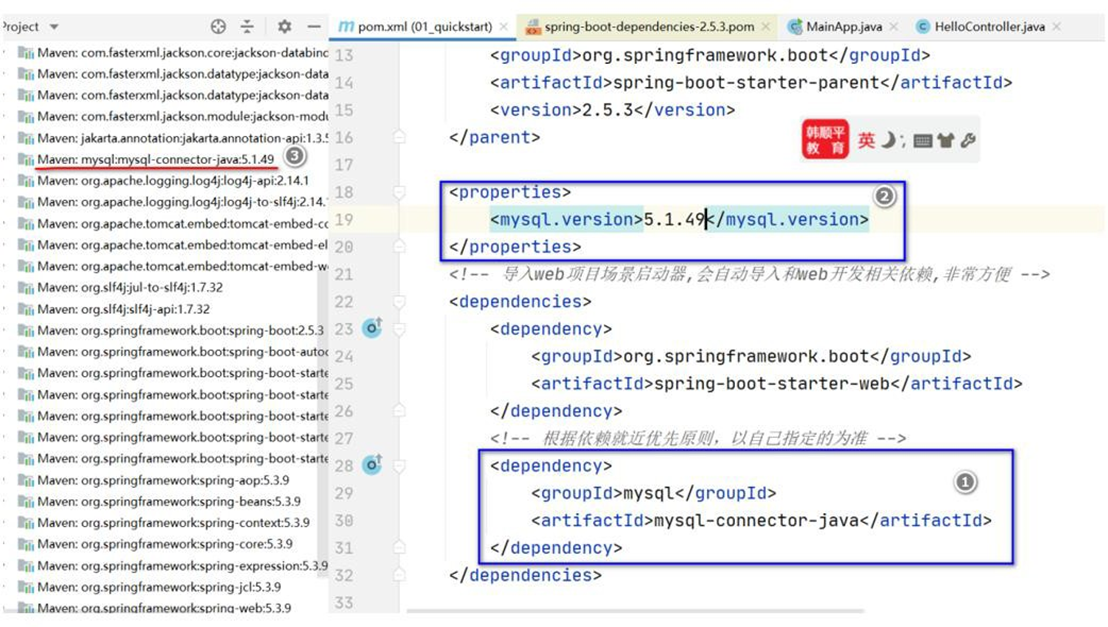
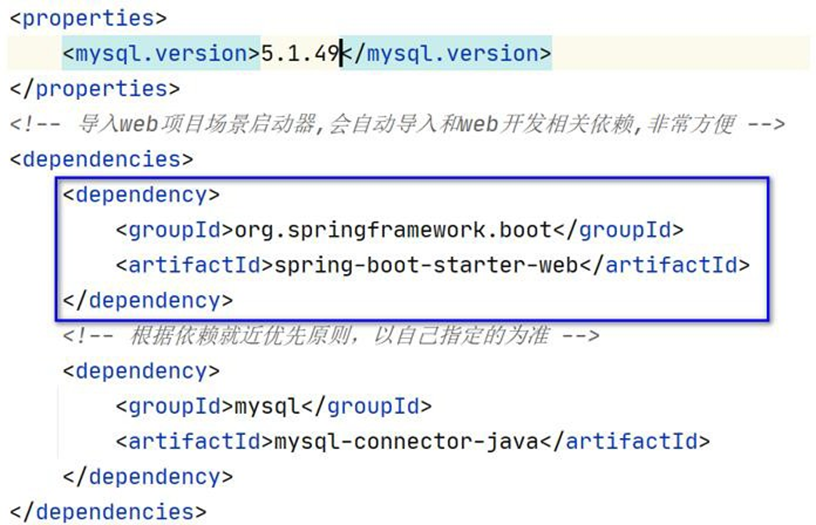
<properties>
    <mysql.version>5.1.49</mysql.version>
</properties>
<!-- 导入web 项目场景启动器,会自动导入和web 开发相关依赖,非常方便-->
<dependencies>
    <dependency>
        <groupId>org.springframework.boot</groupId>
        <artifactId>spring-boot-starter-web</artifactId>
    </dependency>
    <!-- 根据依赖就近优先原则,以自己指定的为准-->
    <dependency>
        <groupId>mysql</groupId>
        <artifactId>mysql-connector-java</artifactId>
    </dependency>
</dependencies>
2
3
4
5
6
7
8
9
10
11
12
13
14
15
# 2.2 starter 场景启动器
# 2.2.1 starter 场景启动器基本介绍
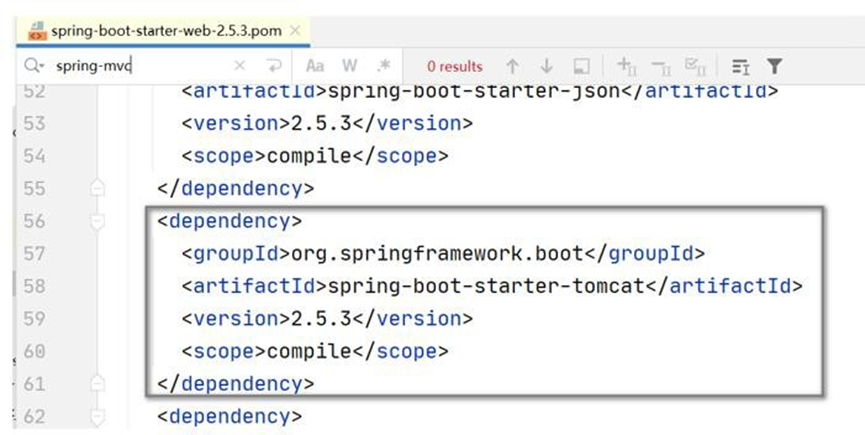
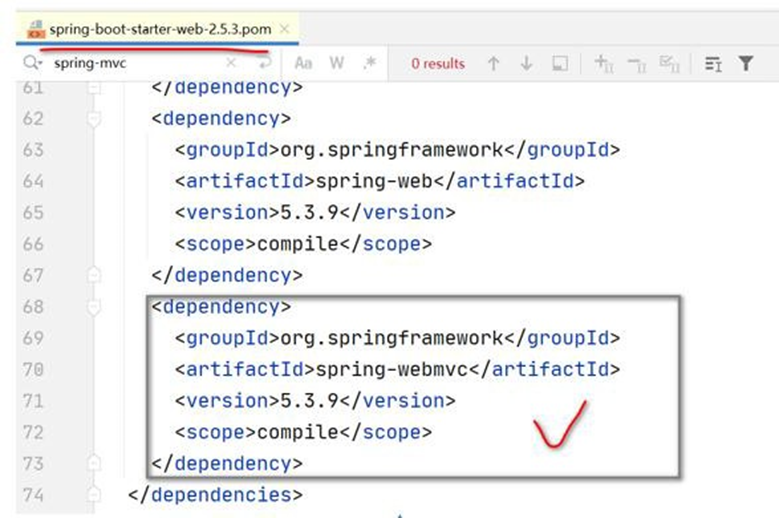
- 开发中我们引入了相关场景的 starter,这个场景中所有的相关依赖都引入进来了,比如
我们做 web 开发引入了,该 starter 将导入与 web 开发相关的所有包
- 依赖树 : 可以看到spring-boot-starter-web ,帮我们引入了 spring-webmvc,spring-web
开发模块,还引入了 spring-boot-starter-tomcat 场景,spring-boot-starter-json 场景,这些
场景下面又引入了一大堆相关的包,这些依赖项可以快速启动和运行一个项目,提高开发
效率.
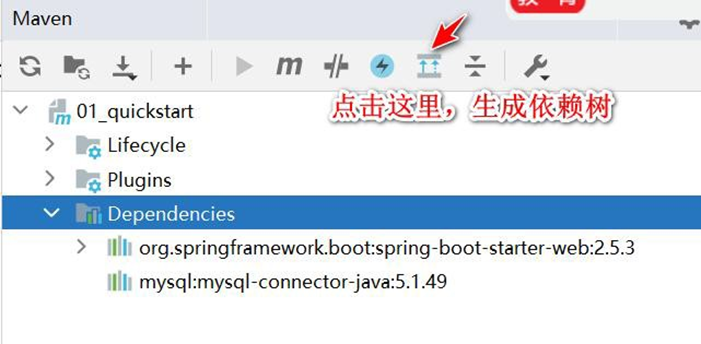

- 所有场景启动器最基本的依赖就是 spring-boot-starter , 前面的依赖树分析可以看到,
这个依赖也就是 SpringBoot 自动配置的核心依赖
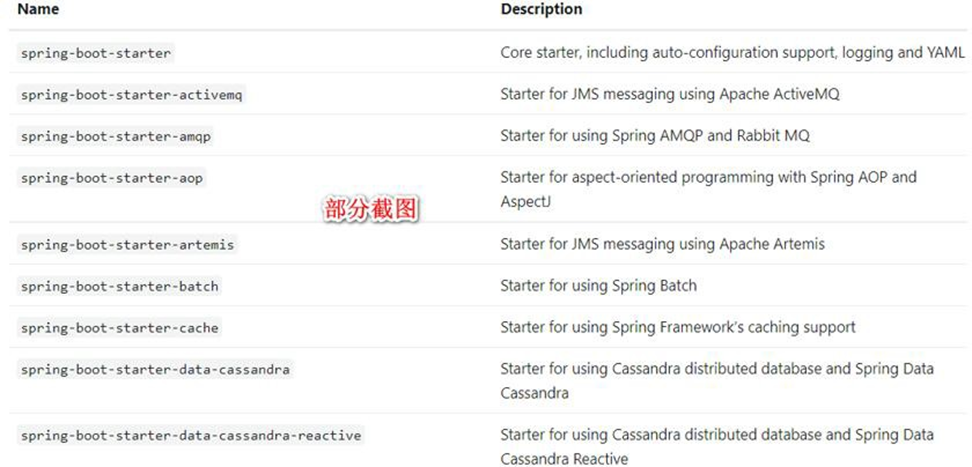
# 2.2.2 官方提供的 starter
# 2.2.2.1 地址:
https://docs.spring.io/spring-boot/docs/current/reference/html/using.html#using.build-systems.starters
# 2.2.2.2 介绍
- 在开发中我们经常会用到spring-boot-starter-xxx ,比如 spring-boot-starter-web,该场
景是用作 web 开发,也就是说 xxx 是某种开发场景。
我们只要引入starter,这个场景的所有常规需要的依赖我们都自动引入。
SpringBoot2 支 持 的 所 有 场 景 如 下 :
https://docs.spring.io/spring-boot/docs/current/reference/html/using.html#using.build-systems.starters
# 2.2.3 第三方 starter
SpringBoot 也支持第三方 starter
第三方starter 不要从 spring-boot 开始,因为这是官方 spring-boot 保留的命名方式的。
第三方启动程序通常以项目名称开头。例如,名为 thirdpartyproject 的第三方启动程序项
目通常被命名为 thirdpartyproject-spring-boot-starter。
- 也就是说:xxx-spring-boot-starter 是第三方为我们提供的简化开发的场景启动器
# 2.3 自动配置
# 2.3.1 自动配置基本介绍
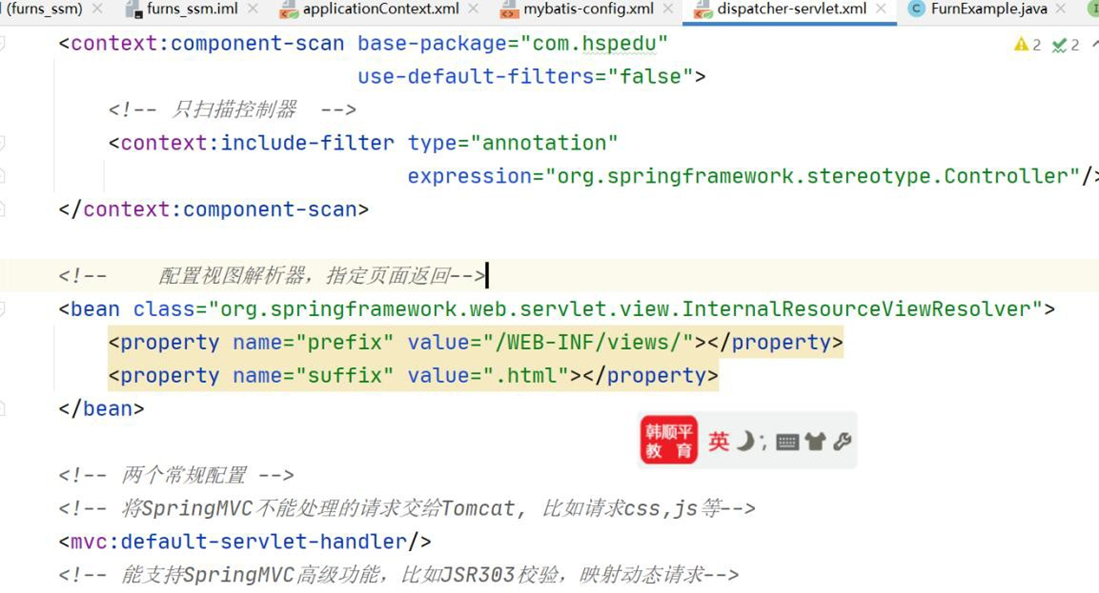
- 小伙伴还记得否,前面学习 SSM 整合时,需要配置 Tomcat 、配置 SpringMVC、配置如
何扫描包、配置字符过滤器、配置视图解析器、文件上传等[如图],非常麻烦。而在
SpringBoot 中,存在自动配置机制,提高开发效率
- 简单回顾以前SSM 整合的配置.
# 2.3.2 SpringBoot 自动配置了哪些?
- 自动配置 Tomcat
- 自动配置SpringMVC
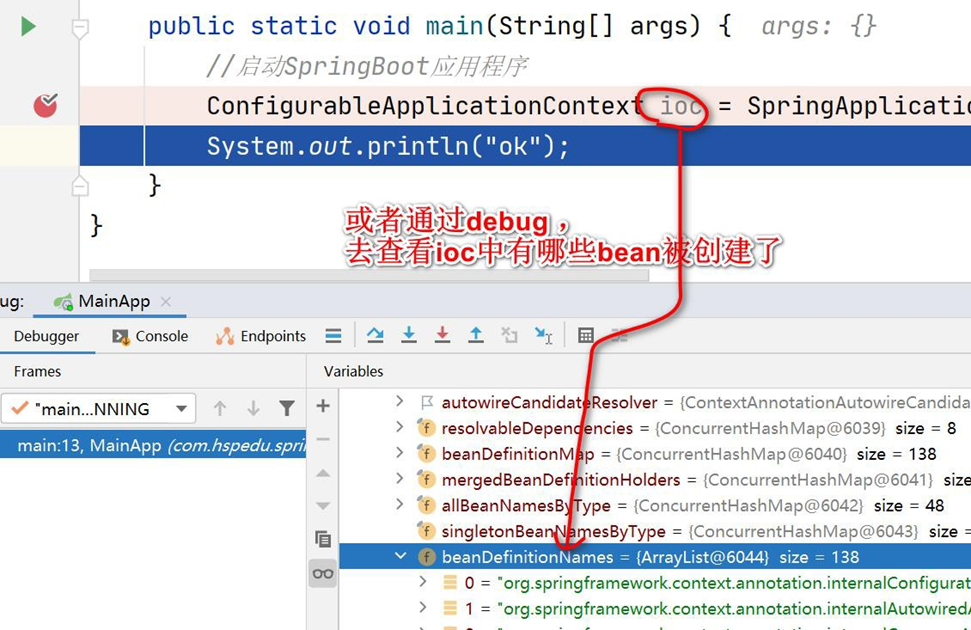
- 自动配置 Web 常用功能: 比如字符过滤器, 老韩提示: 通过获取 ioc 容器,查看容器创建的组件来验证, 修改
D:\hsp_springboot_temp\01-quickstart\src\main\java\com\hspedu\springboot\MainApp.java
 package com.hspedu.springboot;
 /**

 * @author 韩顺平

 * @version 1.0

 */
 /**

 * 1. @SpringBootApplication 表示是一个springboot 应用
 */
 @SpringBootApplication
 public class MainApp {
     public static void main(String[] args) {
         ConfigurableApplicationContext ioc =
             SpringApplication.run(MainApp.class, args);
         //查看容器里面的组件
         String[] beanDefinitionNames = ioc.getBeanDefinitionNames();
         for (String beanDefinitionName: beanDefinitionNames) {
             System.out.println(beanDefinitionName);
         }
     }
 }
2
3
4
5
6
7
8
9
10
11
12
13
14
15
16
17
18
19
20
21
22
23
24
25

-------更加直接查看的方式-------
- 自 动 配 置: 默 认 扫 描 包 结 构 !!! ,官 方 文 档:
https://docs.spring.io/spring-boot/docs/current/reference/html/using.html#using.structuring-your-code.using-the-default-package
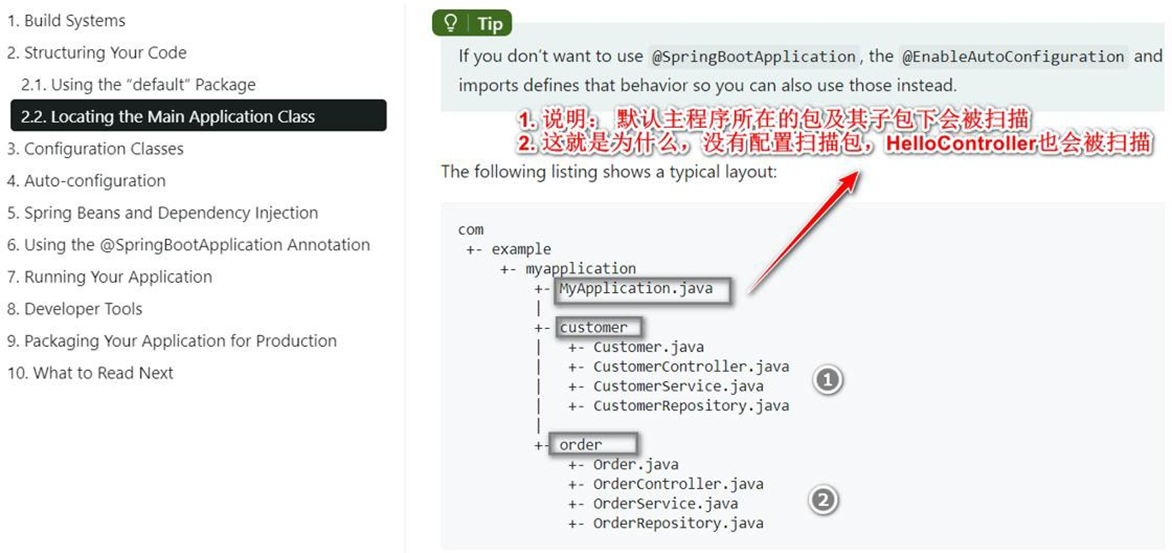
# 2.3.3 如何修改默认配置
# 2.3.3.1 如何修改默认扫描包结构
需求:要求能扫描 com.hspedu 包下的 HiController.java 应该如何处理?
创建: springboot2\01_quickstart\src\main\java\com\hspedu\HiController.java, 并测试,
这时是访问不到的.
package com.hspedu;
import org.springframework.stereotype.Controller;
import org.springframework.web.bind.annotation.RequestMapping;
import org.springframework.web.bind.annotation.ResponseBody;
/**

* @author 韩顺平

* @version 1.0

*/
@Controller
public class HiController {
    @RequestMapping("/hi")
    @ResponseBody
    public String hi() {
        return "hi~, spring boot";
    }
}
2
3
4
5
6
7
8
9
10
11
12
13
14
15
16
17
18
19
20
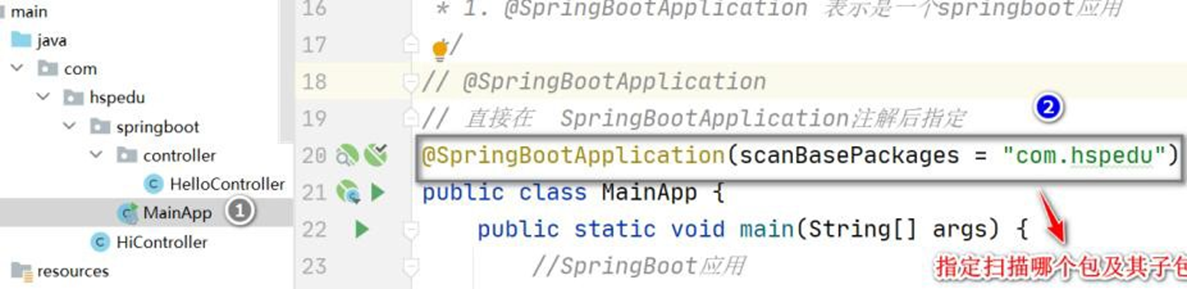
- 修改 MainApp.java, 增加扫描的包, 并完成测试.
// @SpringBootApplication
// 直接在 SpringBootApplication 注解后指定
@SpringBootApplication(scanBasePackages = "com.hspedu")
public class MainApp { //.....
2
3
4
5
# 2.3.3.2 resources\application.properties 配置大全
- SpringBoot 项目最重要也是最核心的配置文件就是 application.properties,所有的框架配
置都可以在这个配置文件中说明
- 地址: https://blog.csdn.net/pbrlovejava/article/details/82659702
#SPRING CONFIG(ConfigFileApplicationListener)
spring.config.name =#配置文件名(默认为'application' )
spring.config.location =#配置文件的位置
# 多环境配置文件激活属性
spring.profiles.active=dev #加载application-dev.properties 配置文件内容
application-dev.properties: #开发环境
application-test.properties: #测试环境
application-prod.properties: #生产环境
#activemq
spring.activemq.broker-url #指定ActiveMQ broker 的URL,默认自动生成.
spring.activemq.in-memory #是否是内存模式,默认为true.
spring.activemq.password #指定broker 的密码.
spring.activemq.pooled # 是否创建PooledConnectionFactory , 而非
ConnectionFactory,默认false
spring.activemq.user #指定broker 的用户.
#aop
spring.aop.auto #是否支持@EnableAspectJAutoProxy,默认为: true
spring.aop.proxy-target-class #true 为使用CGLIB 代理,false 为JDK 代理,默认为false
#application
spring.application.admin.enabled #是否启用admin 特性,默认为: false
spring.application.admin.jmx-name # 指定admin MBean 的名称, 默认为:
org.springframework.boot:type=Admin,name=SpringApplication
#artemis(HornetQ 捐献给apache 后的版本)
spring.artemis.embedded.cluster-password #指定集群的密码,默认是启动时随机生成.
spring.artemis.embedded.data-directory #指定Journal 文件的目录.如果不开始持久化则不必要指定.
spring.artemis.embedded.enabled #是否开启内嵌模式,默认true
spring.artemis.embedded.persistent #是否开启persistent store,默认false.
spring.artemis.embedded.queues #指定启动时创建的队列,多个用逗号分隔,默认: []
spring.artemis.embedded.server-id #指定Server ID. 默认是一个自增的数字,从0 开始.
spring.artemis.embedded.topics #指定启动时创建的topic,多个的话逗号分隔,默认: []
spring.artemis.host #指定Artemis broker 的host. 默认: localhost
spring.artemis.mode # 指定Artemis 的部署模式, 默认为
auto-detected(也可以为native or embedded).
spring.artemis.port #指定Artemis broker 的端口,默认为: 61616
#autoconfig
spring.autoconfigure.exclude #配置要排除的Auto-configuration classes.
#batch
spring.batch.initializer.enabled #是否在必要时创建batch 表,默认为true
spring.batch.job.enabled #是否在启动时开启batch job,默认为true
spring.batch.job.names #指定启动时要执行的job 的名称,逗号分隔,默认所有job 都会被执行
spring.batch.schema # 指定要初始化的sql 语句路径, 默认:classpath:org/springframework/batch/core/schema-@@platform@@.sql)
spring.batch.table-prefix #指定批量处理的表的前缀.
#cookie、session 配置
server.session.cookie.comment #指定session cookie 的comment
server.session.cookie.domain #指定session cookie 的domain
server.session.cookie.http-only #是否开启HttpOnly.
server.session.cookie.max-age #设定session cookie 的最大age.
server.session.cookie.name #设定Session cookie 的名称.
server.session.cookie.path #设定session cookie 的路径.
server.session.cookie.secure #设定session cookie 的“Secure” flag.
server.session.persistent #重启时是否持久化session,默认false
server.session.timeout #session 的超时时间
server.session.tracking-modes #设定Session 的追踪模式(cookie, url, ssl).
#datasource
spring.dao.exceptiontranslation.enabled # 是否开启
PersistenceExceptionTranslationPostProcessor,默认为true
spring.datasource.abandon-when-percentage-full #设定超时被废弃的连接占到多少比例时要被关闭或上报
spring.datasource.allow-pool-suspension #使用Hikari pool 时,是否允许连接池暂停,默认为: false
spring.datasource.alternate-username-allowed#是否允许替代的用户名.
spring.datasource.auto-commit #指定updates 是否自动提交.
spring.datasource.catalog #指定默认的catalog.
spring.datasource.commit-on-return #设置当连接被归还时,是否要提交所有还未完成的事务
spring.datasource.connection-init-sql #指定连接被创建,再被添加到连接池之前执行的sql.
spring.datasource.connection-init-sqls #使用DBCP connection pool 时,指定初始化时要执行的sql
spring.datasource.connection-properties.[key] #在使用DBCP connection pool 时指定要配置的属性
spring.datasource.connection-test-query #指定校验连接合法性执行的sql 语句
spring.datasource.connection-timeout #指定连接的超时时间,毫秒单位.
spring.datasource.continue-on-error #在初始化数据库时,遇到错误是否继续,默认false
spring.datasource.data #指定Data (DML)脚本
spring.datasource.data-source-class-name #指定数据源的全限定名.
spring.datasource.data-source-jndi #指定jndi 的地址
spring.datasource.data-source-properties.[key] #使用Hikari connection pool 时,指定要设置的属性
spring.datasource.db-properties #使用Tomcat connection pool,指定要设置的属性
spring.datasource.default-auto-commit #是否自动提交.
spring.datasource.default-catalog #指定连接默认的catalog.
spring.datasource.default-read-only #是否设置默认连接只读.
spring.datasource.default-transaction-isolation#指定连接的事务的默认隔离级别.
spring.datasource.driver-class-name #指定driver 的类名,默认从jdbc url 中自动探测.
spring.datasource.fair-queue #是否采用FIFO 返回连接.
spring.datasource.health-check-properties.[key]#使用Hikari connection pool 时,在心跳检查时传递的属性
spring.datasource.idle-timeout #指定连接多久没被使用时,被设置为空闲,默认为10ms
spring.datasource.ignore-exception-on-pre-load #当初始化连接池时,是否忽略异常.
spring.datasource.init-sql #当连接创建时,执行的sql
spring.datasource.initial-size #指定启动连接池时,初始建立的连接数量
spring.datasource.initialization-fail-fast #当创建连接池时,没法创建指定最小连接数量是否抛异常
spring.datasource.initialize #指定初始化数据源,是否用data.sql 来初始化,默认: true
spring.datasource.isolate-internal-queries #指定内部查询是否要被隔离,默认为false
spring.datasource.jdbc-interceptors #使用Tomcat connection pool 时,指定jdbc拦截器,分号分隔
spring.datasource.jdbc-url #指定JDBC URL.
spring.datasource.jmx-enabled #是否开启JMX,默认为: false
spring.datasource.jndi-name #指定jndi 的名称.
spring.datasource.leak-detection-threshold #使用Hikari connection pool 时,多少毫秒检测一次连接泄露.
spring.datasource.log-abandoned #使用DBCP connection pool,是否追踪废弃statement 或连接,默认为: false
spring.datasource.log-validation-errors #当使用Tomcat connection pool 是否打印校验错误.
spring.datasource.login-timeout #指定连接数据库的超时时间.
spring.datasource.max-active #指定连接池中最大的活跃连接数.
spring.datasource.max-age #指定连接池中连接的最大年龄
spring.datasource.max-idle #指定连接池最大的空闲连接数量.
spring.datasource.max-lifetime #指定连接池中连接的最大生存时间,毫秒单位.
spring.datasource.max-open-prepared-statements # 指定最大的打开的preparedstatements 数量.
spring.datasource.max-wait #指定连接池等待连接返回的最大等待时间,毫秒单位.
spring.datasource.maximum-pool-size #指定连接池最大的连接数,包括使用中的和空闲的连接.
spring.datasource.min-evictable-idle-time-millis #指定一个空闲连接最少空闲多久后可被清除.
spring.datasource.min-idle #指定必须保持连接的最小值(For DBCP and Tomcat connection pools)
spring.datasource.minimum-idle #指定连接维护的最小空闲连接数,当使用HikariCP 时指定.
spring.datasource.name #指定数据源名.
spring.datasource.num-tests-per-eviction-run#指定运行每个idle object evictor 线程时的对象数量
spring.datasource.password #指定数据库密码.
spring.datasource.platform # 指定schema 要使用的Platform(schema-${platform}.sql),默认为: all
spring.datasource.pool-name #指定连接池名字.
spring.datasource.pool-prepared-statements #指定是否池化statements.
spring.datasource.propagate-interrupt-state #在等待连接时,如果线程被中断,是否传播中断状态.
spring.datasource.read-only #当使用Hikari connection pool 时,是否标记数据源只读
spring.datasource.register-mbeans #指定Hikari connection pool 是否注册JMXMBeans.
spring.datasource.remove-abandoned #指定当连接超过废弃超时时间时,是否立刻删除该连接.
spring.datasource.remove-abandoned-timeout #指定连接应该被废弃的时间.
spring.datasource.rollback-on-return #在归还连接时,是否回滚等待中的事务.
spring.datasource.schema #指定Schema (DDL)脚本.
spring.datasource.separator #指定初始化脚本的语句分隔符,默认: ;
spring.datasource.sql-script-encoding #指定SQL scripts 编码.
spring.datasource.suspect-timeout #指定打印废弃连接前的超时时间.
spring.datasource.test-on-borrow #当从连接池借用连接时,是否测试该连接.
spring.datasource.test-on-connect #创建时,是否测试连接
spring.datasource.test-on-return #在连接归还到连接池时是否测试该连接.
spring.datasource.test-while-idle #当连接空闲时,是否执行连接测试.
spring.datasource.time-between-eviction-runs-millis #指定空闲连接检查、废弃连接清理、空闲连接池大小调整之间的操作时间间隔
spring.datasource.transaction-isolation # 指定事务隔离级别, 使用Hikari connection pool 时指定
spring.datasource.url #指定JDBC URL.
spring.datasource.use-disposable-connection-facade #是否对连接进行包装,防止连接关闭之后被使用.
spring.datasource.use-equals #比较方法名时是否使用String.equals()替换==.
spring.datasource.use-lock #是否对连接操作加锁
spring.datasource.username #指定数据库名.
spring.datasource.validation-interval #指定多少ms 执行一次连接校验.
spring.datasource.validation-query #指定获取连接时连接校验的sql 查询语句.
spring.datasource.validation-query-timeout #指定连接校验查询的超时时间.
spring.datasource.validation-timeout #设定连接校验的超时时间,当使用Hikari connection pool 时指定
spring.datasource.validator-class-name #用来测试查询的validator 全限定名.
spring.datasource.xa.data-source-class-name #指定数据源的全限定名.
spring.datasource.xa.properties #指定传递给XA data source 的属性
#data springdata
spring.data.elasticsearch.cluster-name #指定es 集群名称,默认: elasticsearch
spring.data.elasticsearch.cluster-nodes #指定es 的集群,逗号分隔,不指定的话,则启动client node.
spring.data.elasticsearch.properties #指定要配置的es 属性.
spring.data.elasticsearch.repositories.enabled #是否开启es 存储,默认为: true
spring.data.jpa.repositories.enabled #是否开启JPA 支持,默认为: true
spring.data.mongodb.authentication-database #指定鉴权的数据库名
spring.data.mongodb.database #指定mongodb 数据库名
spring.data.mongodb.field-naming-strategy #指定要使用的FieldNamingStrategy.
spring.data.mongodb.grid-fs-database #指定GridFS database 的名称.
spring.data.mongodb.host #指定Mongo server host.
spring.data.mongodb.password #指定Mongo server 的密码.
spring.data.mongodb.port #指定Mongo server port.
spring.data.mongodb.repositories.enabled #是否开启mongodb 存储,默认为true
spring.data.mongodb.uri # 指定Mongo database URI. 默认:mongodb://localhost/test
spring.data.mongodb.username #指定登陆mongodb 的用户名.
spring.data.rest.base-path #指定暴露资源的基准路径.
spring.data.rest.default-page-size #指定每页的大小,默认为: 20
spring.data.rest.limit-param-name #指定limit 的参数名,默认为: size
spring.data.rest.max-page-size #指定最大的页数,默认为1000
spring.data.rest.page-param-name #指定分页的参数名,默认为: page
spring.data.rest.return-body-on-create #当创建完实体之后,是否返回body,默认为false
spring.data.rest.return-body-on-update #在更新完实体后,是否返回body,默认为false
spring.data.rest.sort-param-name #指定排序使用的key,默认为: sort
spring.data.solr.host #指定Solr host,如果有指定了zk 的host 的话,则忽略。默认为: http://127.0.0.1:8983/solr
spring.data.solr.repositories.enabled #是否开启Solr repositories,默认为: true
spring.data.solr.zk-host #指定zk 的地址,格式为HOST:PORT.
#----------------------------------------
#DEVTOOLS 属性
#----------------------------------------
#DEVTOOLS(DevToolsProperties)
spring.devtools.livereload.enabled = true #启用livereload.com 兼容的server。
spring.devtools.livereload.port = 35729 #服务器端口。
spring.devtools.restart.additional-exclude = #应该从触发完全重新启动时排除的其他模式。
spring.devtools.restart.additional-paths = #额外的路径来观察变化。
spring.devtools.restart.enabled = true #启用自动重启。
spring.devtools.restart.exclude = META-INF /行家/ **,META-INF /资源/ **,资源/ **,静态/ **,公共/ **,模板/ **,** / * Test.class,** / * Tests.class,git.properties#应该排除触发完全重启的模式。
spring.devtools.restart.poll-interval = 1000#polling 路径更改之间等待的时间(以毫秒为单位)。
spring.devtools.restart.quiet-period = 400 #触发重新启动之前,没有任何类路径变化所需的静默时间(以毫秒为单位)。
spring.devtools.restart.trigger-file = #特定文件的名称,在更改时会触发重新启动检查。如果未指定任何类路径文件更改将触发重新启动。
#DEVTOOLS REMOTE DEVTOOLS(RemoteDevToolsProperties)
spring.devtools.remote.context-path = #用于处理远程连接的上下文路径。
spring.devtools.remote.debug.enabled = true #启用远程调试支持。
spring.devtools.remote.debug.local-port = 8000 #本地远程调试服务器端口。
spring.devtools.remote.proxy.host = #用于连接远程应用程序的代理主机。
spring.devtools.remote.proxy.port = #用于连接远程应用程序的代理端口。
spring.devtools.remote.restart.enabled = true #启用远程重启。
spring.devtools.remote.secret = #建立连接所需的共享密钥(需要启用远程支持)。
spring.devtools.remote.secret-header-name = X-AUTH-TOKEN #用于传输共享密钥的HTTP 头。
#----------------------------------------
#执行器属性
#----------------------------------------
#ENDPOINTS(AbstractEndpoint 子类)
endpoints.enabled = true #启用端点。
endpoints.sensitive = #默认的端点敏感设置。
endpoints.actuator.enabled = true #启用端点。
endpoints.actuator.path = #端点URL 路径。
endpoints.actuator.sensitive = false #在端点上启用安全性。
endpoints.autoconfig.enabled = #启用端点。
endpoints.autoconfig.id = #端点标识符。
endpoints.autoconfig.sensitive = #标记端点是否暴露敏感信息。
endpoints.beans.enabled = #启用端点。
endpoints.beans.id = #端点标识符。
endpoints.beans.sensitive = #标记端点是否暴露敏感信息。
endpoints.configprops.enabled = #启用端点。
endpoints.configprops.id = #端点标识符。
endpoints.configprops.keys-to-sanitize #应该清理的密钥。键可以是属性以或正则表达式结束的简单字符串。
endpoints.configprops.sensitive = #标记端点是否公开敏感信息。
endpoints.docs.curies.enabled = false #启用居里代。
endpoints.docs.enabled = true #启用执行器文档终结点。
endpoints.docs.path = / docs #
endpoints.docs.sensitive = false #
#终端CORS 配置(EndpointCorsProperties)
endpoints.cors.allow-credentials = #设置是否支持凭据。未设置时,不支持凭证。
endpoints.cors.allowed-headers = #在请求中允许使用逗号分隔的标题列表。'*'允许所有标题。
endpoints.cors.allowed-methods = GET #逗号分隔的允许的方法列表。'*'允许所有的方法。
endpoints.cors.allowed-origins = #逗号分隔的起源列表允许。'*'允许所有的来源。未设置时,CORS 支持被禁用。
endpoints.cors.exposed-headers = #包含在响应中的逗号分隔的标题列表。
endpoints.cors.max-age = 1800 #以秒为单位,客户端可以缓存飞行前请求的响应。
#JMX ENDPOINT(EndpointMBeanExportProperties)
endpoints.jmx.domain = # JMX 域名。如果设置, 则用“spring.jmx.default-domain”的值初始化。
endpoints.jmx.enabled = true #启用所有端点的JMX 导出。
endpoints.jmx.static-names = #附加到所有表示端点的MBean 的ObjectName的静态属性。
endpoints.jmx.unique-names = false #确保ObjectNames 在发生冲突时被修改。
#flyway
flyway.baseline-description #对执行迁移时基准版本的描述.
flyway.baseline-on-migrate #当迁移时发现目标schema 非空,而且带有没有元数据的表时,是否自动执行基准迁移,默认false.
flyway.baseline-version #开始执行基准迁移时对现有的schema 的版本打标签,默认值为1.
flyway.check-location #检查迁移脚本的位置是否存在,默认false.
flyway.clean-on-validation-error #当发现校验错误时是否自动调用clean,默认false.
flyway.enabled #是否开启flywary,默认true.
flyway.encoding #设置迁移时的编码,默认UTF-8.
flyway.ignore-failed-future-migration #当读取元数据表时是否忽略错误的迁移,默认false.
flyway.init-sqls #当初始化好连接时要执行的SQL.
flyway.locations #迁移脚本的位置,默认db/migration.
flyway.out-of-order #是否允许无序的迁移,默认false.
flyway.password #目标数据库的密码.
flyway.placeholder-prefix #设置每个placeholder 的前缀,默认${.
flyway.placeholder-replacement #placeholders 是否要被替换,默认true.
flyway.placeholder-suffix #设置每个placeholder 的后缀,默认}.
flyway.placeholders.[placeholder name] #设置placeholder 的value
flyway.schemas #设定需要flywary 迁移的schema,大小写敏感,默认为连接默认的schema.
flyway.sql-migration-prefix #迁移文件的前缀,默认为V.
flyway.sql-migration-separator #迁移脚本的文件名分隔符,默认__
flyway.sql-migration-suffix #迁移脚本的后缀,默认为.sql
flyway.table #flyway 使用的元数据表名,默认为schema_version
flyway.target #迁移时使用的目标版本,默认为latest version
flyway.url #迁移时使用的JDBC URL,如果没有指定的话,将使用配置的主数据源
flyway.user #迁移数据库的用户名
flyway.validate-on-migrate #迁移时是否校验,默认为true.
#FREEMARKER(FreeMarkerAutoConfiguration)
spring.freemarker.allowRequestOverride = false #设置HttpServletRequest 属性是否允许覆盖(隐藏)控制器生成的相同名称的模型属性。
spring.freemarker.allowSessionOverride = false #设置HttpSession 属性是否允许覆盖(隐藏)控制器生成的相同名称的模型属性。
spring.freemarker.cache = true #使用模板缓存。
spring.freemarker.charset=UTF-8 # Template encoding.
spring.freemarker.checkTemplateLocation = true #检查模板位置是否存在
spring.freemarker.check-template-location=true
spring.freemarker.contentType = text / html #Content-Type
spring.freemarker.exposeRequestAttributes = false #在与模板合并之前,设置是否应该将所有请求属性添加到模型中。
spring.freemarker.expose-request-attributes=false
spring.freemarker.exposeSessionAttributes = false #在与模板合并之前,设置是否应该将所有HttpSession 属性添加到模型中。
spring.freemarker.expose-session-attributes=false
spring.freemarker.exposeSpringMacroHelpers = false # 设定是否以springMacroRequestContext 的形式暴露RequestContext 给Spring’s macro library 使用
spring.freemarker.expose-spring-macro-helpers=true
spring.freemarker.prefer-file-system-access=true #是否优先从文件系统加载template,以支持热加载,默认为true
spring.freemarker.prefix = #在构建URL 时,前缀被预先指定以查看名称。
spring.freemarker.requestContextAttribute = #所有视图的RequestContext 属性的名称. freemarker.request-context-attribute=
spring.freemarker.settings.* = #Well-known FreeMarker keys which will be passed to FreeMarker's Configuration
spring.freemarker.suffix = .ftl #在构建URL 时附加到视图名称后面的后缀
spring.freemarker.templateEncoding = UTF- 8
spring.freemarker.templateLoaderPath =classpath:/templates #设定ftl 文件路径类路径:/模板/
spring.freemarker.viewNames = #可以解析的视图名称的白名单
spring.mvc.static-path-pattern=/static/** #设定静态文件路径,js,css 等
#GIT 信息
spring.git.properties = #生成的git 信息属性文件的资源引用。
#GROOVY 模板(GroovyTemplateAutoConfiguration)
spring.groovy.template.allow-request-override #指定HttpServletRequest 的属性是否可以覆盖controller 的model 的同名项
spring.groovy.template.allow-session-override #指定HttpSession 的属性是否可以覆盖controller 的model 的同名项
spring.groovy.template.cache #是否开启模板缓存
spring.groovy.template.charset #指定Template 编码
spring.groovy.template.check-template-location #是否检查模板的路径是否存在.
spring.groovy.template.configuration.auto-escape #是否在渲染模板时自动排查model 的变量,默认为: false
spring.groovy.template.configuration.auto-indent #是否在渲染模板时自动缩进,默认为false
spring.groovy.template.configuration.auto-indent-string #如果自动缩进启用的话,是使用SPACES 还是TAB,默认为: SPACES
spring.groovy.template.configuration.auto-new-line #渲染模板时是否要输出换行,默认为false
spring.groovy.template.configuration.base-template-class #指定template base class.
spring.groovy.template.configuration.cache-templates #是否要缓存模板,默认为true
spring.groovy.template.configuration.declaration-encoding # 在写入declaration header 时使用的编码
spring.groovy.template.configuration.expand-empty-elements #是使用<br/>这种形式,还是<br></br>这种展开模式,默认为: false)
spring.groovy.template.configuration.locale #指定template locale.
spring.groovy.template.configuration.new-line-string #当启用自动换行时,换行的输出,默认为系统的line.separator 属性的值
spring.groovy.template.configuration.resource-loader-path # 指定groovy 的模板路径,默认为classpath:/templates/
spring.groovy.template.configuration.use-double-quotes #指定属性要使用双引号还是单引号,默认为false
spring.groovy.template.content-type #指定Content-Type.
spring.groovy.template.enabled #是否开启groovy 模板的支持.
spring.groovy.template.expose-request-attributes #设定所有request 的属性在merge 到模板的时候,是否要都添加到model 中.
spring.groovy.template.expose-session-attributes #设定所有request 的属性在merge 到模板的时候,是否要都添加到model 中.
spring.groovy.template.expose-spring-macro-helpers # 设定是否以springMacroRequestContext 的形式暴露RequestContext 给Spring’s macro library 使用
spring.groovy.template.prefix #指定模板的前缀.
spring.groovy.template.request-context-attribute #指定RequestContext 属性的名.
spring.groovy.template.resource-loader-path #指定模板的路径,默认为:classpath:/templates/
spring.groovy.template.suffix #指定模板的后缀
spring.groovy.template.view-names #指定要使用模板的视图名称.
#h2
spring.h2.console.enabled #是否开启控制台,默认为false
spring.h2.console.path #指定控制台路径,默认为: /h2-console
#hornetq(HornetQProperties)
spring.hornetq.embedded.cluster-password #指定集群的密码,默认启动时随机生成.
spring.hornetq.embedded.data-directory #指定Journal file 的目录. 如果不开启持久化则不必指定.
spring.hornetq.embedded.enabled #是否开启内嵌模式,默认:true
spring.hornetq.embedded.persistent #是否开启persistent store,默认: false
spring.hornetq.embedded.queues #指定启动是创建的queue,多个以逗号分隔,默认: []
spring.hornetq.embedded.server-id #指定Server ID. 默认使用自增数字,从0开始.
spring.hornetq.embedded.topics #指定启动时创建的topic,多个以逗号分隔,默认: []
spring.hornetq.host #指定HornetQ broker 的host,默认: localhost
spring.hornetq.mode # 指定HornetQ 的部署模式, 默认是auto-detected,也可以指定native 或者embedded.
spring.hornetq.port #指定HornetQ broker 端口,默认: 5445
#http
spring.hateoas.apply-to-primary-object-mapper #设定是否对object mapper 也支持HATEOAS,默认为: true
spring.http.converters.preferred-json-mapper #是否优先使用JSON mapper 来转换.
spring.http.encoding.charset #指定http 请求和相应的Charset,默认: UTF-8
spring.http.encoding.enabled #是否开启http 的编码支持,默认为true
spring.http.encoding.force #是否强制对http 请求和响应进行编码,默认为true
#jersey
spring.jersey.filter.order #指定Jersey filter 的order,默认为: 0
spring.jersey.init #指定传递给Jersey 的初始化参数.
spring.jersey.type #指定Jersey 的集成类型,可以是servlet 或者filter.
#jms
spring.jms.jndi-name #指定Connection factory JNDI 名称.
spring.jms.listener.acknowledge-mode #指定ack 模式,默认自动ack.
spring.jms.listener.auto-startup #是否启动时自动启动jms,默认为: true
spring.jms.listener.concurrency #指定最小的并发消费者数量.
spring.jms.listener.max-concurrency #指定最大的并发消费者数量.
spring.jms.pub-sub-domain #是否使用默认的destination type 来支持publish/subscribe,默认: false
#jmx
spring.jmx.default-domain #指定JMX domain name.
spring.jmx.enabled #是否暴露jmx,默认为true
spring.jmx.server # 指定MBeanServer bean name. 默认为:mbeanServer)
#jooq
spring.jooq.sql-dialect #指定JOOQ 使用的SQLDialect,比如POSTGRES.
#Messages
spring.messages.basename #指定message 的basename,多个以逗号分隔,如果不加包名的话,默认从classpath 路径开始,默认: messages
spring.messages.cache-seconds #设定加载的资源文件缓存失效时间,-1 的话为永不过期,默认为-1
spring.messages.encoding #设定Message bundles 的编码,默认:UTF-8
#JPA
spring.jpa.database #指定目标数据库.
spring.jpa.database-platform #指定目标数据库的类型.
spring.jpa.generate-ddl #是否在启动时初始化schema,默认为false
spring.jpa.hibernate.ddl-auto # 指定DDL mode (none, validate, update, create, create-drop). 当使用内嵌数据库时,默认是create-drop,否则为none.
spring.jpa.hibernate.naming-strategy #指定命名策略.
spring.jpa.open-in-view # 是否注册OpenEntityManagerInViewInterceptor,绑定JPA EntityManager 到请求线程中,默认为: true
spring.jpa.properties #添加额外的属性到JPA provider.
spring.jpa.show-sql #是否开启sql 的log,默认为: false
#json
spring.jackson.date-format #指定日期格式,比如yyyy-MM-dd HH:mm:ss,或者具体的格式化类的全限定名
spring.jackson.deserialization #是否开启Jackson 的反序列化
spring.jackson.generator #是否开启json 的generators.
spring.jackson.joda-date-time-format # 指定Joda date/time 的格式, 比如yyyy-MM-dd HH:mm:ss). 如果没有配置的话,dateformat 会作为backup
spring.jackson.locale #指定json 使用的Locale.
spring.jackson.mapper #是否开启Jackson 通用的特性.
spring.jackson.parser #是否开启jackson 的parser 特性.
spring.jackson.property-naming-strategy # 指定PropertyNamingStrategy(CAMEL_CASE_TO_LOWER_CASE_WITH_UNDERSCORES) 或者指定PropertyNamingStrategy 子类的全限定类名.
spring.jackson.serialization #是否开启jackson 的序列化.
spring.jackson.serialization-inclusion #指定序列化时属性的inclusion 方式,具体查看JsonInclude.Include 枚举.
spring.jackson.time-zone #指定日期格式化时区,比如America/Los_Angeles或者GMT+10.
#JTA
spring.jta.allow-multiple-lrc #是否允许multiple LRC,默认为: false
spring.jta.asynchronous2-pc #指定两阶段提交是否可以异步,默认为: false
spring.jta.background-recovery-interval #指定多少分钟跑一次recovery process,默认为: 1
spring.jta.background-recovery-interval-seconds#指定多久跑一次recovery process,默认: 60
spring.jta.current-node-only-recovery #是否过滤掉其他非本JVM 的recovery,默认为: true
spring.jta.debug-zero-resource-transaction #是否追踪没有使用指定资源的事务,默认为: false
spring.jta.default-transaction-timeout #设定默认的事务超时时间,默认为60
spring.jta.disable-jmx #是否禁用jmx,默认为false
spring.jta.enabled #是否开启JTA support,默认为: true
spring.jta.exception-analyzer #设置指定的异常分析类
spring.jta.filter-log-status #使用Bitronix Transaction Manager 时,是否写mandatory logs,开启的话,可以节省磁盘空间,但是调试会复杂写,默认为false
spring.jta.force-batching-enabled #使用Bitronix Transaction Manager 时,是否批量写磁盘,默认为true.
spring.jta.forced-write-enabled #使用Bitronix Transaction Manager 时,是否强制写日志到磁盘,默认为true
spring.jta.graceful-shutdown-interval #当使用Bitronix Transaction Manager,指定shutdown 时等待事务结束的时间,超过则中断,默认为60
spring.jta.jndi-transaction-synchronization-registry-name # 当使用Bitronix Transaction Manager 时, 在JNDI 下得事务同步registry , 默认为:java:comp/TransactionSynchronizationRegistry
spring.jta.jndi-user-transaction-name # 指定在JNDI 使用Bitronix Transaction Manager 的名称,默认:java:comp/UserTransaction
spring.jta.journal #当使用Bitronix Transaction Manager,指定The journal是否disk 还是null 还是一个类的全限定名,默认disk
spring.jta.log-dir #Transaction logs directory.
spring.jta.log-part1-filename #指定The journal fragment 文件1 的名字,默认: btm1.tlog
spring.jta.log-part2-filename #指定The journal fragment 文件2 的名字,默认: btm2.tlog
spring.jta.max-log-size-in-mb #指定journal fragments 大小的最大值. 默认:2M
spring.jta.resource-configuration-filename #指定Bitronix Transaction Manager 配置文件名.
spring.jta.server-id #指定Bitronix Transaction Manager 实例的id.
spring.jta.skip-corrupted-logs #是否忽略corrupted log files 文件,默认为false.
spring.jta.transaction-manager-id #指定Transaction manager 的唯一标识.
spring.jta.warn-about-zero-resource-transaction#当使用Bitronix Transaction Manager时,是否对没有使用指定资源的事务进行警告,默认为: true
#mail
spring.mail.default-encoding #指定默认MimeMessage 的编码,默认为: UTF-8
spring.mail.host #指定SMTP server host.
spring.mail.jndi-name #指定mail 的jndi 名称
spring.mail.password #指定SMTP server 登陆密码.
spring.mail.port #指定SMTP server port.
spring.mail.properties #指定JavaMail session 属性.
spring.mail.protocol #指定SMTP server 使用的协议,默认为: smtp
spring.mail.test-connection #指定是否在启动时测试邮件服务器连接,默认为false
spring.mail.username #指定SMTP server 的用户名.
#mobile
spring.mobile.devicedelegatingviewresolver.enable-fallback#是否支持fallback 的解决方案,默认false
spring.mobile.devicedelegatingviewresolver.enabled # 是否开始device view resolver,默认为: false
spring.mobile.devicedelegatingviewresolver.mobile-prefix #设定mobile 端视图的前缀,默认为:mobile/
spring.mobile.devicedelegatingviewresolver.mobile-suffix #设定mobile 视图的后缀
spring.mobile.devicedelegatingviewresolver.normal-prefix #设定普通设备的视图前缀
spring.mobile.devicedelegatingviewresolver.normal-suffix #设定普通设备视图的后缀
spring.mobile.devicedelegatingviewresolver.tablet-prefix #设定平板设备视图前缀,默认:tablet/
spring.mobile.devicedelegatingviewresolver.tablet-suffix #设定平板设备视图后缀.
spring.mobile.sitepreference.enabled #是否启用SitePreferenceHandler,默认为: true
#MONGODB(Mongo 性能)
spring.data.mongodb.host = #分贝主机
spring.data.mongodb.port = 27017 #连接端口(默认为27107 )
spring.data.mongodb.uri = #连接URL
spring.mongodb.embedded.features #指定要开启的特性,逗号分隔.
spring.mongodb.embedded.version #指定要使用的版本,默认: 2.6.10
#MANAGEMENT HTTP SERVER(ManagementServerProperties)
management.add-application-context-header = true # 在每个响应中添加“X-Application-Context”HTTP 标头。
management.address = #管理端点应该绑定的网络地址。
management.context-path = #管理端点上下文路径。例如`/执行器`
management.port = #管理端点HTTP 端口。默认使用与应用程序相同的端口。
management.security.enabled = true #启用
management.security.role = ADMIN #访问管理端点所需的角色。
management.security.sessions # 会话创建策略使用( always, never, if_required, stateless)。
#HEALTH INDICATORS 健康指标(以前的健康状况*)
management.health.db.enabled = true #启用数据库运行状况检查。
management.health.defaults.enabled = true #启用默认健康指标。
management.health.diskspace.enabled = true #启用磁盘空间运行状况检查。
management.health.diskspace.path = #用于计算可用磁盘空间的路径。
management.health.diskspace.threshold = 0 #应该可用的最小磁盘空间(以字节为单位)。
management.health.elasticsearch.enabled = true #启用elasticsearch 运行状况检查。
management.health.elasticsearch.indices = #逗号分隔的索引名称。
management.health.elasticsearch.response-timeout = 100 #等待群集响应的时间(以毫秒为单位)。
management.health.jms.enabled = true #启用JMS 运行状况检查。
management.health.mail.enabled = true #启用邮件运行状况检查。
management.health.mongo.enabled = true #启用MongoDB 运行状况检查。
management.health.rabbit.enabled = true #启用RabbitMQ 健康检查。
management.health.redis.enabled = true #启用Redis 运行状况检查。
management.health.solr.enabled = true #启用Solr 运行状况检查。
management.health.status.order #以逗号分隔的健康状态列表。
management.trace.include #要包含在跟踪中的项目。
#METRICS EXPORT(MetricExportProperties)
spring.metrics.export.aggregate.key-pattern = #告诉聚合器如何处理源存储库中的密钥的模式。
spring.metrics.export.aggregate.prefix = #全局存储库的前缀(如果处于活动状态)。
spring.metrics.export.delay-millis = 5000 #输出滴答之间的延迟(以毫秒为单位)。度量标准按照计划导出到外部源。
spring.metrics.export.enabled = true # 启用metric 标准导出的标志( 假设MetricWriter 可用)。
spring.metrics.export.excludes = #要排除的metric 标准名称的模式列表。包括后应用。
spring.metrics.export.includes = #要包含的metric 标准名称的模式列表。
spring.metrics.export.redis.key #Redis 存储库导出密钥(如果有效)。
spring.metrics.export.redis.prefix #如果处于活动状态,redis 存储库的前缀。
spring.metrics.export.send-latest #根据不导出不变的metric 值的标志关闭所有可用的优化。
spring.metrics.export.statsd.host = #接收导出metric 的statsd server 的主机。
spring.metrics.export.statsd.port = 8125 #接收导出metric 的statsd server 的端口。
spring.metrics.export.statsd.prefix = #统计导出metric 的前缀。
spring.metrics.export.triggers。* = #每个MetricWriter bean 名称的特定触发器属性。
#multipart
multipart.enabled #是否开启文件上传支持,默认为true
multipart.file-size-threshold #设定文件写入磁盘的阈值,单位为MB 或KB,默认为0
multipart.location #指定文件上传路径.
multipart.max-file-size #指定文件大小最大值,默认1MB
multipart.max-request-size #指定每次请求的最大值,默认为10MB
#mustcache
spring.mustache.cache #是否Enable template caching.
spring.mustache.charset #指定Template 的编码.
spring.mustache.check-template-location #是否检查默认的路径是否存在.
spring.mustache.content-type #指定Content-Type.
spring.mustache.enabled #是否开启mustcache 的模板支持.
spring.mustache.prefix #指定模板的前缀,默认: classpath:/templates/
spring.mustache.suffix #指定模板的后缀,默认: .html
spring.mustache.view-names #指定要使用模板的视图名.
#MVC(SPRING MVC 相关的一些配置)
http.mappers.json-pretty-print = false #打印JSON
http.mappers.json-sort-keys = false #排序键
spring.mvc.locale = #设置固定语言环境,例如en_UK
spring.mvc.date-format = #设置固定的日期格式,例如dd / MM / yyyy
spring.mvc.async.request-timeout #设定async 请求的超时时间,以毫秒为单位,如果没有设置的话,以具体实现的超时时间为准,比如tomcat 的servlet3 的话是10 秒.
spring.mvc.favicon.enabled #是否支持favicon.ico,默认为: true
spring.mvc.ignore-default-model-on-redirect # 在重定向时是否忽略默认model 的内容,默认为true
spring.mvc.locale#指定使用的Locale.
spring.mvc.message-codes-resolver-format #指定message codes 的格式化策略(PREFIX_ERROR_CODE,POSTFIX_ERROR_CODE).
spring.view.prefix = #MVC 视图前缀
spring.view.suffix = #...和后缀
spring.resources.cache-period = #发送到浏览器的标题缓存超时
spring.resources.add-mappings = true #如果应该添加默认映射
#liquibase
liquibase.change-log # Change log 配置文件的路径, 默认值为classpath:/db/changelog/db.changelog-master.yaml
liquibase.check-change-log-location #是否坚持change log 的位置是否存在,默认为true.
liquibase.contexts #逗号分隔的运行时context 列表.
liquibase.default-schema #默认的schema.
liquibase.drop-first #是否首先drop schema,默认为false
liquibase.enabled #是否开启liquibase,默认为true.
liquibase.password #目标数据库密码
liquibase.url #要迁移的JDBC URL,如果没有指定的话,将使用配置的主数据源.
liquibase.user #目标数据用户名
#logging 日志
logging.path = #文件路径
logging.file = myapp.log #文件名称
logging.config = #如果你即想完全掌控日志配置,但又不想用logback.xml作为Logback 配置的名字,可以通过logging.config 属性指定自定义的名字
logging.level.root=INFO #日志级别从控制台打印出来的日志级别只有ERROR, WARN 还有INFO,如果你想要打印debug 级别的日志,可以配置debug=true
logging.level.org.springframework.web=DEBUG
logging.level.org.hibernate=ERROR
#rabbitmq
spring.rabbitmq.addresses #指定client 连接到的server 的地址,多个以逗号分隔.
spring.rabbitmq.dynamic #是否创建AmqpAdmin bean. 默认为: true)
spring.rabbitmq.host #指定RabbitMQ host.默认为: localhost)
spring.rabbitmq.listener.acknowledge-mode #指定Acknowledge 的模式.
spring.rabbitmq.listener.auto-startup #是否在启动时就启动mq,默认: true)
spring.rabbitmq.listener.concurrency #指定最小的消费者数量.
spring.rabbitmq.listener.max-concurrency #指定最大的消费者数量.
spring.rabbitmq.listener.prefetch #指定一个请求能处理多少个消息,如果有事务的话,必须大于等于transaction 数量.
spring.rabbitmq.listener.transaction-size #指定一个事务处理的消息数量,最好是小于等于prefetch 的数量.
spring.rabbitmq.password #指定broker 的密码.
spring.rabbitmq.port #指定RabbitMQ 的端口,默认: 5672)
spring.rabbitmq.requested-heartbeat #指定心跳超时,0 为不指定.
spring.rabbitmq.ssl.enabled #是否开始SSL,默认: false)
spring.rabbitmq.ssl.key-store #指定持有SSL certificate 的key store 的路径
spring.rabbitmq.ssl.key-store-password #指定访问key store 的密码.
spring.rabbitmq.ssl.trust-store #指定持有SSL certificates 的Trust store.
spring.rabbitmq.ssl.trust-store-password #指定访问trust store 的密码.
spring.rabbitmq.username #指定登陆broker 的用户名.
spring.rabbitmq.virtual-host #指定连接到broker 的Virtual host.
#redis
spring.redis.database #指定连接工厂使用的Database index,默认为: 0
spring.redis.host #指定Redis server host,默认为: localhost
spring.redis.password #指定Redis server 的密码
spring.redis.pool.max-active #指定连接池最大的活跃连接数,-1 表示无限,默认为8
spring.redis.pool.max-idle #指定连接池最大的空闲连接数,-1 表示无限,默认为8
spring.redis.pool.max-wait #指定当连接池耗尽时,新获取连接需要等待的最大时间,以毫秒单位,-1 表示无限等待
spring.redis.pool.min-idle #指定连接池中空闲连接的最小数量,默认为0
spring.redis.port #指定redis 服务端端口,默认: 6379
spring.redis.sentinel.master #指定redis server 的名称
spring.redis.sentinel.nodes #指定sentinel 节点,逗号分隔,格式为host:port.
spring.redis.timeout #指定连接超时时间,毫秒单位,默认为0
#resource
spring.resources.add-mappings #是否开启默认的资源处理,默认为true
spring.resources.cache-period #设定资源的缓存时效,以秒为单位.
spring.resources.chain.cache #是否开启缓存,默认为: true
spring.resources.chain.enabled #是否开启资源handling chain,默认为false
spring.resources.chain.html-application-cache #是否开启h5 应用的cache manifest重写,默认为: false
spring.resources.chain.strategy.content.enabled#是否开启内容版本策略,默认为false
spring.resources.chain.strategy.content.paths #指定要应用的版本的路径,多个以逗号分隔,默认为:[/**]
spring.resources.chain.strategy.fixed.enabled #是否开启固定的版本策略,默认为false
spring.resources.chain.strategy.fixed.paths #指定要应用版本策略的路径,多个以逗号分隔
spring.resources.chain.strategy.fixed.version #指定版本策略使用的版本号
spring.resources.static-locations # 指定静态资源路径, 默认为classpath:[/META-INF/resources/,/resources/, /static/, /public/]以及context:/
#security spring security 是springboot 支持的权限控制系统。
security.basic.authorize-mode #要使用权限控制模式.
security.basic.enabled #是否开启基本的鉴权,默认为true
security.basic.path #需要鉴权的path,多个的话以逗号分隔,默认为[/**]
security.basic.realm #HTTP basic realm 的名字,默认为Spring
security.enable-csrf #是否开启cross-site request forgery 校验,默认为false.
security.filter-order #Security filter chain 的order,默认为0
security.headers.cache #是否开启http 头部的cache 控制,默认为false.
security.headers.content-type #是否开启X-Content-Type-Options 头部,默认为false.
security.headers.frame #是否开启X-Frame-Options 头部,默认为false.
security.headers.hsts #指定HTTP Strict Transport Security (HSTS)模式(none, domain, all).
security.headers.xss #是否开启cross-site scripting (XSS) 保护,默认为false.
security.ignored #指定不鉴权的路径,多个的话以逗号分隔.
security.oauth2.client.access-token-uri #指定获取access token 的URI.
security.oauth2.client.access-token-validity-seconds #指定access token 失效时长.
security.oauth2.client.additional-information.[key] #设定要添加的额外信息.
security.oauth2.client.authentication-scheme # 指定传输不记名令牌(bearer token)的方式(form, header, none,query),默认为header
security.oauth2.client.authorities #指定授予客户端的权限.
security.oauth2.client.authorized-grant-types #指定客户端允许的grant types.
security.oauth2.client.auto-approve-scopes #对客户端自动授权的scope.
security.oauth2.client.client-authentication-scheme # 传输authentication credentials 的方式(form, header, none, query),默认为header 方式
security.oauth2.client.client-id #指定OAuth2 client ID.
security.oauth2.client.client-secret #指定OAuth2 client secret. 默认是一个随机的secret.
security.oauth2.client.grant-type #指定获取资源的access token 的授权类型.
security.oauth2.client.id #指定应用的client ID.
security.oauth2.client.pre-established-redirect-uri #服务端pre-established 的跳转URI.
security.oauth2.client.refresh-token-validity-seconds #指定refresh token 的有效期.
security.oauth2.client.registered-redirect-uri #指定客户端跳转URI,多个以逗号分隔.
security.oauth2.client.resource-ids #指定客户端相关的资源id,多个以逗号分隔.
security.oauth2.client.scope #client 的scope
security.oauth2.client.token-name #指定token 的名称
security.oauth2.client.use-current-uri # 是否优先使用请求中URI,再使用pre-established 的跳转URI. 默认为true
security.oauth2.client.user-authorization-uri #用户跳转去获取access token 的URI.
security.oauth2.resource.id #指定resource 的唯一标识.
security.oauth2.resource.jwt.key-uri #JWT token 的URI. 当key 为公钥时,或者value 不指定时指定.
security.oauth2.resource.jwt.key-value #JWT token 验证的value. 可以是对称加密或者PEMencoded RSA 公钥. 可以使用URI 作为value.
security.oauth2.resource.prefer-token-info #是否使用token info,默认为true
security.oauth2.resource.service-id #指定service ID,默认为resource.
security.oauth2.resource.token-info-uri #token 解码的URI.
security.oauth2.resource.token-type #指定当使用userInfoUri 时,发送的token类型.
security.oauth2.resource.user-info-uri #指定user info 的URI
security.oauth2.sso.filter-order # 如果没有显示提供WebSecurityConfigurerAdapter 时指定的Filter order.
security.oauth2.sso.login-path #跳转到SSO 的登录路径默认为/login.
security.require-ssl #是否对所有请求开启SSL,默认为false.
security.sessions #指定Session 的创建策略(always, never, if_required, stateless).
security.user.name #指定默认的用户名,默认为user.
security.user.password #默认的用户密码.
security.user.role #默认用户的授权角色.
#sendgrid
spring.sendgrid.password #指定SendGrid password.
spring.sendgrid.proxy.host #指定SendGrid proxy host.
spring.sendgrid.proxy.port #指定SendGrid proxy port.
spring.sendgrid.username #指定SendGrid username.
#server 配置
server.address #指定server 绑定的地址
server.compression.enabled #是否开启压缩,默认为false.
server.compression.excluded-user-agents #指定不压缩的user-agent,多个以逗号分隔,默认值为:text/html,text/xml,text/plain,text/css
server.compression.mime-types #指定要压缩的MIME type,多个以逗号分隔.
server.compression.min-response-size #执行压缩的阈值,默认为2048
server.context-parameters.[param name] #设置servlet context 参数
server.context-path #设定应用的context-path.
server.display-name #设定应用的展示名称,默认: application
server.jsp-servlet.class-name # 设定编译JSP 用的servlet , 默认:org.apache.jasper.servlet.JspServlet)
server.jsp-servlet.init-parameters.[param name] #设置JSP servlet 初始化参数.
server.jsp-servlet.registered #设定JSP servlet 是否注册到内嵌的servlet 容器,默认true
server.port #设定http 监听端口
server.servlet-path #设定dispatcher servlet 的监听路径,默认为: /
#SHELL REMOTE SHELL
shell.auth = simple #认证类型。根据环境自动检测。
shell.auth.jaas.domain =my-domain #JAAS 域。
shell.auth.key.path = #认证密钥的路径。这应该指向一个有效的“.pem”文件。
shell.auth.simple.user.name = user #登录用户。
shell.auth.simple.user.password = #登录密码。
shell.auth.spring.roles = ADMIN #用于登录到CRaSH 控制台的所需角色的逗号分隔列表。
shell.command-path-patterns = classpath *:/ commands / **,classpath *:/ crash /commands / **#用于查找命令的模式。
shell.command-refresh-interval = -1 #扫描更改并在必要时更新命令(以秒为单位)。
shell.config-path-patterns = #用于查找配置的模式。
shell.disabled-commands #禁用命令的逗号分隔列表。
shell.disabled-plugins = #禁用逗号分隔的插件列表。根据环境,某些插件默认是禁用的。
shell.ssh.auth-timeout = #用户提示重新登录后的毫秒数。
shell.ssh.enabled = true #启用CRaSH SSH 支持。
shell.ssh.idle-timeout = #关闭未使用的连接之后的毫秒数。
shell.ssh.key-path = #SSH 服务器密钥的路径。
shell.ssh.port = 2000 #SSH 端口。
shell.telnet.enabled = false #启用CRaSH telnet 支持。如果TelnetPlugin 可用,则默认启用。
shell.telnet.port = 5000 #Telnet 端口。
#social
spring.social.auto-connection-views #是否开启连接状态的视图,默认为false
spring.social.facebook.app-id #指定应用id
spring.social.facebook.app-secret #指定应用密码
spring.social.linkedin.app-id #指定应用id
spring.social.linkedin.app-secret #指定应用密码
spring.social.twitter.app-id #指定应用ID.
spring.social.twitter.app-secret #指定应用密码
#ssl 配置
server.ssl.ciphers #是否支持SSL ciphers.
server.ssl.client-auth #设定client authentication 是wanted 还是needed.
server.ssl.enabled #是否开启ssl,默认: true
server.ssl.key-alias #设定key store 中key 的别名.
server.ssl.key-password #访问key store 中key 的密码.
server.ssl.key-store #设定持有SSL certificate 的key store 的路径,通常是一个.jks 文件.
server.ssl.key-store-password #设定访问key store 的密码.
server.ssl.key-store-provider #设定key store 的提供者.
server.ssl.key-store-type #设定key store 的类型.
server.ssl.protocol #使用的SSL 协议,默认: TLS
server.ssl.trust-store #持有SSL certificates 的Trust store.
server.ssl.trust-store-password #访问trust store 的密码.
server.ssl.trust-store-provider #设定trust store 的提供者.
server.ssl.trust-store-type #指定trust store 的类型.
#tomcat 服务器配置(ServerProperties)
server.port = 8080 #端口
server.address = #该服务绑定IP 地址,启动服务器时如本机不是该IP 地址则抛出异常启动失败,只有特殊需求的情况下才配置
server.session-timeout = #会话超时秒数默认30
server.context-path = #上下文路径,默认为'/'
server.servlet-path = #servlet 路径,默认为'/'
server.tomcat.access-log-pattern = #访问日志的日志模式
server.tomcat.access-log-enabled = false #启用访问日志记录
server.tomcat.protocol-header = x -forwarded-proto #ssl 转发标头
server.tomcat.accesslog.pattern # 设定access logs 的格式, 默认:common
server.tomcat.accesslog.prefix #设定Log 文件的前缀,默认: access_log
server.tomcat.accesslog.suffix #设定Log 文件的后缀,默认: .log
server.tomcat.background-processor-delay = 30 ; # 后台线程方法的Delay 大小:30
server.tomcat.basedir #设定Tomcat 的base 目录,如果没有指定则使用临时目录.
server.tomcat.internal-proxies # 设定信任的正则表达式, 默认:“10\.\d{1,3}\.\d{1,3}\.\d{1,3}| 192\.168\.\d{1,3}\.\d{1,3}|# 169\.254\.\d{1,3}\.\d{1,3}|127\.\d{1,3}\.\d{1,3}\.\d{1,3}| 172\.1[6-9]{1}\.\d{1,3}\# .\d{1,3}|172\.2[0-9]{1}\.\d{1,3}\.\d{1,3}|172\.3[0-1]{1}\.\d{1,3}\.\d{1,3}”
server.tomcat.max-http-header-size #设定http header 的最小值,默认: 0
server.tomcat.max-threads #设定tomcat 的最大工作线程数,默认为: 0
server.tomcat.port-header #设定http header 使用的,用来覆盖原来port 的value.
server.tomcat.protocol-header #设定Header 包含的协议,通常是X-Forwarded-Proto,如果remoteIpHeader 有值,则将设置为RemoteIpValve.
server.tomcat.protocol-header-https-value #设定使用SSL 的header 的值,默认https.
server.tomcat.remote-ip-header # 设定remote IP 的header , 如果remoteIpHeader 有值,则设置为RemoteIpValve
server.tomcat.uri-encoding #设定URI 的解码字符集.
#THYMELEAF(Thymeleaf 模板)
spring.thymeleaf.prefix = #类路径:/模板/ 检查模板位置
spring.thymeleaf.suffix =
spring.thymeleaf.mode = HTML5 #模板的模式
spring.thymeleaf.encoding = UTF- 8
spring.thymeleaf.content-type = text / html#; charset = <编码>
spring.thymeleaf.cache = true #这个开发配置为false,避免改了模板
还要重启服务器
#undertow
server.undertow.access-log-dir #设定Undertow access log 的目录,默认: logs
server.undertow.access-log-enabled #是否开启access log,默认: false
server.undertow.access-log-pattern #设定access logs 的格式,默认: common
server.undertow.accesslog.dir #设定access log 的目录.
server.undertow.buffer-size #设定buffer 的大小.
server.undertow.buffers-per-region #设定每个region 的buffer 数
server.undertow.direct-buffers #设定堆外内存
server.undertow.io-threads #设定I/O 线程数.
server.undertow.worker-threads #设定工作线程数
#velocity
spring.velocity.allow-request-override #指定HttpServletRequest 的属性是否可以覆盖controller 的model 的同名项
spring.velocity.allow-session-override # 指定HttpSession 的属性是否可以覆盖controller 的model 的同名项
spring.velocity.cache #是否开启模板缓存
spring.velocity.charset #设定模板编码
spring.velocity.check-template-location #是否检查模板路径是否存在.
spring.velocity.content-type #设定ContentType 的值
spring.velocity.date-tool-attribute #设定暴露给velocity 上下文使用的DateTool的名
spring.velocity.enabled #设定是否允许mvc 使用velocity
spring.velocity.expose-request-attributes #是否在merge 模板的时候,将request属性都添加到model 中
spring.velocity.expose-session-attributes #是否在merge 模板的时候,将HttpSession属性都添加到model 中
spring.velocity.expose-spring-macro-helpers # 设定是否以springMacroRequestContext 的名来暴露RequestContext 给Spring’s macro 类库使用
spring.velocity.number-tool-attribute #设定暴露给velocity 上下文的NumberTool的名
spring.velocity.prefer-file-system-access #是否优先从文件系统加载模板以支持热加载,默认为true
spring.velocity.prefix #设定velocity 模板的前缀.
spring.velocity.properties #设置velocity 的额外属性.
spring.velocity.request-context-attribute #设定RequestContext attribute 的名.
spring.velocity.resource-loader-path # 设定模板路径, 默认为:classpath:/templates/
spring.velocity.suffix #设定velocity 模板的后缀.
spring.velocity.toolbox-config-location #设定Velocity Toolbox 配置文件的路径,比如/WEB-INF/toolbox.xml.
spring.velocity.view-names #设定需要解析的视图名称.
2
3
4
5
6
7
8
9
10
11
12
13
14
15
16
17
18
19
20
21
22
23
24
25
26
27
28
29
30
31
32
33
34
35
36
37
38
39
40
41
42
43
44
45
46
47
48
49
50
51
52
53
54
55
56
57
58
59
60
61
62
63
64
65
66
67
68
69
70
71
72
73
74
75
76
77
78
79
80
81
82
83
84
85
86
87
88
89
90
91
92
93
94
95
96
97
98
99
100
101
102
103
104
105
106
107
108
109
110
111
112
113
114
115
116
117
118
119
120
121
122
123
124
125
126
127
128
129
130
131
132
133
134
135
136
137
138
139
140
141
142
143
144
145
146
147
148
149
150
151
152
153
154
155
156
157
158
159
160
161
162
163
164
165
166
167
168
169
170
171
172
173
174
175
176
177
178
179
180
181
182
183
184
185
186
187
188
189
190
191
192
193
194
195
196
197
198
199
200
201
202
203
204
205
206
207
208
209
210
211
212
213
214
215
216
217
218
219
220
221
222
223
224
225
226
227
228
229
230
231
232
233
234
235
236
237
238
239
240
241
242
243
244
245
246
247
248
249
250
251
252
253
254
255
256
257
258
259
260
261
262
263
264
265
266
267
268
269
270
271
272
273
274
275
276
277
278
279
280
281
282
283
284
285
286
287
288
289
290
291
292
293
294
295
296
297
298
299
300
301
302
303
304
305
306
307
308
309
310
311
312
313
314
315
316
317
318
319
320
321
322
323
324
325
326
327
328
329
330
331
332
333
334
335
336
337
338
339
340
341
342
343
344
345
346
347
348
349
350
351
352
353
354
355
356
357
358
359
360
361
362
363
364
365
366
367
368
369
370
371
372
373
374
375
376
377
378
379
380
381
382
383
384
385
386
387
388
389
390
391
392
393
394
395
396
397
398
399
400
401
402
403
404
405
406
407
408
409
410
411
412
413
414
415
416
417
418
419
420
421
422
423
424
425
426
427
428
429
430
431
432
433
434
435
436
437
438
439
440
441
442
443
444
445
446
447
448
449
450
451
452
453
454
455
456
457
458
459
460
461
462
463
464
465
466
467
468
469
470
471
472
473
474
475
476
477
478
479
480
481
482
483
484
485
486
487
488
489
490
491
492
493
494
495
496
497
498
499
500
501
502
503
504
505
506
507
508
509
510
511
512
513
514
515
516
517
518
519
520
521
522
523
524
525
526
527
528
529
530
531
532
533
534
535
536
537
538
539
540
541
542
543
544
545
546
547
548
549
550
551
552
553
554
555
556
557
558
559
560
561
562
563
564
565
566
567
568
569
570
571
572
573
574
575
576
577
578
579
580
581
582
583
584
585
586
587
588
589
590
591
592
593
594
595
596
597
598
599
600
601
602
603
604
605
606
607
608
609
610
611
612
613
614
615
616
617
618
619
620
621
622
623
624
625
626
627
628
629
630
631
632
633
634
635
636
637
638
639
640
641
642
643
644
645
646
647
648
649
650
651
652
653
654
655
656
657
658
659
660
661
662
663
664
665
666
667
668
669
670
671
672
673
674
675
676
677
678
679
680
681
682
683
684
685
686
687
688
689
690
691
692
693
694
695
696
697
698
699
700
701
702
703
704
705
706
707
708
709
710
711
712
713
714
715
716
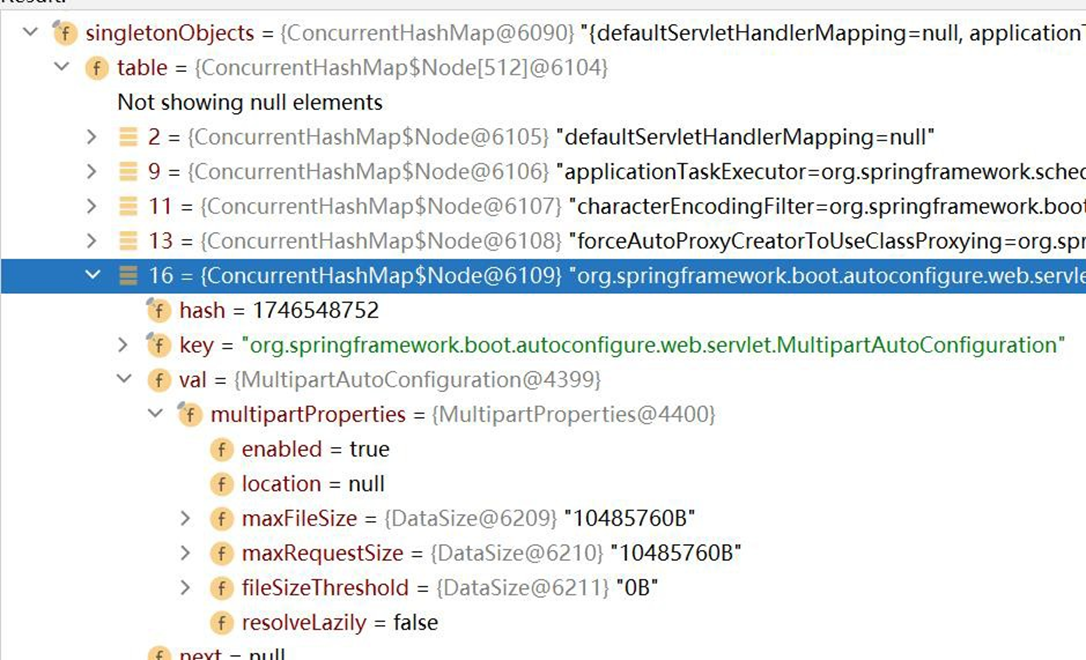
# 2.3.3.3 resources\application.properties 修改配置
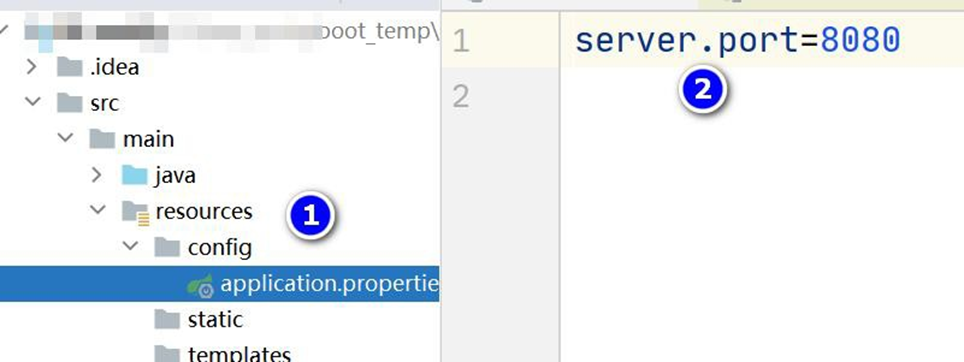
● 各 种 配 置 都 有 默 认 , 可 以 在 resources\application.properties 修 改 ,
application.properties 文件我们可以手动创建
#默认server.port=8080
server.port=10000
#比如: 默认spring.servlet.multipart.max-file-size=1MB
#该属性可以指定springboot 上传文件大小的限制
#默认配置最终都是映射到某个类上,比如这里配置会映射到 MultipartProperties
#把光标放在该属性,ctrl+b 就可以定位该配置映射到的类
spring.servlet.multipart.max-file-size=10MB
# 2.3.3.4 resources\application.properties 常用配置
● 常用配置都一览
#端口号
server.port=10000
#应用的上下文路径(项目路径)
server.servlet.context-path=/allModel

#指定 POJO 扫描包来让 mybatis 自动扫描到自定义的 POJO
mybatis.type-aliases-package=com.cxs.allmodel.model

#指定 mapper.xml 的路径
#(application 上配置了@MapperScan(扫面 mapper 类的路径)和 pom.xml 中放行了 mapper.xml 后,

#配置 mapper-locations 没有意义。 如果 mapper 类和 mapper.xml  不 在 同 一 个 路 径 下 时,mapper-locations 就有用了)
mybatis.mapper-locations=classpath:com/cxs/allmodel/mapper

#session 失效时间(单位 s)
spring.session.timeout=18000

#数据库连接配置
#mysql 数据库 url
mysql.one.jdbc-url=jdbc:mysql://127.0.0.1:3306/test?serverTimezone=Asia/Shanghai&useSSL=false
#mysql 数据库用户名
mysql.one.username=
#数据库密码
mysql.one.password=

#线程池允许的最大连接数
mysql.one.maximum-pool-size=15

#日志打印:日志级别 trace<debug<info<warn<error<fatal  默认级别为 info,即默认打印 info 及其以上级别的日志
#logging.level 设置日志级别,后面跟生效的区域,比如 root 表示整个项目,也可以设置为某个包下,也可以具体到某个类名(日志级别的值不区分大小写)
logging.level.com.cxs.allmodel.=debug
logging.level.com.cxs.allmodel.mapper=debug
logging.level.org.springframework.web=info
logging.level.org.springframework.transaction=info
logging.level.org.apache.ibatis=info
logging.level.org.mybatis=info
logging.level.com.github.pagehelper = info
logging.level.root=info

#日志输出路径
logging.file=/tmp/api/allmodel.log

#配置 pagehelper 分页插件
pagehelper.helperDialect=mysql
pagehelper.reasonable=true
pagehelper.supportMethodsArguments=true
pagehelper.params=count=countSql

#jackson 时间格式化
spring.jackson.serialization.fail-on-empty-beans=false

#指定日期格式,比如 yyyy-MM-dd HH:mm:ss,或者具体的格式化类的全限定名
spring.jackson.date-format=yyyy-MM-dd HH:mm:ss

#指定日期格式化时区,比如 America/Los_Angeles 或者 GMT+10
spring.jackson.time-zone=GMT+8

#设置统一字符集
spring.http.encoding.charset=utf8

#redis 连接配置
#redis 所在主机 ip 地址
spring.redis.host=
#redis 服务器密码
spring.redis.password=
#redis 服务器端口号
spring.redis.port=
#redis 数据库的索引编号(0 到 15)
spring.redis.database=14
##连接池的最大活动连接数量,使用负值无限制
#spring.redis.pool.max-active=8
#
##连接池的最大空闲连接数量,使用负值表示无限数量的空闲连接
#spring.redis.pool.max-idle=8
#
##连接池最大阻塞等待时间,使用负值表示没有限制
#spring.redis.pool.max-wait=-1ms
#
##最小空闲连接数量,使用正值才有效果
#spring.redis.pool.min-idle=0
#
##  是否启用 SSL  连接.
##spring.redis.ssl=false
#
## 连接超时,毫秒为单位
#spring.redis.timeout= 18000ms
#
## 集群模式下,集群最大转发的数量
#spring.redis.cluster.max-redirects=
#
## 集群模式下,逗号分隔的键值对(主机:端口)形式的服务器列表
#spring.redis.cluster.nodes=
#
## 哨兵模式下,Redis 主服务器地址
#spring.redis.sentinel.master=
#
## 哨兵模式下,逗号分隔的键值对(主机:端口)形式的服务器列表
#spring.redis.sentinel.nodes= 127.0.0.1:5050,127.0.0.1:5060
2
3
4
5
6
7
8
9
10
11
12
13
14
15
16
17
18
19
20
21
22
23
24
25
26
27
28
29
30
31
32
33
34
35
36
37
38
39
40
41
42
43
44
45
46
47
48
49
50
51
52
53
54
55
56
57
58
59
60
61
62
63
64
65
66
67
68
69
70
71
72
73
74
75
76
77
78
79
80
81
82
83
84
85
86
87
88
89
90
91
92
93
94
95
96
97
98
# 2.3.3.5 resources\application.properties 自定义配置
● 还可以在 properties 文件中自定义配置,通过@Value("${}")获取对应属性值
application.properties 文件
my.website=https://www.baidu.com
2
//某 个Bean

@Value("${my.website}")
private String bdUrl;
2
3
4
# 2.3.4 SpringBoot 在哪配置读取 application.properites
1、打开 ConfigFileApplicationListener.java , 看一下源码
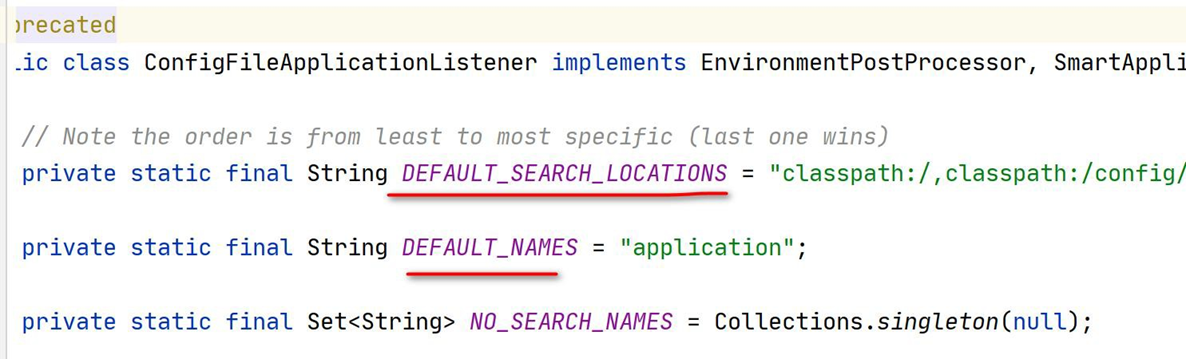
2、测试, 如果我们把 application.properties 放在 resources\config 目录下, 你会发现依然
是管用的.
3、测试完毕, 记得把恢复到原来的位置.
# 2.3.5 自动配置 遵守按需加载原则
# 2.3.5.1 基本说明
- 自动配置遵守按需加载原则:也就是说,引入了哪个场景 starter 就会加载该场景关联
的 jar 包,没有引入的 starter 则不会加载其关联 jar
- SpringBoot 所 有 的 自 动 配 置 功 能 都 在
spring-boot-autoconfigure 包 里 面
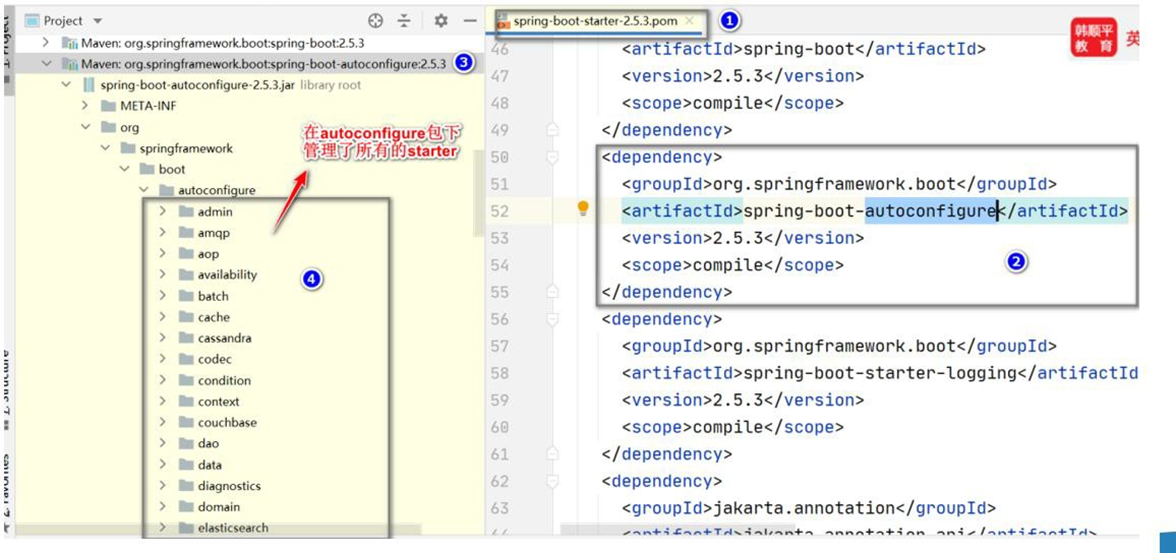
- 在 SpringBoot 的 自 动 配 置 包 , 一 般 是 XxxAutoConfiguration.java, 对 应
XxxxProperties.java, 如图
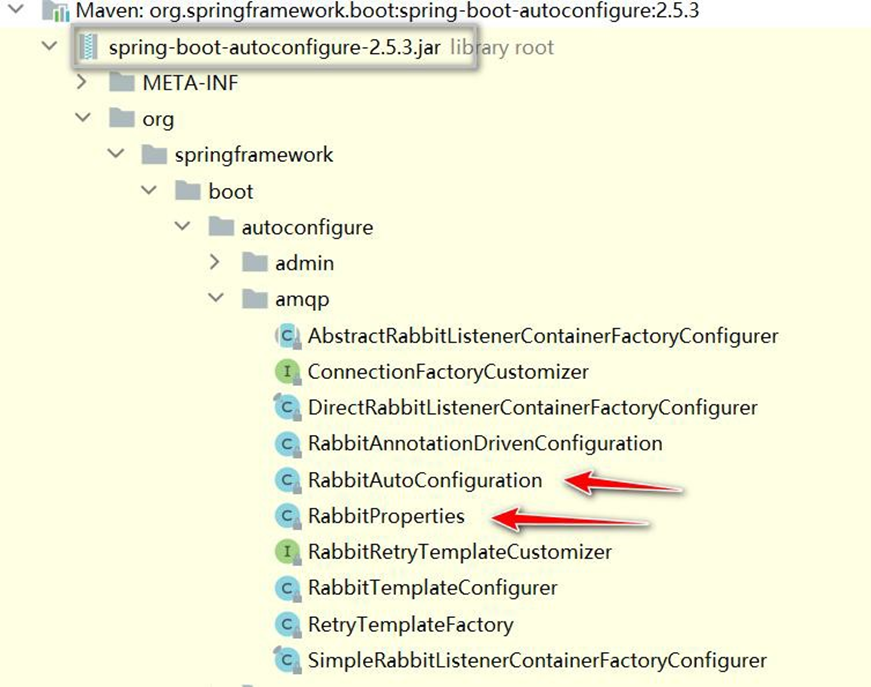
# 2.3.5.2 实例演示
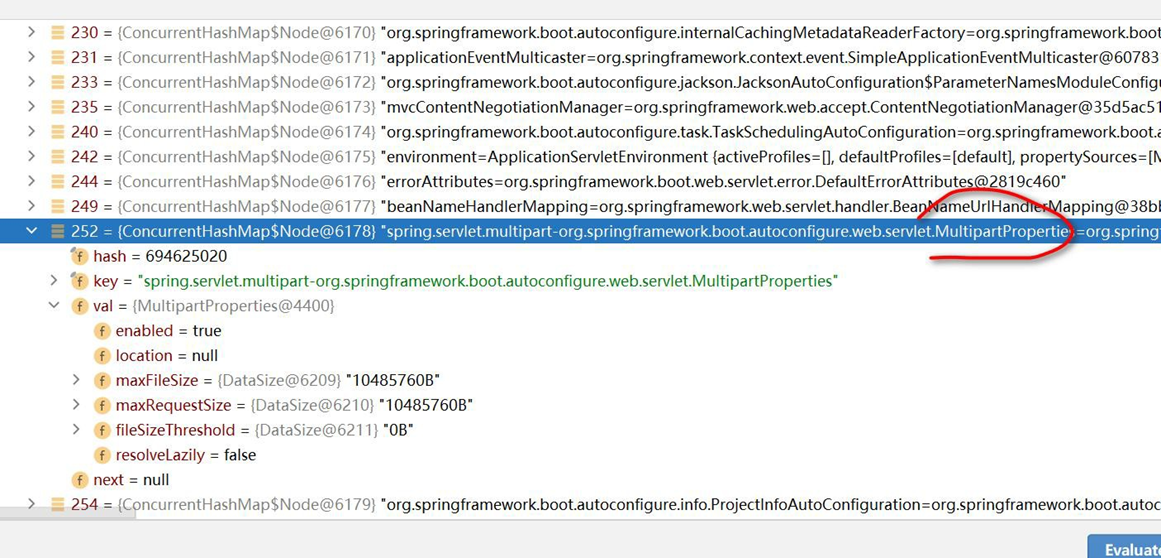
- 以 MultipartProperties , MultipartAutoConfiguration 和 application.properties 来说明
# 3 容器功能
# 3.1 Spring 注入组件的注解
# 3.1.1 @Component、@Controller、 @Service、@Repository
说明: 这些在 Spring 中的传统注解仍然有效,通过这些注解可以给容器注入组件
# 3.1.2 案例演示
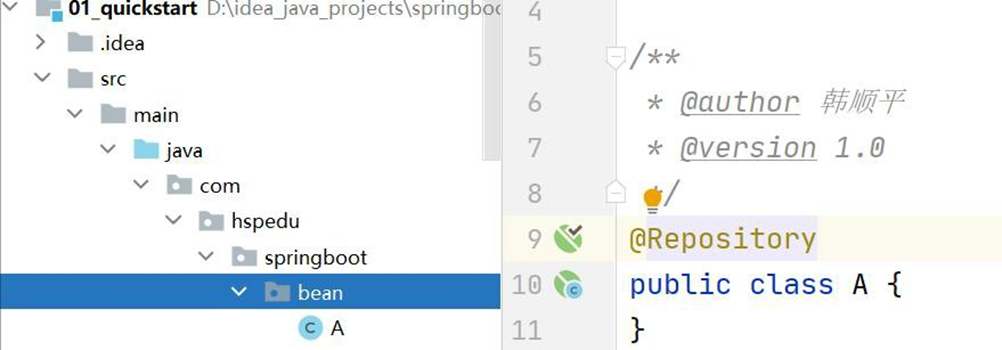
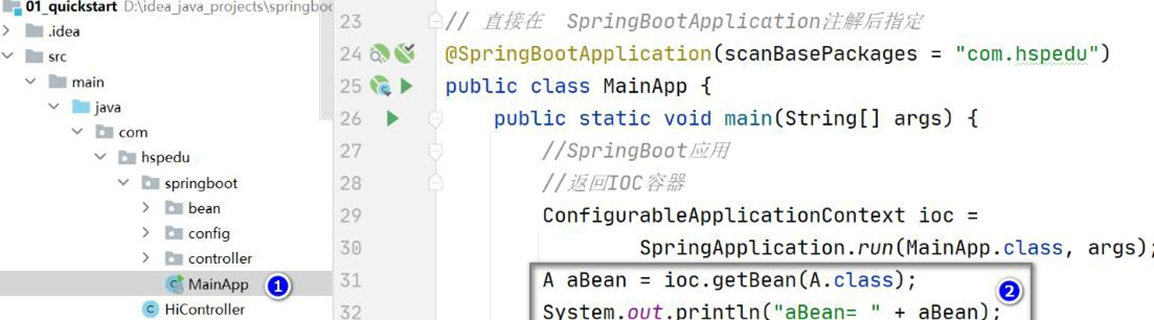
- 创建 springboot2\01_quickstart\src\main\java\com\hspedu\springboot\bean\A.java
- 在 springboot2\01_quickstart\src\main\java\com\hspedu\springboot\MainApp.java 获
取, 完成测试, 其它注解老韩就不一一测试了
# 3.2 @Configuration
# 3.2.1 应用实例
● @Configuration 应用实例需求
老韩说明: 演示在SpringBoot, 如何通过@Configuration 创建配置类来注入组件
● 回顾传统方式如何通过配置文件注入组件
- 创建springboot2\01_quickstart\src\main\java\com\hspedu\springboot\bean\Monster.java
package com.hspedu.springboot.bean;
/**

* @author 韩顺平

* @version 1.0

*/
public class Monster {
    private Integer id;
    private String name;
    private Integer age;
    private String skill;
    public Monster() {}
    public Monster(Integer id, String name, Integer age, String skill) {
        this.id = id;
        this.name = name;
        this.age = age;
        this.skill = skill;
    }
    public Integer getId() {
        return id;
    }
    public void setId(Integer id) {
        this.id = id;
    }
    public String getName() {
        return name;
    }
    public void setName(String name) {
        this.name = name;
    }
    public Integer getAge() {
        return age;
    }
    public void setAge(Integer age) {
        this.age = age;
    }
    public String getSkill() {
        return skill;
    }
    public void setSkill(String skill) {
        this.skill = skill;
    }
    @Override
    public String toString() {
        return "Monster{" +
            "id=" + id +
            ", name='" + name + '\'' +
            ", age=" + age +
            ", skill='" + skill + '\'' +
            '}';
    }
}
2
3
4
5
6
7
8
9
10
11
12
13
14
15
16
17
18
19
20
21
22
23
24
25
26
27
28
29
30
31
32
33
34
35
36
37
38
39
40
41
42
43
44
45
46
47
48
49
50
51
52
53
54
- 创建 springboot2\01_quickstart\src\main\resources\beans.xml
<?xml version="1.0" encoding="UTF-8"?>
<beans
    xmlns="http://www.springframework.org/schema/beans"
    xmlns:xsi="http://www.w3.org/2001/XMLSchema-instance"

xsi:schemaLocation="http://www.springframework.org/schema/beans

http://www.springframework.org/schema/beans/spring-beans.xsd">
    <bean id="monster03" class="com.hspedu.springboot.bean.Monster">
        <property name="name" value="牛魔王~"></property>
        <property name="age" value="5000"></property>
        <property name="skill" value="芭蕉扇~"></property>
        <property name="id" value="1000"></property>
    </bean>
</beans>
2
3
4
5
6
7
8
9
10
11
12
13
14
15
16
● 使用 SpringBoot 的@Configuration 添加/注入组件
- 创建 springboot2\01_quickstart\src\main\java\com\hspedu\springboot\config\BeanConfig.java
package com.hspedu.springboot.config;
import com.hspedu.springboot.bean.Cat;
import com.hspedu.springboot.bean.Dog;
import com.hspedu.springboot.bean.Furn;
import com.hspedu.springboot.bean.Monster;
import org.springframework.boot.autoconfigure.condition.ConditionalOnBean;
import org.springframework.boot.autoconfigure.condition.ConditionalOnMissingBean;
import org.springframework.boot.context.properties.EnableConfigurationProperties;
import org.springframework.context.annotation.Bean;
import org.springframework.context.annotation.Configuration;
import org.springframework.context.annotation.Import;
import org.springframework.context.annotation.ImportResource;
/**
* @author 韩顺平
* @version 1.0
*/
//@Configuration 标识这是一个配置类: 等价配置文件
@Configuration
public class BeanConfig {
/**
* 1. @Bean : 给容器中添加组件
* 2. monster01() : 默认方法名作为组件的id
* 3. Monster: 返回类型就是组件类型, 返回的值就是new Monster(100, "牛魔王", 500,
"芭蕉扇")
* 4. @Bean("monster_nmw"): 重新指定组件的id = “monster_nmw”
* 5. 配置类里面使用@Bean 标注在方法上给容器注册组件,默认是单实例的
*/
// @Bean("monster_nmw")
@Bean
public Monster monster01() {
return new Monster(100, "牛魔王", 500, "芭蕉扇");
}
}
2. 修改 MainApp.java, 从配置文件 / 容器获取bean, 并完成测试
public static void main(String[] args) {
//启动SpringBoot 应用程序
ConfigurableApplicationContext ioc =
SpringApplication.run(MainApp.class, args);
// //查看容器里面的组件
// String[] beanDefinitionNames = ioc.getBeanDefinitionNames();
// for (String beanDefinitionName : beanDefinitionNames) {
System.out.println(beanDefinitionName);
//
// }
//老韩解读
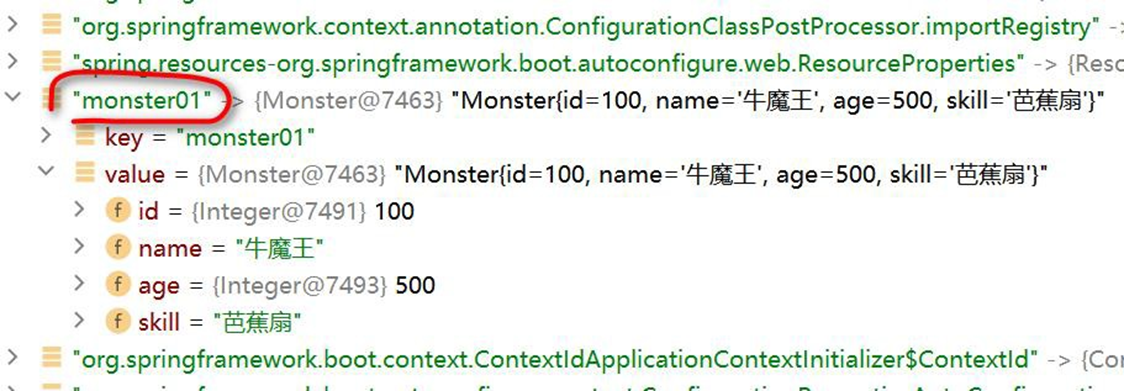
//1. ioc.getBean("monster01", Monster.class) 是从BeanConfig 配置类/容器获取bean
实例
//2. 默认是单列模式, 所以monster01 == monster02
//获取BeanConfig 配置类的组件/bean 实例
Monster monster01 = ioc.getBean("monster01", Monster.class);
System.out.println(monster01);
Monster monster02 = ioc.getBean("monster01", Monster.class);
System.out.println(monster01 == monster02);
}
2
3
4
5
6
7
8
9
10
11
12
13
14
15
16
17
18
19
20
21
22
23
24
25
26
27
28
29
30
31
32
33
34
35
36
37
38
39
40
41
42
43
44
45
46
47
48
49
50
51
52
53
54
55
56
57
58
59
60
61
62
63
64
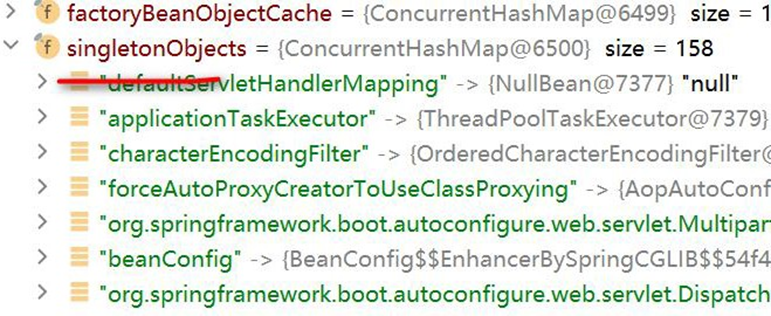
- 也可以通过 Debug 来查看 ioc 容器是否存在 monster01 Bean 实例
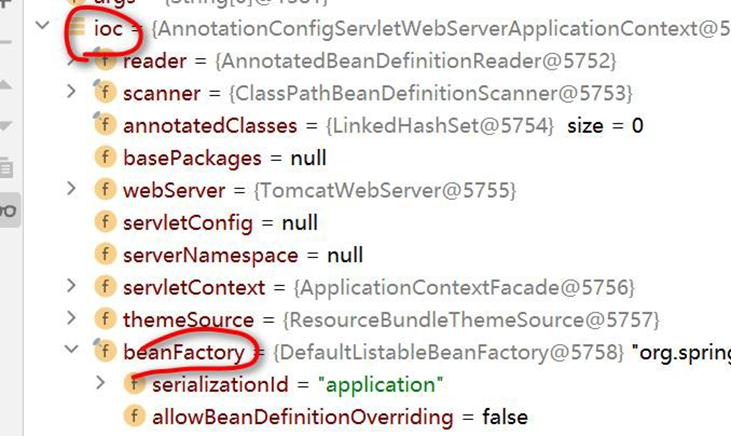
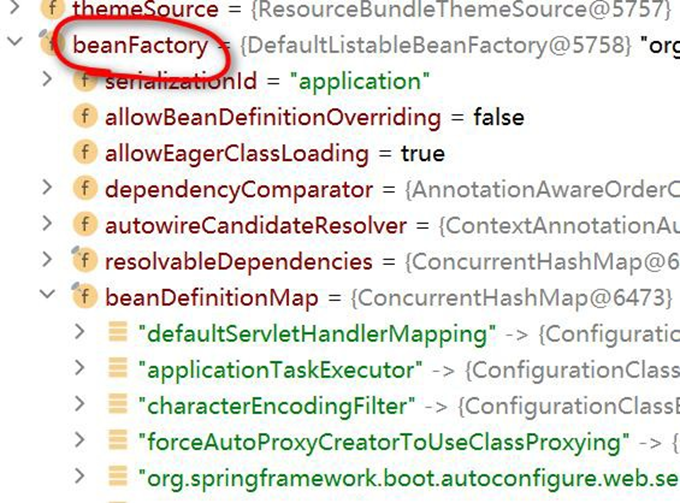
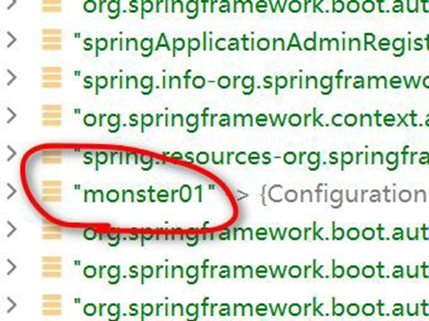
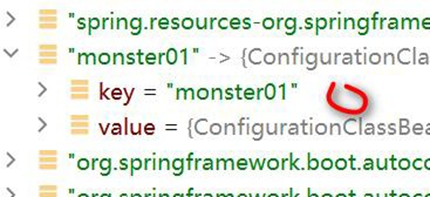
beanDefinitionMap, 只是存放了 bean 定义信息, 真正存放 Bean 实例的在 singleonObjectis
的 Map 中, 对于非单例,是每次动态反射生成的实例
# 3.2.2 @Configuration 注意事项和细节
- 配置类本身也是组件, 因此也可以获取, 测试 修改 MainApp.java
public static void main(String[] args) {
    ConfigurableApplicationContext ioc =
        SpringApplication.run(MainApp.class, args);
    //老韩解读
    //1. ioc.getBean("monster01", Monster.class) 是从BeanConfig 配置类/容器获取bean 实例
    //2. 默认是单列模式, 所以 monster01 == monster02
    //获取BeanConfig 配置类的组件/bean 实例
    Monster monster01 = ioc.getBean("monster01", Monster.class);
    System.out.println(monster01);
    Monster monster02 = ioc.getBean("monster01", Monster.class);
    System.out.println(monster01 == monster02);
    //老韩解读
    //配置类本身也是组件, 因此也可以获取
    BeanConfig beanConfig = ioc.getBean(BeanConfig.class);
    System.out.println("beanConfig= " + beanConfig);
}
2
3
4
5
6
7
8
9
10
11
12
13
14
15
16
- SpringBoot2 新增特性: proxyBeanMethods 指定 Full 模式 和 Lite 模式
- 修改 D:\java_projects\springboot2\01_quickstart\src\main\java\com\hspedu\springboot\config\BeanConfig.java
package com.hspedu.springboot.config;
import com.hspedu.springboot.bean.Monster;
import org.springframework.context.annotation.Bean;
import org.springframework.context.annotation.Configuration;
/**

* @author 韩顺平


* @version 1.0

* 1. proxyBeanMethods:代理bean 的方法

* (1)    Full(proxyBeanMethods    =    true)、【保证每个@Bean    方法被调用多少次返回的组件都是 单

实例的, 是代理方式】

* (2)       Lite(proxyBeanMethods      =       false)【每个@Bean    方法被调用多少次返回的组件都是新创 建

的, 是非代理方式】

* (3) 特别说明: proxyBeanMethods 是在 调用@Bean 方法 才生效,因此,需要先获取

BeanConfig 组件,再调用方法

*  而不是直接通过 SpringBoot 主程序得到的容器来获取bean, 注意观察直接通过

ioc.getBean() 获取Bean, proxyBeanMethods 值并没有生效

* (4) 如何选择: 组件依赖必须使用Full 模式默认。如果不需要组件依赖使用 Lite 模

* (5) Lite 模也称为轻量级模式,因为不检测依赖关系,运行速度快

*/
//@Configuration 标识这是一个配置类: 等价配置文件
@Configuration(proxyBeanMethods = false)
public class BeanConfig {
    /**

    * 1. @Bean : 给容器中添加组件

    * 2. monster01() : 默认方法名作为组件的id

    * 3. Monster: 返回类型就是组件类型, 返回的值就是 new Monster(100, "牛魔王", 500, "

    芭蕉扇")

    * 4. @Bean("monster_nmw"): 重新指定组件的 id = “monster_nmw”

    * 5. 配置类里面使用@Bean 标注在方法上给容器注册组件,默认是单实例的

    */
    // @Bean("monster_nmw")
    @Bean
    public Monster monster01() {
        return new Monster(100, "牛魔王", 500, "芭蕉扇");
    }
}
2
3
4
5
6
7
8
9
10
11
12
13
14
15
16
17
18
19
20
21
22
23
24
25
26
27
28
29
30
31
32
33
34
35
36
37
38
39
40
41
42
43
44
45
46
47
48
49
50
51
52
53
54
55
56
57
58
59
60
61
- 修改D:\java_projects\springboot2\01_quickstart\src\main\java\com\hspedu\springboot\MainApp.java
package com.hspedu.springboot;
import com.hspedu.springboot.bean.Monster;
import com.hspedu.springboot.config.BeanConfig;
import org.springframework.boot.SpringApplication;
import org.springframework.boot.autoconfigure.SpringBootApplication;
import org.springframework.context.ConfigurableApplicationContext;
/**
* @author 韩顺平

* @version 1.0

*/
@SpringBootApplication(scanBasePackages = "com.hspedu")
public class MainApp {
    public static void main(String[] args) {
        //启动SpringBoot 应用程序
        ConfigurableApplicationContext ioc =
            SpringApplication.run(MainApp.class, args);
        // //查看容器里面的组件
        // String[] beanDefinitionNames = ioc.getBeanDefinitionNames();
        // for (String beanDefinitionName : beanDefinitionNames) {
        System.out.println(beanDefinitionName);
        //
        // }
        //老韩解读
        //1. ioc.getBean("monster01", Monster.class) 是从BeanConfig 配置类/容器获取bean
        实例
        //2. 默认是单列模式, 所以 monster01 == monster02
        //获取BeanConfig 配置类的组件/bean 实例
        Monster monster01 = ioc.getBean("monster01", Monster.class);
        System.out.println(monster01);
        Monster monster02 = ioc.getBean("monster01", Monster.class);
        System.out.println(monster01 == monster02);
        //老韩解读
        //配置类本身也是组件, 因此也可以获取
        BeanConfig beanConfig = ioc.getBean(BeanConfig.class);
        System.out.println("beanConfig= " + beanConfig);
        Monster monster03 = beanConfig.monster01();
        Monster monster04 = beanConfig.monster01();
        System.out.println("monster03 == monster04 : " + (monster03 == monster04));
    }
}
2
3
4
5
6
7
8
9
10
11
12
13
14
15
16
17
18
19
20
21
22
23
24
25
26
27
28
29
30
31
32
33
34
35
36
37
38
39
40
41
42
43
- 配置类可以有多个, 就 和 Spring 可以有多个 ioc 配置文件是一个道理.
- 创建D:\hsp_springboot_temp\01-quickstart\src\main\java\com\hspedu\springboot\config\BeanConfig2.java
package com.hspedu.springboot.config;
import com.hspedu.springboot.bean.Monster;
import org.springframework.context.annotation.Bean;
import org.springframework.context.annotation.Configuration;
@Configuration
public class BeanConfig2 {
    @Bean
    public Monster monster100() {
        return new Monster(200, "牛魔王~~", 500, "芭蕉扇");
    }
}
2
3
4
5
6
7
8
9
10
11
12
- 完成测试 D:\hsp_springboot_temp\01-quickstart\src\main\java\com\hspedu\springboot\MainApp.java
package com.hspedu.springboot;
import com.hspedu.springboot.bean.Monster;
import com.hspedu.springboot.config.BeanConfig;
import org.springframework.boot.SpringApplication;
import org.springframework.boot.autoconfigure.SpringBootApplication;
import org.springframework.context.ConfigurableApplicationContext;
@SpringBootApplication
public class MainApp {
    public static void main(String[] args) {
        //启动SpringBoot 应用程序
        ConfigurableApplicationContext ioc = SpringApplication.run(MainApp.class, args);
        Monster monster100 = ioc.getBean("monster100", Monster.class);
        System.out.println(monster100);
    }
}
2
3
4
5
6
7
8
9
10
11
12
13
14
15
16

# 3.3 @Import
# 3.3.1 应用实例
老韩说明: 演示在 SpringBoot, 如何通过 @Import 来注入组件
- 创建 springboot2\01_quickstart\src\main\java\com\hspedu\springboot\bean\Cat.java
和 springboot2\01_quickstart\src\main\java\com\hspedu\springboot\bean\Dog.java
package com.hspedu.springboot.bean;
/**

* @author 韩顺平

* @version 1.0

*/
public class Cat {} ===
=== === === === === === === === === ==
package com.hspedu.springboot.bean;
/**

* @author 韩顺平

* @version 1.0


*/
public class Dog {}
2
3
4
5
6
7
8
9
10
11
12
13
14
15
16
17
18
19
20
21
22
- 修改 BeanConfig.java 通过@Import 注入组件
 /**

 * Import 可以传入一个数组,可以一次注入多个组件

 * public @interface Import {

 Class<?>[] value();

 *

 * }

 * 注意@Import 方式注入的组件, 默认组件的名字就是全类名

 */
 @Import({
     Dog.class
     , Cat.class
 })
 // @Configuration//标识这是一个配置类: 等价配置文件
 @Configuration(proxyBeanMethods = false)
 public class BeanConfig {}
2
3
4
5
6
7
8
9
10
11
12
13
14
15
16
17
18
19
20
21
22
- 修改 MainApp.java 完成测试
public static void main(String[] args) {
    //启动SpringBoot 应用程序
    ConfigurableApplicationContext ioc = SpringApplication.run(MainApp.class, args);
    // //查看容器里面的组件
    // String[] beanDefinitionNames = ioc.getBeanDefinitionNames();
    // for (String beanDefinitionName : beanDefinitionNames) {
    System.out.println(beanDefinitionName);
    //
    // }
    //老韩解读
    //1. ioc.getBean("monster01", Monster.class) 是从BeanConfig 配置类/容器获取bean 实例
    //2. 默认是单列模式, 所以 monster01 == monster02
    //获取BeanConfig 配置类的组件/bean 实例
    Monster monster01 = ioc.getBean("monster01", Monster.class);
    System.out.println(monster01);
    Monster monster02 = ioc.getBean("monster01", Monster.class);
    System.out.println(monster01 == monster02);
    //老韩解读
    //配置类本身也是组件, 因此也可以获取
    BeanConfig beanConfig = ioc.getBean(BeanConfig.class);
    System.out.println("beanConfig= " + beanConfig);
    Monster monster03 = beanConfig.monster01();
    Monster monster04 = beanConfig.monster01();
    System.out.println("monster03 == monster04 : " + (monster03 == monster04));
    System.out.println("======获取@import 注入的组件======");
    Dog dog = ioc.getBean(Dog.class);
    //通过@import 注入的组件, 组件的名字 就是全类名
    String[] beanNamesForType = ioc.getBeanNamesForType(Dog.class);
    for (String s: beanNamesForType) {
        System.out.println("s= " + s);
    }
    Cat cat = ioc.getBean(Cat.class);
    System.out.println("dog= " + dog + " cat= " + cat);
}
2
3
4
5
6
7
8
9
10
11
12
13
14
15
16
17
18
19
20
21
22
23
24
25
26
27
28
29
30
31
32
33
34
35
# 3.4 @Conditional
# 3.4.1 @Conditional 介绍
条件装配:满足 Conditional 指定的条件,则进行组件注入
@Conditional 是一个根注解,下面有很多扩展注解
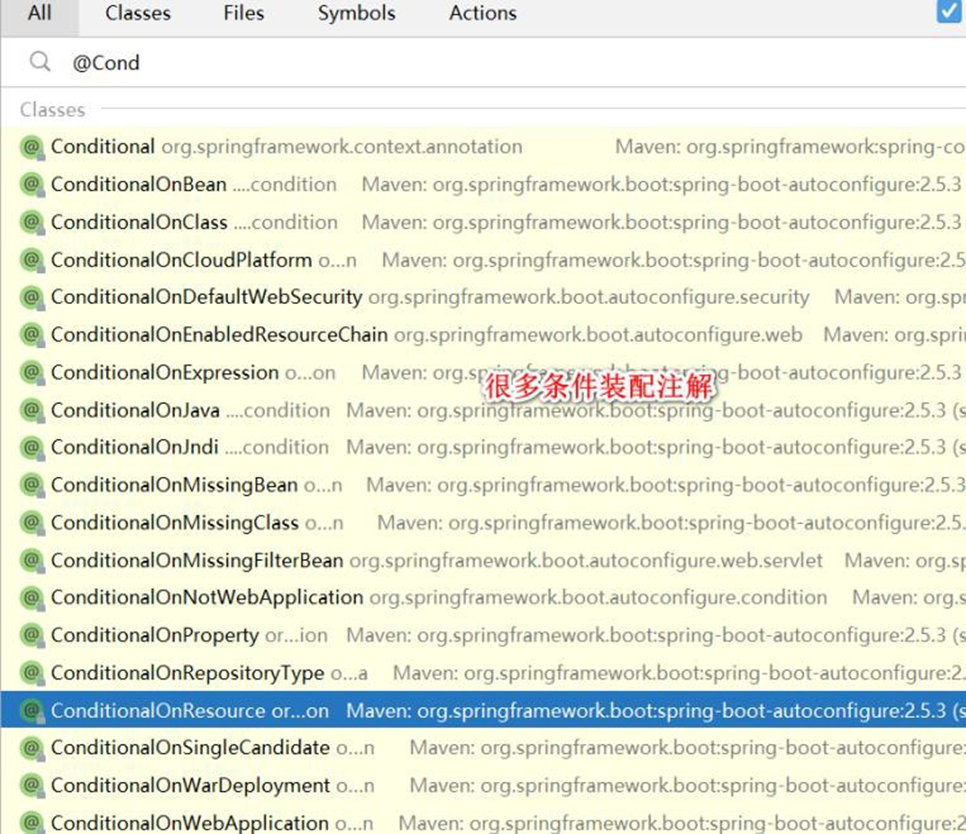
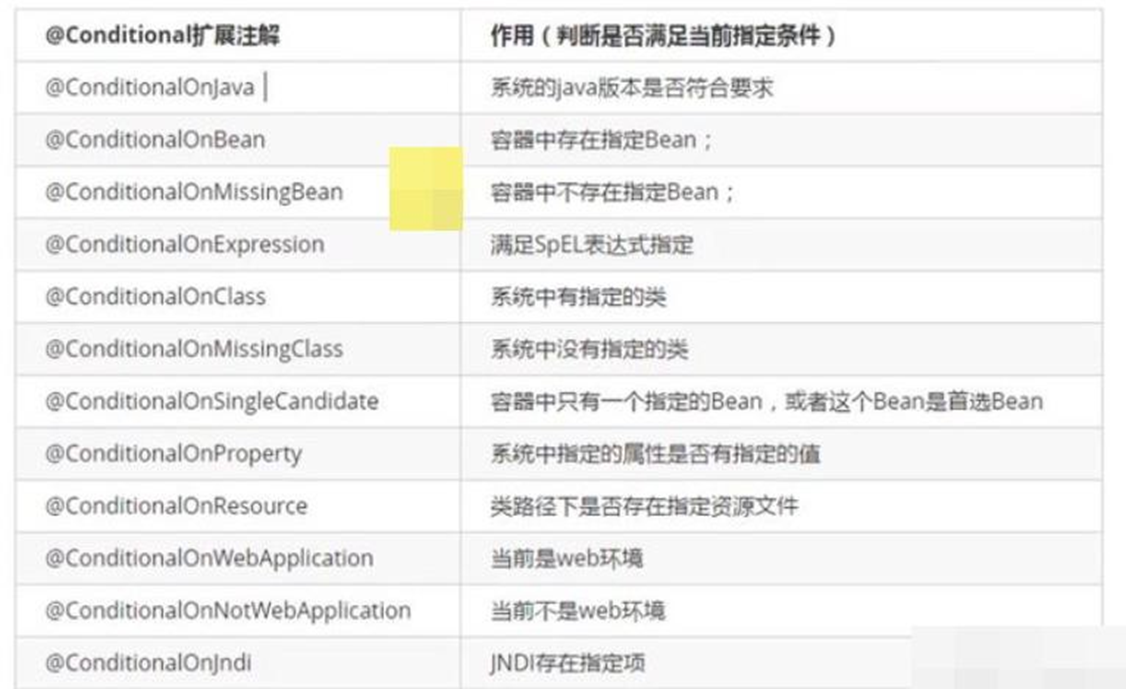
# 3.4.2 应用实例
要求: 演示在 SpringBoot, 如何通过 @ConditionalOnBean 来注入组件
只有在容器中有 name = monster_nmw 组件时,才注入 dog01, 代码如图
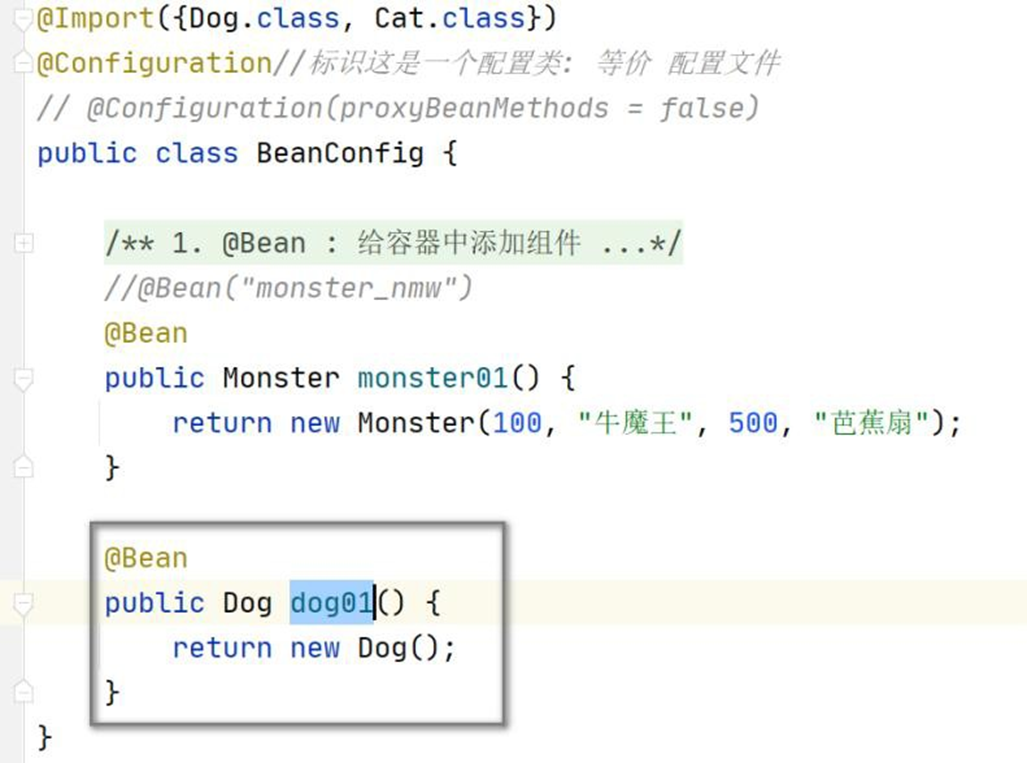
@Bean
public Dog dog01() {
    return new Dog();
}
2
3
4
- 先测试下,当前是否能注入 dog01
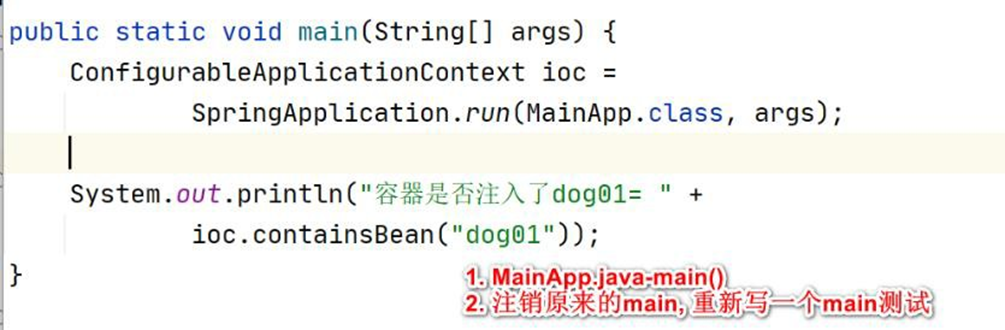
System.out.println("容器是否注入了dog01= " + ioc.containsBean("dog01"));
- 修改 BeanConfig.java , 加入@ConditionalOnBean 条件约束,并完成测试
package com.hspedu.springboot.config;
import com.hspedu.springboot.bean.Cat;
import com.hspedu.springboot.bean.Dog;
import com.hspedu.springboot.bean.Furn;
import com.hspedu.springboot.bean.Monster;
import org.springframework.boot.autoconfigure.condition.ConditionalOnBean;
import org.springframework.boot.autoconfigure.condition.ConditionalOnMissingBean;
import org.springframework.boot.context.properties.EnableConfigurationProperties;
import org.springframework.context.annotation.Bean;
import org.springframework.context.annotation.Configuration;
import org.springframework.context.annotation.Import;
import org.springframework.context.annotation.ImportResource;
/**

* @author 韩顺平

* @version 1.0

* 1. proxyBeanMethods:代理bean 的方法

* (1)       Full(proxyBeanMethods      =       true)、【保证每个@Bean   方法被调用多少次返回的组件都是单 实

例的, 是代理方式】

* (2)       Lite(proxyBeanMethods      =      false) 【每个@Bean   方法被调用多少次返回的组件都是新创建

的, 是非代理方式】

* (3) 特别说明: proxyBeanMethods 是在 调用@Bean 方法 才生效,因此,需要先获取

BeanConfig 组件,再调用方法

* 而不是直接通过 SpringBoot 主程序得到的容器来获取bean

* (4) 如何选择: 组件依赖必须使用Full 模式默认。如果不需要组件依赖使用 Lite 模

* (5) Lite 模也称为轻量级模式,因为不检测依赖关系,运行速度快

*/
/**

* Import 可以传入一个数组,可以一次注入多个组件

* public @interface Import {

Class<?>[] value();

*

* }

* 注意@Import 方式注入的组件, 默认组件的名字就是全类名
*/
@Import({
    Dog.class
    , Cat.class
})
// @Configuration//标识这是一个配置类: 等价配置文件
@Configuration(proxyBeanMethods = false)
public class BeanConfig {
    /**

    * 1. @Bean : 给容器中添加组件

    * 2. monster01() : 默认方法名作为组件的id

    * 3. Monster: 返回类型就是组件类型, 返回的值就是 new Monster(100, "牛魔王", 500, "

    芭蕉扇")

    * 4. @Bean("monster_nmw"): 重新指定组件的 id = “monster_nmw”

    * 5. 配置类里面使用@Bean 标注在方法上给容器注册组件,默认是单实例的

    */
    // @Bean("monster_nmw")
    @Bean
    public Monster monster01() {
        return new Monster(100, "牛魔王", 500, "芭蕉扇");
    }
    /**

    * @ConditionalOnBean(name = "monster_nmw"):
    * 1. 表示只有容器中注入了 name = monster_nmw 的组件,下面的组件(dog01)才会被

    注入

    * 2. @ConditionalOnBean(name = "monster_nmw") 也可以放在类名处,
    *  则表示对该配置类中所有要注入
    *  的组件都进行条件约束
    *  3.  还有很多其它条件约束注解,用到时在讲解.
    */
    @ConditionalOnBean(name = "monster_nmw")
    @Bean
    public Dog dog01() {
        return new Dog();
    }
}
2
3
4
5
6
7
8
9
10
11
12
13
14
15
16
17
18
19
20
21
22
23
24
25
26
27
28
29
30
31
32
33
34
35
36
37
38
39
40
41
42
43
44
45
46
47
48
49
50
51
52
53
54
55
56
57
58
59
60
61
62
63
64
65
66
67
68
69
70
71
72
73
74
75
76
77
78
79
80
81
82
83
84
85
86
87
88
89
90
91
92
93
94
95
96
97
98
99
# 3.5 @ImportResource
# 3.5.1 作用:原生配置文件引入, 也就是可以直接导入 Spring 传统的 beans.xml ,可以认
为是 SpringBoot 对 Spring 容器文件的兼容.
# 3.5.2 @ImportResource 应用实例
- 需求: 将 beans.xml 导入到 BeanConfig.java 配置类, 并测试是否可以获得 beans.xml
注入/配置的组件
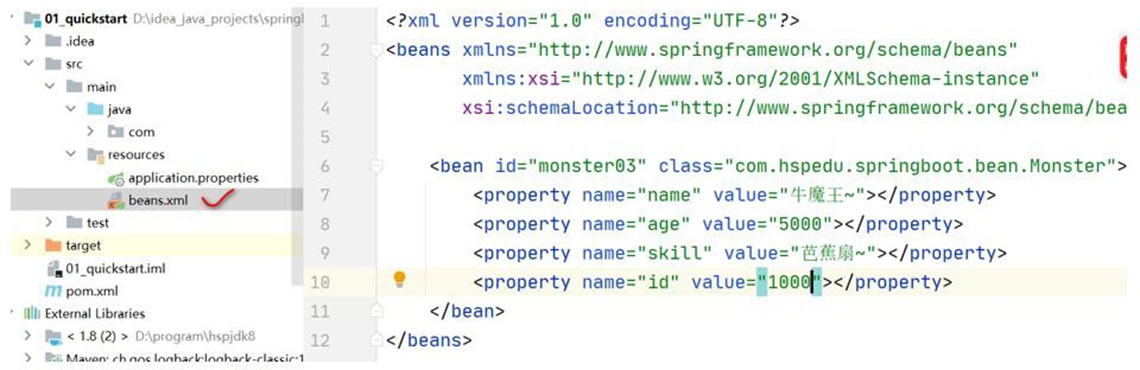
- 修改 BeanConfig.java / 或者创建新的 BeanConfig3.java(建议创建新的配置类) 来测试,
使用@ImportResource 导入 beans.xml
@Import({
    Dog.class
    , Cat.class
})
// @Configuration//标识这是一个配置类: 等价配置文件
@Configuration(proxyBeanMethods = false)
//导入beans.xml
@ImportResource("classpath:beans.xml")
public class BeanConfig {}
2
3
4
5
6
7
8
9
10
- 在 MainApp.java 测试
public static void main(String[] args) {
    ConfigurableApplicationContext ioc =
        SpringApplication.run(MainApp.class, args);
    System.out.println("容器是否注入了dog01= " +
        ioc.containsBean("dog01"));
    System.out.println("monster03: " + ioc.containsBean("monster03"));
    System.out.println(ioc.getBean("monster03"));
}
2
3
4
5
6
7
8
9
# 3.6 配置绑定
# 3.6.1 一句话:使用 Java 读取到 SpringBoot 核心配置文件 application.properties 的内容,
并且把它封装到 JavaBean 中
# 3.6.2 应用实例
- 需求: 将 application.properties 指定的 k-v 和 JavaBean 绑定
 #默认server.port=8080
server.port=10000
#比如:  默认spring.servlet.multipart.max-file-size=1MB
#默认配置最终都是映射到某个类上,比如这里配置会映射到MultipartProperties
spring.servlet.multipart.max-file-size=10MB
#设置属性k-v
furn01.id=100
furn01.name=soft_chair!!
furn01.price=45678.9
2
3
4
5
6
7
8
9
- 创建D:\idea_java_projects\springboot2\01_quickstart\src\main\java\com\hspedu\springboot\bean\Furn.java
package com.hspedu.springboot.bean;
import org.springframework.boot.context.properties.ConfigurationProperties;
import org.springframework.stereotype.Component;
/**

* @author 韩顺平

* @version 1.0

*/
/**

* 老韩解读

* 1. @Component 将Furn 注册为一个组件

* 2. @ConfigurationProperties(prefix = "furn01") 指定在application.properties 前缀

* 这样Furn 组件就会属性文件中的值绑定了

*/
@Component
@ConfigurationProperties(prefix = "furn01")
public class Furn {
    private Integer id;
    private String name;
    private Double price;
    public Integer getId() {
        return id;
    }
    public void setId(Integer id) {
        this.id = id;
    }
    public String getName() {
        return name;
    }
    public void setName(String name) {
        this.name = name;
    }
    public Double getPrice() {
        return price;
    }
    public void setPrice(Double price) {
        this.price = price;
    }
}
2
3
4
5
6
7
8
9
10
11
12
13
14
15
16
17
18
19
20
21
22
23
24
25
26
27
28
29
30
31
32
33
34
35
36
37
38
39
40
41
42
43
44
45
46
47
- 修改 HelloController.java
package com.hspedu.springboot.controller;
import com.hspedu.springboot.bean.Furn;
import org.springframework.beans.factory.annotation.Autowired;
import org.springframework.stereotype.Controller;
import org.springframework.web.bind.annotation.RequestMapping;
import org.springframework.web.bind.annotation.ResponseBody;
/**

* @author 韩顺平

* @version 1.0

*/
@Controller
public class HelloController {
    @RequestMapping("/hello")
    @ResponseBody
    public String hello() {
        return "hello, spring boot";
    }
    @Autowired
    Furn furn;
    @RequestMapping("/furn")
    @ResponseBody
    public Furn
    furn() {
        return
        furn;
    }
}
2
3
4
5
6
7
8
9
10
11
12
13
14
15
16
17
18
19
20
21
22
23
24
25
26
27
28
29
30
31
- 启动 SpringBoot 主程序,测试
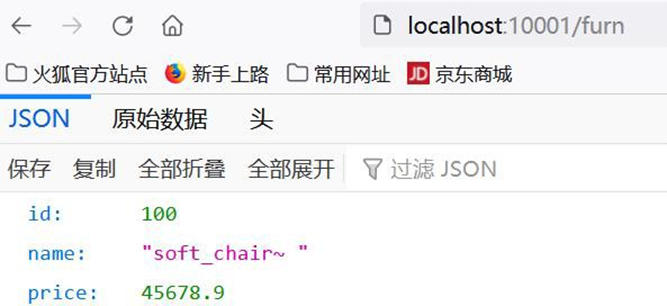
- 配置绑定还有第 2 种方式, 也给小伙伴演示下, 完成测试,效果一样, 注意: 注销
@Component 需要 在 BeanConfig.java( 老 韩 说 明: 也 可 以 是 其 它 配 置 类 ) 配 置
@EnableConfigurationProperties(Furn.class), 否则会提示错误
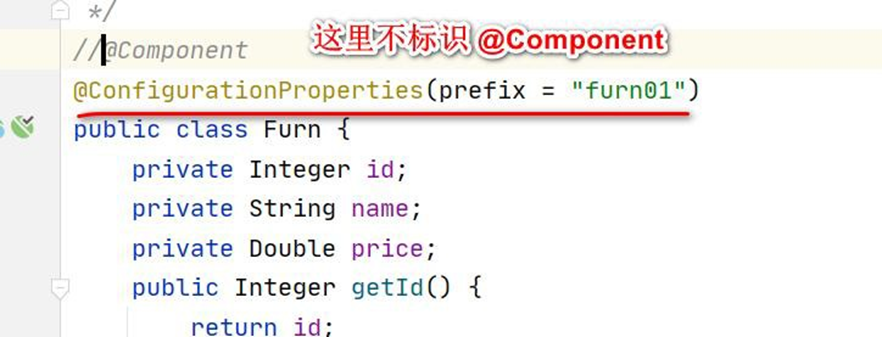
//@EnableConfigurationProperties(Furn.class)解读
//1、开启Furn 配置绑定功能
//2、把Furn 组件自动注册到容器中
@EnableConfigurationProperties(Furn.class)
public class BeanConfig {}
2
3
4
5
6
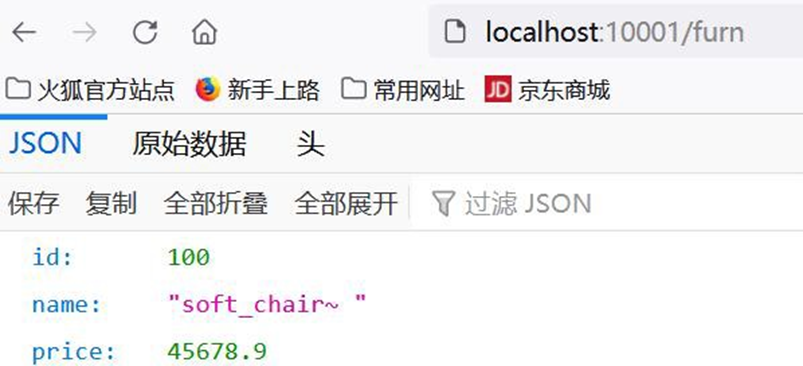
# 3.6.3 注意事项和细节
- 如果 application.properties 有中文, 需要转成 unicode 编码写入, 否则出现乱码
#设置属性k-v

furn01.id=100

furn01.name=soft_chair\u6c99\u53d1!!

furn01.price=45678.9
2
3
4
5
6
7
- 使用 @ConfigurationProperties(prefix = "furn01") 会提示如下信息, 但是不会影响使用

- 解决 @ConfigurationProperties(prefix = "furn01") 提示信息, 在 pom.xml 增加依赖, 即可
<dependency>
    <groupId>org.springframework.boot</groupId>
    <artifactId>spring-boot-configuration-processor</artifactId>
    <optional>true</optional>
</dependency>
2
3
4
5
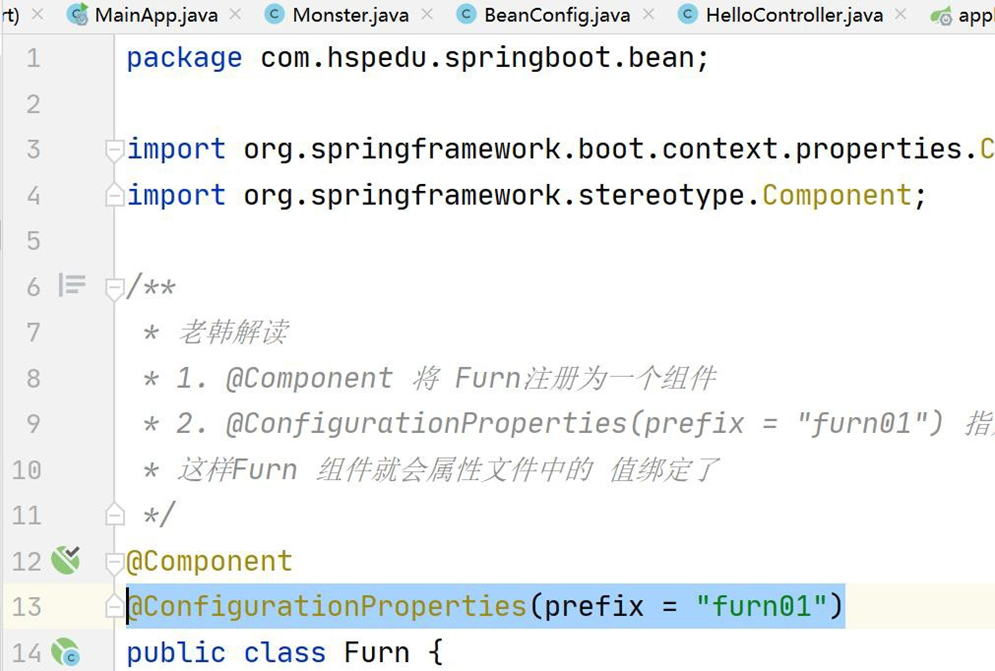
# 4 韩顺平 [新增]分析 SpringBoot 底层机制 【Tomcat 启动分析 +
Spring 容器初始化 +Tomcat 如何关联 Spring 容器 】
# 4.1 搭建 SpringBoot 底层机制开发环境
1、创建 Maven 项 目 hsp-springboot
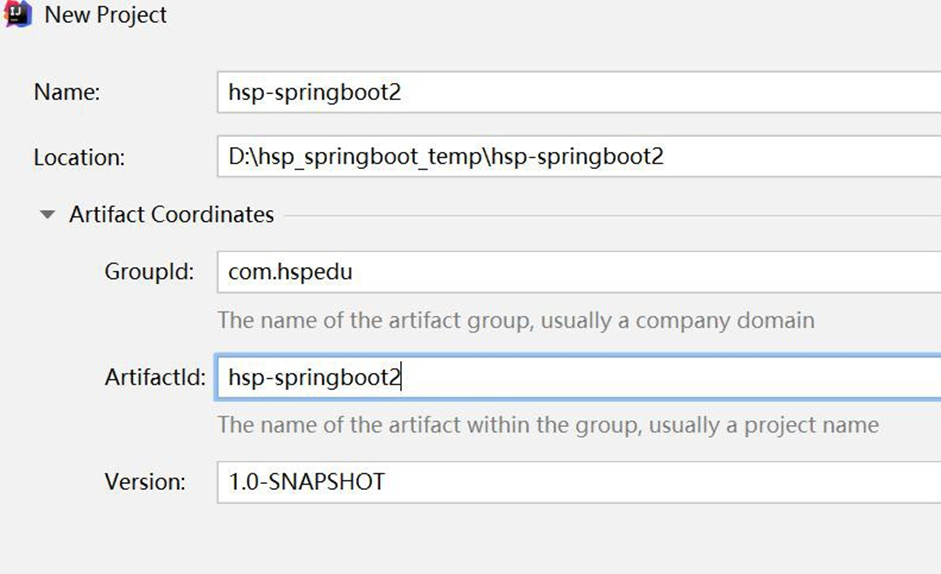
2、修改 D:\hsp_springboot_temp\hsp-springboot2\pom.xml , 导入相关依赖
<groupId>com.hspedu</groupId>
<artifactId>hsp-springboot2</artifactId>
<version>1.0-SNAPSHOT</version>
<!-- 导入springboot 父工程,规定的写法-->
<parent>
    <groupId>org.springframework.boot</groupId>
    <artifactId>spring-boot-starter-parent</artifactId>
    <version>2.5.3</version>
</parent>
<!-- 导入web 项目场景启动器,会自动导入和web 开发相关依赖,非常方便-->
<dependencies>
    <dependency>
        <groupId>org.springframework.boot</groupId>
        <artifactId>spring-boot-starter-web</artifactId>
    </dependency>
</dependencies>
2
3
4
5
6
7
8
9
10
11
12
13
14
15
16
3 创建 D:\hsp_springboot_temp\hsp-springboot2\src\main\java\com\hspedu\springboot\MainApp.java
package com.hspedu.springboot;
import org.springframework.boot.SpringApplication;
import org.springframework.boot.autoconfigure.SpringBootApplication;
import org.springframework.context.ConfigurableApplicationContext;
@SpringBootApplication
public class MainApp {
    public static void main(String[] args) {
        //启动SpringBoot 应用程序
        ConfigurableApplicationContext run =
            SpringApplication.run(MainApp.class, args);
    }
}
2
3
4
5
6
7
8
9
10
11
12
13
4、启动项目 ok, 大家注意 Tomcat 也启动了[这里请同学们先思考, 是如何实现的?]
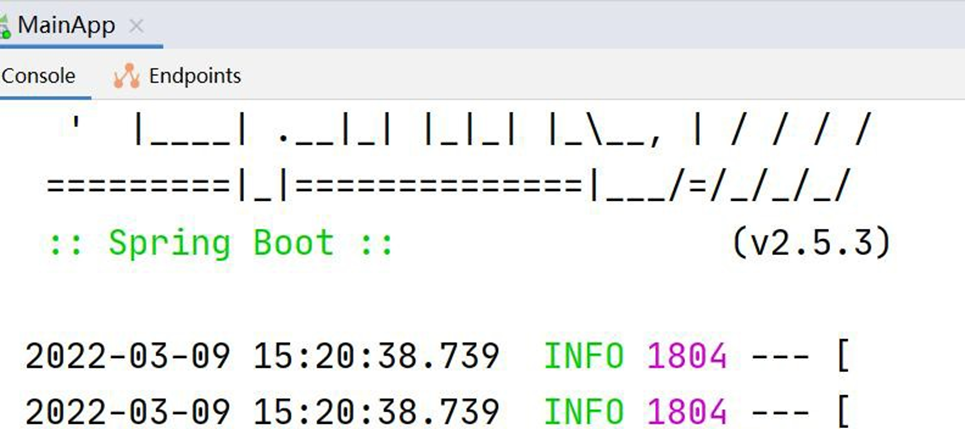
# 4.2 @Configuration + @Bean 会发生什么,并分析机制
- 创建 D:\hsp_springboot_temp\hsp-springboot2\src\main\java\com\hspedu\springboot\bean\Dog.java
package com.hspedu.springboot.bean;
public class Dog {}
2
3
- 创建 D:\hsp_springboot_temp\hsp-springboot2\src\main\java\com\hspedu\springboot\config\Config.java
 package com.hspedu.springboot.config;
 import com.hspedu.springboot.bean.Dog;
 import org.springframework.context.annotation.Bean;
 import org.springframework.context.annotation.Configuration;
 @Configuration
 public class Config {
     /**

     * 1. 通过@Bean 的方式, 将new 出来的Bean 对象, 放入到Spring 容器

     * 2. 该bean 在Spring 容器的name 就是方法名

     * 3. 通过方法名, 可以得到new Dog()

     * @return

     */
     @Bean
     public Dog dog() {
         return new Dog();
     }
 }
2
3
4
5
6
7
8
9
10
11
12
13
14
15
16
17
18
19
20
21
22
23
- Debug D:\hsp_springboot_temp\hsp-springboot2\src\main\java\com\hspedu\springboot\MainApp.java, 看看容器中是否已经注入了 dog 实例
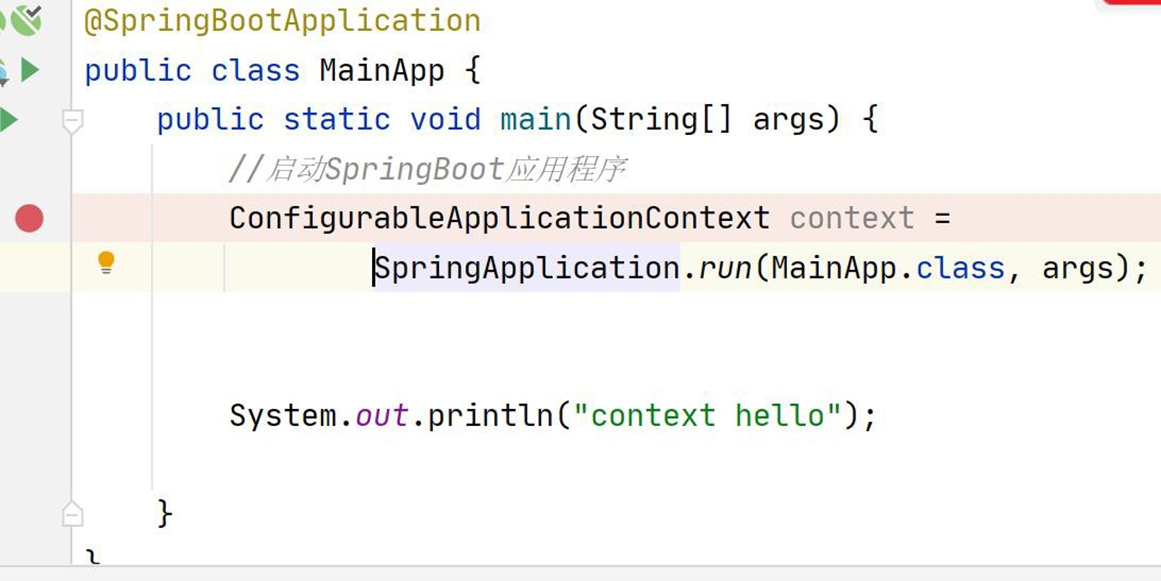
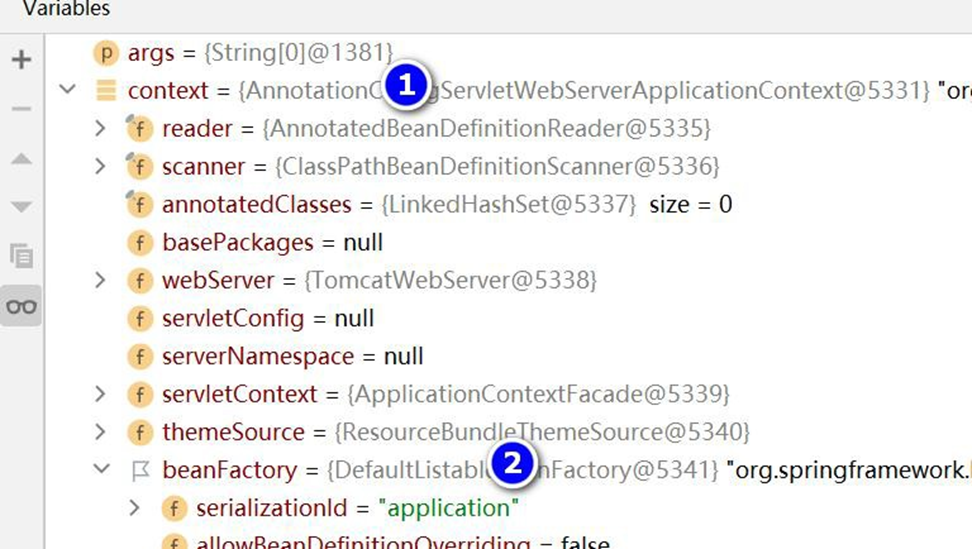
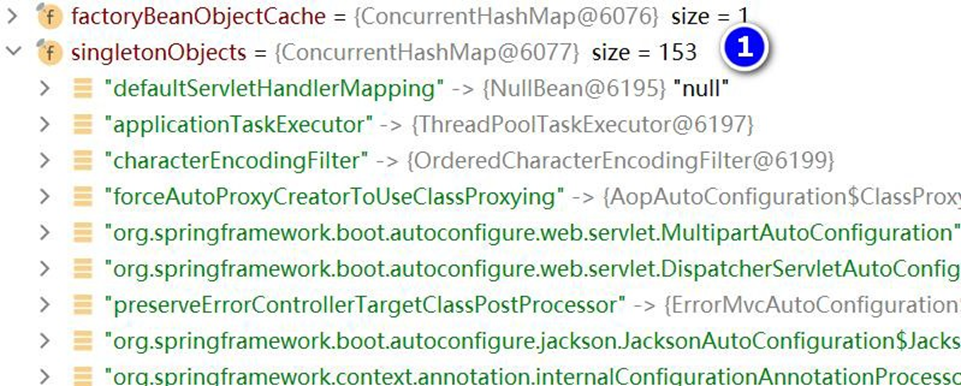
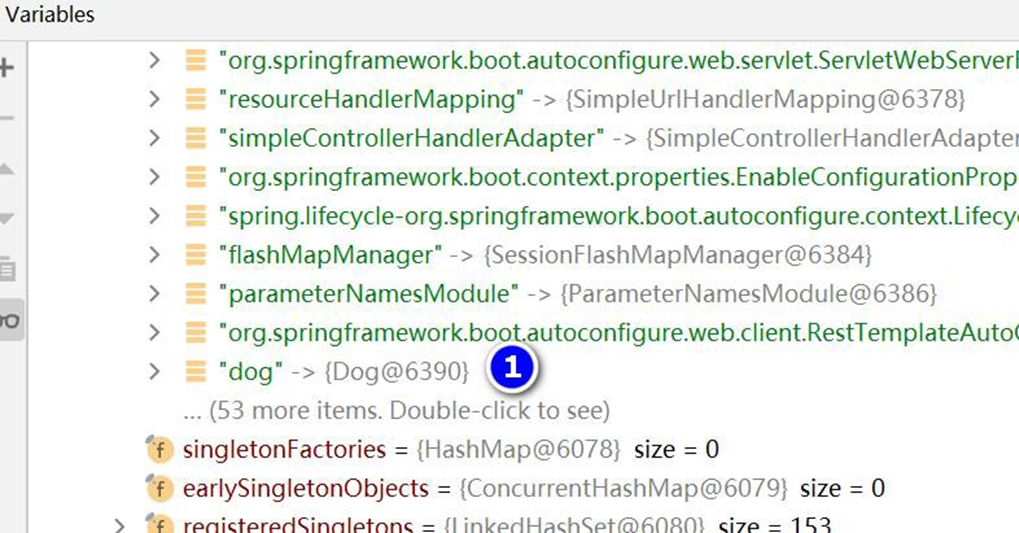
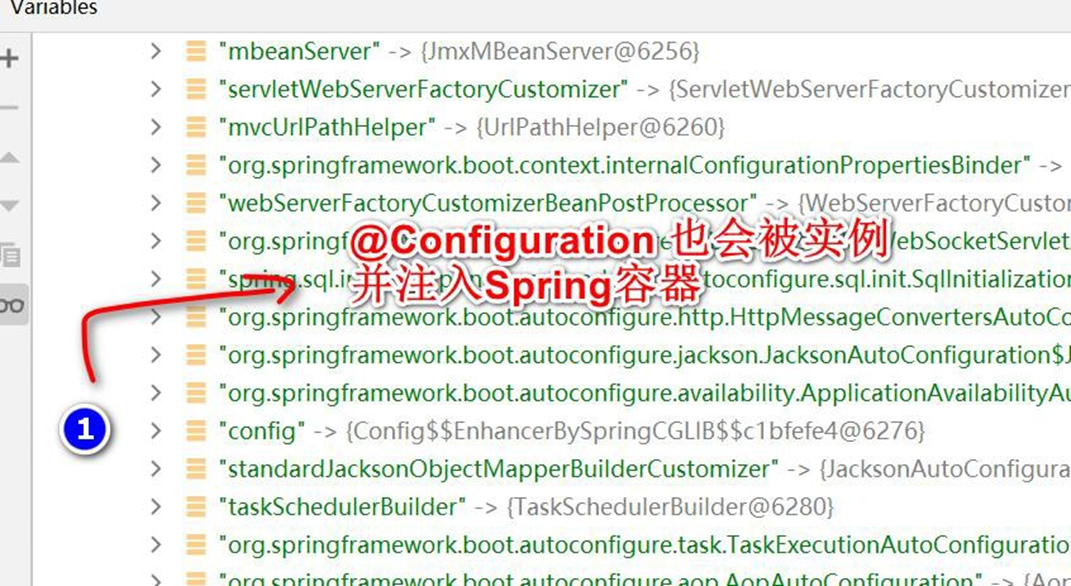
4、老韩底层机制分析: 仍然是 我们实现 Spring 容器那一套机制 IO/文件扫描+注解+反射+
集合+映射 , 提示: 回去看我们讲过的-"实现 Spring 底层机制程序" , 就会回忆起来的. [给学
员指出课程位置..]
-通透
# 4.3 提出问题:SpringBoot 是怎么启动 Tomcat ,并可以支持访问@Controller
- 创建 D:\hsp_springboot_temp\hsp-springboot2\src\main\java\com\hspedu\springboot\controller\HiController.java
package com.hspedu.springboot.controller;
import org.springframework.stereotype.Controller;
import org.springframework.web.bind.annotation.RequestMapping;
import org.springframework.web.bind.annotation.RestController;
@RestController
public class HiController {
    @RequestMapping("/hi")
    public String hi() {
        System.out.println("hi i am HiController");
        return "hi i am HiController";
    }
}
2
3
4
5
6
7
8
9
10
11
12
13
2、完成测试 , 浏览器输入 http://localhost:8080/hi
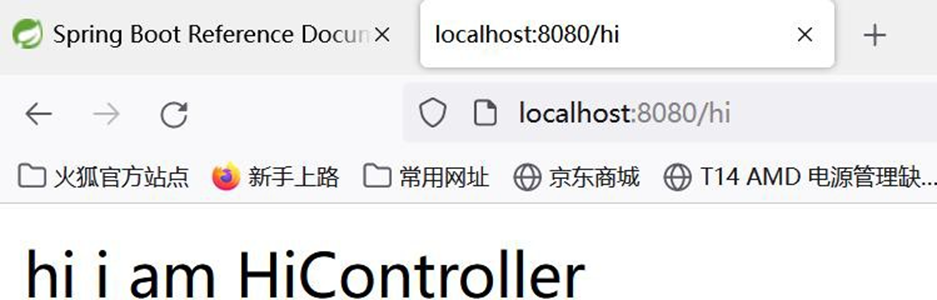
3、老韩问题: SpringBoot 是怎么内嵌 Tomcat, 并启动 Tomcat 的? => 老韩会给小伙伴追踪源码
# 4.4 源码分析: SpringApplication.run()
1、Debug SpringApplication.run(MainApp.class, args) 看看 SpringBoot 是如何启动 Tomcat 的.
2、我们的 Debug 目标: 紧抓一条线, 就是看到 tomcat 被启动的代码. 比如 tomcat.start()

package com.hspedu.springboot;

import org.springframework.boot.SpringApplication;
import org.springframework.boot.autoconfigure.SpringBootApplication;
import org.springframework.context.ConfigurableApplicationContext;

/**
 * @author 韩顺平
 * @version 1.0
 */
@SpringBootApplication
public class MainApp {
    public static void main(String[] args) {

        //启动springboot应用程序/项目
        //老师提出问题: 当我们执行run方法时,怎么就启动我们的内置的tomcat?
        //在分析run方法的底层机制的基础上,我们自己尝试实现
        ConfigurableApplicationContext ioc =
                SpringApplication.run(MainApp.class, args);

        /**
         *  这里我们开始Debug SpringApplication.run()
         *  1. SpringApplication.java
         *  public static ConfigurableApplicationContext run(Class<?> primarySource, String... args) {
         * 		return run(new Class<?>[] { primarySource }, args);
         *   }
         *
         *  2.SpringApplication.java : 创建返回 ConfigurableApplicationContext对象
         *  public static ConfigurableApplicationContext run(Class<?>[] primarySources, String[] args) {
         * 		return new SpringApplication(primarySources).run(args);
         *        }
         *
         *  3. SpringApplication.java
         *
         *  public ConfigurableApplicationContext run(String... args) {
         * 		StopWatch stopWatch = new StopWatch();
         * 		stopWatch.start();
         * 		DefaultBootstrapContext bootstrapContext = createBootstrapContext();
         * 		ConfigurableApplicationContext context = null;
         * 		configureHeadlessProperty();
         * 		SpringApplicationRunListeners listeners = getRunListeners(args);
         * 		listeners.starting(bootstrapContext, this.mainApplicationClass);
         * 		try {
         * 			ApplicationArguments applicationArguments = new DefaultApplicationArguments(args);
         * 			ConfigurableEnvironment environment = prepareEnvironment(listeners, bootstrapContext, applicationArguments);
         * 			configureIgnoreBeanInfo(environment);
         * 			Banner printedBanner = printBanner(environment);
         * 			context = createApplicationContext(); //严重分析: 创建容器
         * 			context.setApplicationStartup(this.applicationStartup);
         * 			prepareContext(bootstrapContext, context, environment, listeners, applicationArguments, printedBanner);
         * 			refreshContext(context); //严重分析: 刷新应用程序上下文,比如 初始化默认设置/注入相关Bean/启动tomcat
         * 			afterRefresh(context, applicationArguments);
         * 			stopWatch.stop();
         * 			if (this.logStartupInfo) {
         * 				new StartupInfoLogger(this.mainApplicationClass).logStarted(getApplicationLog(), stopWatch);
         *                        }
         * 			listeners.started(context);
         * 			callRunners(context, applicationArguments);* 		}
         * 		catch (Throwable ex) {
         * 			handleRunFailure(context, ex, listeners);
         * 			throw new IllegalStateException(ex);
         * 		}
         *
         * 		try {
         * 			listeners.running(context);
         * 		}
         * 		catch (Throwable ex) {
         * 			handleRunFailure(context, ex, null);
         * 			throw new IllegalStateException(ex);
         * 		}
         * 		return context;
         * 	}
         *
         * 	4. SpringApplication.java : 容器类型很多,会根据你的this.webApplicationType创建对应的容器
         * 	默认 this.webApplicationType 是 SERVLET 也就是web容器/可以处理servlet
         * 	protected ConfigurableApplicationContext createApplicationContext() {
         * 		return this.applicationContextFactory.create(this.webApplicationType);
         *        }
         *
         *  5. ApplicationContextFactory.java
         *
         *  ApplicationContextFactory DEFAULT = (webApplicationType) -> {
         * 		try {
         * 			switch (webApplicationType) {
         * 			case SERVLET://默认是进入到这个分支 ,返回AnnotationConfigServletWebServerApplicationContext容器
         * 				return new AnnotationConfigServletWebServerApplicationContext();
         * 			case REACTIVE:
         * 				return new AnnotationConfigReactiveWebServerApplicationContext();
         * 			default:
         * 				return new AnnotationConfigApplicationContext();
         *                        }* 		}
         * 		catch (Exception ex) {
         * 			throw new IllegalStateException("Unable create a default ApplicationContext instance, "
         * 					+ "you may need a custom ApplicationContextFactory", ex);
         * 		}
         * 	};
         *
         * 	6. SpringApplication.java
         * 	private void refreshContext(ConfigurableApplicationContext context) {
         * 		if (this.registerShutdownHook) {
         * 			shutdownHook.registerApplicationContext(context);
         *                }
         * 		refresh(context); //严重分析,真正执行相关任务
         *  }
         *
         *  7. SpringApplication.java
         *  protected void refresh(ConfigurableApplicationContext applicationContext) {
         * 		applicationContext.refresh();
         *    }
         *
         *
         *  8. ServletWebServerApplicationContext.java
         *  @Override
         *        public final void refresh() throws BeansException, IllegalStateException {
         * 		try {
         * 			super.refresh();//分析这个方法
         *        }
         * 		catch (RuntimeException ex) {
         * 			WebServer webServer = this.webServer;
         * 			if (webServer != null) {
         * 				webServer.stop();
         *            }
         * 			throw ex;
         *        }
         *    }
         *
         * 9. AbstractApplicationContext.java
         *
         * @Override
         *        public void refresh() throws BeansException, IllegalStateException {
         * 		synchronized (this.startupShutdownMonitor) {
         * 			StartupStep contextRefresh = this.applicationStartup.start("spring.context.refresh");
         *
         * 			// Prepare this context for refreshing.
         * 			prepareRefresh();
         *
         * 			// Tell the subclass to refresh the internal bean factory.
         * 			ConfigurableListableBeanFactory beanFactory = obtainFreshBeanFactory();
         *
         * 			// Prepare the bean factory for use in this context.
         * 			prepareBeanFactory(beanFactory);
         *
         * 			try {
         * 				// Allows post-processing of the bean factory in context subclasses.
         * 				postProcessBeanFactory(beanFactory);
         *
         * 				StartupStep beanPostProcess = this.applicationStartup.start("spring.context.beans.post-process");
         * 				// Invoke factory processors registered as beans in the context.
         * 				invokeBeanFactoryPostProcessors(beanFactory);
         *
         * 				// Register bean processors that intercept bean creation.
         * 				registerBeanPostProcessors(beanFactory);
         * 				beanPostProcess.end();
         *
         * 				// Initialize message source for this context.
         * 				initMessageSource();
         *
         * 				// Initialize event multicaster for this context.
         * 				initApplicationEventMulticaster();
         *
         * 				// Initialize other special beans in specific context subclasses.
         * 				onRefresh(); //严重分析,当父类完成通用的工作后,再重新动态绑定机制回到子类
         *
         * 				// Check for listener beans and register them.
         * 				registerListeners();
         *
         * 				// Instantiate all remaining (non-lazy-init) singletons.
         * 				finishBeanFactoryInitialization(beanFactory);
         *
         * 				// Last step: publish corresponding event.
         * 				finishRefresh();
         *            }
         *
         * 			catch (BeansException ex) {
         * 				if (logger.isWarnEnabled()) {
         * 					logger.warn("Exception encountered during context initialization - " +
         * 							"cancelling refresh attempt: " + ex);
         *                }
         *
         * 				// Destroy already created singletons to avoid dangling resources.
         * 				destroyBeans();
         *
         * 				// Reset 'active' flag.
         * 				cancelRefresh(ex);
         *
         * 				// Propagate exception to caller.
         * 				throw ex;
         *            }
         *
         * 			finally {
         * 				// Reset common introspection caches in Spring's core, since we
         * 				// might not ever need metadata for singleton beans anymore...
         * 				resetCommonCaches();
         * 				contextRefresh.end();
         *            }
         *        }
         *    }
         *  10. ServletWebServerApplicationContext.java
         *  @Override
         * 	protected void onRefresh() {
         * 		super.onRefresh();
         * 		try {
         * 			createWebServer();//看到胜利的曙光,创建webserver 可以理解成会创建指定web服务-Tomcat
         *                }
         * 		catch (Throwable ex) {
         * 			throw new ApplicationContextException("Unable to start web server", ex);
         *        }    * 	}
         *   11. ServletWebServerApplicationContext.java
         *
         *   private void createWebServer() {
         * 		WebServer webServer = this.webServer;
         * 		ServletContext servletContext = getServletContext();
         * 		if (webServer == null && servletContext == null) {
         * 			StartupStep createWebServer = this.getApplicationStartup().start("spring.boot.webserver.create");
         * 			ServletWebServerFactory factory = getWebServerFactory();
         * 			createWebServer.tag("factory", factory.getClass().toString());
         * 			this.webServer = factory.getWebServer(getSelfInitializer());//严重分析,使用TomcatServletWebServerFactory 创建一个TomcatWebServer
         * 			createWebServer.end();
         * 			getBeanFactory().registerSingleton("webServerGracefulShutdown",
         * 					new WebServerGracefulShutdownLifecycle(this.webServer));
         * 			getBeanFactory().registerSingleton("webServerStartStop",
         * 					new WebServerStartStopLifecycle(this, this.webServer));
         *                }
         * 		else if (servletContext != null) {
         * 			try {
         * 				getSelfInitializer().onStartup(servletContext);
         *            }
         * 			catch (ServletException ex) {
         * 				throw new ApplicationContextException("Cannot initialize servlet context", ex);
         *            }
         *        }
         * 		initPropertySources();    * 	}
         *
         * 	12. TomcatServletWebServerFactory.java 会创建Tomcat 并启动Tomcat
         *
         *        @Override
         *    public WebServer getWebServer(ServletContextInitializer... initializers) {
         * 		if (this.disableMBeanRegistry) {
         * 			Registry.disableRegistry();
         *        }
         * 		Tomcat tomcat = new Tomcat();//创建了Tomcat对象
         * 		File baseDir = (this.baseDirectory != null) ? this.baseDirectory : createTempDir("tomcat");
         * 	    //做了一系列的设置
         * 		tomcat.setBaseDir(baseDir.getAbsolutePath());
         *
         * 		Connector connector = new Connector(this.protocol);
         * 		connector.setThrowOnFailure(true);
         * 		tomcat.getService().addConnector(connector);
         * 		customizeConnector(connector);
         * 		tomcat.setConnector(connector);
         * 		tomcat.getHost().setAutoDeploy(false);
         * 		configureEngine(tomcat.getEngine());
         * 		for (Connector additionalConnector : this.additionalTomcatConnectors) {
         * 			tomcat.getService().addConnector(additionalConnector);
         *        }
         * 		prepareContext(tomcat.getHost(), initializers);
         * 		return getTomcatWebServer(tomcat); //严重分析该方法.
         *    }
         *
         *    13. TomcatServletWebServerFactory.java , 这里做了校验创建 TomcatWebServer
         *    protected TomcatWebServer getTomcatWebServer(Tomcat tomcat) {
         * 		return new TomcatWebServer(tomcat, getPort() >= 0, getShutdown());
         *        }
         *    14. TomcatServletWebServerFactory.java
         *    public TomcatWebServer(Tomcat tomcat, boolean autoStart, Shutdown shutdown) {
         * 		Assert.notNull(tomcat, "Tomcat Server must not be null");
         * 		this.tomcat = tomcat;
         * 		this.autoStart = autoStart;
         * 		this.gracefulShutdown = (shutdown == Shutdown.GRACEFUL) ? new GracefulShutdown(tomcat) : null;
         * 		initialize();//分析这个方法.
         *        }
         *    15.TomcatServletWebServerFactory.java
         *
         *    private void initialize() throws WebServerException {
         * 		logger.info("Tomcat initialized with port(s): " + getPortsDescription(false));
         * 		synchronized (this.monitor) {
         * 			try {
         * 				addInstanceIdToEngineName();
         *
         * 				Context context = findContext();
         * 				context.addLifecycleListener((event) -> {
         * 					if (context.equals(event.getSource()) && Lifecycle.START_EVENT.equals(event.getType())) {
         * 						// Remove service connectors so that protocol binding doesn't
         * 						// happen when the service is started.
         * 						removeServiceConnectors();
         *                                        }                * 				});
         *
         * 				// Start the server to trigger initialization listeners
         * 				this.tomcat.start(); //启动Tomcat
         *
         * 				// We can re-throw failure exception directly in the main thread
         * 				rethrowDeferredStartupExceptions();
         *
         * 				try {
         * 					ContextBindings.bindClassLoader(context, context.getNamingToken(), getClass().getClassLoader());
         *                }
         * 				catch (NamingException ex) {
         * 					// Naming is not enabled. Continue
         *                }
         *
         * 				// Unlike Jetty, all Tomcat threads are daemon threads. We create a
         * 				// blocking non-daemon to stop immediate shutdown
         * 				startDaemonAwaitThread();
         *            }
         * 			catch (Exception ex) {
         * 				stopSilently();
         * 				destroySilently();
         * 				throw new WebServerException("Unable to start embedded Tomcat", ex);
         *            }
         *        }
         *    }
         */
        System.out.println("hello ioc");

    }
}
2
3
4
5
6
7
8
9
10
11
12
13
14
15
16
17
18
19
20
21
22
23
24
25
26
27
28
29
30
31
32
33
34
35
36
37
38
39
40
41
42
43
44
45
46
47
48
49
50
51
52
53
54
55
56
57
58
59
60
61
62
63
64
65
66
67
68
69
70
71
72
73
74
75
76
77
78
79
80
81
82
83
84
85
86
87
88
89
90
91
92
93
94
95
96
97
98
99
100
101
102
103
104
105
106
107
108
109
110
111
112
113
114
115
116
117
118
119
120
121
122
123
124
125
126
127
128
129
130
131
132
133
134
135
136
137
138
139
140
141
142
143
144
145
146
147
148
149
150
151
152
153
154
155
156
157
158
159
160
161
162
163
164
165
166
167
168
169
170
171
172
173
174
175
176
177
178
179
180
181
182
183
184
185
186
187
188
189
190
191
192
193
194
195
196
197
198
199
200
201
202
203
204
205
206
207
208
209
210
211
212
213
214
215
216
217
218
219
220
221
222
223
224
225
226
227
228
229
230
231
232
233
234
235
236
237
238
239
240
241
242
243
244
245
246
247
248
249
250
251
252
253
254
255
256
257
258
259
260
261
262
263
264
265
266
267
268
269
270
271
272
273
274
275
276
277
278
279
280
281
282
283
284
285
286
287
288
289
290
291
292
293
294
295
296
297
298
299
300
301
302
303
304
305
306
307
308
309
310
311
312
313
314
315
316
317
# 4.5 实现 SpringBoot 底层机制 【Tomcat 启动分析 + Spring 容器初始化+Tomcat 如何关联Spring 容器 】
# 4.5.1 实现任务阶段 1- 创建 Tomcat, 并启动
# 4.5.1.1 说明: 创建 Tomcat, 并启动
# 4.5.1.2 分析+代码实现
● 代码实现
0、修改 D:\hsp_springboot_temp\hsp-springboot2\pom.xml
<?xml version="1.0" encoding="UTF-8"?>
<project
    xmlns="http://maven.apache.org/POM/4.0.0"
    xmlns:xsi="http://www.w3.org/2001/XMLSchema-instance"

xsi:schemaLocation="http://maven.apache.org/POM/4.0.0

http://maven.apache.org/xsd/maven-4.0.0.xsd">
    <modelVersion>4.0.0</modelVersion>
    <groupId>com.hspedu</groupId>
    <artifactId>hsp-springboot2</artifactId>
    <version>1.0-SNAPSHOT</version>
    <!-- 导入springboot 父工程,规定的写法

老韩解读:

1. springboot 我们指定2.5.3

-->
    <parent>
        <groupId>org.springframework.boot</groupId>
        <artifactId>spring-boot-starter-parent</artifactId>
        <version>2.5.3</version>
    </parent>
    <!-- 导入web 项目场景启动器,会自动导入和web 开发相关依赖,非常方便-->
    <dependencies>
        <dependency>
            <groupId>org.springframework.boot</groupId>
            <artifactId>spring-boot-starter-web</artifactId>
            <exclusions>
                <exclusion>
                    <groupId>org.springframework.boot</groupId>
                    <artifactId>spring-boot-starter-tomcat</artifactId>
                </exclusion>
            </exclusions>
        </dependency>
        <!--用我们指定tomcat 版本来完, 可以到mvn 去获取依赖坐标.

老韩解读:

1. 使用指定的tomcat 才会验证效果高版本的tomcat 默认不会真正监听

2. 使用了指定tomcat , 需要在spring-boot-starter-web 排除内嵌的

starter-tomcat

3. 否则会出现包冲突, 提示GenericServlet Not Found 类似错误

-->
        <dependency>
            <groupId>org.apache.tomcat.embed</groupId>
            <artifactId>tomcat-embed-core</artifactId>
            <version>8.5.75</version>
        </dependency>
    </dependencies>
</project>
2
3
4
5
6
7
8
9
10
11
12
13
14
15
16
17
18
19
20
21
22
23
24
25
26
27
28
29
30
31
32
33
34
35
36
37
38
39
40
41
42
43
44
45
46
47
48
49
50
51
52
53
54
55
56
57
58
- 创建 D:\hsp_springboot_temp\hsp-springboot2\src\main\java\com\hspedu\hspspringboot\HspSpringApplication.java
package com.hspedu.hspspringboot;
import org.apache.catalina.startup.Tomcat;
public class HspSpringApplication {
    public static void run() {
        try {
            Tomcat tomcat = new Tomcat();
            tomcat.setPort(9090);
            //启动Tomcat
            tomcat.start();
            //等待请求接入
            System.out.println("=====9090====等待请求");
            tomcat.getServer()
                .await();
        }
        catch (Exception e) {
            e.printStackTrace();
        }
    }
}
2
3
4
5
6
7
8
9
10
11
12
13
14
15
16
17
18
19
20
- 创建 D:\hsp_springboot_temp\hsp-springboot2\src\main\java\com\hspedu\hspspringboot\HspMainApp.java
package com.hspedu.hspspringboot;
public class HspMainApp {
    public static void main(String[] args) {
        //启动HspSpringboot 项目
        HspSpringApplication.run();
    }
}
2
3
4
5
6
7
8
# 4.5.1.3 完成测试
1、运行效果
三月 09, 2022 6:51:07  下午 org.apache.coyote.AbstractProtocol init

信息: Initializing ProtocolHandler ["http-nio-9090"]

三月 09, 2022 6:51:08  下午 org.apache.tomcat.util.net.NioSelectorPool getSharedSelector

信息: Using a shared selector for servlet write/read

三月 09, 2022 6:51:08  下午 org.apache.catalina.core.StandardService startInternal

信息: Starting service Tomcat

三月 09, 2022 6:51:08  下午 org.apache.coyote.AbstractProtocol start

信息: Starting ProtocolHandler ["http-nio-9090"]

=====9090====等待请求
2
3
4
5
6
7
8
9
10
11
12
13
14
15
16
17

2、浏览器请求, http://localhost:9090/ , 这时没有返回信息
# 4.5.2 实现任务阶段 2- 创建 Spring 容器
# 4.5.2.1 说明: 创建 Spring 容器
# 4.5.2.2 分析+代码实现
● 代码实现
- 创建 D:\hsp_springboot_temp\hsp-springboot2\src\main\java\com\hspedu\hspspringboot\bean\Monster.java , 做一个测试 Bean
package com.hspedu.hspspringboot.bean;
public class Monster {}
2
3
- 创建 D:hsp_springboot_temp\hsp-springboot2\src\main\java\com\hspedu\hspspringboot\controlller\HiController.java, 作为 Controller
package com.hspedu.hspspringboot.controlller;
import org.springframework.stereotype.Controller;
import org.springframework.web.bind.annotation.RequestMapping;
import org.springframework.web.bind.annotation.RestController;
import javax.servlet.http.HttpServletResponse;
@RestController
public class HiController {
    @RequestMapping("/hi")
    public String hi(HttpServletResponse response) {
        System.out.println("hi i am HiController");
        return "hi i am HiController~~~";
    }
}
2
3
4
5
6
7
8
9
10
11
12
13
14
- 创建 D:\hsp_springboot_temp\hsp-springboot2\src\main\java\com\hspedu\hspspringboot\config\HspConfig.java , 作为 Spring 的配置文件.
package com.hspedu.hspspringboot.config;
import com.hspedu.hspspringboot.bean.Monster;
import org.springframework.context.annotation.Bean;
import org.springframework.context.annotation.ComponentScan;
import org.springframework.context.annotation.Configuration;
import org.springframework.web.servlet.view.InternalResourceViewResolver;
@Configuration
@ComponentScan("com.hspedu.hspspringboot")
public class HspConfig {
    /**

    * 1. 通过@Bean 的方式, 将new 出来的Bean 对象, 放入到Spring 容器

    * 2. 该bean 在Spring 容器的name 就是方法名

    * 3. 通过方法名, 可以得到new Monster()

    * @return

    */
    @Bean
    public Monster monster() {
        System.out.println("monster...");
        return new Monster();
    }
}
2
3
4
5
6
7
8
9
10
11
12
13
14
15
16
17
18
19
20
21
22
23
24
25
26
27
- 创建 D:\hsp_springboot_temp\hsp-springboot2\src\main\java\com\hspedu\hspspringboot\HspWebApplicationInitializer.java , 作为 Spring 的容器.
package com.hspedu.hspspringboot;
import com.hspedu.hspspringboot.config.HspConfig;
import org.springframework.context.annotation.AnnotationConfigApplicationContext;
import org.springframework.web.WebApplicationInitializer;
import org.springframework.web.context.WebApplicationContext;
import org.springframework.web.context.support.AnnotationConfigWebApplicationContext;
import org.springframework.web.servlet.DispatcherServlet;
import javax.servlet.ServletContext;
import javax.servlet.ServletException;
import javax.servlet.ServletRegistration;
//作为 Spring 的容器
/**

* 1. 创建我们的spring 容器

* 2. 并加载/关联spring 容器的配置- 按注解方式

* 3. 完成spring 容器配置的bean 的创建, 依赖注入等

* 4. 创建分发器DispatcherServlet ,并让其持有spring 容器

* 5. 当DispatcherServlet 持有容器,就可以进行分发映射, 请小伙伴回忆我们实现

springmvc 底层机制程序

* 6.这个类的onStartup 是Tomcat 来调用,并把ServletContext 对象也传入...

*/
public class HspWebApplicationInitializer implements WebApplicationInitializer {
    @Override
    public void onStartup(ServletContext servletContext) throws ServletException {
        System.out.println("startup ...");
        //加载spring web application configuration
        AnnotationConfigWebApplicationContext ac =
            new AnnotationConfigWebApplicationContext();
        ac.register(HspConfig.class);
        ac.refresh(); //完成bean 的创建, 和配置
        //创建注册非常重要的分发器DispatcherServlet
        //注意, 把spring 容器给到DispatcherServlet
        //这样就可以做映射分发,       回忆一下我们实现SpringMVC
        DispatcherServlet dispatcherServlet = new DispatcherServlet(ac);
        ServletRegistration.Dynamic registration =
            servletContext.addServlet("app", dispatcherServlet);
        registration.setLoadOnStartup(1);
        registration.addMapping("/*");
    }
}
2
3
4
5
6
7
8
9
10
11
12
13
14
15
16
17
18
19
20
21
22
23
24
25
26
27
28
29
30
31
32
33
34
35
36
37
38
39
40
41
42
43
44
45
46
47
48
# 4.5.3 实现任务阶段 3- 将 Tomcat 和 Spring 容器关联, 并启动 Spring 容器
# 4.5.3.1 说明: 将 Tomcat 和 Spring 容器关联, 并启动 Spring 容器
# 4.5.3.2 分析+代码实现
● 代码实现
- 修改 D:\hsp_springboot_temp\hsp-springboot2\src\main\java\com\hspedu\hspspringboot\HspSpringApplication.java
package com.hspedu.hspspringboot;
import org.apache.catalina.startup.Tomcat;
public class HspSpringApplication {
    public static void run() {
        try {
            Tomcat tomcat = new Tomcat();
            tomcat.setPort(9090);
            //让tomcat 可以将请求转发到spring web 容器, 因此需要关联一把
            //1. /hspboot 就是tomcat 的applicaton context
            //理解为工程路径, D:\\hsp ..................... 就是这个工程的路径
            tomcat.addWebapp("/hspboot", "D:\\hsp_springboot_temp\\hsp-springboot2");
            tomcat.start();
            //等待请求...
            System.out.println("=====9090====等待请求");
            tomcat.getServer()
                .await();
        }
        catch (Exception e) {
            e.printStackTrace();
        }
    }
}
2
3
4
5
6
7
8
9
10
11
12
13
14
15
16
17
18
19
20
21
22
23
- debug 一下, 看看是否进行 Spring 容器的初始化工作, 可以看到 ac.refresh() 会将
HspConfig.class 中配置Bean 实例化装入到容器中..
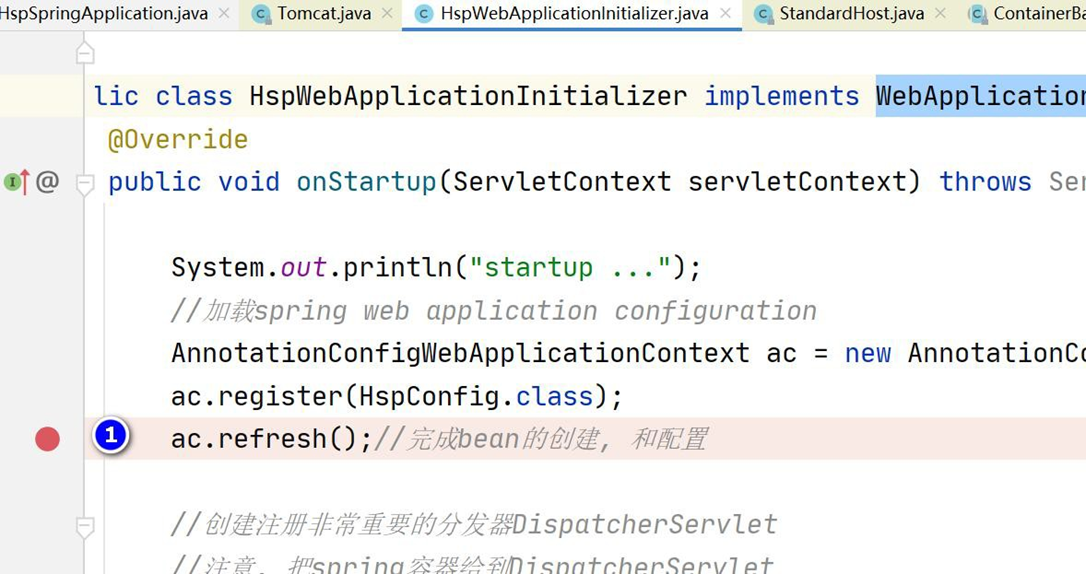
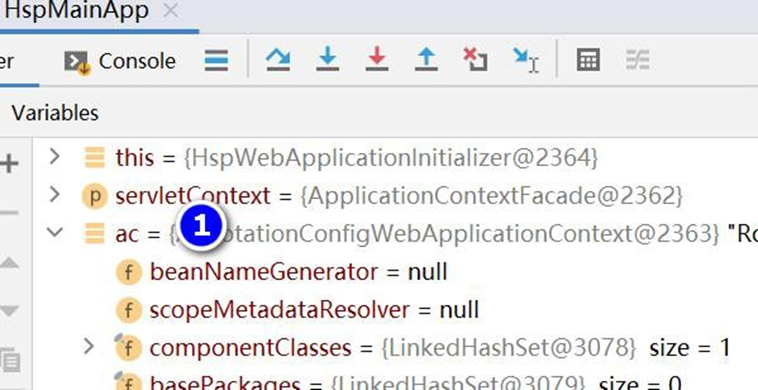
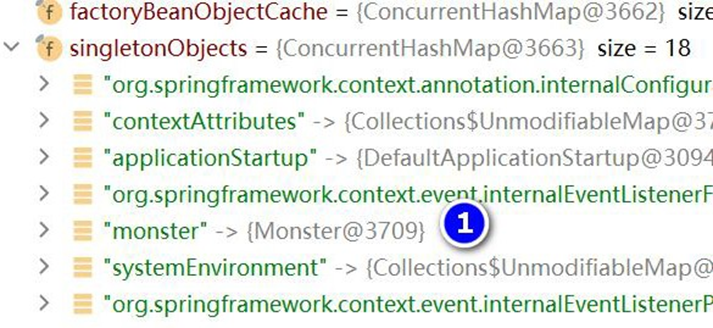
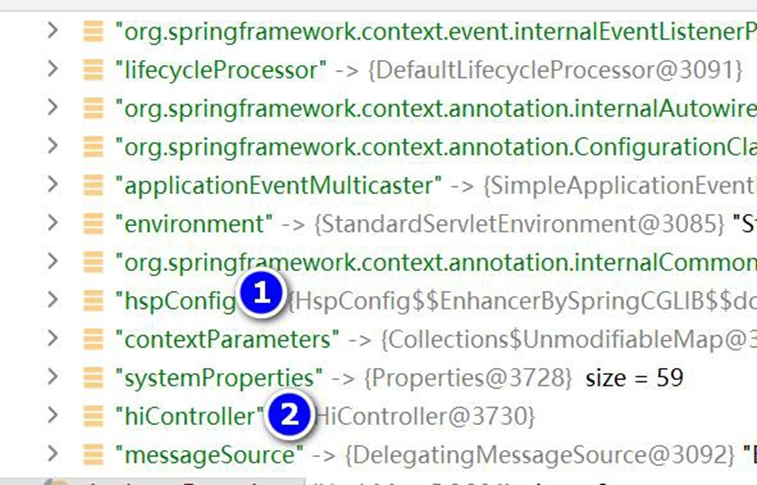
# 4.5.3.3 完成测试
1、启动项目, 运行 HspMainApp
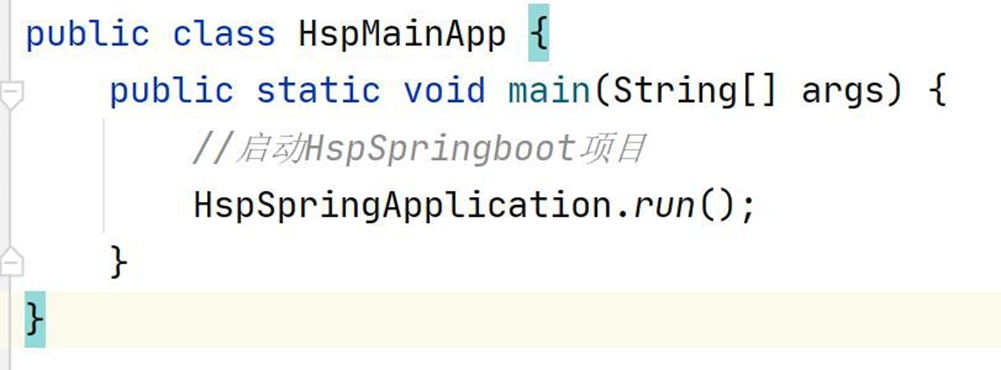
2、运行的效果
三月 12, 2022 7:28:53  下午 org.apache.coyote.AbstractProtocol start

信息: Starting ProtocolHandler ["http-nio-9090"]

=====9090====等待请求
2
3
4
5
3、浏览器访问
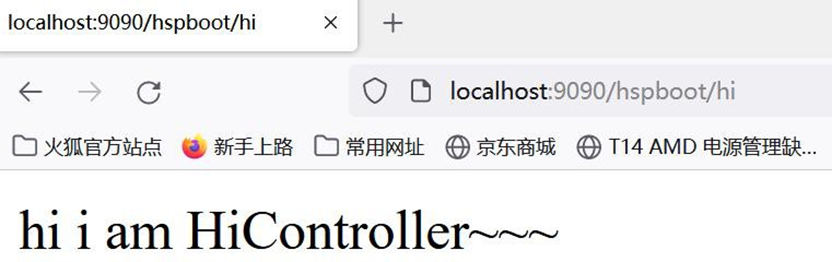
# 4.5.3.4 注意事项和细节
1、如果启动包异常, 如下:
严重: Servlet [jsp] in web application [/hspboot] threw load() exception
java.lang.ClassNotFoundException: org.apache.jasper.servlet.JspServlet
2 、 解决方案,引入对应版本的jasper包即可, 修改 D:\hsp_springboot_temp\hsp-springboot2\pom.xml
<!-- https://mvnrepository.com/artifact/org.apache.tomcat/tomcat-jasper -->
 <dependency>
    <groupId>org.apache.tomcat</groupId>
    <artifactId>tomcat-jasper</artifactId>
    <version>8.5.75</version>
</dependency>
2
3
4
5
6
7
# 5 Lombok
# 5.1 Lombok 介绍
● Lombok 作用
简化 JavaBean 开发, 可以使用 Lombok 的注解让代码更加简洁
Java 项目中,很多没有技术含量又必须存在的代码:POJO 的getter/setter/toString;异常
处理;I/O 流的关闭操作等等,这些代码既没有技术含量,又影响着代码的美观,Lombok
应运而生
● SpringBoot 和 IDEA 官方支持
IDEA 2020 已经内置了 Lombok 插件
SpringBoot 2.1.x 之后的版本也在 Starter 中内置了 Lombok 依赖

# 5.2 Lombok 常用注解
# 5.3 Lombok 应用实例
# 5.3.1 需求说明 使用 Lombok 简化 Furn.java 代码 , 让代码简洁高效
# 5.3.2 代码实现
- 在 pom.xml 引入 lombok
<!-- 引入lombok, 版本在spring-boot-dependencies-2.5.3.pom 指定了, 把光标放在

lombok ctrl+b 可以看到-->
<dependency>
    <groupId>org.projectlombok</groupId>
    <artifactId>lombok</artifactId>
</dependency>
2
3
4
5
6
7
-----------------------------------------看对应的版本---------------------------------------------
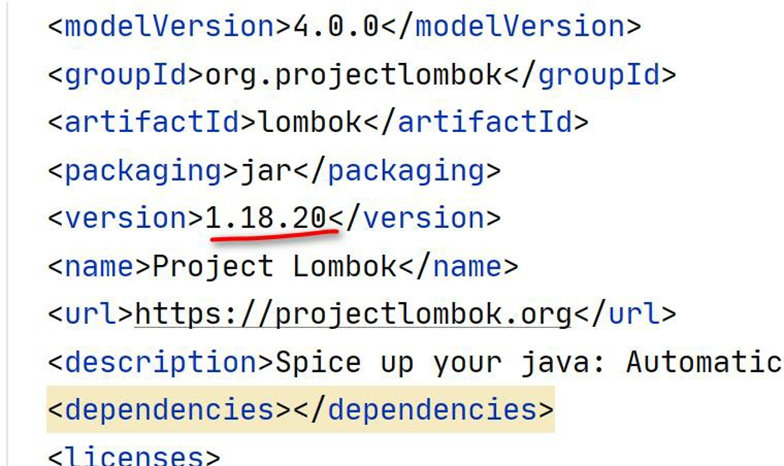
- 修改 Furn.java 使用 Lombok 注解简化代码, 老韩提示:可以通过 idea 自带的反编译功
能, 看 Furn.class 的源码, 就可以看到生成的完整代码.
package com.hspedu.springboot.bean;
import lombok.AllArgsConstructor;
import lombok.Data;
import lombok.NoArgsConstructor;
import lombok.ToString;
import org.springframework.boot.context.properties.ConfigurationProperties;
import org.springframework.stereotype.Component;
/**

* @author 韩顺平

* @version 1.0

*/
/**

* 老韩解读

* 1. @Component 将Furn 注册为一个组件

* 2. @ConfigurationProperties(prefix = "furn01") 指定在application.properties 前缀

* 这样Furn 组件就会属性文件中的值绑定了

*/
//@ToString : lombok 注解, 会在编译时生成toString()
@ToString
//@Data: lombok 注解, 会在编译时生成setter / getter
@Data
//@NoArgsConstructor:lombok 注解, 会在编译时生成无参构造器
@NoArgsConstructor
//@AllArgsConstructor: lombok 注解, 会在编译时生成全参构造器
@AllArgsConstructor
@Component
@ConfigurationProperties(prefix = "furn01")
public class Furn {
    private Integer id;
    private String name;
    private Double price;
}
2
3
4
5
6
7
8
9
10
11
12
13
14
15
16
17
18
19
20
21
22
23
24
25
26
27
28
29
30
31
32
33
34
35
36
37
38
39
40
41
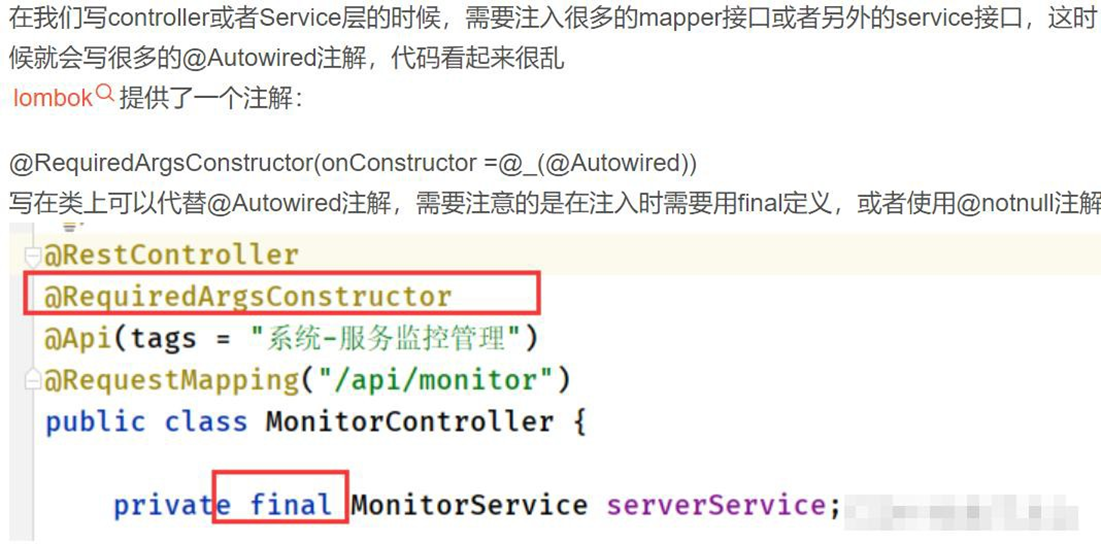
反编译, 看源码
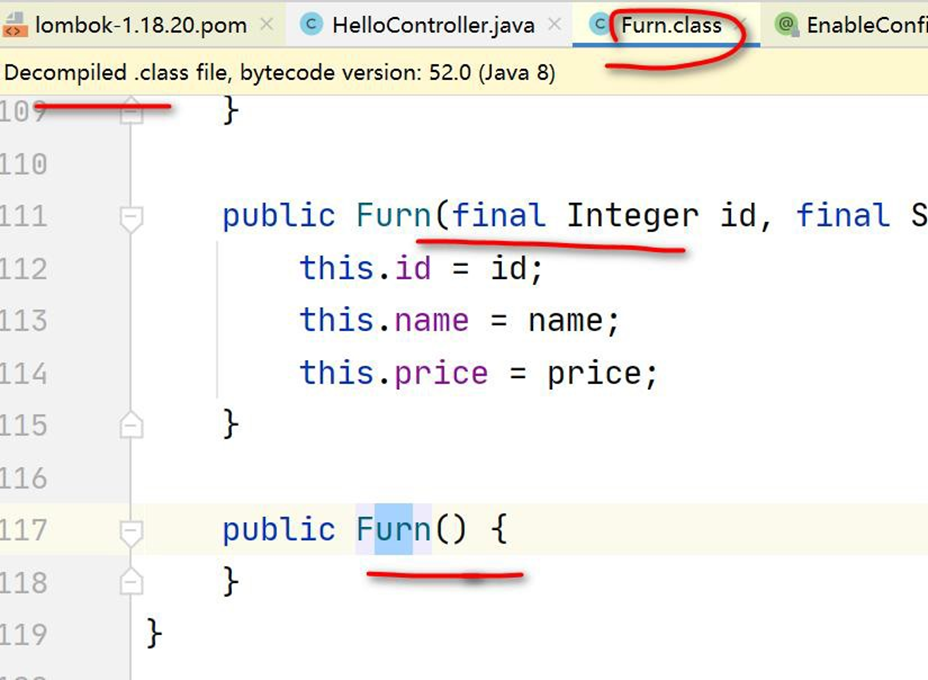
- 启动 MainApp.java , 完成测试
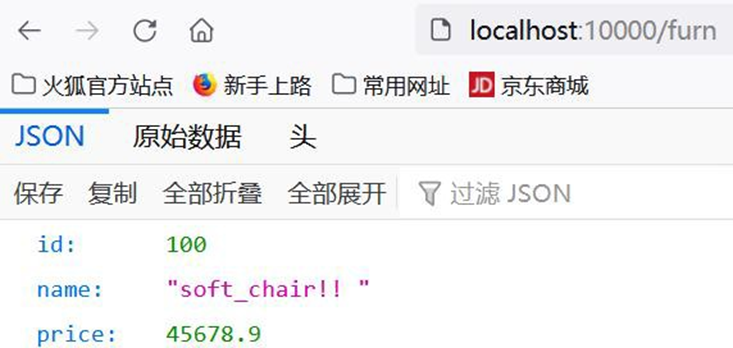
- 在 idea 安装 lombok 插件, 不装插件也可以用基本的注解,比如 @Data @Getter 等, 但
是不能使用其扩展功能, 比如日志输出..., 所以我们还是安装一下,也比较简单
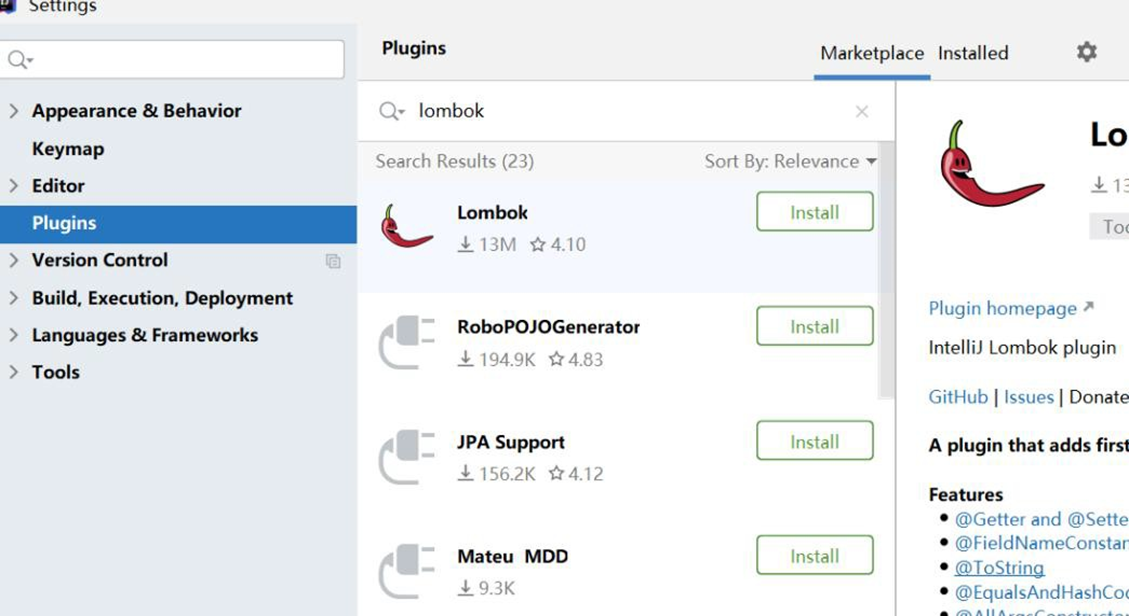
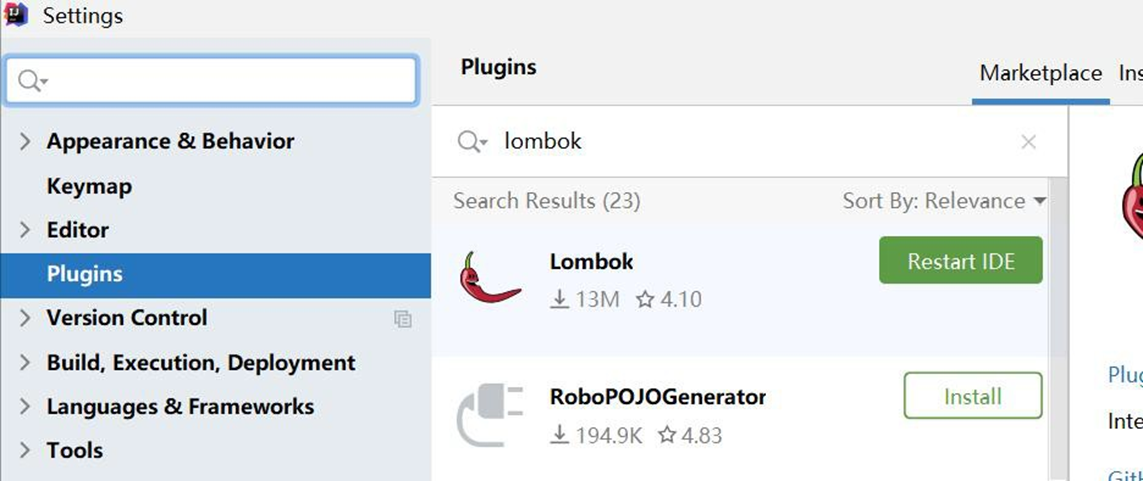
- 演 示 使 用 Lombok 支 持 日 志 输 出 ( 建 议 使 用 slf4j), 修 改
01_quickstart\src\main\java\com\hspedu\springboot\controller\HelloController.java
package com.hspedu.springboot.controller;
import com.hspedu.springboot.bean.Furn;
import lombok.extern.slf4j.Slf4j;
import org.springframework.beans.factory.annotation.Autowired;
import org.springframework.stereotype.Controller;
import org.springframework.web.bind.annotation.RequestMapping;
import org.springframework.web.bind.annotation.ResponseBody;
/**

* @author 韩顺平


* @version 1.0

*/
@Slf4j
@Controller
public class HelloController {
    @RequestMapping("/hello")
    @ResponseBody
    public String hello() {
        return "hello, spring boot";
    }
    @Autowired
    Furn furn;
    @RequestMapping("/furn")
    @ResponseBody
    public Furn furn() {
        log.info("furn =  " + furn);
        //占位用法
        log.info("furn = {} ", furn);
        return furn;
    }
}
2
3
4
5
6
7
8
9
10
11
12
13
14
15
16
17
18
19
20
21
22
23
24
25
26
27
28
29
30
31
32
33
34
35
36
37
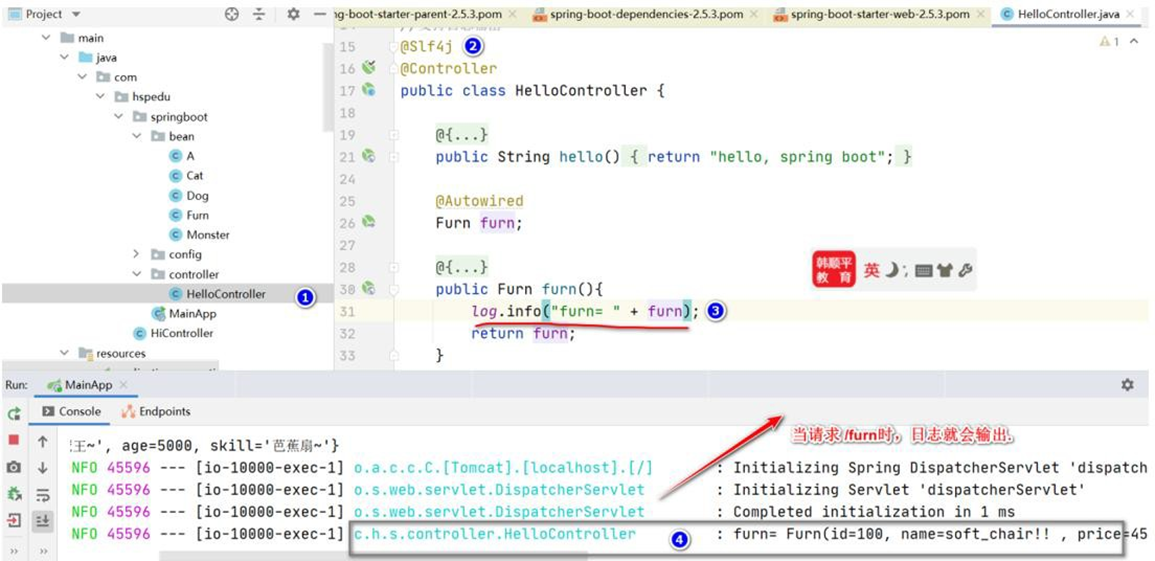
# 6 Spring Initailizr
# 6.1 Spring Initailizr 介绍
● Spring Initailizr 作用
程序员通过Maven Archetype 来生成Maven 项目,项目原型相对简陋, 需要手动配置, 比较灵活.
通过 Spring 官方提供的 Spring Initializr 来构建Maven 项目,能完美支持 IDEA 和 Eclipse,
让程序员来选择需要的开发场景(starter),还能自动生成启动类和单元测试代码, 老师也给
小伙伴介绍一下
- Spring Initailizr 对 Idea 版本有要求 同时还要走网 络, 我自己还是习惯用, Maven
Archetype 来生成Maven 项目 , 但是作为知识点, 我还是给大家演示一下.

# 6.2 Spring Initailizr 使用演示
# 6.2.1 需求: 使用 Spring Initailizr 创建 SpringBoot 项目,并支持 web 应用场景,支持 MyBatis
# 6.2.2 方式 1: IDEA 创建
- 创建项目
- 选择 Spring Initializr
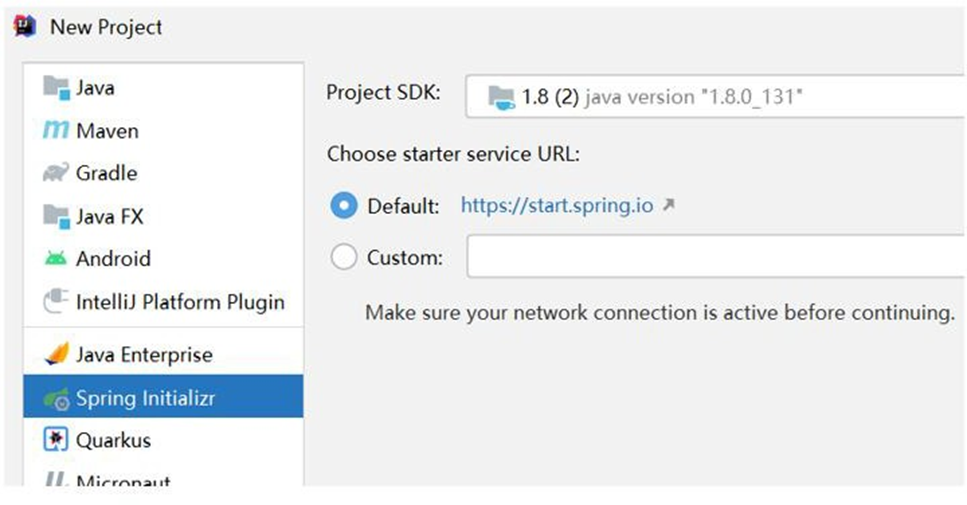
- 项目的设置
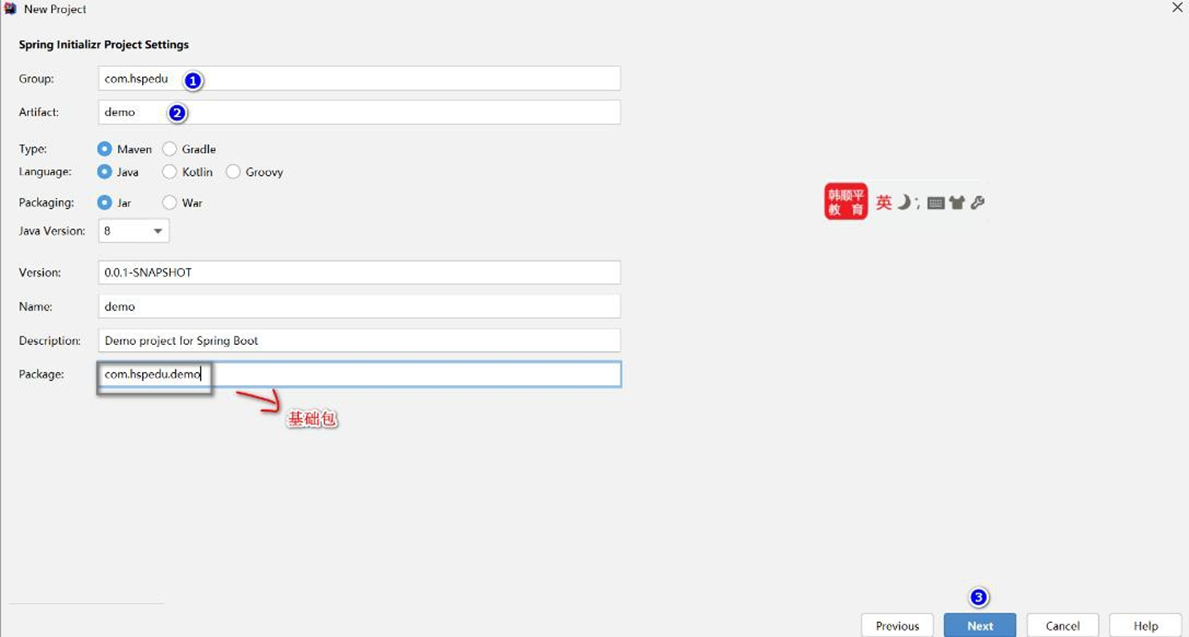
- 选择需要的开发场景
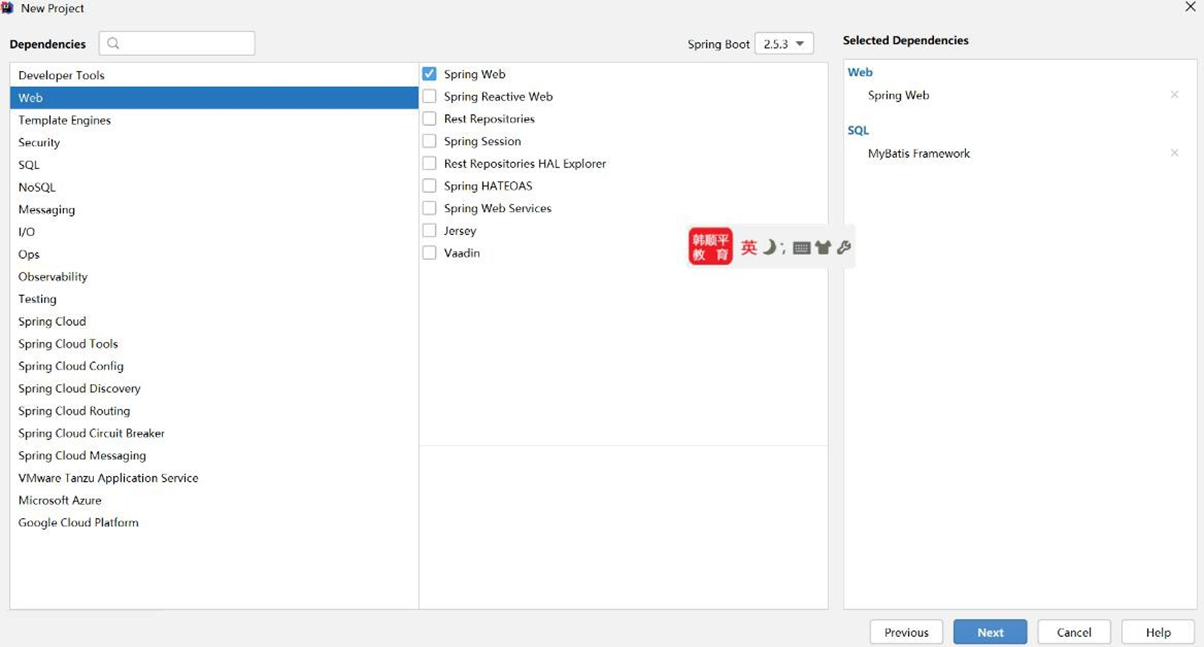
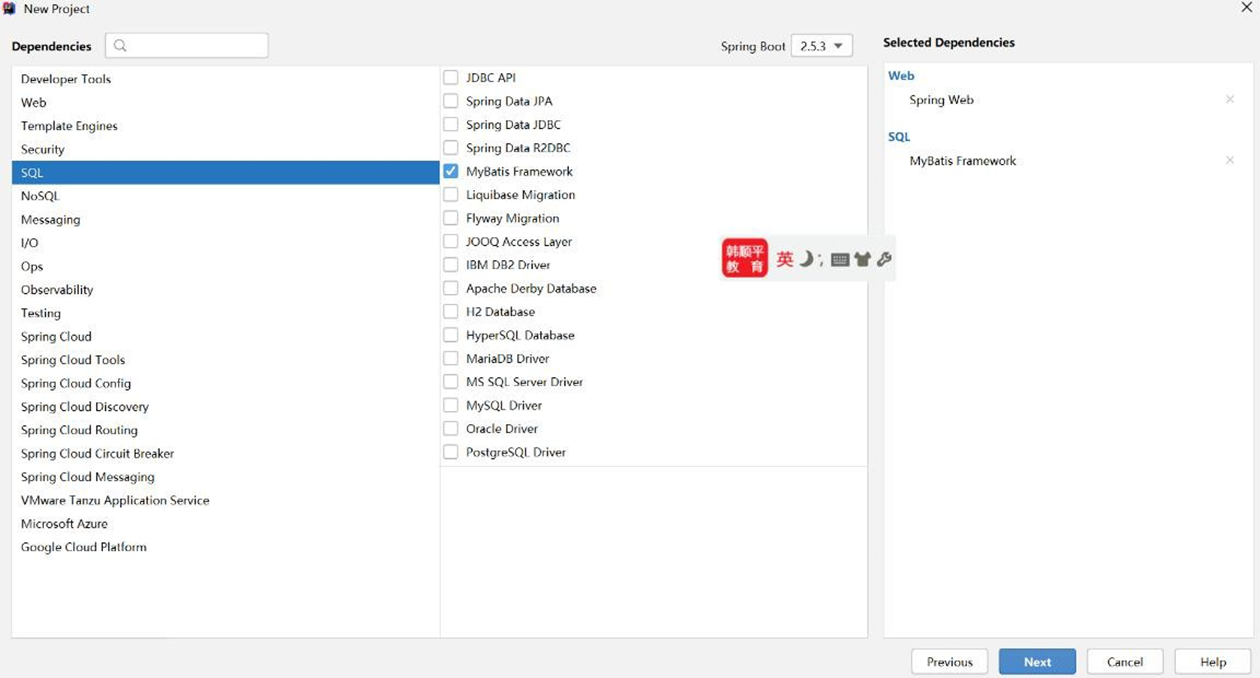
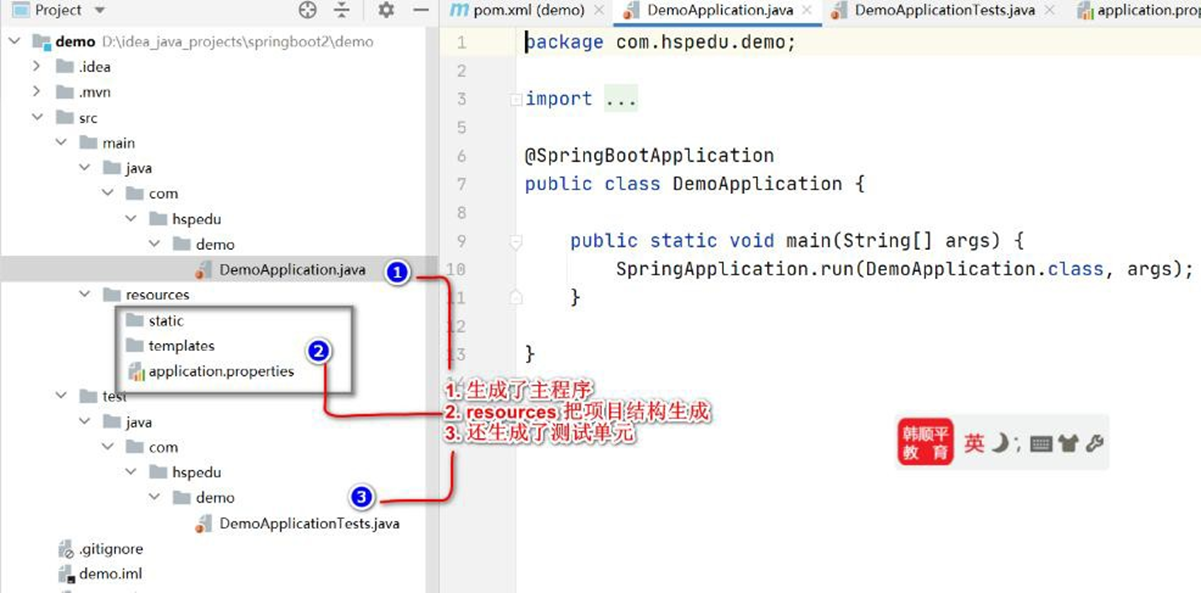
- 项目创建好后,自动生成启动类和单元测试代码等

- 老韩说明:因为没有配置数据库连接信息,启动 SpringBoot 应用程序会错误提示(如
图), ,程序员根据项目需要进行配置(比如数据库连接设置等), 进行业务开发即可

# 6.2.3 方式 2: start.spring.io 创建
# 6.2.4 注意事项和细节
- 如果通过Spring Initailizr 的 pom.xml 爆红
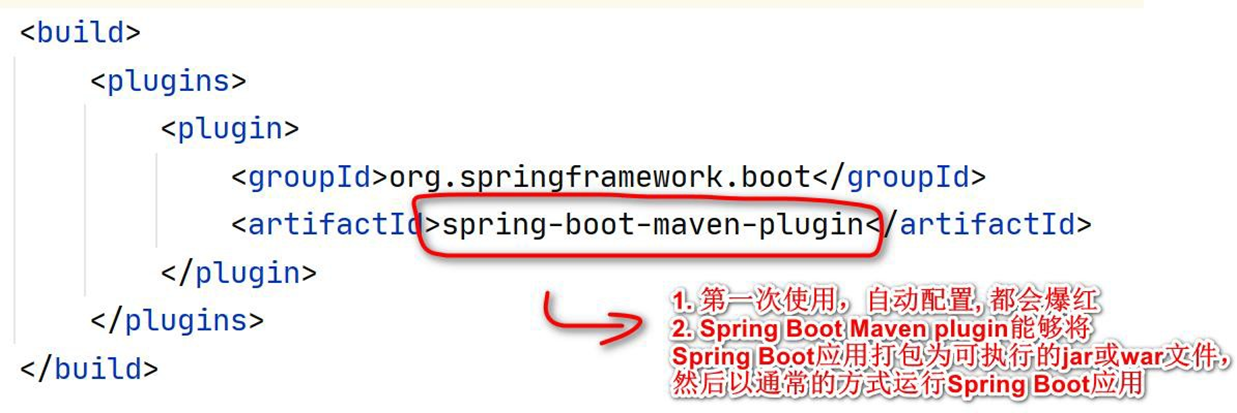
- 解决方案, 指定版本和当前的 springboot 一致,刷新 maven 即可解决
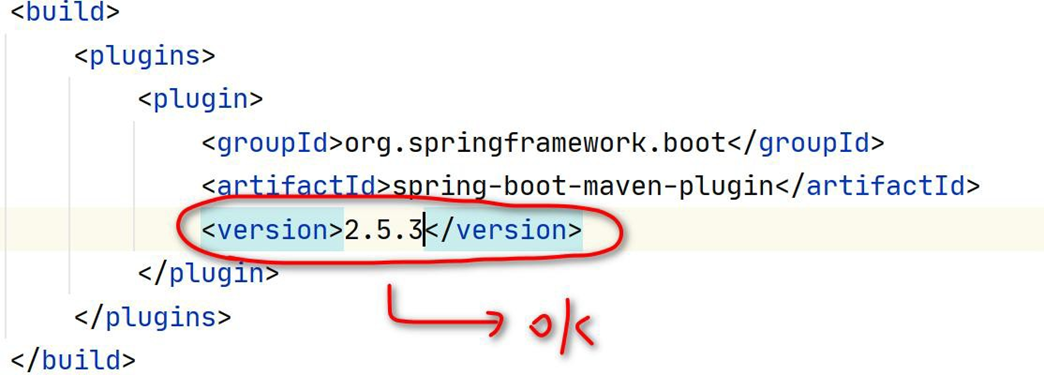
# 7 yaml
# 7.1 yaml 介绍
- 基本说明
1、YAML 是"YAML Ain't a Markup Language"(YAML 不是一种标记语言) 的递归缩写。在开发
的这种语言时,YAML 的意思其实是:"Yet Another Markup Language"(仍是一种标记语言),
是为了强调这种语言以数据做为中心,而不是以标记语言为重点,而用反向缩略语重命名
【百度百科】
- 老韩解读
1、YAML 以数据做为中心,而不是以标记语言为重点
2、YAML 仍然是一种标记语言, 但是和传统的标记语言不一样, 是以数据为中心的标记语
言.
3、YAML 非常适合用来做以数据为中心的配置文件 [springboot : application.yml]

# 7.2 使用文档
# 7.2.1 官方文档:https://yaml.org/
# 7.2.2 yaml for java: https://www.cnblogs.com/strongmore/p/14219180.html
# 7.3 yaml 基本语法
形式为 key: value;注意: 后面有空格
区分大小写
使用缩进表示层级关系
缩进不允许使用 tab,只允许空格 [有些地方也识别 tab , 推荐使用空格]
缩进的空格数不重要,只要相同层级的元素左对齐即可
字符串无需加引号
yml 中, 注释使用 #
# 7.4 数据类型
# 7.4.1 字面量
字面量:单个的、不可再分的值。date、boolean、string、number、null
保存形式为 key: value 如图
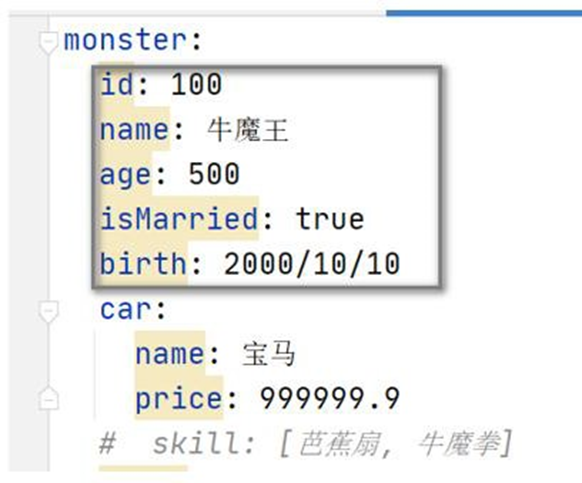
# 7.4.2 对象
- 对象:键值对的集合, 比如 map、hash、set、object
行内写法: k: {k1:v1,k2:v2,k3:v3} monster: {id: 100,name: 牛魔王} #或换行形式 k: k1: v1 k2: v2 k3: v3 monster: id: 100 name: 牛魔王
- 举例说明
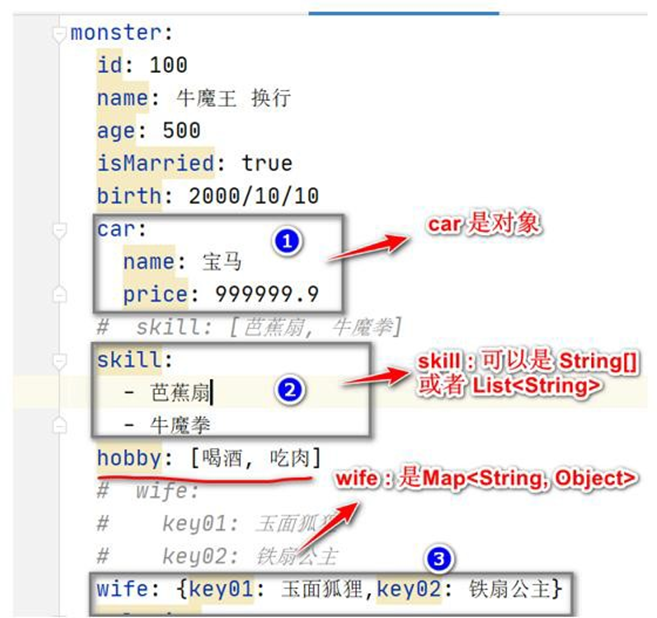
# 7.4.3 数组
- 数组:一组按次序排列的值, 比如 array、list、queue
行内写法:  k: [v1,v2,v3]

hobby: [打篮球, 打乒乓球, 踢足球]

#或者换行格式

k:

- v1

- v2

- v3

hobby:

-  打篮球

-  打乒乓球

-  踢足球
2
3
4
5
6
7
8
9
10
11
12
13
14
15
16
17
18
19
20
21
- 举例说明
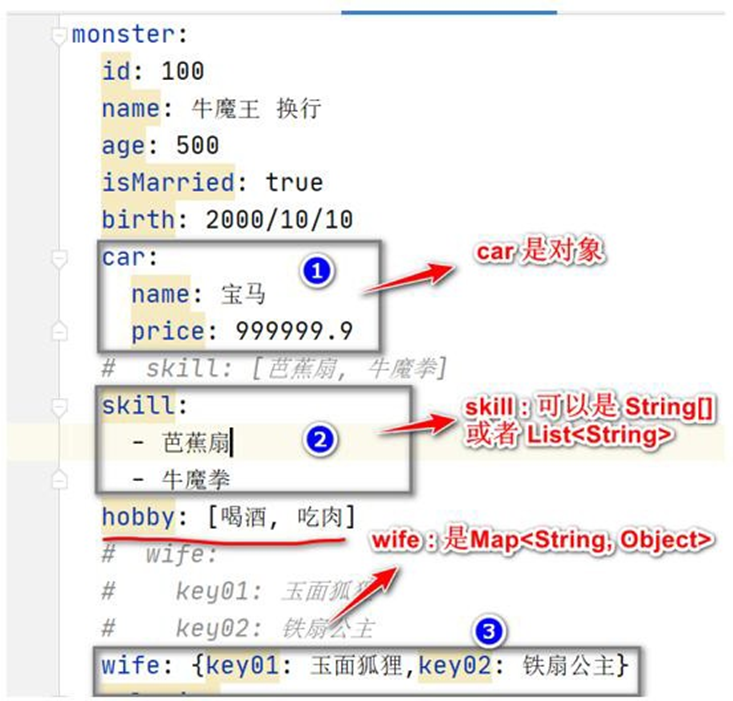
# 7.5 yaml 应用实例
# 7.5.1 需求: 使用 yaml 配置文件 和 JavaBean 进行数据绑定, 体会 yaml 使用方式
# 7.5.2 需求图解
创建项目 configuration , 完 成 yaml 的使用
运行效果
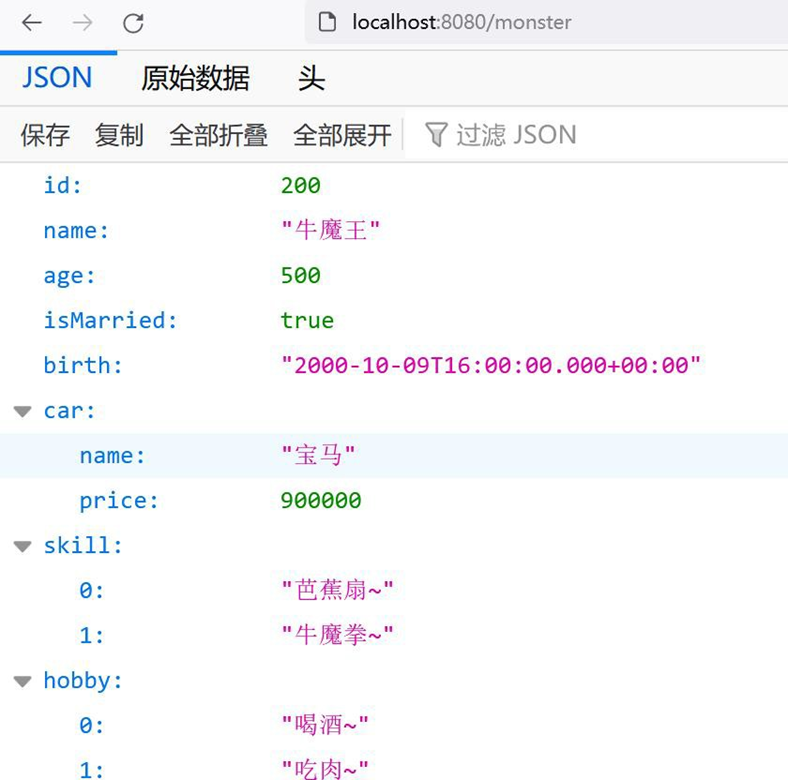
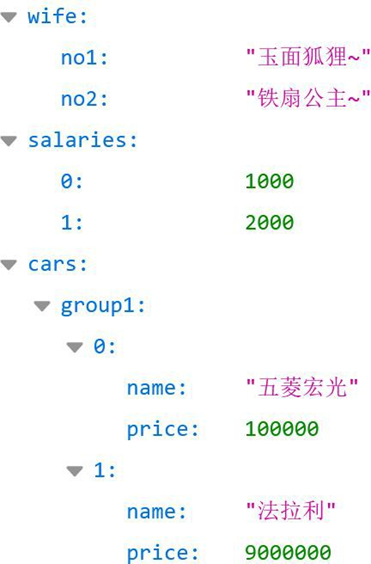
# 7.5.3 代码实现
创建一个新的 SpringBoot 项目 - configuration , 老韩使用灵活配置方式创建项目
在 pom.xml 引入 lombok, 并切换一下 springboot 版本
<parent>
    <groupId>org.springframework.boot</groupId>
    <artifactId>spring-boot-starter-parent</artifactId>
    <version>2.5.3</version>
    <relativePath/>
    <!-- lookup parent from repository -->
</parent>
<!-- 引入lombok, 版本在spring-boot-dependencies-2.5.3.pom 指定了-->
<dependency>
    <groupId>org.projectlombok</groupId>
    <artifactId>lombok</artifactId>
</dependency>
2
3
4
5
6
7
8
9
10
11
12
13
- 创建 02_configuration\src\main\java\com\hspedu\springboot\bean\Car.java , 老韩提醒
一个小细节: 创建的bean 需要在SpringBootApplication 包或者其子包, 否则不会被默认扫描, 同时也不能完全使用lombok 的相关简化注解.
package com.hspedu.springboot.bean;
import lombok.Data;
import lombok.ToString;
/**

* @author 韩顺平

* @version 1.0

*/
@ToString
@Data
public class Car {
    private String
    name;
    private Double price;
}
2
3
4
5
6
7
8
9
10
11
12
13
14
15
16
17
18
- 创建 02_configuration\src\main\java\com\hspedu\springboot\bean\Monster.java
package com.hspedu.springboot.bean;
import lombok.Data;
import lombok.ToString;
import org.springframework.boot.context.properties.ConfigurationProperties;
import org.springframework.stereotype.Component;
import java.util.Date;
import java.util.List;
import java.util.Map;
import java.util.Set;
/**

* @author 韩顺平

* @version 1.0

*/
@ConfigurationProperties(prefix = "monster")
@Component
@ToString
@Data
public class Monster {
    private Integer id;
    private String name;
    private Integer age;
    private Boolean isMarried;
    private Date birth;
    private Car car;
    private String[] skill;
    private List < String > hobby;
    private Map < String, Object > wife;
    private Set < Double > salaries;
    private Map < String, List < Car >> cars;
}
2
3
4
5
6
7
8
9
10
11
12
13
14
15
16
17
18
19
20
21
22
23
24
25
26
27
28
29
30
31
32
33
34
- 创建 resources/application.yml, 演示各种写法. 老韩提醒: 编写 application.yml 时, 这
些 Bean 的字段是可以通过安装插件或 jar 来自动提示的, 后面会讲, 现在先苦后甜
monster:
  age: 500
  birth: 2000/10/10
  car:
    name: 宝马~
    price: 300000
  cars:
    group1:
    - name: 奔驰
      price: 300000
    - name: 保时捷
      price: 400000
    group2:
    - name: 奔驰~
      price: 100000
    - name: 保时捷~
      price: 500000
  hobby:
  - 喝酒~
  - 吃肉~
  id: 100
  isMarried: true
  name: 牛魔王~~
  salaries:
  - 10000
  - 20000
  skill:
  - 芭蕉扇~
  - 牛魔拳~
  wife:
    no1: 玉面狐狸~
    no2: 铁扇公主~
2
3
4
5
6
7
8
9
10
11
12
13
14
15
16
17
18
19
20
21
22
23
24
25
26
27
28
29
30
31
32
33
- 创建 com/hspedu/springboot/controller/HiController.java
package com.hspedu.springboot.controller;
import com.hspedu.springboot.bean.Monster;
import org.springframework.beans.factory.annotation.Autowired;
import org.springframework.web.bind.annotation.RequestMapping;
import org.springframework.web.bind.annotation.RestController;
/**

* @author 韩顺平

* @version 1.0

*/
/**

* @RestController : 包含了@Controller @ResponseBody

*/
@RestController
public class HiController {
    @Autowired
    Monster monster;
    @RequestMapping("/monster")
    public Monster monster() {
        return monster;
    }
}
2
3
4
5
6
7
8
9
10
11
12
13
14
15
16
17
18
19
20
21
22
23
24
25
26
27
- 启动项目,完成测试
 **
**
# 7.6 yaml 使用细节
- 如 果 application.properties 和 application.yml 有 相 同 的 前 缀 值 绑 定 , 则
application.properties 优先级高, 开发时,应当避免

- 字符串无需加引号, 这个在前面已经演示了, 如果你用" " 或者 ' ' 包起来, 也可以 , 简单举例
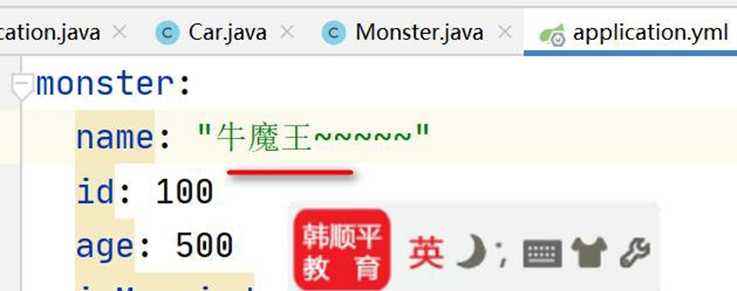
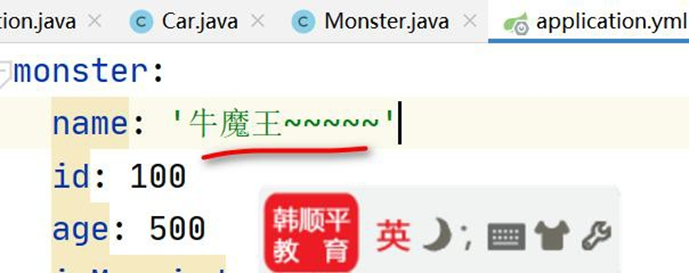
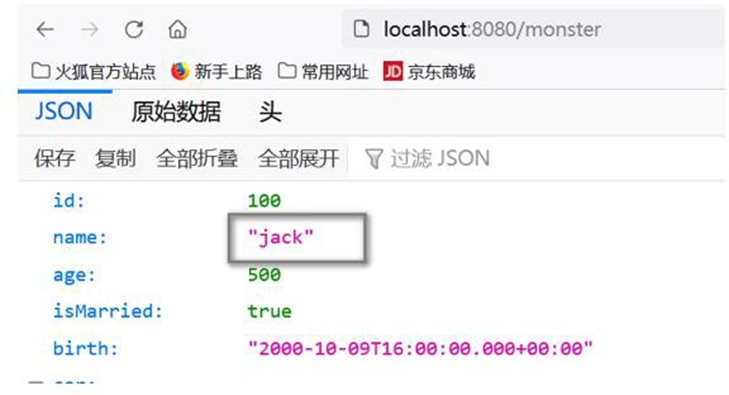
- 解决 yaml 配置文件,不提示字段信息问题
- 如图, 大家可以知道,在编写 application.yml 文件时,没有提示 Monster 的字段信息,
非常不方便

- 在 pom.xml 加 入 spring-boot-configuration-processor 依 赖 , 可 以 从 spring-boot-reference.pdf 拷贝
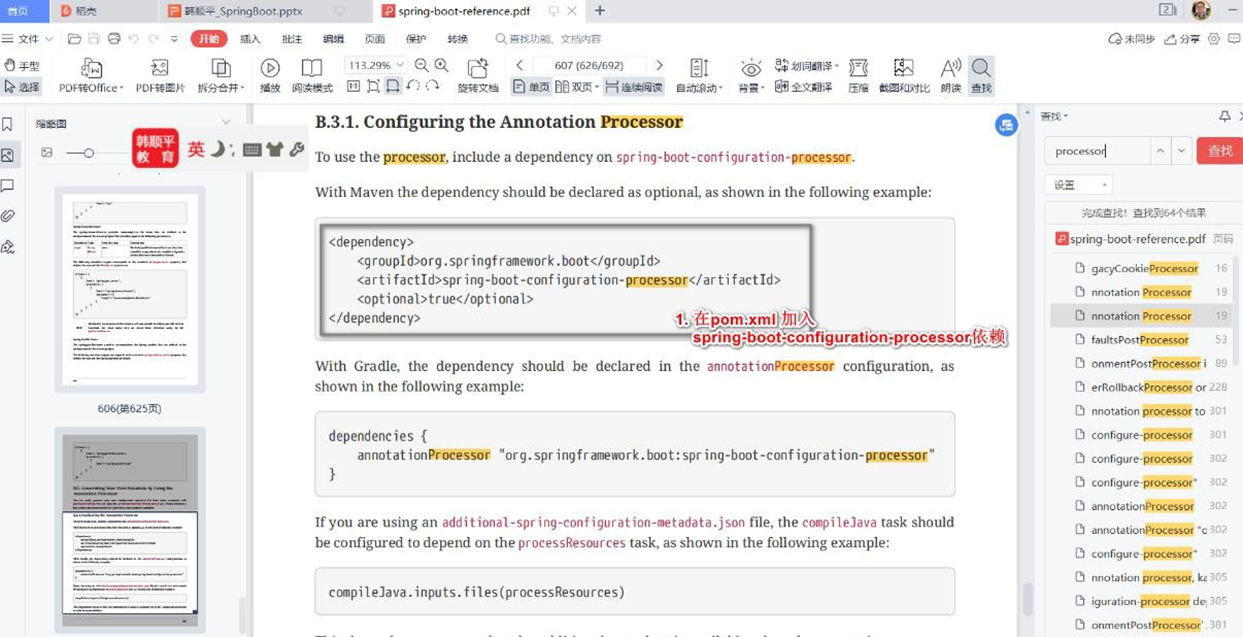
<!-- 引入yaml 文件提示, 可以看到JavaBean 字段提示-->
<dependency>
    <groupId>org.springframework.boot</groupId>
    <artifactId>spring-boot-configuration-processor</artifactId>
    <optional>true</optional>
</dependency>
2
3
4
5
6
- 对 application.yml 文件编辑,就会提示字段, 老韩提示: 输入你在 Bean 配置的prefix 名字就会提示.
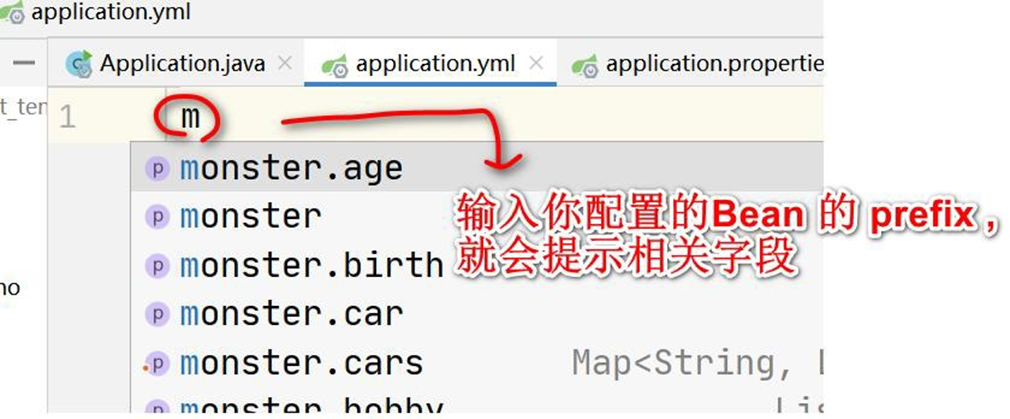
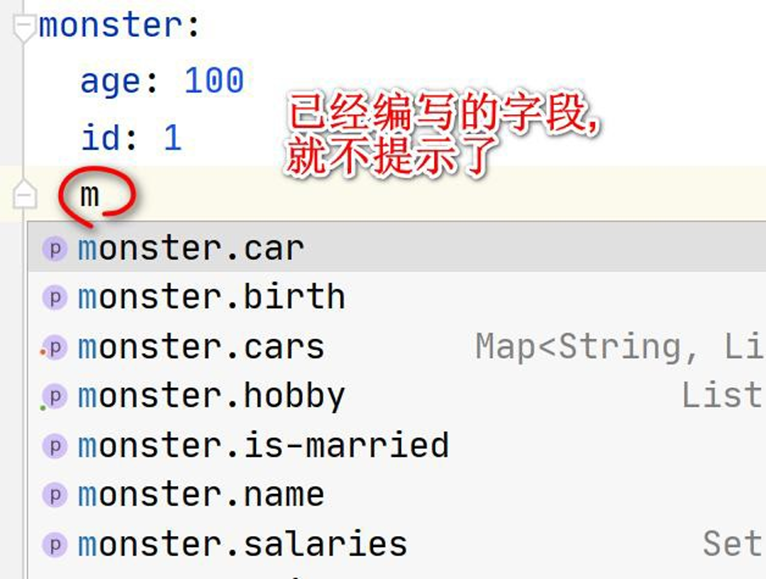
- 老韩提示: 如果还没有提出提示, 可以安装一个 yaml 插件来搞定.
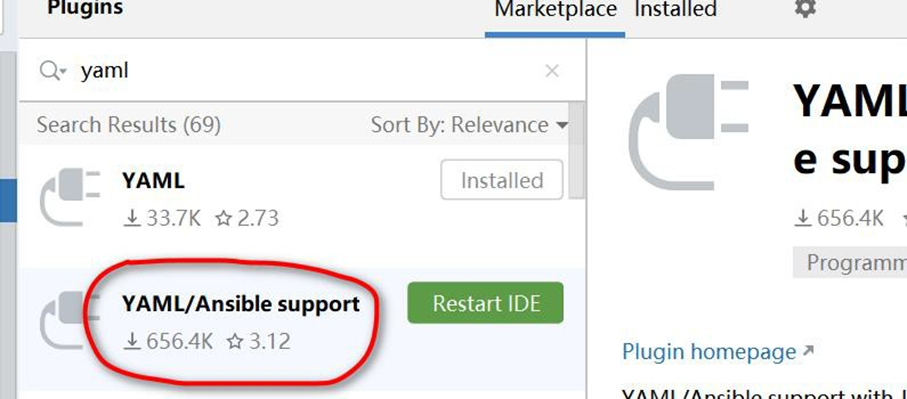
# 8 WEB 开发-静态资源访问
# 8.1 官方文档
# 8.1.1 在线文档:
https://docs.spring.io/spring-boot/docs/current/reference/html/features.html#features.developing-web-applications

# 8.2 基本介绍
- 只要静态资源放在类路径下: /static 、 /public 、 /resources 、 /META-INF/resources
可以被直接访问- 对应文件 WebProperties.java
private
static
final
String[]
CLASSPATH_RESOURCE_LOCATIONS
    = {
        "classpath:/META-INF/resources/"
        , "classpath:/resources/"
        , "classpath:/static/"
        , "classpath:/public/"
    };
2
3
4
5
6
7
8
9
10
11
12
常见静态资源:JS、CSS 、图片(.jpg .png .gif .bmp .svg)、字体文件(Fonts)等
访问方式 :默认: 项目根路径/ + 静态资源名 比如 http://localhost:8080/hi.jpg . - 设置
WebMvcProperties.java
private String staticPathPattern = "/**";
# 8.3 快速入门
创建 SpringBoot 项目 springbootweb , 老师使用灵活配置方式来创建项目
创建相关静态资源目录, 并放入测试图片, 没有目录,自己创建即可, 完成测试
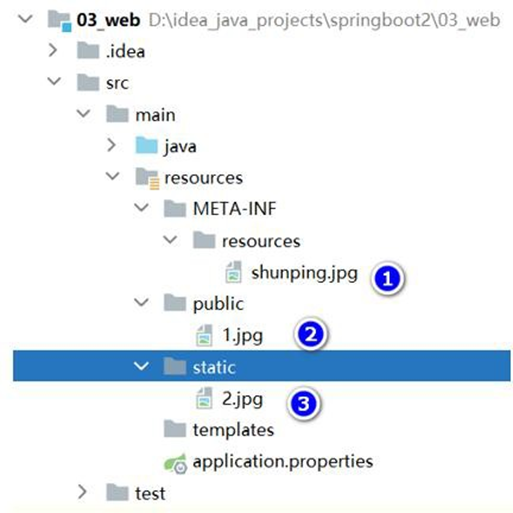

# 8.4 静态资源访问注意事项和细节
- 静态资源访问原理:静态映射是 /**, 也就是对所有请求拦截,请求进来,先看 Controller
能不能处理,不能处理的请求交给静态资源处理器,如果静态资源找不到则响应 404 页面

- 改变静态资源访问前缀,比如我们希望 http://localhost:8080/hspres/* 去请求静态资源,
应用场景:静态资源访问前缀和控制器请求路径冲突
- 创建 D:\idea_java_projects\springboot2\03_web\src\main\resources\application.yml
spring:
  mvc:
    static-path-pattern: /hspres/** #修改静态资源访问的路径/前缀
2
3
- 重启应用,完成测试, 浏览器输入: http://localhost:8080/hspres/1.jpg
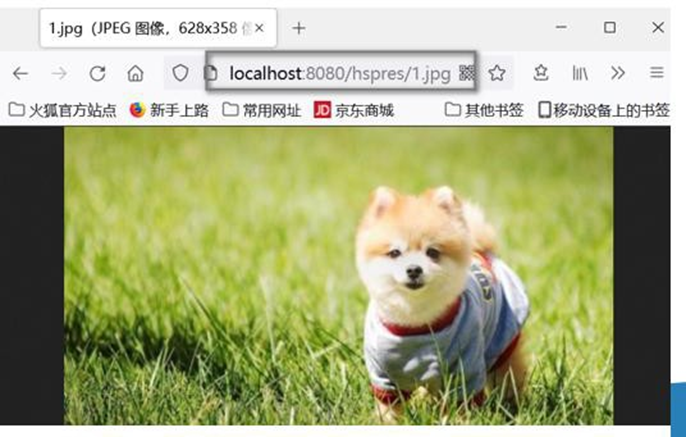
- 改变默认的静态资源路径,比如希望在类路径下增加 hspimg 目录 作为静态资源路径 , 并完成测试.
- 如图所示
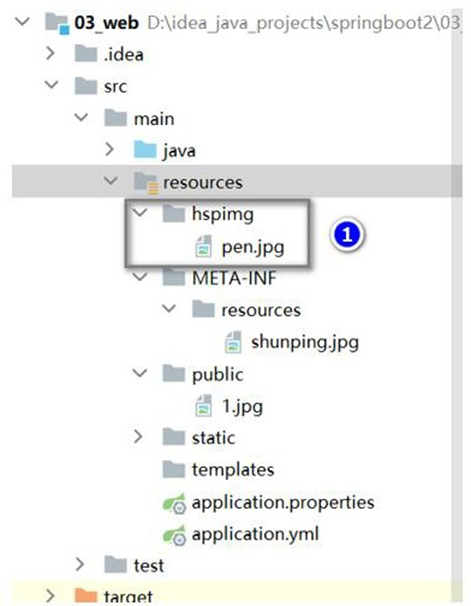
- 配置 springboot2\03_web\src\main\resources\application.yml, 增加路径
spring:
  mvc:
    static-path-pattern: /hspres/** #修改静态资源访问的路径/前缀
  web:
    resources:
      static-locations: ["classpath:/hspimg/", "classpath:/static/", "classpath:/public/"]      #String[] staticLocations
2
3
4
5
6
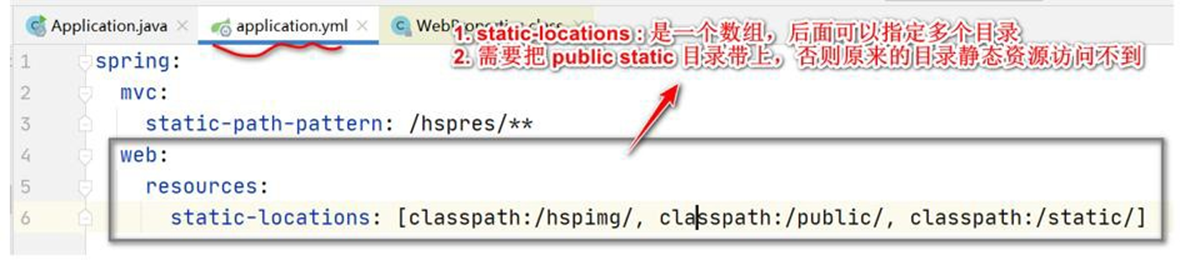
- 测试, 浏览器输入 http://localhost:8080/hspres/pen.jpg [老师提示: 没错就是这样访问pen.jpg, 不是 /hspimg/pen.jpg 形式, 另外因为 pen.jpg 还是拷贝来的, 一定要保证工作目录 target 有 pen.jpg ,如果没有, 请 rebulid 下项目, 再重启项目 ]

- 如果你配置 static-locations, 原来的访问路径就被覆盖,如果需要保留,你再指定一下即可
spring:
  mvc:
    static-path-pattern: /hspres/** #修改静态资源访问的路径/前缀
  web:
    resources:
      #修改/指定 静态资源的访问路径/位置
      #
      static-locations: ["classpath:/hspimg/","classpath:/META-INF/resources/",
                         "classpath:/resources/", "classpath:/static/", "classpath:/public/"]      #String[] staticLocations
2
3
4
5
6
7
8
9
10
11
12
# 9 Rest 风格请求处理
# 9.1 基本介绍
Rest 风格支持(使用 HTTP 请求方式动词来表示对资源的操作)
举例说明:
● 请求方式: /monster
● GET-获取怪物
● DELETE-删除怪物
● PUT-修改怪物
● POST-保存妖怪
# 9.2 SpringBoot Rest 风格应用实例
# 9.2.1 需求: 演示 SpringBoot 中如何实现 Rest 风格的 增删改查
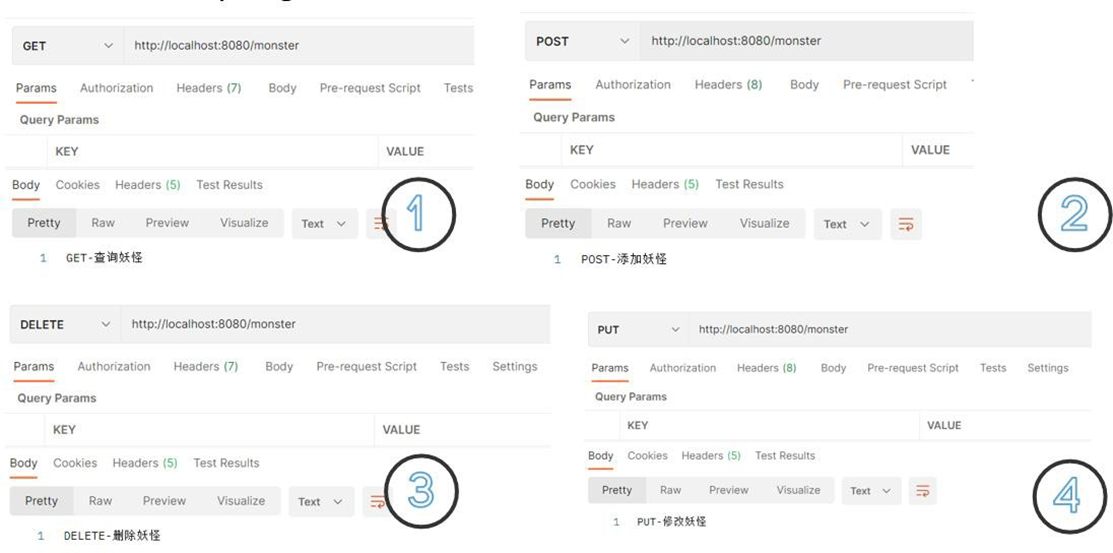
# 9.2.2 应用实例
- 创建 com/hspedu/web/controller/MonsterController.java
package com.hspedu.web.controller;
import org.springframework.web.bind.annotation.*;
/**
* @author 韩顺平
* @version 1.0
*/
@RestController
public class MonsterController {
    //  @RequestMapping(value = "/monster",method = RequestMethod.GET)
    //  留一个思考题:        为什么这里  return      "GET-查询妖怪",        返回的是字符串,        而不是转发到
    对应的资源文件 ?
        //  后面在注意事项和细节再解答,小伙伴们先思考
        @GetMapping("/monster")
    public String getMonster() {
        return "GET-查询妖怪";
    }
    //  @RequestMapping(value = "/monster",method = RequestMethod.POST)
    @PostMapping("/monster")
    public String saveMonster() {
        return "POST-添加妖怪";
    }
    //  @RequestMapping(value = "/monster",method = RequestMethod.PUT)
    @PutMapping("/monster")
    public String putMonster() {
        return "PUT-修改妖怪";
    }
    @DeleteMapping("/monster")
    //  @RequestMapping(value = "/monster",method = RequestMethod.DELETE)
    public String deleteMonster() {
        return "DELETE-删除妖怪";
    }
}
2
3
4
5
6
7
8
9
10
11
12
13
14
15
16
17
18
19
20
21
22
23
24
25
26
27
28
29
30
31
32
33
- 使用 Postman 完成测试, 请求 url: http://localhost:8080/monster
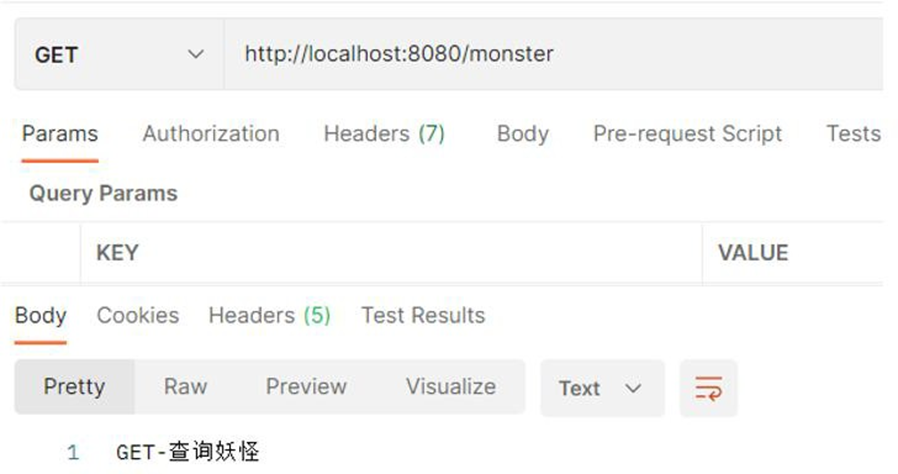
# 9.2.3 Rest 风格请求 -注意事项和细节
1、客户端是 PostMan 可以直接发送 Put、delete 等方式请求,可不设置Filter
2、如果要 SpringBoot 支持 页面表单的 Rest 功能, 则需要注意如下细节
- Rest 风 格 请 求 核 心 Filter ; HiddenHttpMethodFilter , 表 单 请 求 会 被
HiddenHttpMethodFilter 拦截 , 获取到表单 _method 的值, 再判断是 PUT/DELETE/PATCH
(老师注释: PATCH 方法是新引入的,是对 PUT 方法的补充,用来对已知资源进行局部更新:
https://segmentfault.com/q/1010000005685904)
- 如果要 SpringBoot 支持 页面表单的 Rest 功能, 需要在 application.yml 启用 filter 功能,
否则无效
- 修改 application.yml 启用 filter 功能
spring:
  mvc:
    static-path-pattern: /hspres/** #修改静态资源访问的路径/前缀
    hiddenmethod:
      filter:
        enabled: true #启用了HiddenHttpMethodFilter,开启页面表单的Rest功能
  web:
    resources:
      #修改/指定 静态资源的访问路径/位置
      #
      static-locations: ["classpath:/hspimg/", "classpath:/static/", "classpath:/public/"]      #String[] staticLocations
2
3
4
5
6
7
8
9
10
11
12
13
14
- 修改对应的页面, 同学们自己测即可.
- 创建 D:\hsp_springboot_temp\03-web\src\main\resources\public\rest.html
<!DOCTYPE html>
<html lang="en">

  <head>
    <meta charset="UTF-8">
    <title>rest</title></head>

  <body>
    <h1>测试 rest 风格的url, 来完成请求.</h1>
    <form action="/monster" method="post">u:
      <input type="text" name="name">
      <br/>
      <!--如果要测试delete, put , 就打开下面的注释-->
      <!-- <input type="hidden" name="_method" value="delete">-->
      <input type="submit" value="点击提交"></form></body>

</html>
2
3
4
5
6
7
8
9
10
11
12
13
14
15
16
17
- 完 成 测 试 , 注 意 url 是 localhost:8080/hspres/rest.html, 如 果 希 望 url 是
localhost:8080/rest.html, 将 application.yml static-path-pattern: /hspres/** 注销即可
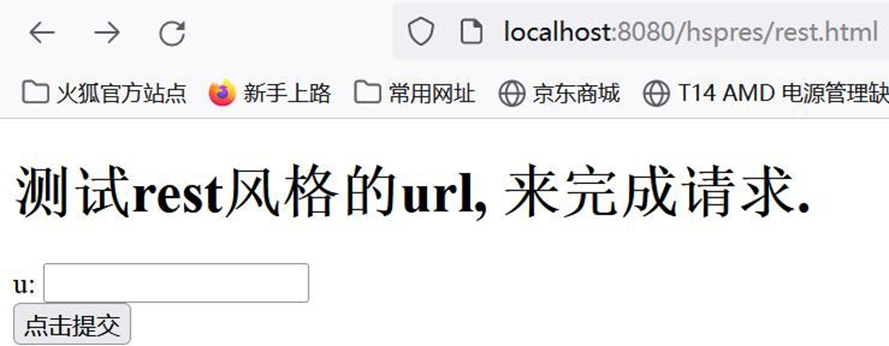
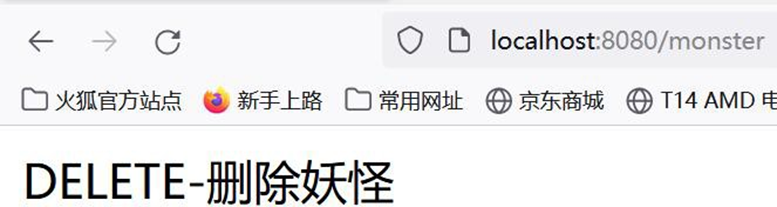
# 9.3 思考题
- 留一个思考题: 为什么这里 return "GET-查询妖怪", 返回的是字符串, 而不是转发到对应的资源文件?-在 SpringMVC
/**
* @author 韩顺平
* @version 1.0
*/
@RestController
public class MonsterController {
    //  老韩解读:因为@ResController 是一个复合注解, 含有@ResponseBody, 所以
    springboot 底层(springmvc), 在处理
    return " xxx"
    时, 会以 @ResponseBody 注解进行解析处理, 即返回字符串 "xxx", 而
    //
    不会使用视图解析器来处理.
    //  同学们, 可以试一下, 如果我们把 @RestController 改成 @Controller , 当你访问
    getMonster() 时, 如果你有xxx.html
    //  就会转发到xxx.html , 如果没有xxx.html , 就会报404
    //  提示: 在测试时, 讲xxx.html 放在 main\resources\public\xxx.html 进行测试, 并在
    application.yml 配置视图解析器
    @GetMapping("/monster")
    public String getMonster() {
        return "GET-查询妖怪";
    }
}
2
3
4
5
6
7
8
9
10
11
12
13
14
15
16
17
18
19
20
21
22
23
---在 application.yml 配置解析器-----
spring:
  mvc:
    view:
      prefix: /
      suffix: .html
2
3
4
5
---老韩提示: 测试完后, 把代码恢复原状 -----
- 使用 Postman 进行测试, 可能出现的问题和解决方案分析.
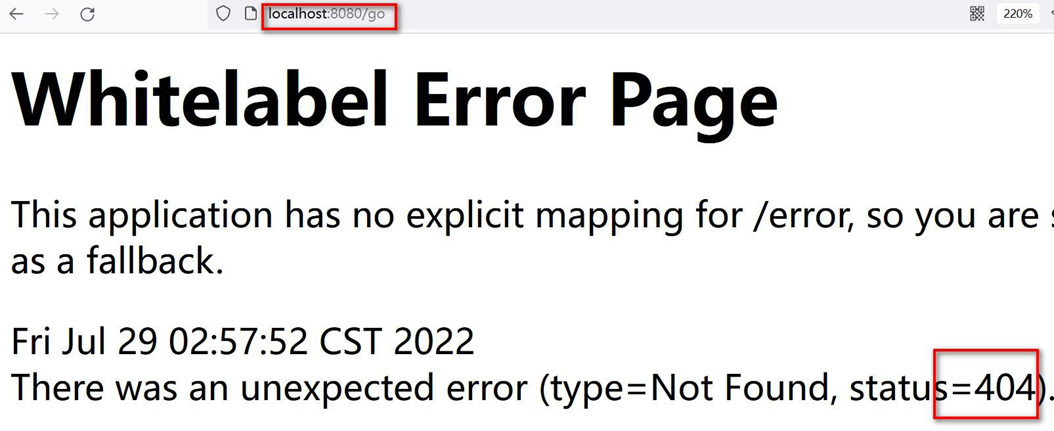
如何解决
spring:
  mvc:
    static-path-pattern: /hspres/** #修改静态资源访问的路径/前缀
    hiddenmethod:
      filter:
        enabled: true #启用了HiddenHttpMethodFilter,开启页面表单的Rest功能
    view:       #配置视图解析器
      suffix: .html
      prefix: /        #这里是需要注意 prefix需要和当前的static-path-pattern一致
2
3
4
5
6
7
8
9
# 10 接收参数相关注解
# 10.1 基本介绍
SpringBoot 接收客户端提交数据/参数会使用到相关注解
详 解 @PathVariable 、 @RequestHeader 、 @ModelAttribute 、 @RequestParam 、
@MatrixVariable、@CookieValue、@RequestBody
# 10.2 接收参数相关注解应用实例
# 10.2.1 需求: 演示各种方式提交数据/参数给服务器,服务器如何使用注解接收
# 10.2.2 应用实例演示
● 需求: 演示各种方式提交数据/参数给服务器,服务器如何使用注解接收
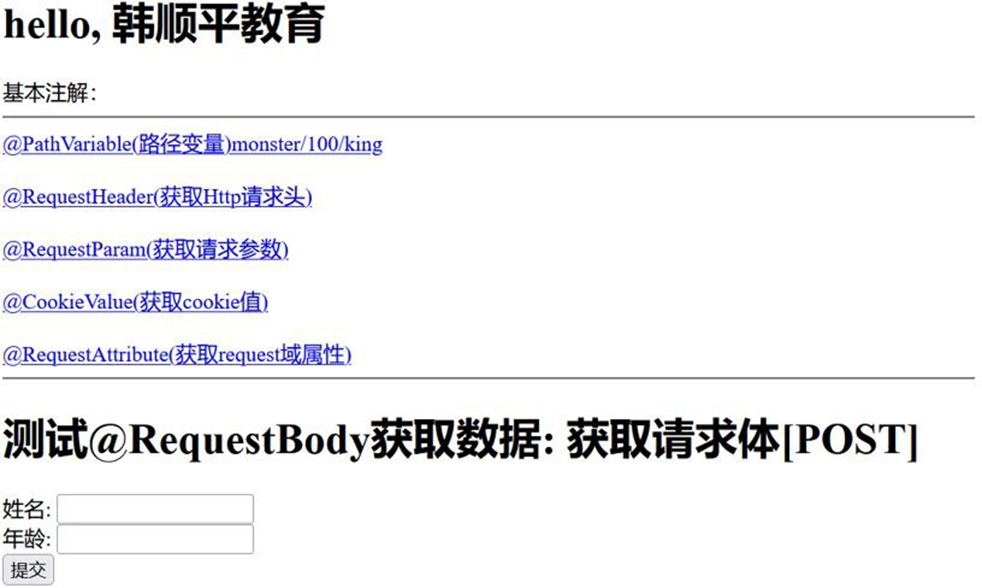
- 创建 03_web\src\main\resources\public\index.html
<!DOCTYPE html>
<html lang="en">

  <head>
    <meta charset="UTF-8">
    <title>Title</title></head>

  <body>
    <h1>hello, 韩顺平教育</h1>基本注解:
    <hr/>
    <a href="monster/100/king">@PathVariable-路径变量 monster/100/king</a>
    <br/>
    <br/></body>

</html>
2
3
4
5
6
7
8
9
10
11
12
13
14
15
- 演示@PathVariable 使用,创建 com/hspedu/web/controller/ParameterController.java 完成测试
package com.hspedu.web.controller;
import com.hspedu.web.bean.Monster;
import org.springframework.web.bind.annotation.*;
import javax.servlet.http.Cookie;
import java.util.HashMap;
import java.util.List;
import java.util.Map;
/**

* @author 韩顺平

* @version 1.0

*/
@RestController
public class ParameterController {
    /**

    * /monster/{id}/{name} 解读

    * 1. /monster/{id}/{name} 构成完整请求路径

    * 2. {id} {name} 就是占位变量

    * 3. @PathVariable("name"): 这里name 和{name} 命名保持一致

    * 4. String name_ 这里自定义,老师故意这样写下

    * 5. @PathVariable Map<String, String> map 把所有传递的值传入map

    * 6. 可以看下@PathVariable 源码

    */
    @GetMapping("/monster/{id}/{name}")
    public String pathVariable(@PathVariable("id") Integer id
        , @PathVariable("name") String name_
        , @PathVariable Map < String, String > map
        , @RequestHeader("Host") String host
        , @RequestHeader Map < String, String > header
    ) {
        System.out.println("id= " + id + " name= " + name_);
        System.out.println(map);
        System.out.println("===============================");
        System.out.println("host= " + host);
        System.out.println(header);
        return "success";
    }
}
2
3
4
5
6
7
8
9
10
11
12
13
14
15
16
17
18
19
20
21
22
23
24
25
26
27
28
29
30
31
32
33
34
35
36
37
38
39
40
41
42
43
44
45
46
47
48
49
- 演示@RequestHeader 使用,修改 ParameterController.java , 完成测试
√ 修改 index.html
<a href="requestHeader">@RequestHeader-获取 Http 请求头 </a><br/><br/>
√ 修改 ParameterController.java
@GetMapping("/requestHeader")
public String requestHeader(
    @RequestHeader("Host") String host
    , @RequestHeader Map < String, String > header
) {
    System.out.println("===============================");
    System.out.println("host= " + host);
    System.out.println(header);
    return "success";
}
2
3
4
5
6
7
8
9
10
11
√ 测试
- 演示@RequestParam 使用,修改 ParameterController.java , 完成测试
√ 修改 index.html
<a href="hi?name= 韩 顺 平 &fruit=apple&fruit=pear">@RequestParam- 获 取 请 求 参 数</a>
<br/>
<br/>
2
3
√ 修改 ParameterController.java
/**

* 如果fruit 是多个值, 可以使用List 来接收

*/
@GetMapping("/hi")
public String hi(
    @RequestParam("name") String name
    , @RequestParam("fruit") List < String > fruit
    , @RequestParam Map < String, String > paras
) {
    System.out.println("===============================");
    System.out.println("name= " + name);
    System.out.println(fruit);
    System.out.println(paras);
    return "success";
}
2
3
4
5
6
7
8
9
10
11
12
13
14
15
16
17
18
√ 测试
- 演示@CookieValue 使用,修改 ParameterController.java , 完成测试
√ 修改 index.html
<a href="cookie">@CookieValue-获 取cookie 值</a><br/><br/>
√ 修改 ParameterController.java
/**
* 因为我的浏览器目前没有cook ie,所以就不测试,大家知道怎么使用即可

* 如果要测试,可以先写一个方法,在浏览器创建对应的cookie

* 说明1. value = "cookie_key" 表示接收名字为 cookie_key 的 cookie

* 2. 如果浏览器携带来对应的cookie , 那么后面的参数是String ,则接收到的是对应对value

* 3. 后面的参数是Cookie ,则接收到的是封装好的对应的cookie
*
*/
@GetMapping("/cookie")
public String cookie(
    @CookieValue(value = "cookie_key", required = false) String cookie_value
    , @CookieValue(value = "username", required = false) Cookie cookie
) {
    System.out.println("username=" + cookie.getName() + "--" + cookie.getValue());
    return "success";
}
2
3
4
5
6
7
8
9
10
11
12
13
14
15
16
17
18
19
20
21
√ 测试
- 演示@RequestBody 使用,修改 ParameterController.java , 完成测试
√ 修改 index.html
<hr/>
<h1>测试@RequestBody 获取数据: 获 取POST 请求体</h1>
<form action="/save" method="post">姓名:
  <input name="name" />
  <br>年龄:
  <input name="age" />
  <br/>
  <input type="submit" value="提交" /></form>
2
3
4
5
6
7
8
√ 修改 ParameterController.java
/**

* @RequestBody 是整体取出Post 请求内容

*/
@PostMapping("/save")
public String postMethod(@RequestBody String content) {
    System.out.println("content= " + content);
    return "success";
}
2
3
4
5
6
7
8
9
10
11
√ 测试
- 演示@RequestAttribute 使用,创建 com/hspedu/web/controller/RequestController.java,完成测试
√ 修改 index.html
<a href="login">@RequestAttribute-获 取request 域属性-</a>
√ 创建 RequestController.java
 package com.hspedu.web.controller;
 import org.springframework.stereotype.Controller;
 import org.springframework.ui.Model;
 import org.springframework.web.bind.annotation.GetMapping;
 import org.springframework.web.bind.annotation.RequestAttribute;
 import org.springframework.web.bind.annotation.ResponseBody;
 import org.springframework.web.bind.annotation.RestController;
 import javax.servlet.http.Cookie;
 import javax.servlet.http.HttpServletRequest;
 import javax.servlet.http.HttpServletResponse;
 import java.util.Map;
 /**

 * @author 韩顺平

 * @version 1.0

 */
 @Controller
 public class RequestController {
     @GetMapping("/login")
     public String login(HttpServletRequest request) {
         request.setAttribute("user", "老韩");
         //转发到 /ok
         return "forward:/ok";
     }
     @ResponseBody
     @GetMapping("/ok")
     public String ok(@RequestAttribute(value = "user", required = false) String user
         , HttpServletRequest request) {
         System.out.println("request 域中  user= " + user);
         System.out.println("request 域中 user= " + request.getAttribute("user"));
         return "success";
     }
 }
2
3
4
5
6
7
8
9
10
11
12
13
14
15
16
17
18
19
20
21
22
23
24
25
26
27
28
29
30
31
32
33
34
35
36
√ 测试
# 10.3 复杂参数
# 10.3.1 基本介绍
在开发中,SpringBoot 在响应客户端请求时,也支持复杂参数
Map、Model、Errors/BindingResult、RedirectAttributes、ServletResponse、SessionStatus、
UriComponentsBuilder、ServletUriComponentsBuilder、HttpSession
Map、Model 数据会被放在request 域, 底层 request.setAttribute()
RedirectAttributes 重定向携带数据
# 10.3.2 复杂参数应用实例
# 10.3.2.1 说明 : 演示复杂参数的使用,重点: Map、Model、ServletResponse
# 10.3.2.2 代码实现
- 修改 com/hspedu/web/controller/RequestController.java
package com.hspedu.web.controller;
import org.springframework.stereotype.Controller;
import org.springframework.ui.Model;
import org.springframework.web.bind.annotation.GetMapping;
import org.springframework.web.bind.annotation.RequestAttribute;
import org.springframework.web.bind.annotation.ResponseBody;
import org.springframework.web.bind.annotation.RestController;
import javax.servlet.http.Cookie;
import javax.servlet.http.HttpServletRequest;
import javax.servlet.http.HttpServletResponse;
import java.util.Map;
/**

* @author 韩顺平
* @version 1.0

*/
@Controller
public class RequestController {
    @GetMapping("/login")
    public String login(HttpServletRequest request) {
        request.setAttribute("user", "老韩");
        //转发到 /ok
        return "forward:/ok";
    }
    @ResponseBody
    @GetMapping("/ok")
    public String ok(@RequestAttribute(value = "user", required = false) String user
        , HttpServletRequest request) {
        System.out.println("request 域中 user= " + user);
        System.out.println("request 域中 user= " + request.getAttribute("user"));
        return "success";
    }
    @GetMapping("/register")
    public String register(Map < String, Object > map
        , Model model
        , HttpServletResponse response) {
        map.put("user", "hspedu");
        map.put("job", "java 架构师");
        model.addAttribute("sal", 999999.9);
        //可以将cookie 加入到response 对象,返回给客户端
        Cookie cookie = new Cookie("pwd", "666666");
        response.addCookie(cookie);
        return "forward:/registerOk";
    }
    @ResponseBody
    @GetMapping("/registerOk")
    public String registerOk(HttpServletRequest request) {
        System.out.println("request 域中 user= " + request.getAttribute("user"));
        System.out.println("request 域中 job= " + request.getAttribute("job"));
        System.out.println("request 域中 sal= " + request.getAttribute("sal"));
        return "success";
    }
}
2
3
4
5
6
7
8
9
10
11
12
13
14
15
16
17
18
19
20
21
22
23
24
25
26
27
28
29
30
31
32
33
34
35
36
37
38
39
40
41
42
43
44
45
46
47
48
49
50
51
52
53
54
55
- 完成测试 : 浏览器 http://localhost:8080/register
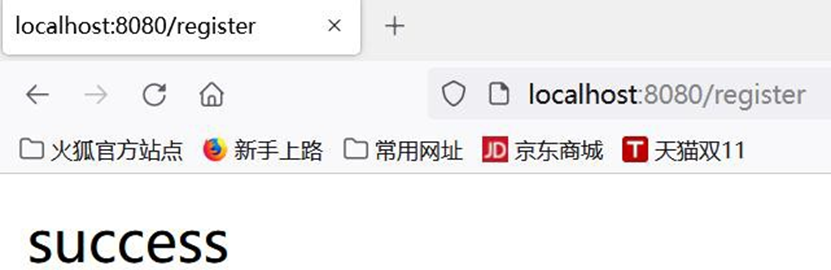
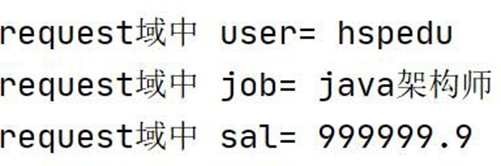
# 10.4 自定义对象参数-自动封装
# 10.4.1 基本介绍
在开发中,SpringBoot 在响应客户端请求时,也支持自定义对象参数
完成自动类型转换与格式化
支持级联封装
# 10.4.2 自定义对象参数-应用实例
# 10.4.2.1 需求说明 : 演示自定义对象参数使用,完成自动封装,类型转换
# 10.4.2.2 代码实现
- 创建 public/save.html
<!DOCTYPE html>
<html lang="en">

  <head>
    <meta charset="UTF-8">
    <title>添加妖怪</title></head>

  <body>
    <h1>添加妖怪-坐骑[测试封装POJO;]</h1>
    <form action="/savemonster" method="post">编号:
      <input name="id" value="100">
      <br/>姓名:
      <input name="name" value="牛魔王" />
      <br/>年龄:
      <input name="age" value="120" />
      <br/>婚否:
      <input name="isMarried" value="true" />
      <br/>生日:
      <input name="birth" value="2000/11/11" />
      <br/>坐骑:
      <input name="car.name" value="法拉利" />
      <br/>价格:
      <input name="car.price" value="99999.9" />
      <input type="submit" value="保存" /></form></body>

</html>
2
3
4
5
6
7
8
9
10
11
12
13
14
15
16
17
18
19
20
21
22
23
24
25
26
- 创建 03_web\src\main\java\com\hspedu\web\bean\Car.java和 03_web\src\main\java\com\hspedu\web\bean\Monster.java
 package com.hspedu.web.bean;
 import lombok.Data;
 import lombok.ToString;
 /**

 * @author 韩顺平

 * @version 1.0

 */
 @ToString
 @Data
 public class Car {
     private String
     name;
     private Double price;
 } ===
 === === === === === === === === =
 package com.hspedu.web.bean;
 import lombok.Data;
 import lombok.ToString;
 import org.springframework.boot.context.properties.ConfigurationProperties;
 import org.springframework.stereotype.Component;
 import java.util.Date;
 /**

 * @author 韩顺平

 * @version 1.0

 */
 @ToString
 @Data
 public class Monster {
     private Integer id;
     private String name;
     private Integer age;
     private Boolean isMarried;
     private Date birth;
     private Car car;
 }
2
3
4
5
6
7
8
9
10
11
12
13
14
15
16
17
18
19
20
21
22
23
24
25
26
27
28
29
30
31
32
33
34
35
36
37
38
39
40
41
42
- 修改 com/hspedu/web/controller/ParameterController.java 增加处理添加请求
@PostMapping("/savemonster")
public String saveMonster(Monster monster) {
    System.out.println("monster= " +
        monster);
    return "success";
}
2
3
4
5
6
7
- 完成测试, 浏览器 http://localhost:8080/save.html


# 11 自定义转换器
# 11.1 基本介绍
SpringBoot 在响应客户端请求时,将提交的数据封装成对象时,使用了内置的转换器
SpringBoot 也支持自定义转换器, 这个内置转换器在 debug 的时候, 可以看到, 后面给小
伙伴演示, 提供了 124 个内置转换器. 看下源码 GenericConverter-ConvertiblePair
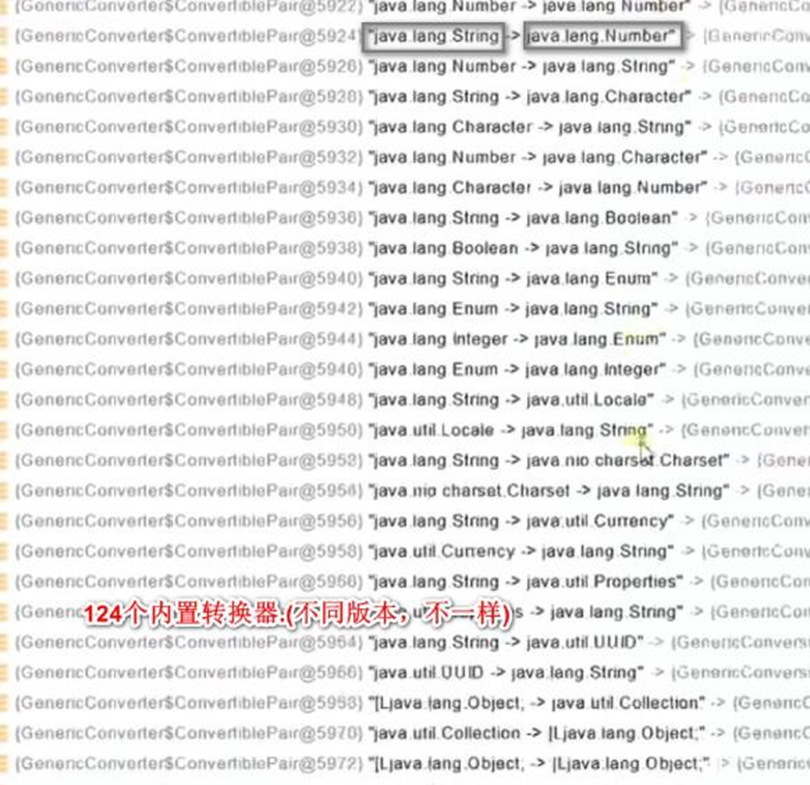
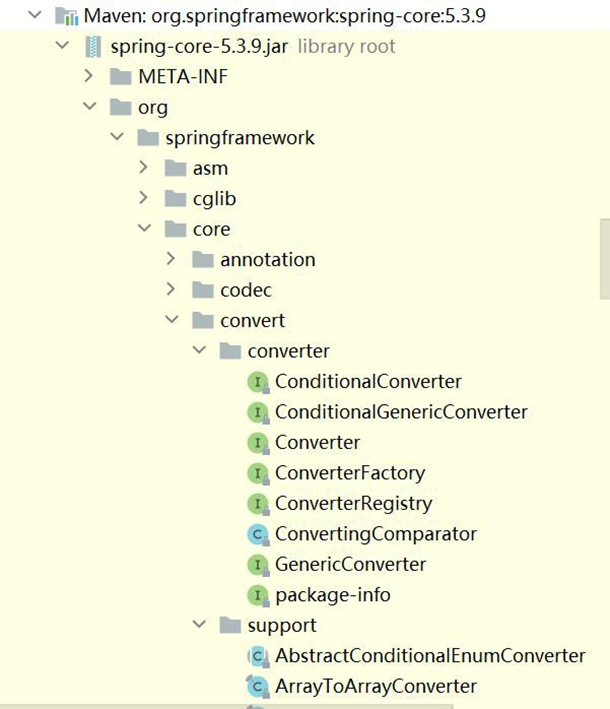
# 11.2 自定义转换器-应用实例
# 11.2.1 需求说明 : 演示自定义转换器使用
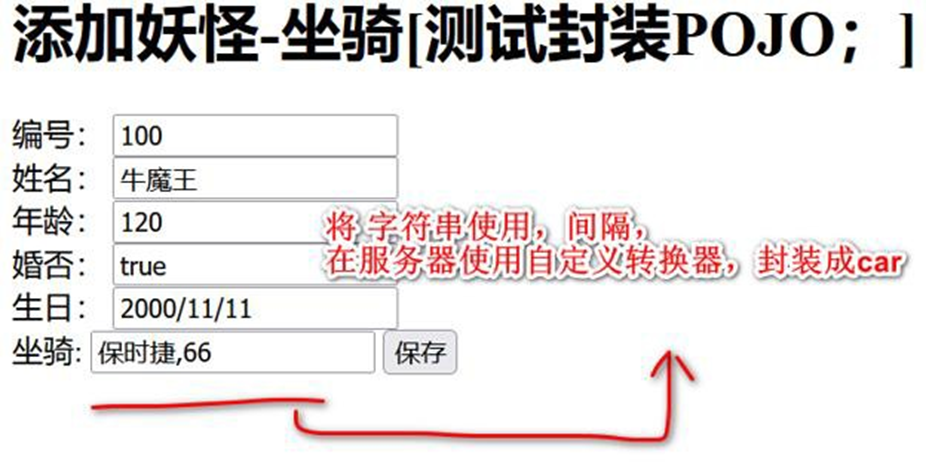
# 11.2.2 代码实现
- 修改 save.html
<form action="/savemonster" method="post">编号:
  <input name="id" value="100">
  <br/>姓名:
  <input name="name" value="牛魔王" />
  <br/>年龄:
  <input name="age" value="120" />
  <br/>婚否:
  <input name="isMarried" value="true" />
  <br/>生日:
  <input name="birth" value="2000/11/11" />
  <br/>
  <!-- 坐骑:<input name="car.name" value="法拉利"/>
  <br/>-->
  <!-- 价格:<input name="car.price" value="99999.9"/>-->
  <!-- 使用自定义转换器关联car, 字符串整体提交 -->坐骑:
  <input name="car" value="保时捷,66666.6">
  <input type="submit" value="保存" /></form>
2
3
4
5
6
7
8
9
10
11
12
13
14
15
16
17
- 创建 D:\hsp_springboot_temp\03-web\src\main\java\com\hspedu\web\config\WebConfig.java, 增加自定义转换器
 package com.hspedu.web.config;
 import com.hspedu.web.bean.Car;
 import org.springframework.context.annotation.Bean;
 import org.springframework.context.annotation.Configuration;
 import org.springframework.core.convert.converter.Converter;
 import org.springframework.format.FormatterRegistry;
 import org.springframework.util.ObjectUtils;
 import org.springframework.web.servlet.config.annotation.WebMvcConfigurer;
 //lite 模式下,直接返回新实例对象
 @Configuration(proxyBeanMethods = false)
 public class WebConfig {
     @Bean
     public WebMvcConfigurer webMvcConfigurer() {
         return new WebMvcConfigurer() {
             @Override
             public void addFormatters(FormatterRegistry registry) {
                 //注册一个String->Car : 底层和我们手写Spring/SpringMvc 机制一样
                 //仍然使用反射+注解+IO+动态代理那一套来玩,将该转换器注册到转换器converters 的容器中
                 // (converters 底层是ConcurrentHashMap), 没有多么神奇, 如果感觉不明白回去看看
                 // 老韩自己实现Spring 底层机制, 就了然了
                 registry.addConverter(new Converter < String, Car > () {
                     @Override
                     public Car convert(String source) {
                         if (!ObjectUtils.isEmpty(source)) {
                             Car car = new Car();
                             String[] split = source.split(",");
                             car.setName(split[0]);
                             car.setPrice(Double.parseDouble(split[1]));
                             return car;
                         }
                         return null;
                     }
                 });
             }
         };
     }
 }
2
3
4
5
6
7
8
9
10
11
12
13
14
15
16
17
18
19
20
21
22
23
24
25
26
27
28
29
30
31
32
33
34
35
36
37
38
- 完成测试, 浏览器 http://localhost:8080/save.html
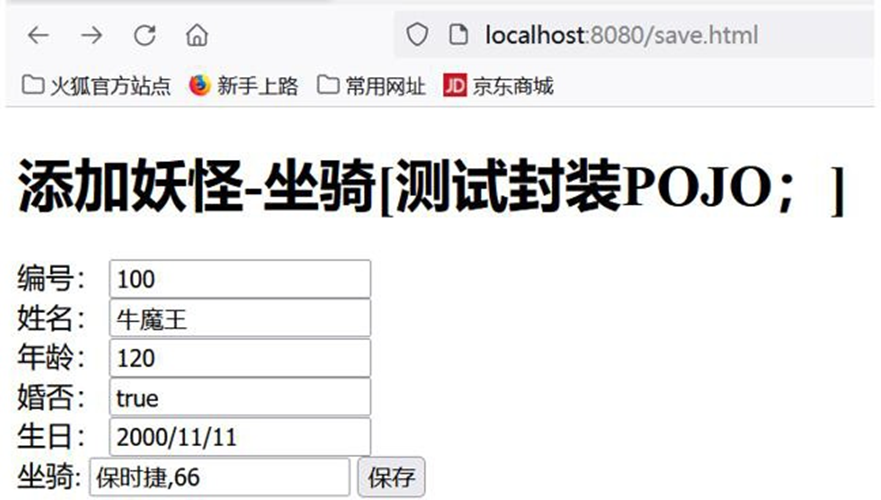

- Debug 可以看到我们新增的Converter.
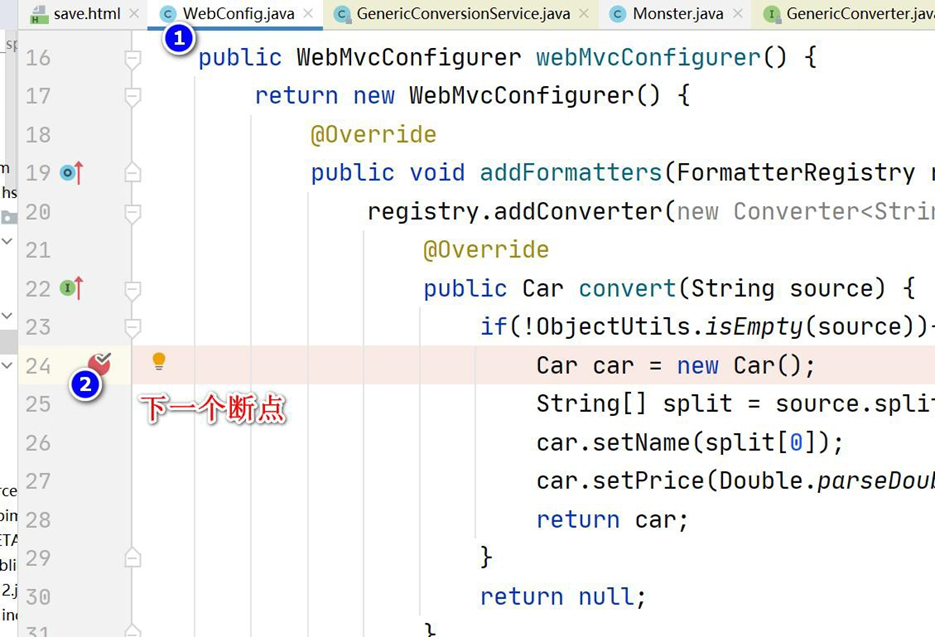

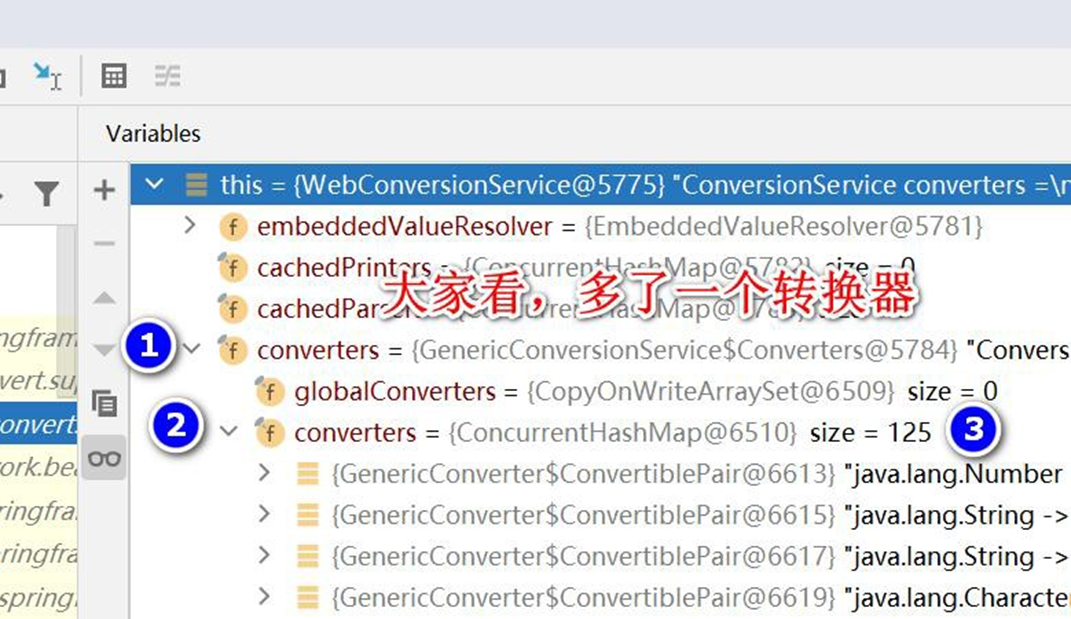
------注意看, 多了一个 我们自定义的转换器 String->com.hspedu.web.bean.Car
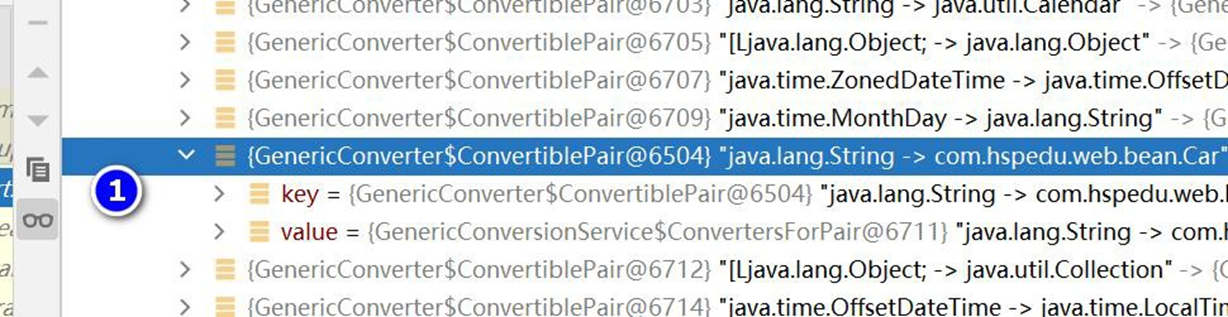
# 11.2.3 注册转换器换种写法 -方便理解
# 12 处理 JSON
# 12.1 需求说明 : 演示返回 JSON 格式数据
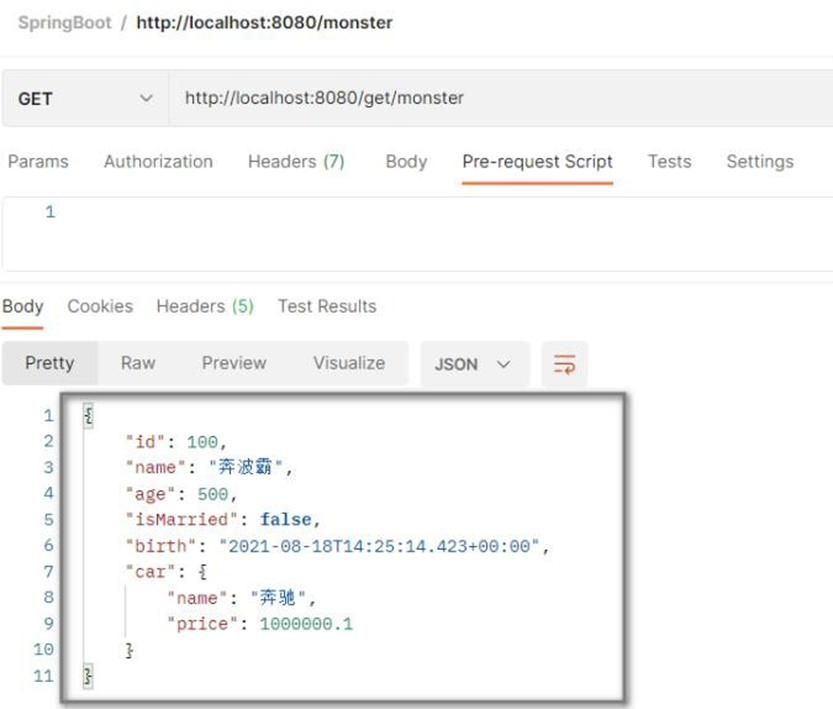
# 12.2 应用实例
- SpringBoot 支持返回 JSON 格式数据,在启用 WEB 开发场景时,已经引入了相关依赖
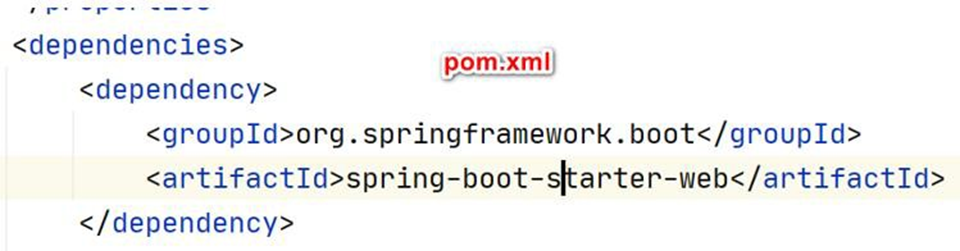
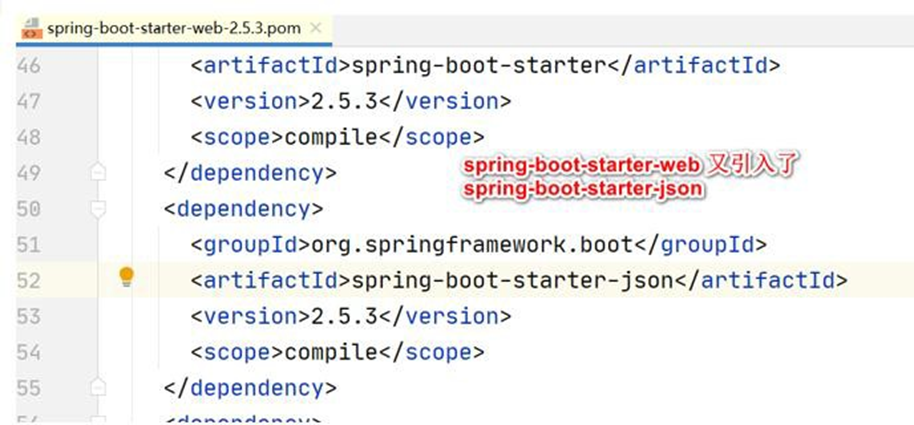
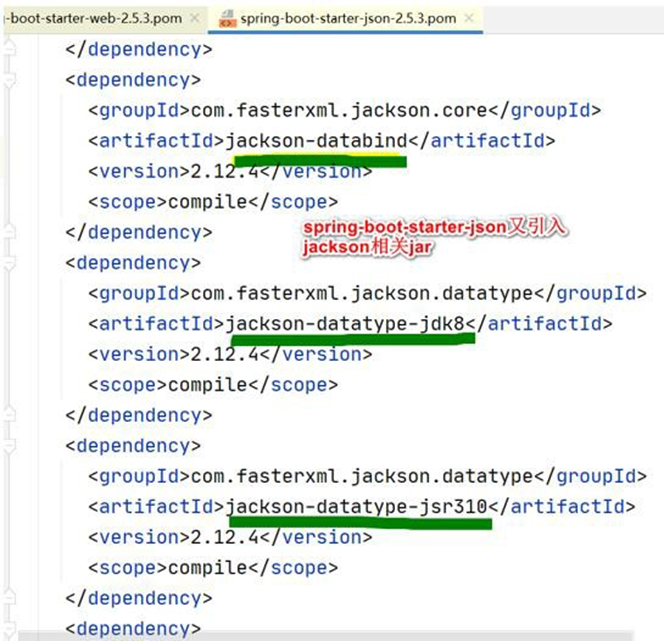
- 创建 com/hspedu/web/controller/ResponseController.java
 package com.hspedu.web.controller;
 import com.hspedu.web.bean.Car;
 import com.hspedu.web.bean.Monster;
 import org.springframework.stereotype.Controller;
 import org.springframework.web.bind.annotation.GetMapping;
 import org.springframework.web.bind.annotation.ResponseBody;
 import java.util.Date;
 /**

 * @author 韩顺平

 * @version 1.0

 */
 @Controller
 public class ResponseController {
     //底层机制:返回值处理器的消息转换器进行处理
     @ResponseBody
     @GetMapping("/get/monster")
     public Monster getMonster() {
         Monster monster = new Monster();
         Car car = new Car();
         car.setName("奔驰");
         car.setPrice(1000000.1);
         monster.setId(100);
         monster.setName("奔波霸");
         monster.setAge(500);
         monster.setBirth(new Date());
         monster.setIsMarried(false);
         monster.setCar(car);
         return monster;
     }
 }
2
3
4
5
6
7
8
9
10
11
12
13
14
15
16
17
18
19
20
21
22
23
24
25
26
27
28
29
30
31
32
33
34
- Postman 完成测试
- Debug 一下 monster 对象以 Json 格式返回
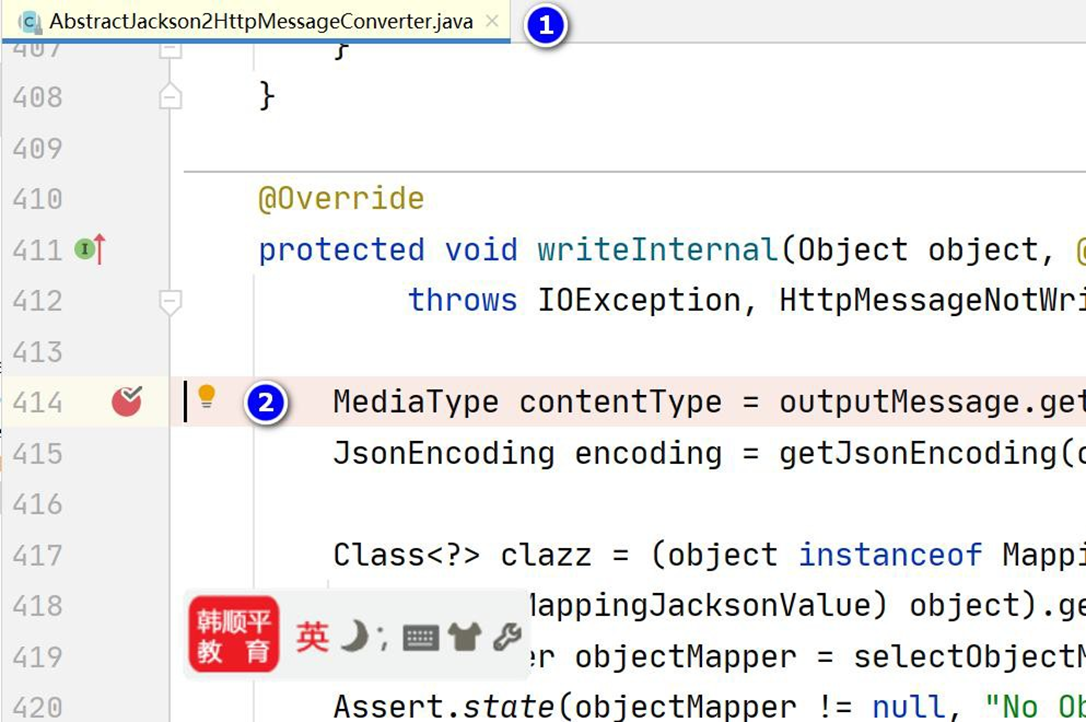
# 13 内容协商
# 13.1 基本介绍
根据客户端接收能力不同,SpringBoot 返回不同媒体类型的数据
比如: 客户端 Http 请求 Accept: application/xml 则返回 xml 数据,客户端 Http 请求
Accept: application/json 则返回 json 数据
- 比如下面的示意图
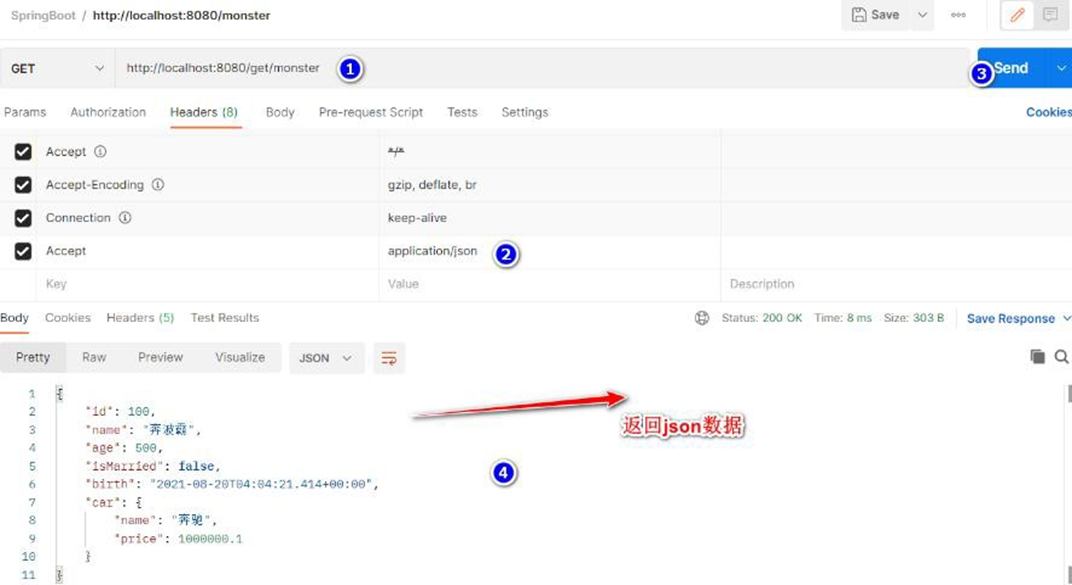
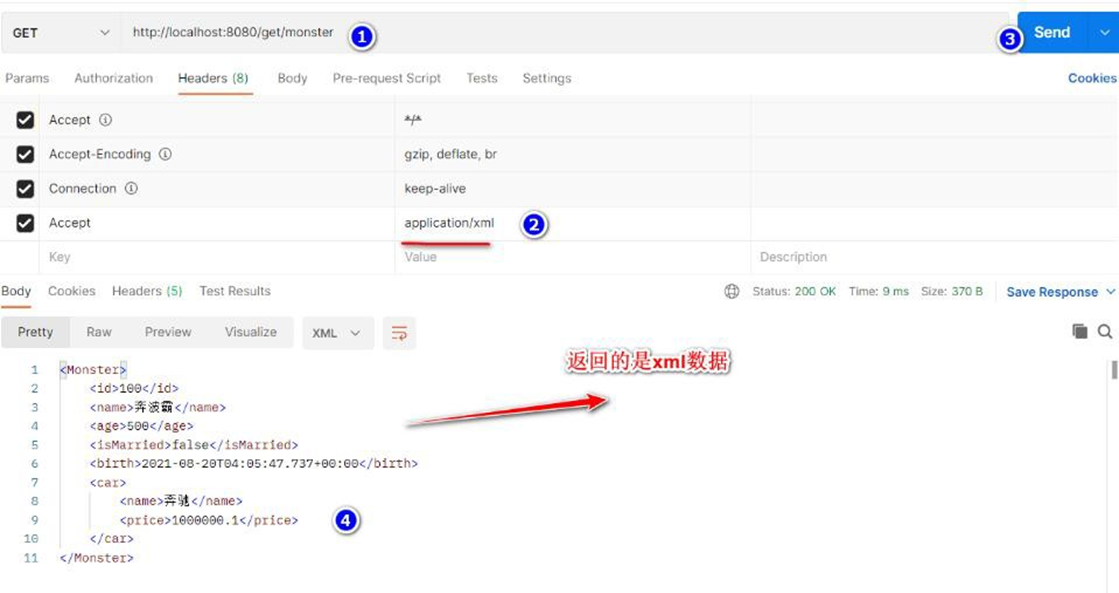
# 13.2 内容协商-应用实例
● 需求说明 : 使用Postman 发送Http 请求,根据请求头不同,返回对应的json 数据 或者 xml
数据, 如图


- 在 pom.xml 增加处理 xml 的依赖
<!-- 引入支持返回xml 数据格式-->
<dependency>
    <groupId>com.fasterxml.jackson.dataformat</groupId>
    <artifactId>jackson-dataformat-xml</artifactId>
</dependency>
2
3
4
5
- 使用Postman 发出不同的Http Header , 可以看到返回对应的数据格式(老韩说明: 测试前请重启一把项目)

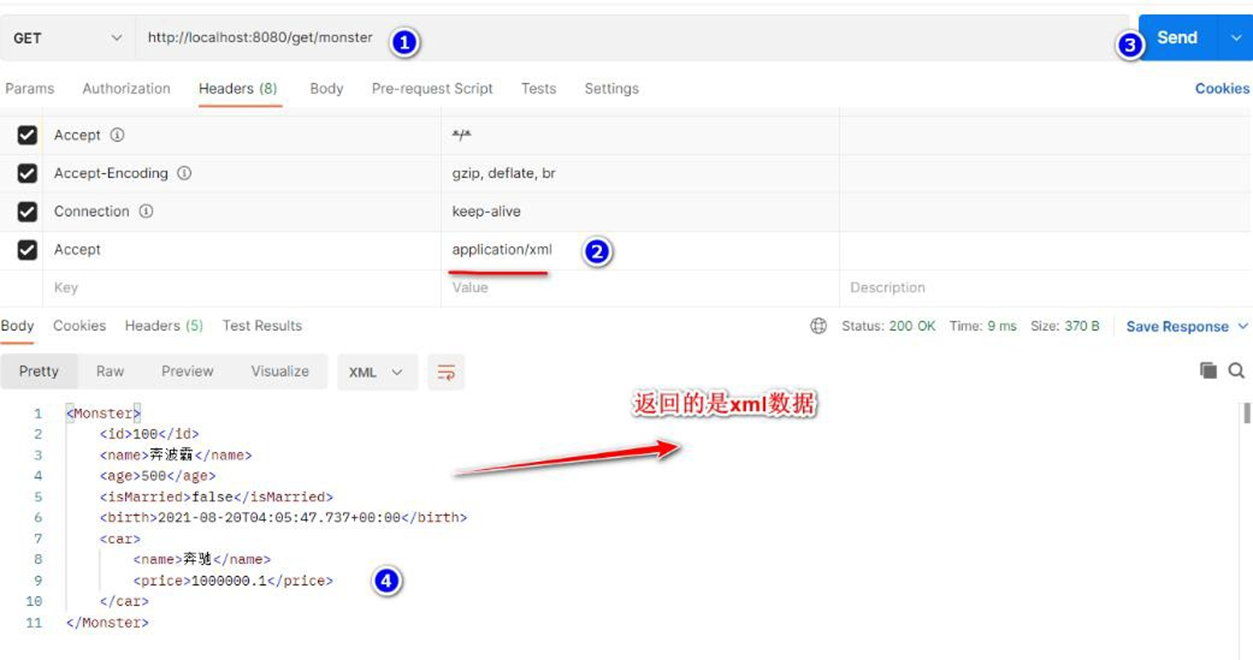
- 切换 Postman 不同的Accept 类型, 来 Debug 源码, 看看对应的 JsonGenerator 类型
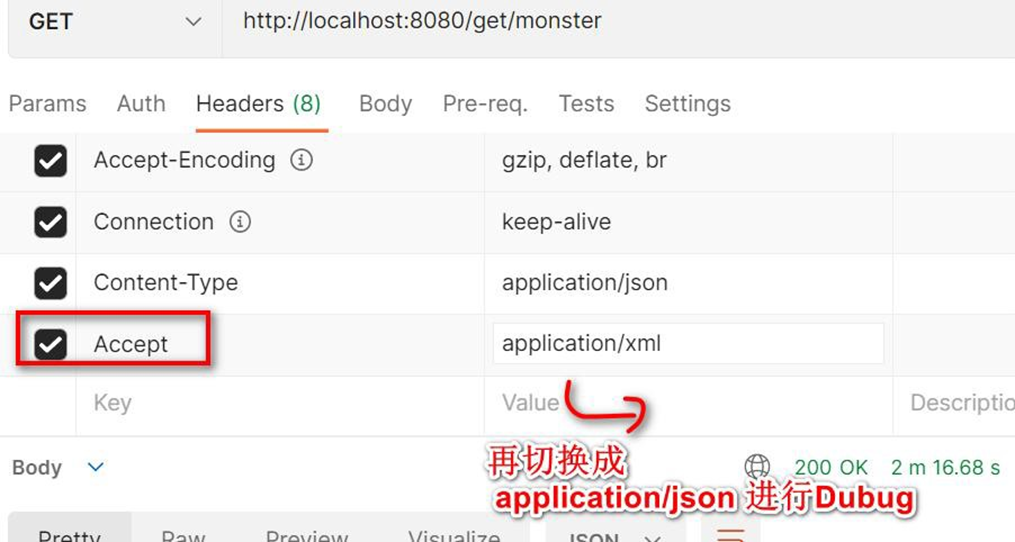

- 使用浏览器请求,为什么会返回 xml 数据分析,而不是 json?

# 13.3 注意事项和使用细节
Postman 可以通过修改 Accept 的值,来返回不同的数据格式
对于浏览器,我们无法修改其 Accept 的值,怎么办? 解决方案: 开启支持基于请求参数
的内容协商功能
- 修改 application.yml, 开启基于请求参数的内容协商功能
spring:
  mvc:
    static-path-pattern: /hspres/** #修改静态资源访问的路径/前缀
    hiddenmethod:
      filter:
        enabled: true #启用了HiddenHttpMethodFilter,开启页面表单的Rest功能
    contentnegotiation:
      favor-parameter: true #开启基于请求参数的内容协商功能

  web:
    resources:
      #修改/指定 静态资源的访问路径/位置
      #
      static-locations: ["classpath:/hspimg/","classpath:/META-INF/resources/",
                         "classpath:/resources/", "classpath:/static/", "classpath:/public/"]      #String[] staticLocations
2
3
4
5
6
7
8
9
10
11
12
13
14
15
- 完成测试
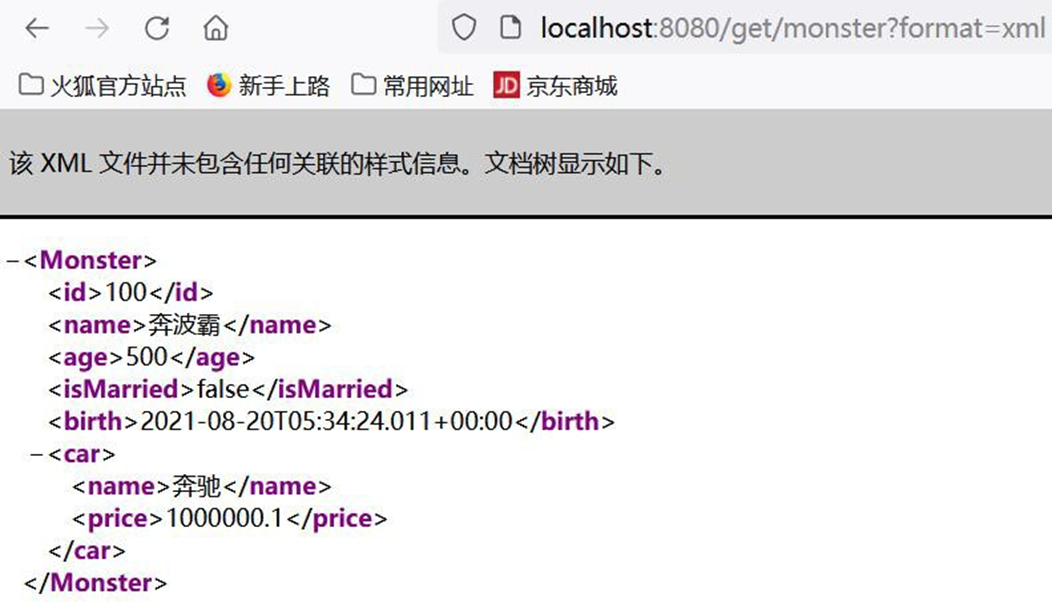
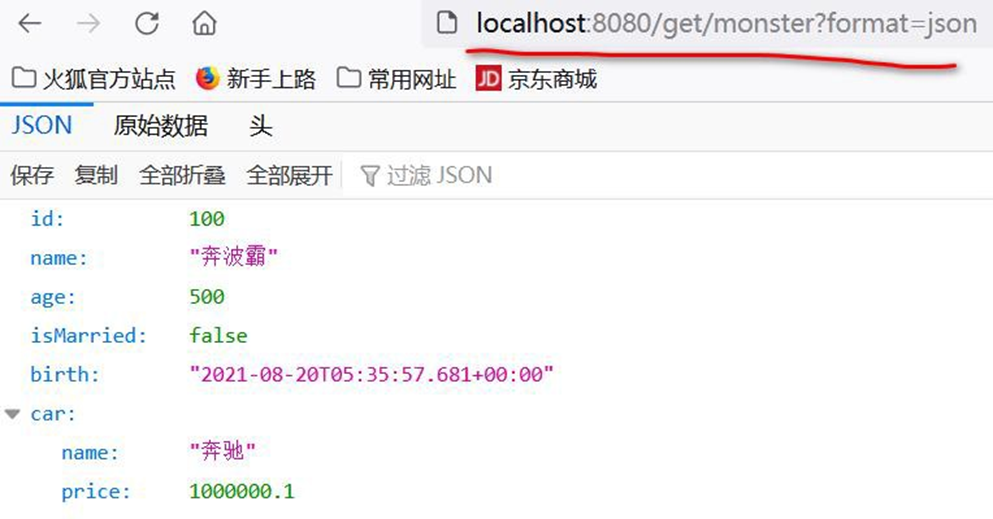
- 注意,参数 format 是规定好的 , 在开启请求参数的内容协商功能后,SpringBoot 底层ParameterContentNegotiationStrategy 会通过format 来接收参数,然后返回对应的媒体类型/数据格式 , 当然 format=xx 这个 xx 媒体类型/数据格式 是SpringBoot 可以处理的才行,不能乱写.
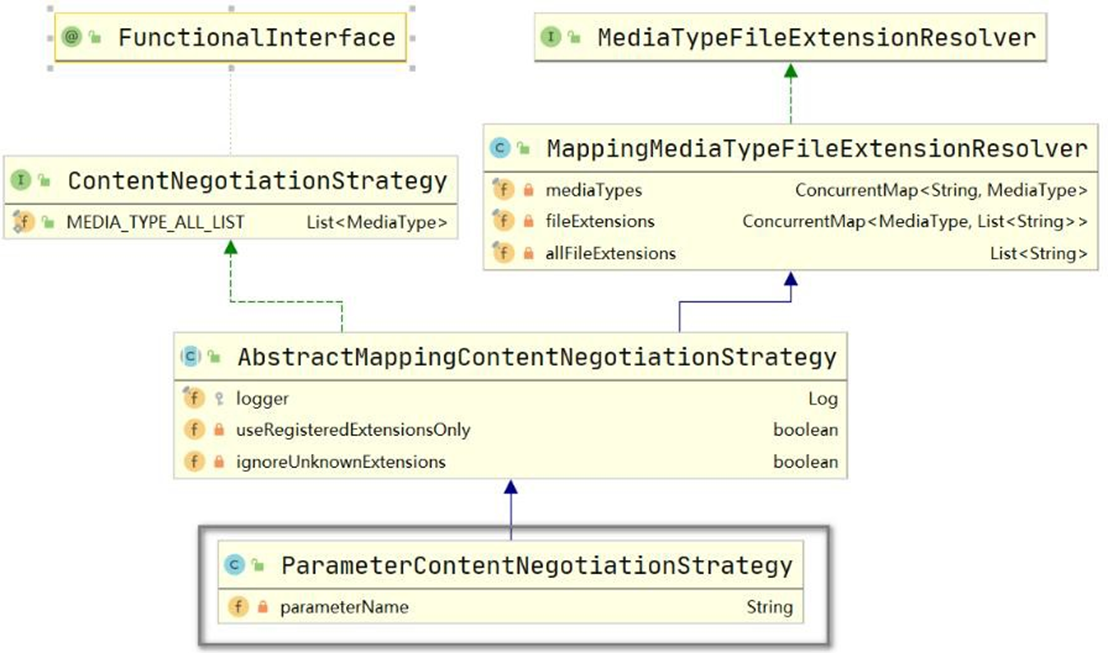

# 14 Thymeleaf
# 14.1 官方文档
# 14.1.1 在线文档: https://www.thymeleaf.org/doc/tutorials/3.0/usingthymeleaf.html
# 14.1.2 离线文档: usingthymeleaf.pdf
# 14.2 基本介绍
● Thymeleaf 是什么
Thymeleaf 是一个跟 Velocity、FreeMarker 类似的模板引擎,可完全替代 JSP
Thymeleaf 是一个 java 类库,他是一个 xml/xhtml/html5 的模板引擎,可以作为 mvc 的
web 应用的view 层
● Thymeleaf 的优点
实现 JSTL、 OGNL 表达式效果, 语法相似, java 程序员上手快
Thymeleaf 模版页面无需服务器渲染,也可以被浏览器运行,页面简洁。
SpringBoot 支持 FreeMarker、Thymeleaf、veocity 。
● Thymeleaf 的缺点
- Thymeleaf:
Thymeleaf is a modern server-side Java template engine for both web and
standalone environments
缺点: 并不是一个高性能的引擎,适用于单体应用
老韩说明:如果要做一个高并发的应用, 选择前后端分离更好,但是作为 SpringBoot 推
荐的模板引擎,老师还是要讲解 Thymeleaf 使用, 这样小伙伴在工作中使用到, 也能搞定
- 后面老韩还要讲Vue + ElementPlus + Axios + SpringBoot 前后端分离
# 14.3 Thymeleaf 机制说明
Thymeleaf 是服务器渲染技术, 页面数据是在服务端进行渲染的
比如: manage.html 中一段 thymeleaf 代码, 是在用户请求该页面时,有 thymeleaf 模板
引擎完成处理的(在服务端完成), 并将结果页面返回.
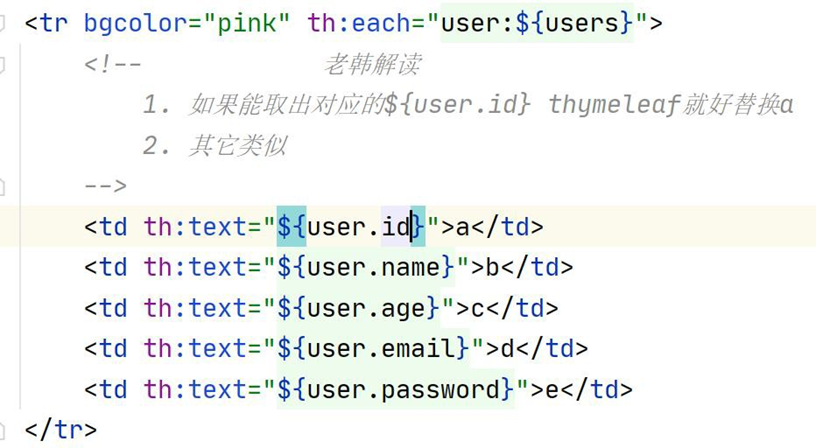
- 因此使用了 Thymeleaf , 并不是前后端分离.
# 14.4 Thymeleaf 语法
# 14.4.1 表达式
- 表达式一览
| 表达式名字 | 语法 | 用途 |
|---|---|---|
| 变量取值 | ${...} | 获取请求域、session 域、对象等值 |
| 选择变量 | *{...} | 获取上下文对象值 |
| 消息 | #{...} | 获取国际化等值 |
| 链接 | @{...} | 生成链接 |
| 片段表达式 | ~{...} | jsp:include 作用,引入公共页面片段 |
- 字面量
文本值: 'hsp edu' , 'hello' ,…数字: 10 , 7 , 36.8 , …布尔值: true , false
空值: null
变量: name,age, ...... 变量不能有空格
- 文本操作
文本操作
字符串拼接: +
变量替换: |age= ${age}|
# 14.4.2 运算符
- 数学运算
运算符: + , - , * , / , %
- 布尔运算
运算符: and , or
一元运算: ! , not
- 比较运算
比较: > , < , >= , <= ( gt , lt , ge , le )等式: == , != ( eq , ne )
- 条件运算
If-then: (if) ? (then)
If-then-else: (if) ? (then) : (else)
Default: (value) ?: (defaultvalue)
# 14.4.3 th 属性
html 有的属性,Thymeleaf 基本都有,而常用的属性大概有七八个。其中 th 属性执行的优
先级从 1~8,数字越低优先级越高
● th:text :设置当前元素的文本内容,相同功能的还有 th:utext,两者的区别在于前
者不会转义 html 标签,后者会。优先级不高:order=7
● th:value:设置当前元素的 value 值,类似修改指定属性的还有 th:src,th:href。优先
级不高:order=6
● th:each:遍历循环元素,和 th:text 或 th:value 一起使用。注意该属性修饰的标签位
置,详细往后看。优先级很高:order=2
● th:if:条件判断,类似的还有 th:unless,th:switch,th:case。优先级较高:order=3
● th:insert:代码块引入,类似的还有 th:replace,th:include,三者的区别较大,若使
用不恰当会破坏 html 结构,常用于公共代码块提取的场景。优先级最高:order=1
● th:fragment:定义代码块,方便被 th:insert 引用。优先级最低:order=8
● th:object:声明变量,一般和*{}一起配合使用,达到偷懒的效果。优先级一般:order=4
● th:attr:修改任意属性,实际开发中用的较少,因为有丰富的其他 th 属性帮忙,类
似的还有 th:attrappend,th:attrprepend。优先级一般:order=5
# 14.4.4 迭代
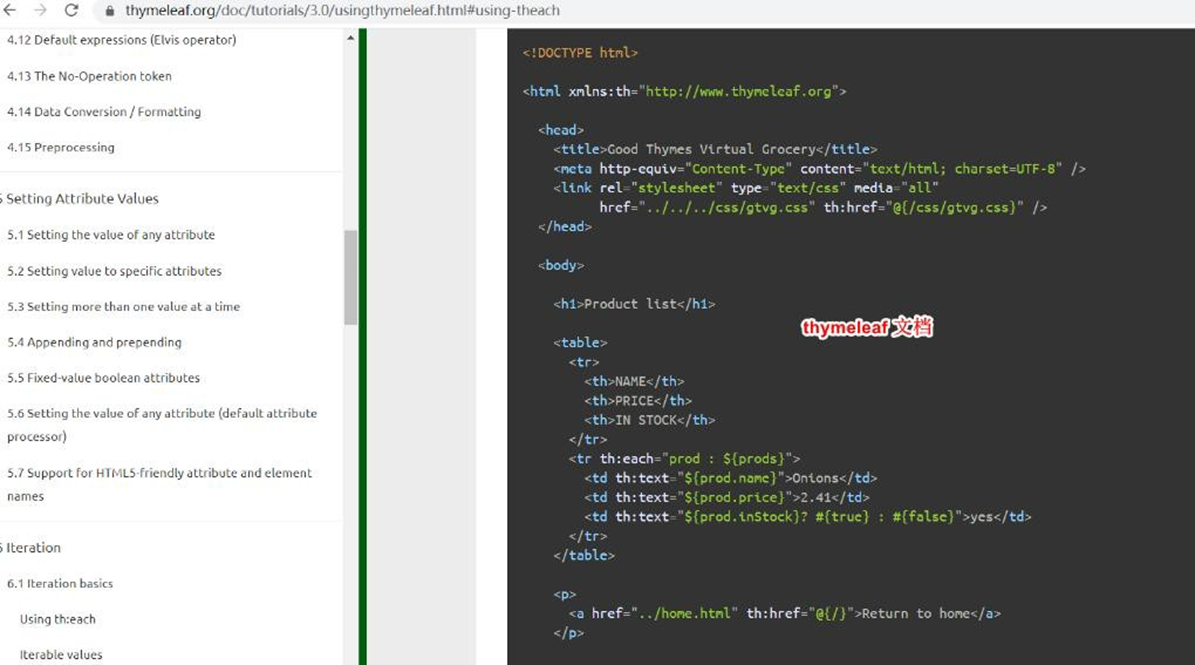
<tr th:each="prod : ${prods}">
  <td th:text="${prod.name}">Onions</td>
  <td th:text="${prod.price}">2.41</td>
  <td th:text="${prod.inStock}? #{true} : #{false}">yes</td>
</tr>
<tr th:each="prod,iterStat : ${prods}" th:class="${iterStat.odd}? 'odd'">
  <td th:text="${prod.name}">Onions</td>
  <td th:text="${prod.price}">2.41</td>
  <td th:text="${prod.inStock}? #{true} : #{false}">yes</td>
</tr>
2
3
4
5
6
7
8
9
10
# 14.4.5 条件运算
<a href="comments.html"
th:href="@{/product/comments(prodId=${prod.id})}"
th:if="${not #lists.isEmpty(prod.comments)}">view</a>
<div th:switch="${user.role}">
  <p th:case="'admin'">User is an administrator</p>
  <p th:case="#{roles.manager}">User is a manager</p>
  <p th:case="*">User is some other thing</p>
</div>
2
3
4
5
6
7
8
# 14.4.6 使用 Thymeleaf -th 属性需要注意点
1、若要使用 Thymeleaf 语法,首先要声明名称空间: xmlns:th="http://www.thymeleaf.org"
2、设置文本内容 th:text,设置 input 的值 th:value,循环输出 th:each,条件判断 th:if,
插入代码块 th:insert,定义代码块 th:fragment,声明变量 th:object
3、th:each 的用法需要格外注意,打个比方:如果你要循环一个 div 中的 p 标签,则 th:each
属性必须放在 p 标签上。若你将 th:each 属性放在div 上,则循环的是将整个 div。
4、变量表达式中提供了很多的内置方法,该内置方法是用#开头,请不要与#{}消息表达式弄混。
# 14.5 Thymeleaf 综合案例
# 14.5.1 需求说明
说明: 使用 SpringBoot + Thymeleaf 完成简单的用户登录-列表功能

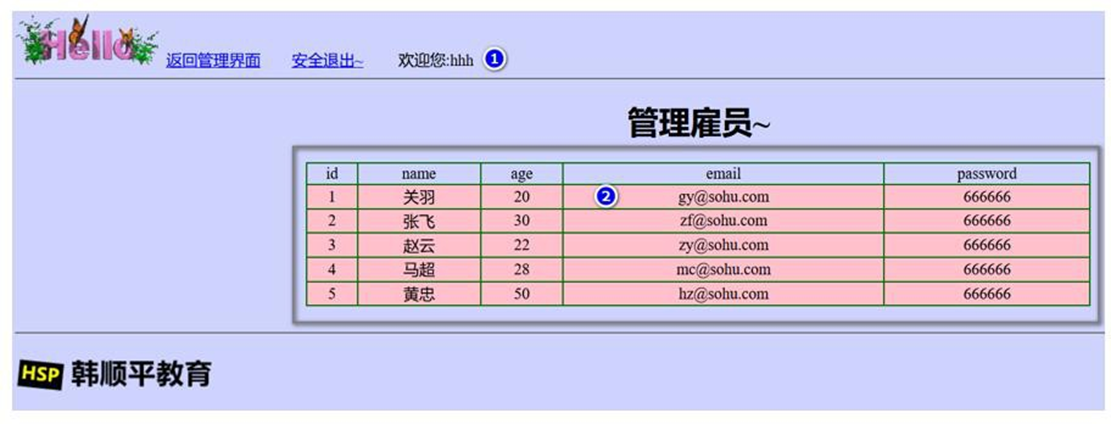
# 14.5.2 需求说明
说明: 使用 SpringBoot + Thymeleaf 完成简单的用户登录-思路分析/图解
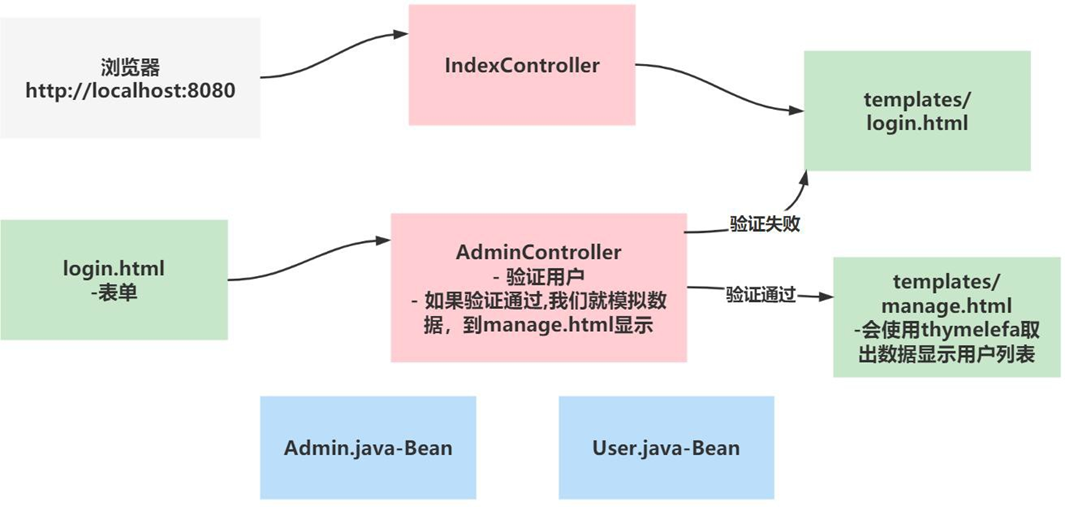
# 14.5.3 代码实现
创建项目, 项目名使用 04-springboot-usersys, 老韩还是使用灵活创建项目的方式.
说明一下,要支持 Thymeleaf, 需要加入 thymeleaf-starter, 在 pom.xml 配置
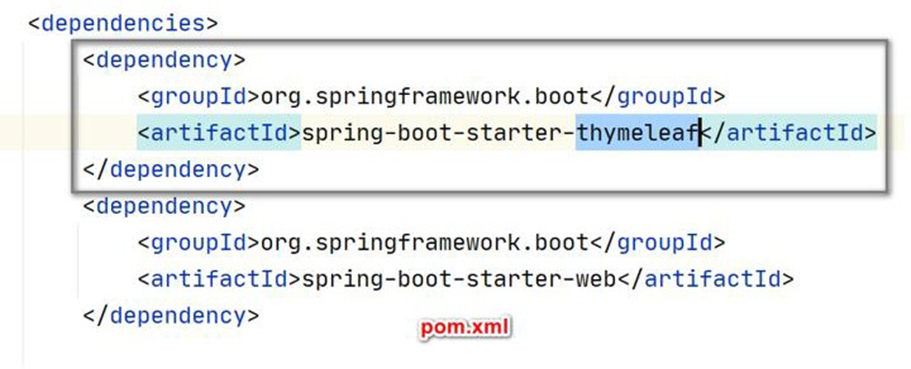
- 引入 starter-Thymeleaf , 项目会自动完成配置, 程序员按照规则开发即可
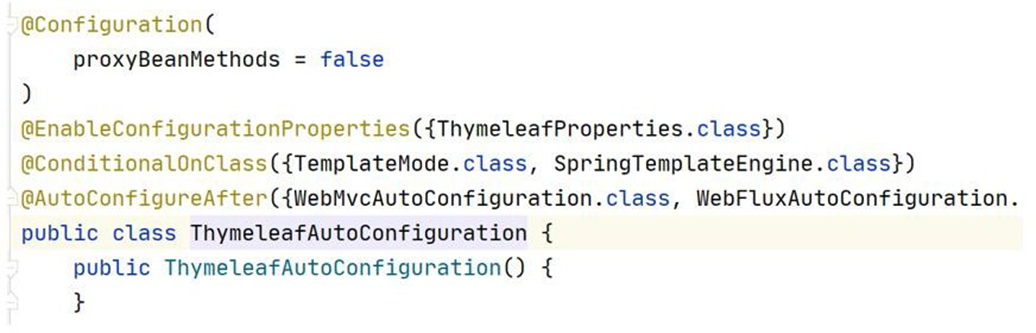
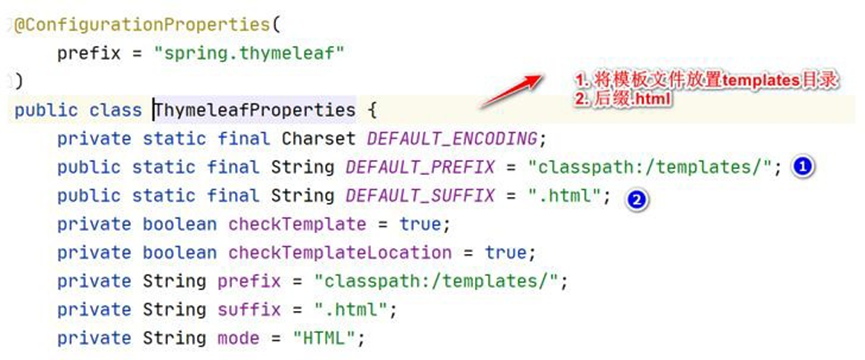
- 创建 index.html 和 manage.html 和静态图片到指定目录,从准备好的拷贝即可, 注意
我将 html 文件放到 templates/ 目录下, 该目录, 不能直接访问.
============login.html==============
<!DOCTYPE html>
<html lang="en" xmlns:th="http://www.thymeleaf.org">
<head>
   <meta charset="UTF-8">
   <title>login</title>
</head>
<body bgcolor="#CED3FE">
<img src="images/1.GIF"/>
<hr/>
<div style="text-align: center">
   <h1>用户登陆</h1>
   <form action="#" th:action="@{/login}"  method="post">
       <label style="color: red" th:text="${msg}"></label><br/>
       用户名:<input type="text" style="width:150px" name="name"/><br/><br/>
       密 码:<input type="password" style="width:150px" name="password"/><br/><br/>
       <input type="submit" value="登录"/>
       <input type="reset" value="重新填写"/>
   </form>
</div>
<hr/>
<img src="images/logo.png"/>
</body>
</html>
2
3
4
5
6
7
8
9
10
11
12
13
14
15
16
17
18
19
20
21
22
23
==============manage.html========================
<!DOCTYPE html>
<html lang="en" xmlns:th="http://www.thymeleaf.org">
<head>
   <meta charset="UTF-8">
   <title>管理后台</title>
</head>
<body bgcolor="#CED3FE">
<img src="images/1.GIF"/>
<a href='#'>返回管理界面</a>  <a href='#' th:href="@{/}">安全退出</a>   欢迎您:[[${session.loginAdmin.name}]]
<hr/>
<div style="text-align: center">
   <h1>管理雇员~</h1>
   <table border="1px" cellspacing="0" bordercolor="green" style="width:800px;margin: auto">
       <tr bgcolor="pink">
           <td>id</td>
           <td>name</td>
           <td>pwd</td>
           <td>email</td>
           <td>age</td>
       </tr>
       <tr bgcolor="#ffc0cb" th:each="user:${users}">
           <td th:text="${user.id}">a</td>
           <td th:text="${user.name}">b</td>
           <td th:text="${user.password}">c</td>
           <td th:text="${user.email}">d</td>
           <td th:text="${user.age}">e</td>
       </tr>
   </table>
   <br/>
</div>
<hr/>
<img src="images/logo.png"/>
</body>
</html>
2
3
4
5
6
7
8
9
10
11
12
13
14
15
16
17
18
19
20
21
22
23
24
25
26
27
28
29
30
31
32
33
34
- 创建 com/hspedu/usersys/bean/Admin.java
package com.hspedu.springboot.bean;

import lombok.Data;

/**
 * @author 韩顺平
 * @version 1.0
 */
@Data
public class Admin {
    private String name;
    private String password;
}
2
3
4
5
6
7
8
9
10
11
12
13
- 创建 com/hspedu/usersys/bean/User.java
package com.hspedu.springboot.bean;

import lombok.AllArgsConstructor;
import lombok.Data;
import lombok.NoArgsConstructor;

/**
 * @author 韩顺平
 * @version 1.0
 */
@Data
@AllArgsConstructor
@NoArgsConstructor
public class User {
    private Integer id;
    private String name;
    private String password;
    private Integer age;
    private String email;
}
2
3
4
5
6
7
8
9
10
11
12
13
14
15
16
17
18
19
20
- 创建 com/hspedu/usersys/controller/IndexController.java 默认进入登录页面
package com.hspedu.springboot.controller;

import org.springframework.stereotype.Controller;
import org.springframework.web.bind.annotation.GetMapping;
import org.springframework.web.bind.annotation.RestController;

/**
 * @author 韩顺平
 * @version 1.0
 */
@Controller
public class IndexController {

    //编写方法,转发到登录页面
    @GetMapping(value = {"/", "/login"})
    public String login() {
        /**
         * 老师解读
         * 1. 因为我们引入了starter-thymeleaf
         * 2. 这里就会直接使用视图解析到 thymeleaf下的模板文件adminLogin.html
         */
        return "adminLogin";
    }
}
2
3
4
5
6
7
8
9
10
11
12
13
14
15
16
17
18
19
20
21
22
23
24
- 创建 com/hspedu/usersys/controller/AdminController.java 处理登录请求 完成测试
@Controller
public class AdminController {
    @PostMapping("/login")
    public String login(Admin admin, HttpSession session, Model model) { //RedirectAttributes

        if (StringUtils.hasLength(admin.getName()) &&
                "666666".equals(admin.getPassword())) {
            //把登陆成功的管理员保存起来
            session.setAttribute("loginAdmin", admin);

            //这里不用return "manage.html" 转发为了防止登录成功后,刷新页面会登录表单重复提交
            //登录成功重定向到manage.html; 重定向防止表单重复提交
            return "redirect:/manage.html";
        } else {
            model.addAttribute("msg", "账号/密码错误");

            //转发到登录页面
            return "login";
        }
    }

    /**
    * 去manage 页面, 这里使用manage.html 路径是为了含义更清晰
    * @return
    */
    @GetMapping("/manage.html")
    public String mainPage(HttpSession session, Model model) {
        //是否登录。拦截器,过滤器
        Object loginAdmin = session.getAttribute("loginAdmin");

        if (loginAdmin != null) {
            return "manage";
        } else {
            //回到登录页面
            model.addAttribute("msg", "请重新登录");

            return "login";
        }
    }
}
2
3
4
5
6
7
8
9
10
11
12
13
14
15
16
17
18
19
20
21
22
23
24
25
26
27
28
29
30
31
32
33
34
35
36
37
38
39
40
//浏览器输入: http://localhost:8080/login
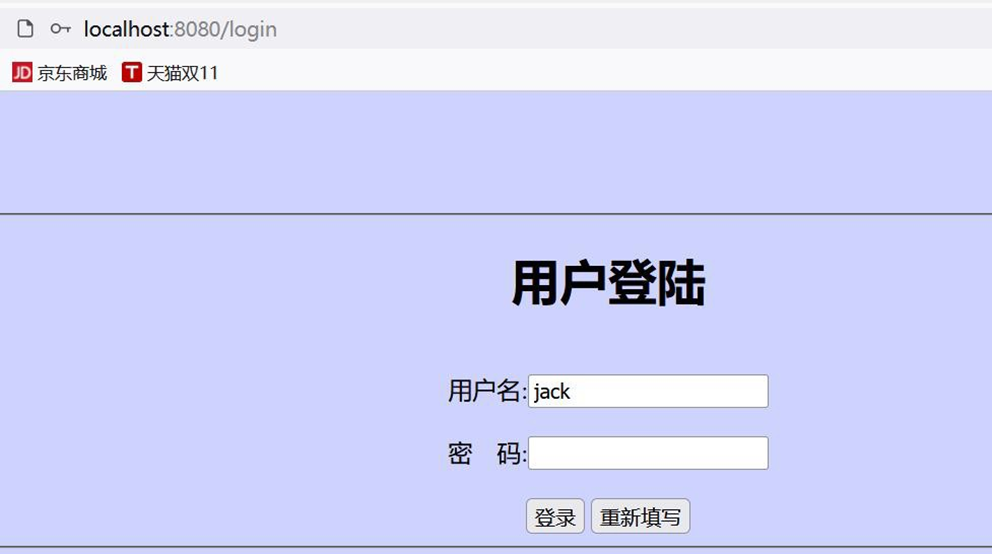

- 修改 AdminController.java 模拟返回用户列表
/**
* 去manage 页面, 这里使用manage.html 路径是为了含义更清晰
* 当然也可以按照你的习惯写.
* @return
*/
@GetMapping("/manage.html")
public String mainPage(HttpSession session, Model model) {
    //是否登录。拦截器,过滤器
    Object loginAdmin = session.getAttribute("loginAdmin");
    if (loginAdmin != null) {
        ArrayList < User > users = new ArrayList < > ();
        users.add(new User(1, "关羽~", "666666", 20, "[email protected]"));
        users.add(new User(2, "张飞", "666666", 30, "[email protected]"));
        users.add(new User(3, "赵云", "666666", 22, "[email protected]"));
        users.add(new User(4, "马超", "666666", 28, "[email protected]"));
        users.add(new User(5, "黄忠", "666666", 50, "[email protected]"));
        model.addAttribute("users", users);
        return "manage";
    } else {
        //回到登录页面
        model.addAttribute("msg", "错误/重新登录");
        return "login";
    }
}
2
3
4
5
6
7
8
9
10
11
12
13
14
15
16
17
18
19
20
21
22
23
24
- 修改 manage.html , 显示用户列表
<!DOCTYPE html>
<html lang="en" xmlns:th="http://www.thymeleaf.org">
<head>
    <meta charset="UTF-8">
    <title>管理后台</title>
</head>
<body bgcolor="#CED3FE">
<img src="images/1.GIF"/>
<a href='#'>返回管理界面</a>  <a href='#' th:href="@{/}">安全退出</a>   欢迎您:[[${session.loginAdmin.name}]]
<hr/>
<div style="text-align: center">
    <h1>管理雇员~</h1>
    <table border="1px" cellspacing="0" bordercolor="green" style="width:800px;margin: auto">
        <tr bgcolor="pink">
            <td>id</td>
            <td>name</td>
            <td>pwd</td>
            <td>email</td>
            <td>age</td>
        </tr>
        <tr bgcolor="#ffc0cb" th:each="user:${users}">
            <td th:text="${user.id}">a</td>
            <td th:text="${user.name}">b</td>
            <td th:text="${user.password}">c</td>
            <td th:text="${user.email}">d</td>
            <td th:text="${user.age}">e</td>
        </tr>
    </table>
    <br/>
</div>
<hr/>
<img src="images/logo.png"/>
</body>
</html>
2
3
4
5
6
7
8
9
10
11
12
13
14
15
16
17
18
19
20
21
22
23
24
25
26
27
28
29
30
31
32
33
34
- 修改 login.html , 显示登录错误信息和提交 action
<!DOCTYPE html>
<html lang="en" xmlns:th="http://www.thymeleaf.org">
<head>
   <meta charset="UTF-8">
   <title>login</title>
</head>
<body bgcolor="#CED3FE">
<img src="images/1.GIF"/>
<hr/>
<div style="text-align: center">
   <h1>用户登陆</h1>
   <form action="#" th:action="@{/login}"  method="post">
       <label style="color: red" th:text="${msg}"></label><br/>
       用户名:<input type="text" style="width:150px" name="name"/><br/><br/>
       密 码:<input type="password" style="width:150px" name="password"/><br/><br/>
       <input type="submit" value="登录"/>
       <input type="reset" value="重新填写"/>
   </form>
</div>
<hr/>
<img src="images/logo.png"/>
</body>
</html>
2
3
4
5
6
7
8
9
10
11
12
13
14
15
16
17
18
19
20
21
22
23
# 14.5.4 完成测试- Thymeleaf 显示数据页面效果
● 完成测试, 浏览器 : http://localhost:8080/login.html


# 14.6 作业布置
1、 把前面老师讲过的接收参数相关注解、自定义转换器、处理 JSON、内容协商, 相关代
码和案例, 自己写一遍
-一定要自己写一遍,否则没有印象, 理解不会深入
2、将 Thymeleaf 用户管理 改成 妖怪管理列表, 字段做相应的改变,进行练习
Monster [id, name, skill, age, sal, birth]
基本界面仍然使用老师
在完成过程中, 小伙伴会遇到各种问题, 要开始培养自己独立解决问题的能力了.

# 15 拦截器-HandlerInterceptor
# 15.1 基本介绍
在 Spring Boot 项目中, 拦截器是开发中常用手段,要来做登陆验证、性能检查、日志记录等。
基本步骤:
√ 编写一个拦截器实现HandlerInterceptor 接口
√ 拦截器注册到配置类中(实现 WebMvcConfigurer 的 addInterceptors)
√ 指定拦截规则
√ 回顾 SpringMVC 中讲解的 Interceptor

# 15.2 拦截器应用实例
# 15.2.1 需求: 使用拦截器防止用户非法登录, 如图 - 使用拦截器就不需要在每个方法验证了
● 浏览器输入 : http://localhost:8080/manage.html , 如果用户没有登录,则返回登录界面.

# 15.2.2 代码实现
- 创建 com/hspedu/usersys/interceptor/LoginInterceptor.java
package com.hspedu.usersys.interceptor;

import lombok.extern.slf4j.Slf4j;

import org.springframework.web.servlet.HandlerInterceptor;

import org.springframework.web.servlet.ModelAndView;

import javax.servlet.http.HttpServletRequest;

import javax.servlet.http.HttpServletResponse;

import javax.servlet.http.HttpSession;

/**

* @author 韩顺平

* @version 1.0

*/

@Slf4j
public class LoginInterceptor implements HandlerInterceptor {

    /**

    * 目标方法执行之前*/

    @Override
    public boolean preHandle(HttpServletRequest request, HttpServletResponse response,

        Object handler) throws Exception {

        String requestURI = request.getRequestURI();

        log.info("preHandle 拦截的请求路径是{}", requestURI);

        //登录检查逻辑

        HttpSession session = request.getSession();

        Object loginAdmin = session.getAttribute("loginAdmin");

        if (loginAdmin != null) {

            //放行

            return true;

        }

        //拦截

        request.setAttribute("msg", "错误/重新登录");

        request.getRequestDispatcher("/").forward(request, response);

        return false;
    }

    /**

    * 目标方法执行完成以后*/

    @Override
    public void postHandle(HttpServletRequest request, HttpServletResponse response,

        Object handler, ModelAndView modelAndView) throws Exception {

        log.info("postHandle 执行");

    }

    /**

    * 页面渲染以后*/

    @Override
    public void afterCompletion(HttpServletRequest request, HttpServletResponse response,

        Object handler, Exception ex) throws Exception {

        log.info("afterCompletion 执行");

    }

}
2
3
4
5
6
7
8
9
10
11
12
13
14
15
16
17
18
19
20
21
22
23
24
25
26
27
28
29
30
31
32
33
34
35
36
37
38
39
40
41
42
43
44
45
46
47
48
49
50
51
52
53
54
55
56
57
58
59
60
61
62
63
64
65
66
67
68
69
70
71
72
73
74
75
76
77
78
79
80
81
82
83
84
85
86
87
88
- 创建 com/hspedu/usersys/config/WebConfig.java
package com.hspedu.usersys.config;

import com.hspedu.usersys.interceptor.LoginInterceptor;

// import org.apache.catalina.connector.Connector;

// import org.apache.coyote.http11.Http11NioProtocol;

// import org.springframework.boot.web.embedded.tomcat.TomcatConnectorCustomizer;

// import org.springframework.context.annotation.Bean;

import org.springframework.context.annotation.Configuration;

import org.springframework.context.annotation.Configuration;

import org.springframework.web.servlet.config.annotation.InterceptorRegistry;

import org.springframework.web.servlet.config.annotation.WebMvcConfigurer;

/**

* @author 韩顺平

* @version 1.0
*/

/**
* 这里实现Spring-Boot 定制功能, 加入自己的配置
*/
@Configuration
public class WebConfig implements WebMvcConfigurer {
    @Override
    public void addInterceptors(InterceptorRegistry registry)

    {
        registry.addInterceptor(new LoginInterceptor())

        //拦截所有请求

        .addPathPatterns("/**")

        .excludePathPatterns("/", "/login", "/images/**"); //放行的请求, 可以根据需要增加

    }

}
2
3
4
5
6
7
8
9
10
11
12
13
14
15
16
17
18
19
20
21
22
23
24
25
26
27
28
29
30
31
32
33
34
35
36
37
38
39
40
41
42
43
44
45
46
47
- 修改 com/hspedu/usersys/controller/AdminController.java , 去掉 session 验证用户是否
登录代码 , 并完成测试, 注意看页面和后台日志.
/**
 * 去manage 页面, 这里使用manage.html 路径是为了含义更清晰
 * 当然也可以按照你的习惯写.
 * @return
 */
@GetMapping("/manage.html")
public String mainPage(HttpSession session, Model model) {
    //是否登录。拦截器,过滤器
    // Object loginAdmin = session.getAttribute("loginAdmin");
    // if (loginAdmin != null) {
    //
    // ArrayList<User> users = new ArrayList<>();
    // users.add(new User(1, "关羽~", "666666", 20, "[email protected]"));
    // users.add(new User(2, "张飞", "666666", 30, "[email protected]"));
    // users.add(new User(3, "赵云", "666666", 22, "[email protected]"));
    // users.add(new User(4, "马超", "666666", 28, "[email protected]"));
    // users.add(new User(5, "黄忠", "666666", 50, "[email protected]"));
    // model.addAttribute("users", users);
    // return "manage";
    // } else {
    // //回到登录页面
    // model.addAttribute("msg", "错误/重新登录");
    // return "login";
    // }
    /**/
    //有了拦截器, 不需再使用sessoin 验证
    log.info("执行mainPage()");
    ArrayList < User > users = new ArrayList < > ();
    users.add(new User(1, "关羽~", "666666", 20, "[email protected]"));
    users.add(new User(2, "张飞", "666666", 30, "[email protected]"));
    users.add(new User(3, "赵云", "666666", 22, "[email protected]"));
    users.add(new User(4, "马超", "666666", 28, "[email protected]"));
    users.add(new User(5, "黄忠", "666666", 50, "[email protected]"));
    model.addAttribute("users", users);
    return "manage";
}
2
3
4
5
6
7
8
9
10
11
12
13
14
15
16
17
18
19
20
21
22
23
24
25
26
27
28
29
30
31
32
33
34
35
36
37
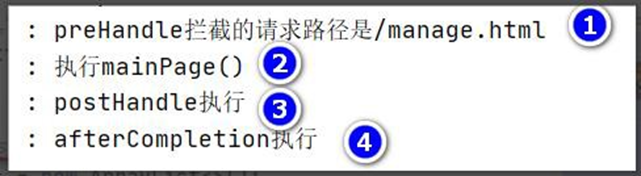
# 15.2.3 注意事项和细节
1、URI 和 URL 的区别
URI = Universal Resource Identifier
URL = Universal Resource Locator
Identifier:标识符,Locator:定位器 从字面上来看, URI 可以唯一标识一个资源, URL 可以
提供找到该资源的路径
老韩举例说明:
String requestURI = request.getRequestURI();
String requestURL = request.getRequestURL().toString();
2、注册拦截器, 依然可以使用如下方式
@Configuration
public class WebConfig /*implements WebMvcConfigurer*/ {
    //将我们的拦截器, 注入到容器中
    //@Override
    //public void addInterceptors(InterceptorRegistry registry) {
    // System.out.println("addInterceptors...");
    // //加入我们的拦截器
    // registry.addInterceptor(new LoginInterceptor())
    // .addPathPatterns("/**") //拦截所有请求
    // .excludePathPatterns("/","/login","/images/**");//
    //}
    @Bean
    public WebMvcConfigurer webMvcConfigurer() {
        return new WebMvcConfigurer() {
            @Override
            public void addInterceptors(InterceptorRegistry registry) {
                System.out.println("addInterceptors...~~~~:):)");
                //加入我们的拦截器
                registry.addInterceptor(new LoginInterceptor())
                    .addPathPatterns("/**") //拦截所有请求
                    .excludePathPatterns("/", "/login", "/images/**"); //
            }
        };
    }
}
2
3
4
5
6
7
8
9
10
11
12
13
14
15
16
17
18
19
20
21
22
23
24
25
26
# 16 文件上传
# 16.1 应用实例
# 16.1.1 需求: 演示 Spring-Boot 通过表单注册用户,并支持上传图片
● 需求: 演示 Spring-Boot 通过表单注册用户,并支持上传图片
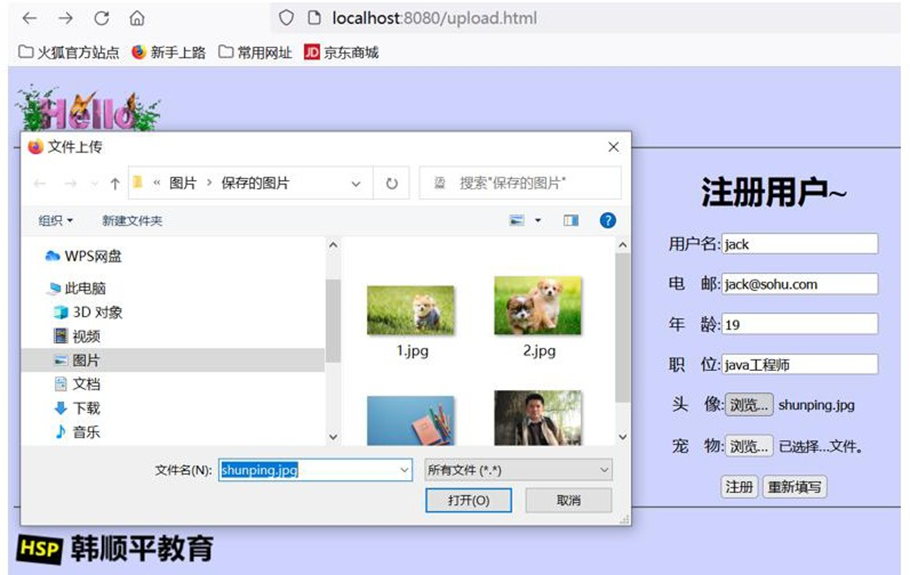
● 带学员回顾 SpringMVC 文件上传
# 16.1.2 代码实现
● 代码实现-文件上传
- 创建 templates/upload.html , 要求头像只能选择一个, 而宠物可以上传多个图片
<!DOCTYPE html>
<html lang="en" xmlns:th="http://www.thymeleaf.org">

  <head>
    <meta charset="UTF-8">
    <title>upload</title></head>

  <body bgcolor="#CED3FE">
    <img src="images/1.GIF" />
    <hr/>
    <div style="text-align: center">
      <h1>注册用户~</h1>
      <form action="#" method="post" th:action="@{/upload}" enctype="multipart/form-data">用户名:
        <input type="text" style="width:150px" name="name" />
        <br/>
        <br/>电 邮:
        <input type="text" style="width:150px" name="email" />
        <br/>
        <br/>年 龄:
        <input type="text" style="width:150px" name="age" />
        <br/>
        <br/>职 位:
        <input type="text" style="width:150px" name="job" />
        <br/>
        <br/>头 像:
        <input type="file" style="width:150px" name="header">
        <br/>
        <br/>宠 物:
        <input type="file" style="width:150px" name="photos" multiple>
        <br/>
        <br/>
        <input type="submit" value="注册" />
        <input type="reset" value="重新填写" /></form></div>
    <hr/>
    <img src="images/logo.png" /></body>

</html>
2
3
4
5
6
7
8
9
10
11
12
13
14
15
16
17
18
19
20
21
22
23
24
25
26
27
28
29
30
31
32
33
34
35
36
37
- 创建 com/hspedu/usersys/controller/UploadController.java
package com.hspedu.usersys.controller;
import lombok.extern.slf4j.Slf4j;
import org.springframework.stereotype.Controller;
import org.springframework.util.ResourceUtils;
import org.springframework.web.bind.annotation.*;
import org.springframework.web.multipart.MultipartFile;
import java.io.File;
import java.io.IOException;
/**
 * @author 韩顺平
 * @version 1.0
 */
@Slf4j
@Controller
public class UploadController {
    @GetMapping("/upload.html")
    public String uploadPage() {
        return "upload";
    }
    /**
     * MultipartFile 自动封装上传过来的文件
     */
    @ResponseBody
    @PostMapping("/upload")
    public String upload(@RequestParam("email") String email, @RequestParam("name") String name
        , @RequestParam("age") Integer age, @RequestParam("job") String job
        , @RequestPart("header") MultipartFile header
        , @RequestPart("photos") MultipartFile[] photos) throws
    IOException {
        log.info("上传的信息:email={},name={},age={}, job={}, header={},photos={}"
            , email, name, age, job, header.getSize(), photos.length);
        // 也可以自己动态的创建上传文件目录, 来存放文件, 比如在
        resources / static / images / upload /
            // String path = ResourceUtils.getURL("classpath:").getPath();
            // File file = new File(path + "static/images/upload/");
            // if (!file.exists()) file.mkdirs();
            if (!header.isEmpty()) {
                //保存到文件服务器或者OSS 服务器//需要先创建好d:\\temp_upload 目录
                String originalFilename = header.getOriginalFilename();
                //方式1: 指定某个目录存放上传文件
                header.transferTo(new File("d:\\temp_upload\\" + originalFilename));
                //方式2: 动态的创建文件存放文件
                //header.transferTo(new File(file.getAbsolutePath() + "/" + originalFilename));
            }
        if (photos.length > 0) {
            for (MultipartFile photo: photos) {
                if (!photo.isEmpty()) {
                    String originalFilename = photo.getOriginalFilename();
                    photo.transferTo(new File("d:\\temp_upload\\" + originalFilename));
                    //photo.transferTo(new File(file.getAbsolutePath() + "/" + originalFilename));
                }
            }
        }
        return "上传成功~~";
    }
}
2
3
4
5
6
7
8
9
10
11
12
13
14
15
16
17
18
19
20
21
22
23
24
25
26
27
28
29
30
31
32
33
34
35
36
37
38
39
40
41
42
43
44
45
46
47
48
49
50
51
52
53
54
55
56
57
- 修改 WebConfig 配置,放行/upload.html 和 /upload 请求
package com.hspedu.usersys.config;
import com.hspedu.usersys.interceptor.LoginInterceptor;
// import org.apache.catalina.connector.Connector;
// import org.apache.coyote.http11.Http11NioProtocol;
// import org.springframework.boot.web.embedded.tomcat.TomcatConnectorCustomizer;
// import org.springframework.context.annotation.Bean;
import org.springframework.context.annotation.Configuration;
import org.springframework.context.annotation.Configuration;
import org.springframework.web.servlet.config.annotation.InterceptorRegistry;
import org.springframework.web.servlet.config.annotation.WebMvcConfigurer;
/**

* @author 韩顺平

* @version 1.0

*/
/**

* 这里实现Spring-Boot 定制功能, 加入自己的配置

*/
@Configuration
public class WebConfig implements WebMvcConfigurer {
    @Override
    public void addInterceptors(InterceptorRegistry registry) {
        registry.addInterceptor(new LoginInterceptor())
            //拦截所有请求
            .addPathPatterns("/**")
            .excludePathPatterns("/", "/login", "/images/**"
                , "/upload.html", "/upload"); //放行的请求, 可以根据需要增加
    }
}
2
3
4
5
6
7
8
9
10
11
12
13
14
15
16
17
18
19
20
21
22
23
24
25
26
27
28
29
30
31
32
33
34
- 根据项目需求修改文件上传的参数, 否则文件上传会抛出异常, [可以演示错误]
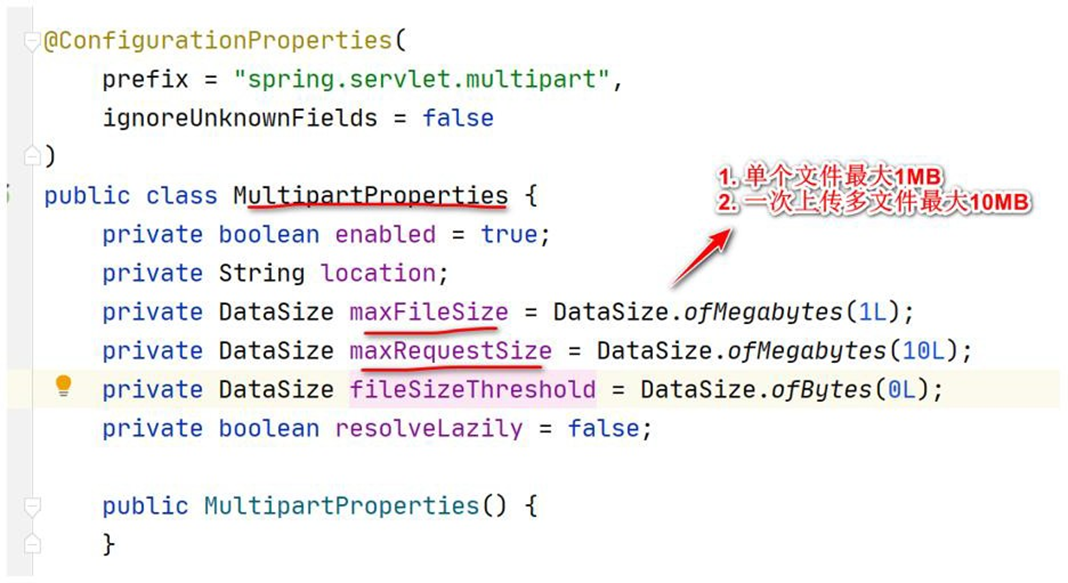
- 创建 resources\application.yml 修改文件上 传配置参数, max-file-size 单个文 件大小,
max-request-size 一次请求最大上传大小(多个文件.)
spring:
  servlet:
    multipart:
      max-file-size: 10MB
      max-request-size: 50MB
2
3
4
5
# 16.1.3 完成注册用户/上传图片 -测试
# 16.1.3.1 启动项目
# 16.1.3.2 浏览器:http://localhost:8080/upload.html
# 16.1.3.3 页面效果
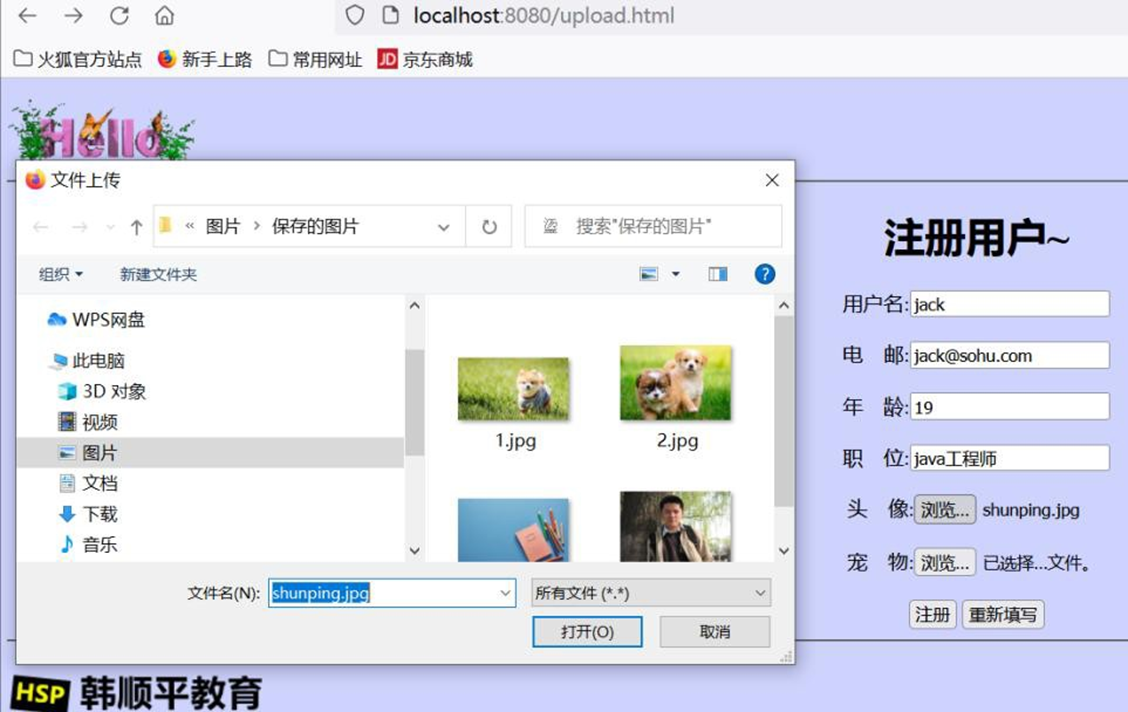
# 16.1.4 课后作业-扩展要求
1、解决文件覆盖问题, 如果文件名相同, 会出现覆盖问题, 如何解决 [演示问题]
2、解决文件分目录存放问题, 如果将文件都上传到一个目录下,当上传文件很多时,会造
成访问文件速度变慢,因此 可以将文件上传到不同目录 比如 一天上传的文件,统一放到一
个文件夹 年/月/日, 比如 2022/11/11 目录
3、老师提示-参考 javaweb 原生项目-家居购项目, 看看老师如何处理的...
# 17 异常处理
# 17.1 介绍
默认情况下,Spring Boot 提供/error 处理所有错误的映射
对于机器客户端,它将生成 JSON 响应,其中包含错误,HTTP 状态和异常消息的详细信
息。对于浏览器客户端,响应一个"whitelabel"错误视图,以 HTML 格式呈现相同的数据
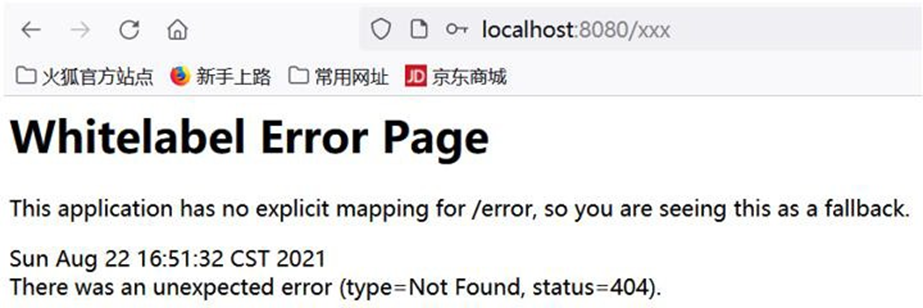
# 17.2 拦截器 VS 过滤器
1、使用范围不同
- 过滤器 实现的是 javax.servlet.Filter 接口,而这个接口是在 Servlet 规范中定义的,也就
是说过滤器 Filter 的使用要依赖于 Tomcat 等容器,Filter 只能在 web 程序中使用
- 拦截器(Interceptor) 它是一个 Spring 组件,并由 Spring 容器管理,并不依赖 Tomcat 等容
器,是可以单独使用的。不仅能应用在 web 程序中,也可以用于 Application 等程序中
2、过滤器 和 拦截器的触发时机也不同,看下边这张图
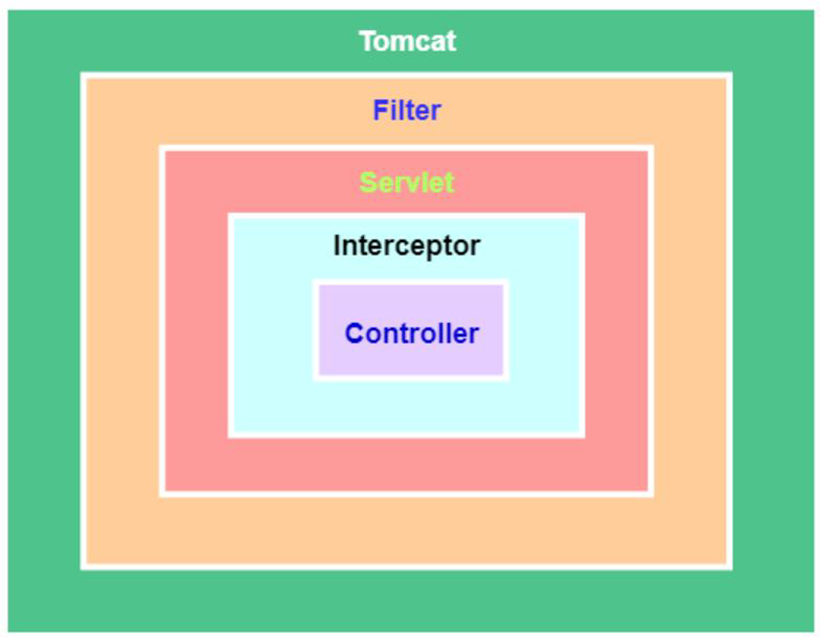
- 过滤器 Filter 是在请求进入容器后, 但在进入 servlet 之前进行预处理, 请求结束是在
servlet 处理完以后
- 拦截器 Interceptor 是在请求进入 servlet 后 , 在进入 Controller 之 前 进 行 预 处 理 的 ,
Controller 中渲染了对应的视图之后请求结束
- 听不懂的回去补 javaweb filter , 和 springmvc 的 interceptor 和 springmvc 的执行流程
3、说明: 过滤器不会处理请求转发, 拦截器会处理请求转发
4、至于过滤器和拦截器的原理和机制, 老韩已经详细讲解过了, 过滤器在 JavaWeb 讲过, 拦
截器在 SpringMVC 讲过, 忘了的小伙伴去巩固一下
# 17.3 自定义异常页面
# 17.3.1 文档:
https://docs.spring.io/spring-boot/docs/current/reference/html/features.html#features.developing-web-applications.spring-mvc.error-handling.error-pages
# 17.3.2 自定义异常页面说明
1、如何找到这个文档位置, 看下面一步步的指引
https://docs.spring.io/spring-boot/docs/current/reference/html/index.html => a single page
html => 8.web => servlet web application => The "Spring Web MVC Framework" => Error
Handling => Custom Error Pages
# 17.3.3 自定义异常页面-应用实例
# 17.3.3.1 需求: 自定义 404.html 500.html 4xx.html 5xx.html 当发生相应错误时,显示自定义的页面信息

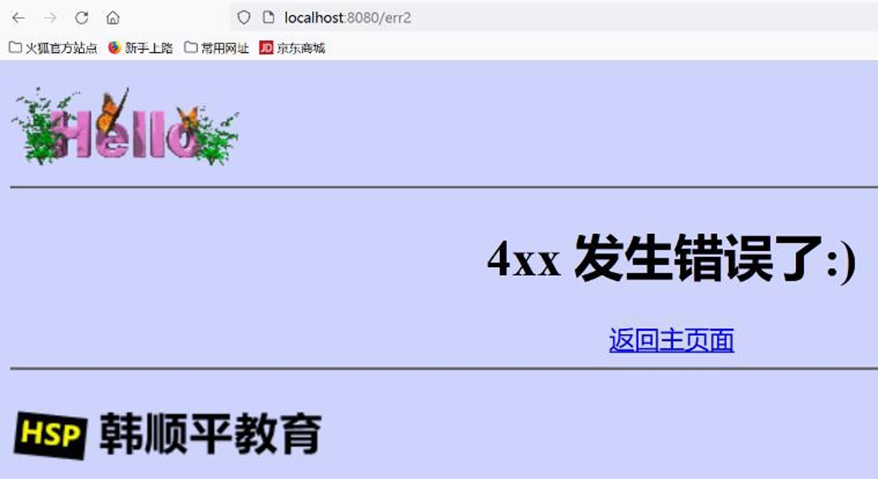

# 17.3.3.2 代码实现
- 创建 4 个页面, 这几个页面拷贝即可
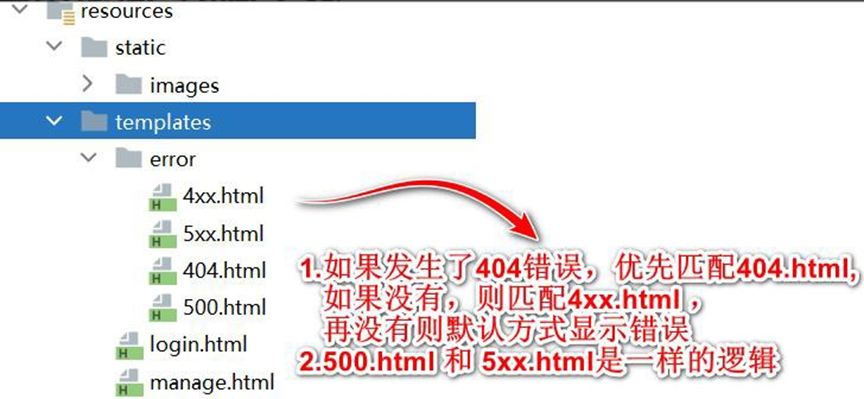
- 创建 com/hspedu/usersys/controller/MyErrorController.java , 用于模拟错误
package com.hspedu.usersys.controller;
import com.hspedu.usersys.bean.User;
import com.hspedu.usersys.exception.AccessException;
import org.springframework.stereotype.Controller;
import org.springframework.web.bind.annotation.GetMapping;
import org.springframework.web.bind.annotation.PostMapping;
import org.springframework.web.bind.annotation.ResponseBody;
/**

* @author 韩顺平

* @version 1.0

*/
@Controller
public class MyErrorController {
    @GetMapping(value = {
        "/err"
    })
    public String err() {
        int i = 10 / 0;
        return "manage";
    }
    @PostMapping(value = {
        "/err2"
    })
    public String err2() {
        return "manage";
    }
}
2
3
4
5
6
7
8
9
10
11
12
13
14
15
16
17
18
19
20
21
22
23
24
25
26
27
28
29
30
31
- 完成测试
● 需要先登录,再进行测试,否则会被拦截器打回登录页面
● 对于 /err2 , 使用 get 方式去请求,就会生成 400 错误, 可以看到 4xx.html
http://localhost:8080/xx
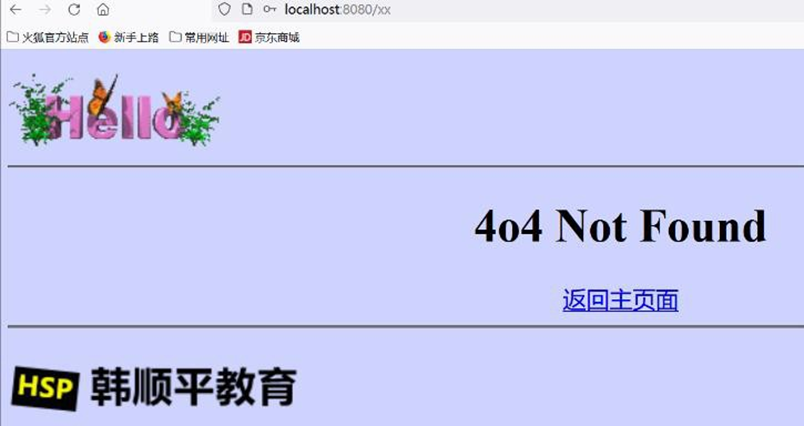
http://localhost:8080/err2

http://localhost:8080/err
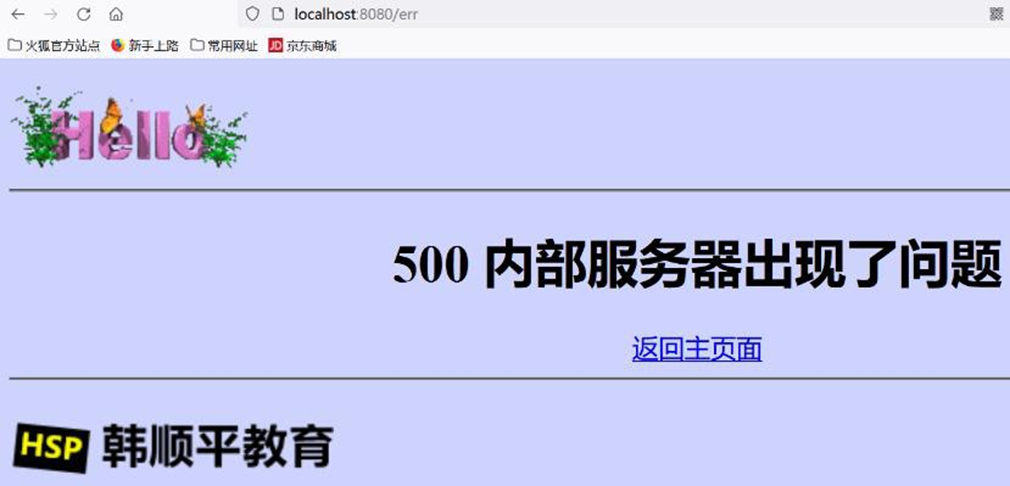
# 17.4 全局异常
# 17.4.1 说明
@ControllerAdvice+@ExceptionHandler 处理全局异常
底层是 ExceptionHandlerExceptionResolver 支持的
# 17.4.2 全局异常-应用实例
- 需求: 演示全局异常使用, 当发生 ArithmeticException、NullPointerException 时,不使
用默认异常机制匹配的 xxx.html , 而是显示全局异常机制指定的错误页面

- 创建 com/hspedu/usersys/exception/GlobalExceptionHandler.java
 package com.hspedu.usersys.exception;
 import lombok.extern.slf4j.Slf4j;
 import org.springframework.ui.Model;
 import org.springframework.web.bind.annotation.ControllerAdvice;
 import org.springframework.web.bind.annotation.ExceptionHandler;
 /**

 * @author 韩顺平

 * @version 1.0

 */
 @Slf4j
 @ControllerAdvice
 public class GlobalExceptionHandler {
     //可以处理的异常,可以有多个
     @ExceptionHandler({
         ArithmeticException.class
         , NullPointerException.class
     })
     public String handleArithException(Exception e, Model model) {
         log.error("异常:{}", e);
         model.addAttribute("mes", e.getMessage());
         return "/error/global"; //视图地址
     }
 }
2
3
4
5
6
7
8
9
10
11
12
13
14
15
16
17
18
19
20
21
22
23
24
25
26
27
- 创建 templates/error/global.html
<!DOCTYPE html>
<html lang="en" xmlns:th="http://www.thymeleaf.org">

  <head>
    <meta charset="UTF-8">
    <title>全局异常</title></head>

  <body bgcolor="#CED3FE">
    <img src="images/1.GIF" />
    <hr/>
    <div style="text-align: center">
      <h1>全局异常/错误 发生了:)</h1>
      <br/>异常/错误信息:
      <h1 th:text="${mes}"></h1>
      <br/>
      <a href='#' th:href="@{/}">返回主页面</a></div>
    <hr/>
    <img src="images/logo.png" /></body>

</html>
2
3
4
5
6
7
8
9
10
11
12
13
14
15
16
17
18
19
20
- 完成测试, 浏览器 http://localhost:8080/err
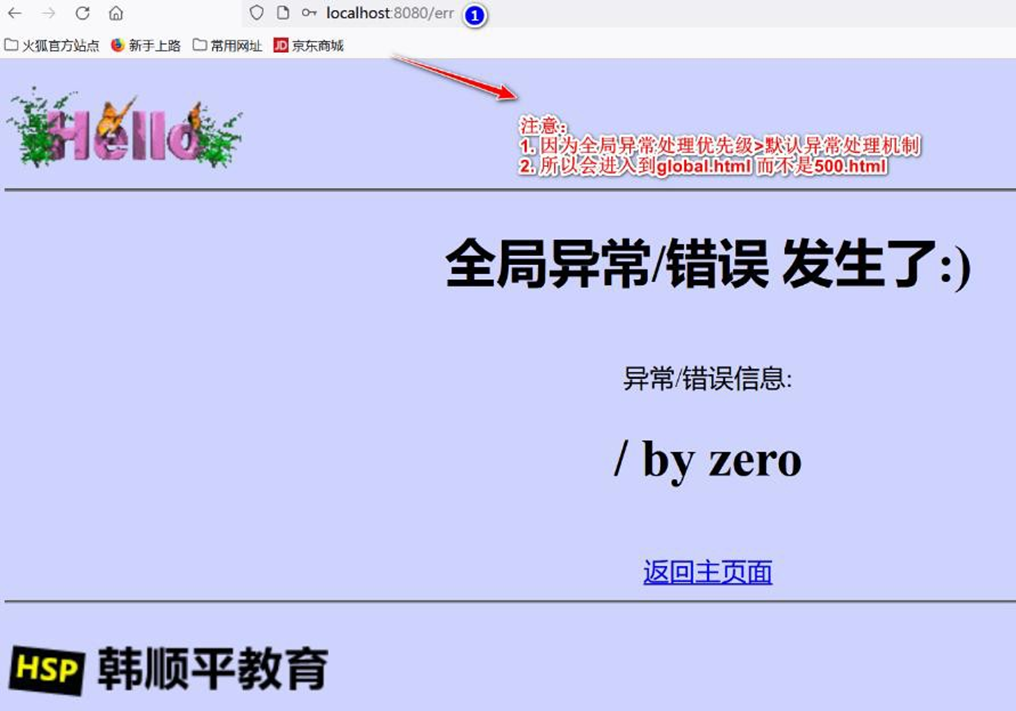
# 17.5 自定义异常
# 17.5.1 说明
如果 Spring Boot 提供的异常不能满足开发需求,程序员也可以自定义异常.
@ResponseStatus+自定义异常
底 层 是 ResponseStatusExceptionResolver , 底层调用 response.sendError(statusCode, resolvedReason);
当抛出自定义异常后,仍然会根据状态码,去匹配使用 x.html 显示
# 17.5.2 自定义异常-应用实例
# 17.5.2.1 需求:自定义一个异常 AccessException, 当用户访问某个无权访问的路径时,抛出该异常,显示
自定义异常状态码
# 17.5.2.2 应用实例-实现
- 创建 com/hspedu/usersys/exception/AccessException.java
 package com.hspedu.usersys.exception;
 import org.springframework.http.HttpStatus;
 import org.springframework.web.bind.annotation.ResponseStatus;
 /**

 * @author 韩顺平

 * @version 1.0

 */
 //自定义异常,也会根据状态码,匹配到对应的错误页面显示
 @ResponseStatus(value = HttpStatus.FORBIDDEN)
 public class AccessException extends RuntimeException {
     public AccessException() {}
     public AccessException(String message) {
         super(message);
     }
 }
2
3
4
5
6
7
8
9
10
11
12
13
14
15
16
17
18
19
- 修改 MyErrorController.java
@Controller
public class MyErrorController {
    @GetMapping(value = {
        "/err"
    })
    public String err() {
        int i = 10 / 0;
        return "manage";
    }
    @PostMapping(value = {
        "/err2"
    })
    public String err2() {
        return "manage";
    }
    @GetMapping(value = {
        "/err3"
    })
    public String err3(String name) {
        if (!"tom".equals(name)) {
            throw new AccessException();
        }
        return "manage";
    }
}
2
3
4
5
6
7
8
9
10
11
12
13
14
15
16
17
18
19
20
21
22
23
24
25
26
- 完成测试, 浏览器 http://localhost:8080/err3
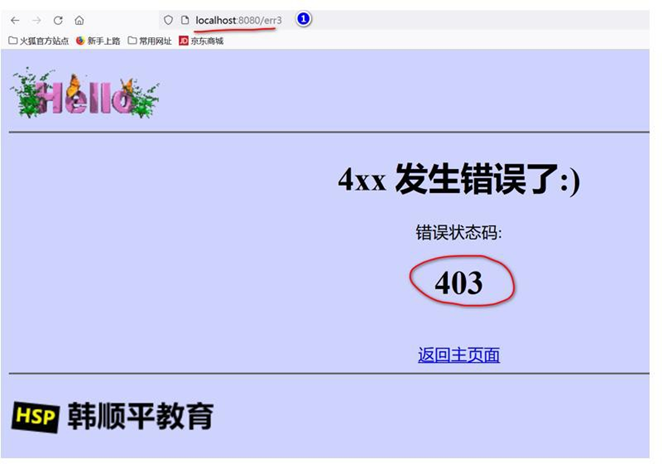
# 18 注入 Servlet、Filter、Listener
# 18.1 官方文档
# 18.1.1 文档:
https://docs.spring.io/spring-boot/docs/current/reference/html/features.html#features.developing-web-applications.embedded-container.servlets-filters-listeners
# 18.2 基本介绍
- 考虑到实际开发业务非常复杂和兼容,Spring-Boot 支持将 Servlet、Filter、Listener 注入
Spring 容器, 成为 Spring bean
- 也就是说明 Spring-Boot 开放了和原生WEB 组件(Servlet、Filter、Listener)的兼容
# 18.3 应用实例 1-使用注解方式注入
# 18.3.1 需求 : 演示通过注解方式注入 Servlet、Filter、Listener
# 18.3.2 应用实例-实现
- 创建 com/hspedu/usersys/servlet/Servlet_.java
 package com.hspedu.usersys.servlet;
 import javax.servlet.ServletException;
 import javax.servlet.annotation.WebServlet;
 import javax.servlet.http.HttpServlet;
 import javax.servlet.http.HttpServletRequest;
 import javax.servlet.http.HttpServletResponse;
 import java.io.IOException;
 /**

 * @author 韩顺平

 * @version 1.0

 */
 /**

 * 1. @WebServlet 标识要注入该Servlet

 * 2. urlPatterns = {"/servlet01", "/servlet02"}: 是映射路径

 * 3. @WebServlet(urlPatterns = "/servlet01") : 映射一个路径

 * 4. 注意注入的原生Servlet 不会被Spring-Boot 拦截器拦截

 */
 @WebServlet(urlPatterns = {
     "/servlet01"
     , "/servlet02"
 })
 public class Servlet_ extends HttpServlet {
     @Override
     protected void doGet(HttpServletRequest req, HttpServletResponse resp)
     throws ServletException, IOException {
         resp.getWriter()
             .write("hello, servlet");
     }
 }
2
3
4
5
6
7
8
9
10
11
12
13
14
15
16
17
18
19
20
21
22
23
24
25
26
27
28
29
30
31
32
33
34
35
36
37
38
- 修改 com/hspedu/usersys/Application.java , 加入@ServletComponentScan
//要求扫描com.hspedu.usersys 包下的原生方式注入的Servlet
@ServletComponentScan(basePackages = "com.hspedu.usersys")
@SpringBootApplication
public class Application {
    public static void main(String[] args) {
        SpringApplication.run(Application.class, args);
    }
}
2
3
4
5
6
7
8
9
- 完成测试, 浏览器 http://localhost:8080/servlet01
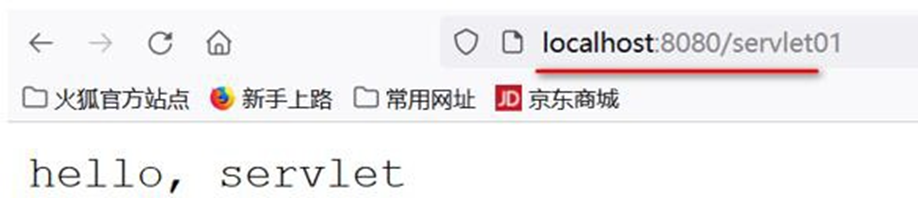
- 创建 com/hspedu/usersys/servlet/Filter_.java
package com.hspedu.usersys.servlet;
import lombok.extern.slf4j.Slf4j;
import javax.servlet.*;
import javax.servlet.annotation.WebFilter;
import java.io.IOException;
/**

* @author 韩顺平

* @version 1.0

*/
/**

* 1. @WebFilter 标识要注入该Filter

* 2. urlPatterns = {"/css/*", "/images/*"}: 是映射路径

* 3. 过滤器配置的urlPatterns 也会经过Spring-Boot 拦截器

*/
@Slf4j
@WebFilter(urlPatterns = {
    "/css/*"
    , "/images/*"
})
public class Filter_ implements Filter {
    @Override
    public void init(FilterConfig filterConfig) throws ServletException {
        log.info("=====Filter_ init()=====");
    }
    @Override
    public void doFilter(ServletRequest request, ServletResponse response, FilterChain chain)
    throws IOException, ServletException {
        log.info("=====Filter_ doFilter()=====");
        chain.doFilter(request, response);
    }
    @Override
    public void destroy() {
        log.info("=====Filter_ destroy()=====");
    }
}
2
3
4
5
6
7
8
9
10
11
12
13
14
15
16
17
18
19
20
21
22
23
24
25
26
27
28
29
30
31
32
33
34
35
36
37
38
39
40
41
42
43
- 创建 static/css/t.css, 作为测试文件
- 完成测试, 注意观察后台, 浏览器 : http://localhost:8080/css/t.css
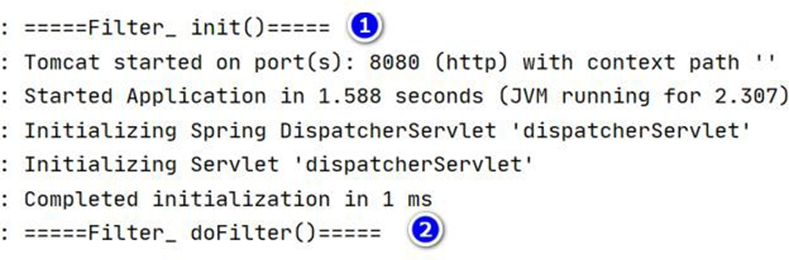
注意: 过滤器配置的urlPatterns 也会经过Spring-Boot 拦截器(根据拦截器的规则)
所以为了看到效果,请在拦截器配置放行 /css/**
在 servlet 匹配全部是 /*, 在 Spring-Boot 是/**
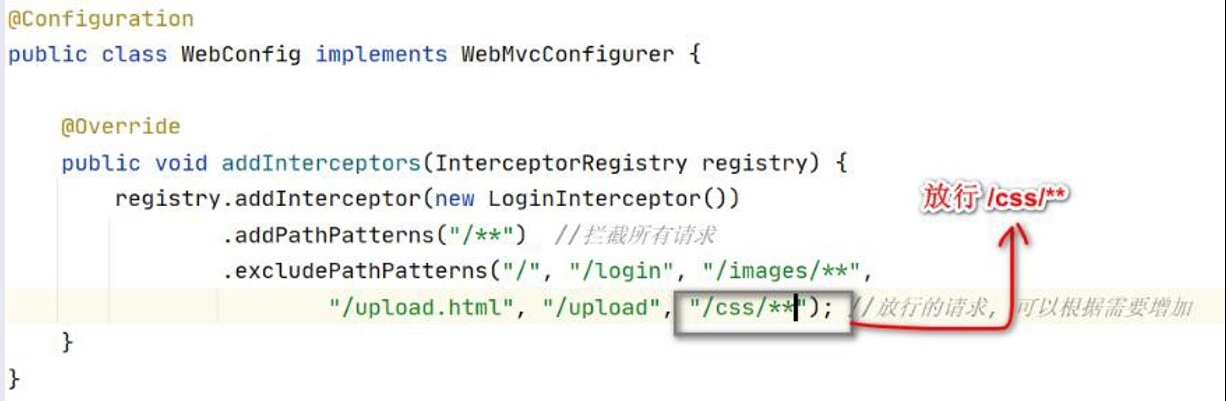
- 创建 com/hspedu/usersys/servlet/Listener_.java
 package com.hspedu.usersys.servlet;
 import lombok.extern.slf4j.Slf4j;
 import javax.servlet.ServletContextEvent;
 import javax.servlet.ServletContextListener;
 import javax.servlet.annotation.WebListener;
 /**

 * @author 韩顺平

 * @version 1.0

 */
 @Slf4j
 @WebListener
 public class Listener_ implements ServletContextListener {
     @Override
     public void contextInitialized(ServletContextEvent sce) {
         log.info("Listener_ contextInitialized() 项目初始化 OK~ ");
     }
     @Override
     public void contextDestroyed(ServletContextEvent sce) {
         log.info("Listener_ contextDestroyed() 项目销毁 ");
     }
 }
2
3
4
5
6
7
8
9
10
11
12
13
14
15
16
17
18
19
20
21
22
23
24
25
- 完成测试 , 启动项目,观察后台输出

# 18.4 应用实例 2-使用 RegistrationBean 方式注入
# 18.4.1 需求 : 演示使用 RegistrationBean 注入 Servlet、Filter、Listener
# 18.4.2 应用实例-实现
- 创建 com/hspedu/usersys/config/RegisterConfig_.java
 package com.hspedu.usersys.servlet;
 import org.springframework.boot.web.servlet.FilterRegistrationBean;
 import org.springframework.boot.web.servlet.ServletListenerRegistrationBean;
 import org.springframework.boot.web.servlet.ServletRegistrationBean;
 import org.springframework.context.annotation.Bean;
 import org.springframework.context.annotation.Configuration;
 import java.util.Arrays;
 /**

 * @author 韩顺平

 * @version 1.0

 */
 /**

 * 1. (proxyBeanMethods = true):保证依赖的组件始终是单实例的

 */
 @Configuration(proxyBeanMethods = true)
 public class RegisterConfig_ {
     @Bean
     public ServletRegistrationBean servlet_() {
         Servlet_ servlet_ = new Servlet_();
         return new ServletRegistrationBean(servlet_, "/servlet01", "/servlet02");
     }
     @Bean
     public FilterRegistrationBean filter_() {
         Filter_ filter_ = new Filter_();
         //return new FilterRegistrationBean(filter_,servlet_());
         FilterRegistrationBean filterRegistrationBean = new FilterRegistrationBean(filter_);
         filterRegistrationBean.setUrlPatterns(Arrays.asList("/images/*", "/css/*"));
         return filterRegistrationBean;
     }
     @Bean
     public ServletListenerRegistrationBean listener_() {
         Listener_ listener_ = new Listener_();
         return new ServletListenerRegistrationBean(listener_);
     }
 }
2
3
4
5
6
7
8
9
10
11
12
13
14
15
16
17
18
19
20
21
22
23
24
25
26
27
28
29
30
31
32
33
34
35
36
37
38
39
40
41
- 去掉相关的注解,再次完成测试

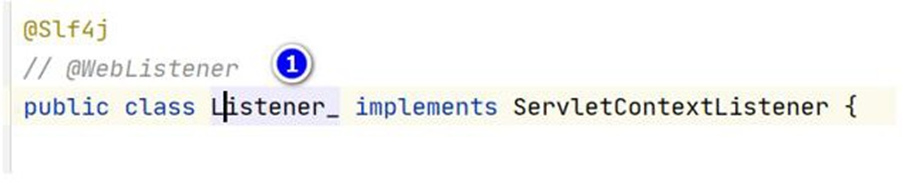
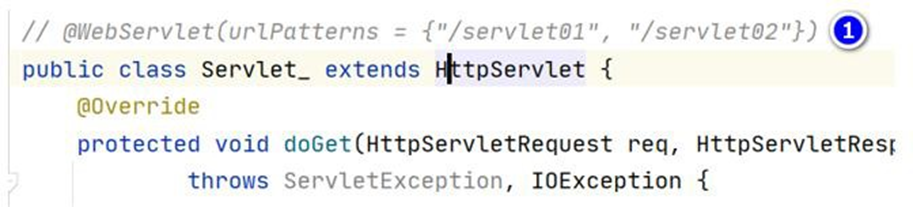
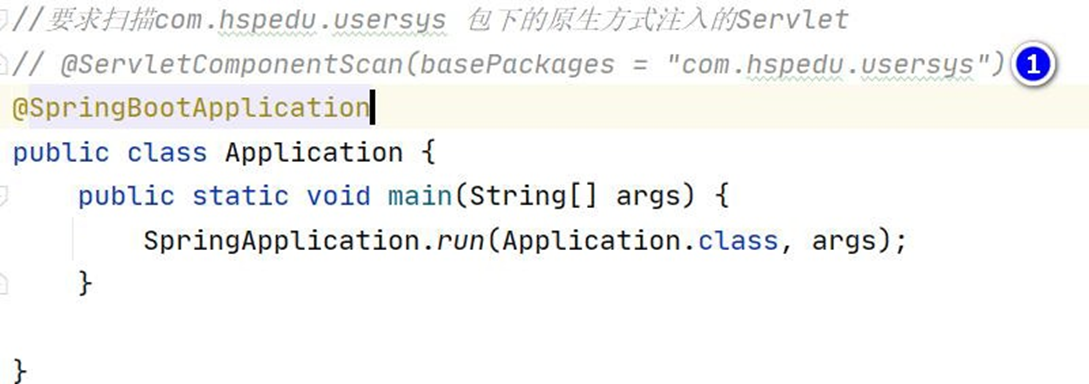
# 18.5 注意事项和细节说明
# 18.5.1 请求 Servlet 时,为什么不会到达拦截器
请求 Servlet 时,不会到达 DispatherServlet, 因此也不会达到拦截器
原因分析
√ 注入的Servlet 会存在Spring 容器
√ DispatherServlet 也存在Spring 容器

- 大家回忆一下我们讲过的 Tomcat 在 对Servlet url 匹配的原则, 多 个 servlet 都能处理到
同一层路径, 精确优先原则/最长前缀匹配原则.
- 在看看spring 容器的debug 图.
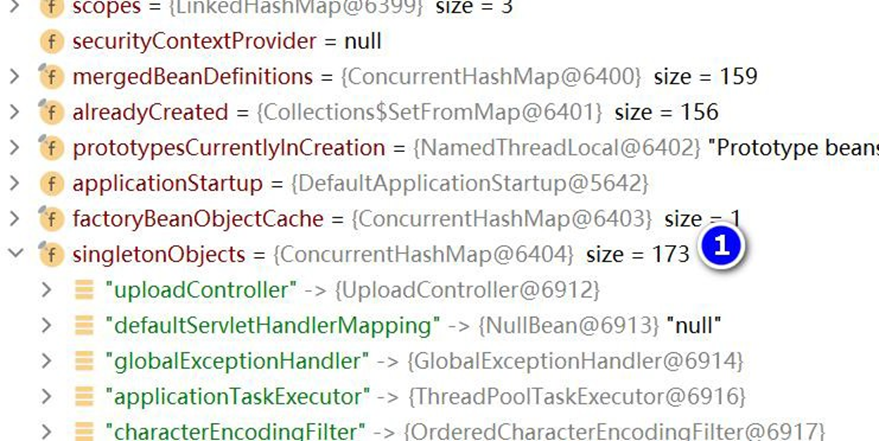
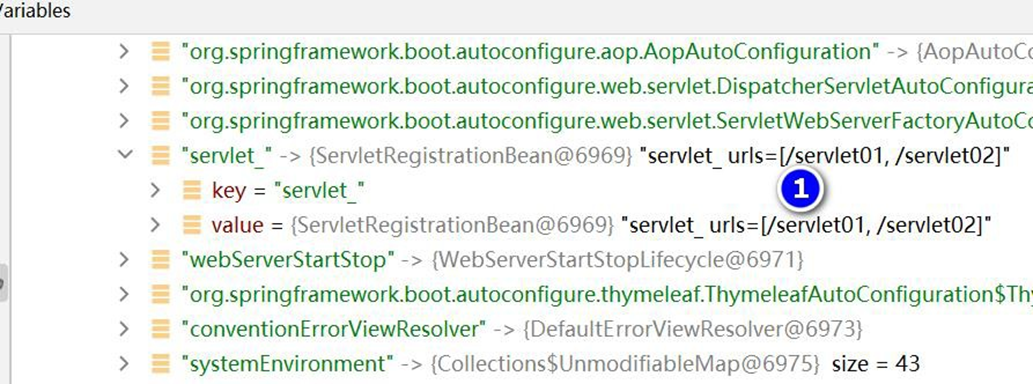
- 在 SpringBoot 中, 去调用@Controller 目标方法 是按照 DispatherServlet 分发匹配的机
制, 请同学们回顾一下我自己实现 SpringMVC 的底层机制的程序.(忘了的同学回去再看看)
# 18.5.2 源码分析
DispatcherServletAutoConfiguration 完成对 DispatcherServlet 自动配置
下面执行流程分析
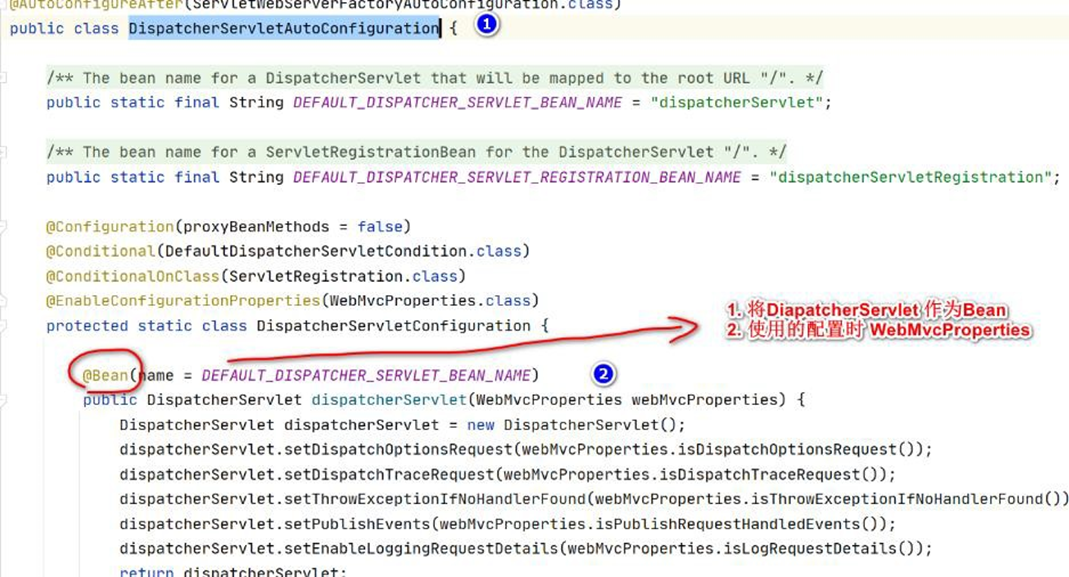
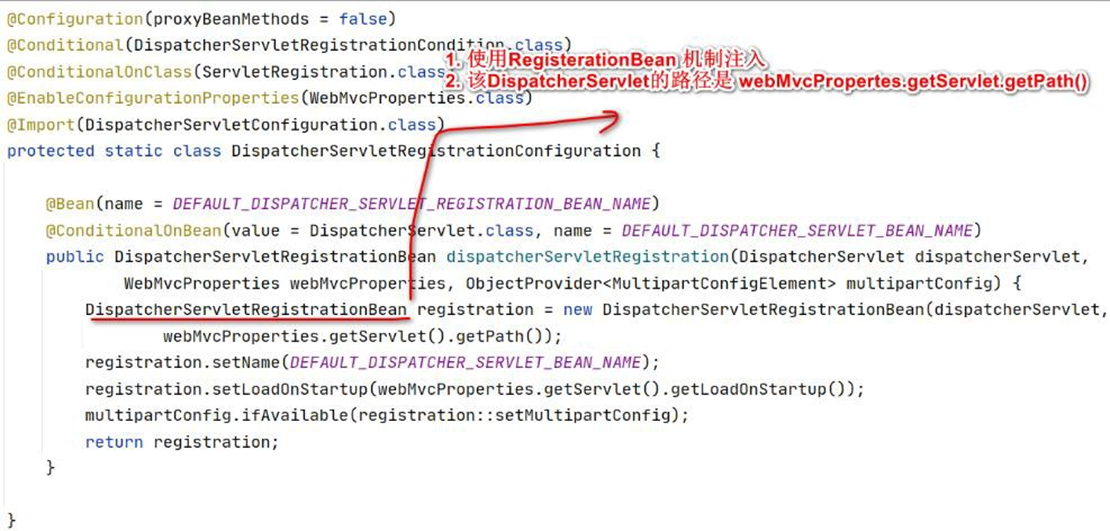
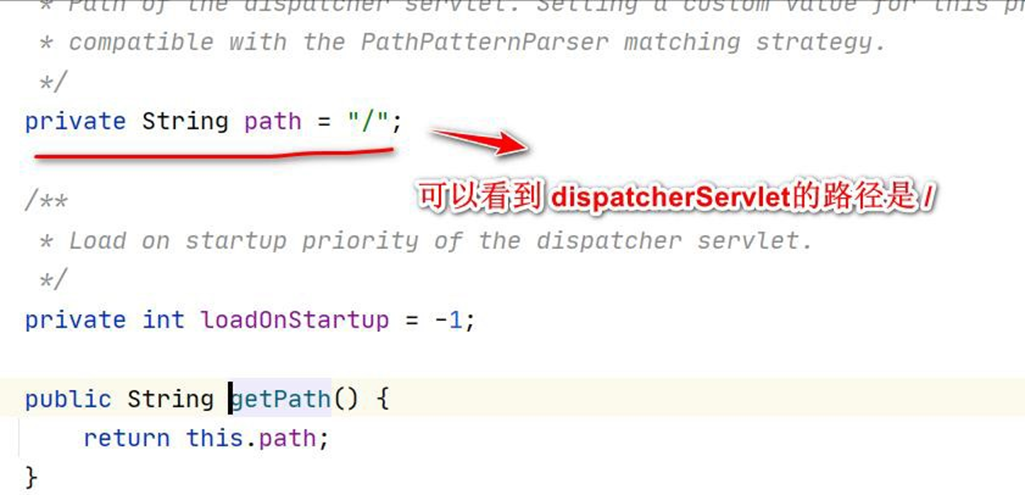
# 19 内置 Tomcat 配置和切换
# 19.1 基本介绍
- SpringBoot 支持的 webServer: Tomcat, Jetty, or Undertow
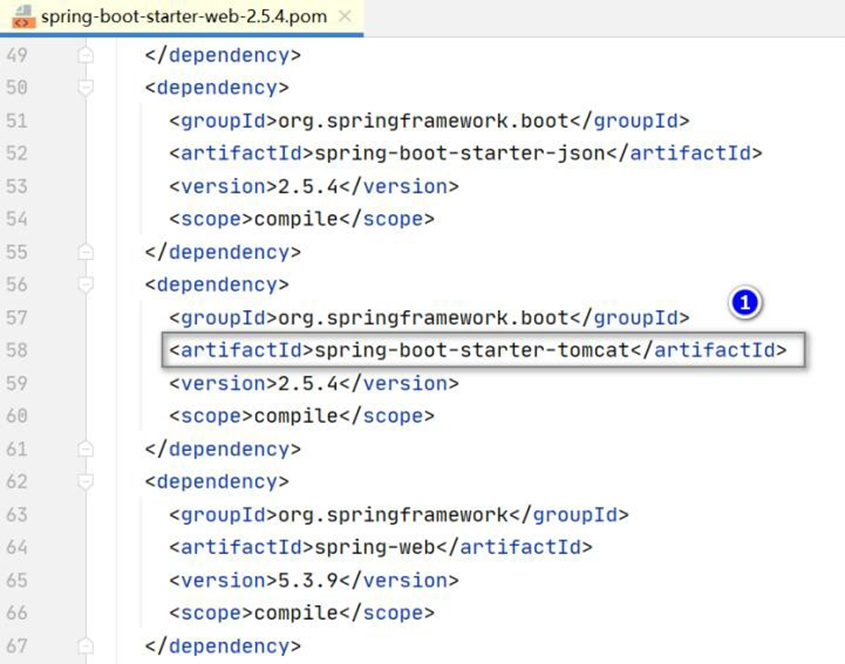

SpringBoot 应用启动是 Web 应用时。web 场景包-导入 tomcat
支持对 Tomcat(也可以是 Jetty 、Undertow)的配置和切换
# 19.2 内置 Tomcat 的配置
# 19.2.1 通过 application.yml 完成配置
配置和 ServerProperties.java 关联, 通过查看源码得知有哪些属性配置
server:
  #配置端口
  port: 9999
  tomcat: #对tomcat配置
    threads:
      max: 10 #最大的工作线程, 默认是200
      min-spare: 5 #最小工作线程, 默认是10
    accept-count: 200 #tomcat启动的线程达到最大值, 接受排队的请求个数,默认100
    max-connections: 2000 #最大连接数, 并发数
    connection-timeout: 10000 #建立连接的超时时间, 单位是毫秒
    #还有很多其它的配置,老师就不一一列举
2
3
4
5
6
7
8
9
10
11

https://blog.csdn.net/jack1liu/article/details/100511226
# 19.2.2 通过类来配置 Tomcat
- 通过类来配置 Tomcat(说明: 配置文件可配置的更全.),
创建 com/hspedu/usersys/config/CustomizationBean.java
 package com.hspedu.usersys.config;
 import org.springframework.boot.web.embedded.tomcat.TomcatServletWebServerFactory;
 import org.springframework.boot.web.server.WebServerFactoryCustomizer;
 import org.springframework.boot.web.servlet.server.ConfigurableServletWebServerFactory;
 import org.springframework.stereotype.Component;
 /**

 * @author 韩顺平

 * @version 1.0

 */
 @Component
 public class CustomizationBean
 implements
 WebServerFactoryCustomizer < ConfigurableServletWebServerFactory > {
     @Override
     public void customize(ConfigurableServletWebServerFactory server) {
         server.setPort(10000);
     }
 }
2
3
4
5
6
7
8
9
10
11
12
13
14
15
16
17
18
19
20
21
22
- 注销 application.yml 对 tomcat 配置,完成测试
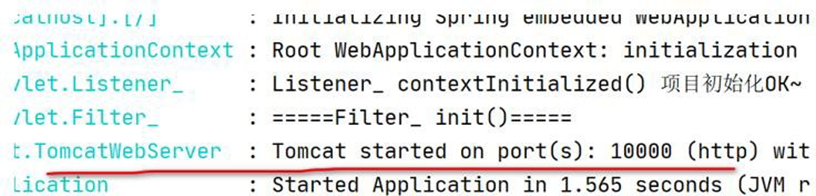
# 19.3 切换 WebServer, 演示如何切换成 Undertow
- 修改 pom.xml , 排 除 tomcat , 加入 Undertow 包的依赖
 <dependency>
    <groupId>org.springframework.boot</groupId>
    <artifactId>spring-boot-starter-web</artifactId>
    <!-- 引入spring-boot-starter-web 排除tomcat -->
    <exclusions>
        <exclusion>
            <groupId>org.springframework.boot</groupId>
            <artifactId>spring-boot-starter-tomcat</artifactId>
        </exclusion>
    </exclusions>
</dependency>
<!-- 引入undertow -->
<dependency>
    <groupId>org.springframework.boot</groupId>
    <artifactId>spring-boot-starter-undertow</artifactId>
</dependency>
2
3
4
5
6
7
8
9
10
11
12
13
14
15
16
- 老韩说明: 因为去掉了 tomcat 的依赖,所以项目有使用到 tomcat 相关类/接口,就会报
错,注销/删除这部分代码即可 , 运行项目,完成测试
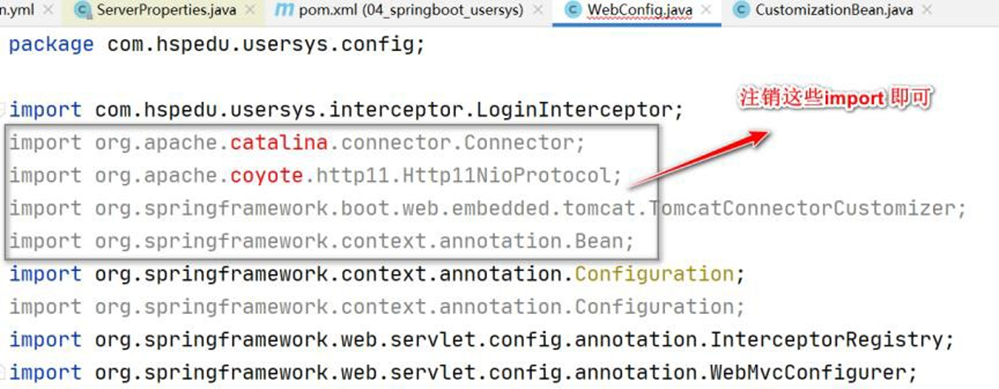

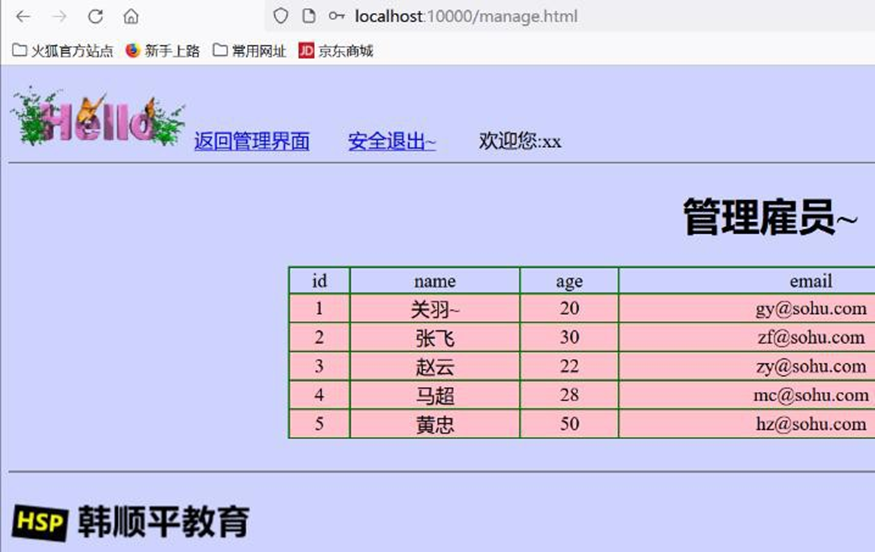
- 测试完毕,我还是改回成 Tomcat
# 20 数据库操作
# 20.1 JDBC+HikariDataSource
# 20.1.1 应用实例-需求
● 需求:演示 Spring Boot 如何通过 jdbc+HikariDataSource 完成对 Mysql 操作
说明: HikariDataSource : 目前市面上非常优秀的数据源, 是 springboot2 默认数据源

# 20.1.2 应用实例-代码实现
- 创建测试数据库和表
-- 创建furns_ssm
DROP DATABASE
IF
	EXISTS spring_boot;
CREATE DATABASE spring_boot;
USE spring_boot;-- 创建家居表
CREATE TABLE furn (
	`id` INT ( 11 ) PRIMARY KEY AUTO_INCREMENT,## id
	`name` VARCHAR ( 64 ) NOT NULL,## 家居名
	`maker` VARCHAR ( 64 ) NOT NULL,## 厂商
	`price` DECIMAL ( 11, 2 ) NOT NULL,## 价格
	`sales` INT ( 11 ) NOT NULL,## 销量
	`stock` INT ( 11 ) NOT NULL,## 库存
	`img_path` VARCHAR ( 256 ) NOT NULL ## 照片路径

);-- 初始化家居数据
INSERT INTO furn ( `id`, `name`, `maker`, `price`, `sales`, `stock`, `img_path` )
VALUES
	( NULL, ' 北欧风格小桌子', ' 熊猫家居', 180, 666, 7, 'assets/images/product-image/1.jpg' );
INSERT INTO furn ( `id`, `name`, `maker`, `price`, `sales`, `stock`, `img_path` )
VALUES
	( NULL, ' 简约风格小椅子', ' 熊猫家居', 180, 666, 7, 'assets/images/product-image/2.jpg' );
INSERT INTO furn ( `id`, `name`, `maker`, `price`, `sales`, `stock`, `img_path` )
VALUES
	( NULL, ' 典雅风格小台灯', ' 蚂蚁家居', 180, 666, 7, 'assets/images/product-image/3.jpg' );
INSERT INTO furn ( `id`, `name`, `maker`, `price`, `sales`, `stock`, `img_path` )
VALUES
	( NULL, ' 温馨风格盆景架', ' 蚂蚁家居', 180, 666, 7, 'assets/images/product-image/4.jpg' );
SELECT
	*
FROM
	furn;
2
3
4
5
6
7
8
9
10
11
12
13
14
15
16
17
18
19
20
21
22
23
24
25
26
27
28
29
30
31
32
- 进行数据库开发,在pom.xml引入data-jdbc starter,参考官方文档
https://docs.spring.io/spring-boot/docs/current/reference/html/using.html#using.build-systems.starters .
<!--
老韩说明
1. 进行数据库开发,引入data-jdbc starter
-->
<dependency>
    <groupId>org.springframework.boot</groupId>
    <artifactId>spring-boot-starter-data-jdbc</artifactId>
</dependency>
2
3
4
5
6
7
8
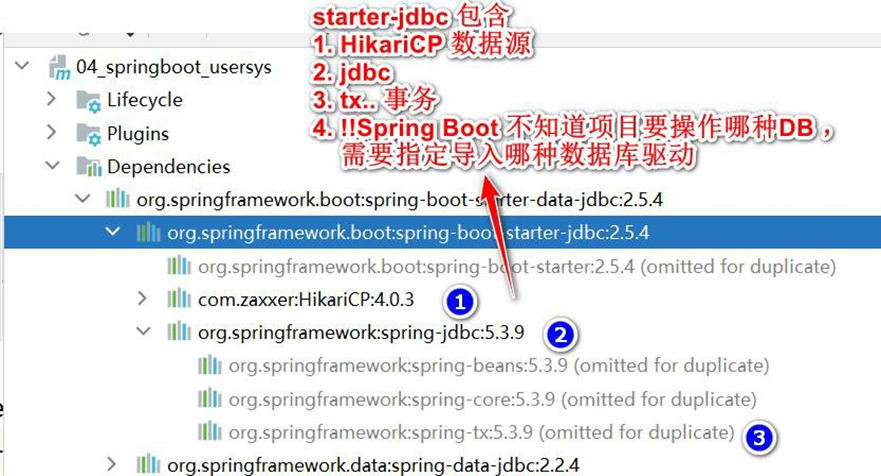
- Spring Boot 不知道项目要操作 Mysql 还是 Oracle , 需要在pom.xml 指定导入数据库驱动, 并指定对应版本.
<!--
1. 引入操作mysql 的驱动
2. 这个驱动版本要和你实际操作的mysql 版本对应
3. 我们spring-boot mysql 区别仲裁版本是<mysql.version>8.0.26</mysql.version>
,我们安装的是mysql5 ,因此重新指定mysql 驱动版本
4. 这个mysql 驱动版本也可以在 pom.xml properties 指定
<properties><mysql.version>5.1.49</mysql.version></properties>
-->
<dependency>
    <groupId>mysql</groupId>
    <artifactId>mysql-connector-java</artifactId>
    <version>5.1.49</version>
</dependency>
2
3
4
5
6
7
8
9
10
11
12
13
- 在 application.yml 配置操作数据源的信息
spring:
  servlet:
    multipart:
      max-file-size: 5MB
      max-request-size: 50MB
  datasource: #配置数据源
    # 说明: 如果你没有指定useSSL=true ,启动项目会报红警告, 环境的问题,小伙伴们灵活处理
    url: jdbc:mysql://192.168.1.102:3306/spring_boot?useSSL=true&useUnicode=true&characterEncoding=UTF-8
    username: root
    password: root
    driver-class-name: com.mysql.jdbc.Driver
2
3
4
5
6
7
8
9
10
11
- 创建 04_springboot_usersys\src\main\java\com\hspedu\usersys\bean\Furn.java
package com.hspedu.usersys.bean;
import java.math.BigDecimal;
/**

* @author 韩顺平

* @version 1.0

*/
public class Furn {
    private Integer id;
    private String name;
    private String maker;
    private BigDecimal price;
    private Integer sales;
    private Integer stock;
    private String imgPath = "assets/images/product-image/1.jpg";
    //这里增加无参构造器和有参构造器
    public Furn() {}
    public Furn(Integer id, String name, String maker, BigDecimal price
        , Integer sales, Integer stock, String imgPath) {
        this.id = id;
        this.name = name;
        this.maker = maker;
        this.price = price;
        this.sales = sales;
        this.stock = stock;
        if (!(imgPath == null || imgPath.equals(""))) {
            this.imgPath = imgPath;
        }
    }
    public Integer getId() {
        return id;
    }
    public void setId(Integer id) {
        this.id = id;
    }
    public String getName() {
        return name;
    }
    public void setName(String name) {
        this.name = name == null ? null : name.trim();
    }
    public String getMaker() {
        return maker;
    }
    public void setMaker(String maker) {
        this.maker = maker == null ? null : maker.trim();
    }
    public BigDecimal getPrice() {
        return price;
    }
    public void setPrice(BigDecimal price) {
        this.price = price;
    }
    public Integer getSales() {
        return sales;
    }
    public void setSales(Integer sales) {
        this.sales = sales;
    }
    public Integer getStock() {
        return stock;
    }
    public void setStock(Integer stock) {
        this.stock = stock;
    }
    public String getImgPath() {
        return imgPath;
    }
    public void setImgPath(String imgPath) {
        this.imgPath = imgPath == null ? null : imgPath.trim();
    }
    @Override
    public String toString() {
        return "Furn{" +
            "id=" + id +
            ", name='" + name + '\'' +
            ", maker='" + maker + '\'' +
            ", price=" + price +
            ", sales=" + sales +
            ", stock=" + stock +
            ", imgPath='" + imgPath + '\'' +
            '}';
    }
}
2
3
4
5
6
7
8
9
10
11
12
13
14
15
16
17
18
19
20
21
22
23
24
25
26
27
28
29
30
31
32
33
34
35
36
37
38
39
40
41
42
43
44
45
46
47
48
49
50
51
52
53
54
55
56
57
58
59
60
61
62
63
64
65
66
67
68
69
70
71
72
73
74
75
76
77
78
79
80
81
82
83
84
85
86
87
# 20.1.3 应用实例-测试结果
● test 目录下的 com/hspedu/usersys/ApplicationTests.java , 完成测试
 package com.hspedu.usersys;
 import com.hspedu.usersys.bean.Furn;
 import org.junit.jupiter.api.Test;
 import org.springframework.beans.factory.annotation.Autowired;
 import org.springframework.boot.test.context.SpringBootTest;
 import org.springframework.jdbc.core.BeanPropertyRowMapper;
 import org.springframework.jdbc.core.JdbcTemplate;
 import java.util.List;
 @SpringBootTest
 class ApplicationTests {
     @Autowired
     JdbcTemplate jdbcTemplate;
     @Test
     void contextLoads() {
         BeanPropertyRowMapper < Furn > rowMapper =
             new BeanPropertyRowMapper < > (Furn.class);
         List < Furn > furns = jdbcTemplate.query("select * from furn", rowMapper);
         for (Furn furn: furns) {
             System.out.println(furn);
         }
         System.out.println(jdbcTemplate.getDataSource()
             .getClass());
     }
 }
2
3
4
5
6
7
8
9
10
11
12
13
14
15
16
17
18
19
20
21
22
23
24
25
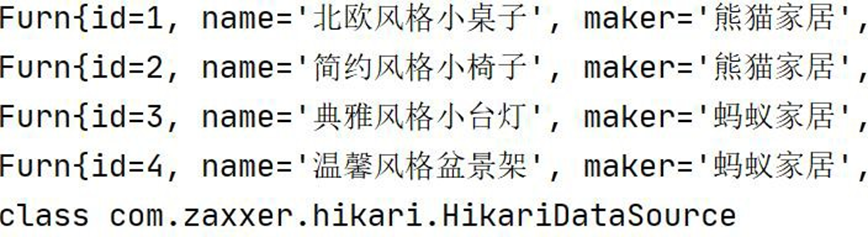
# 20.2 整合 Druid 到 Spring-Boot
# 20.2.1 官方文档
# 20.2.1.1 使用手册: https://github.com/alibaba/druid
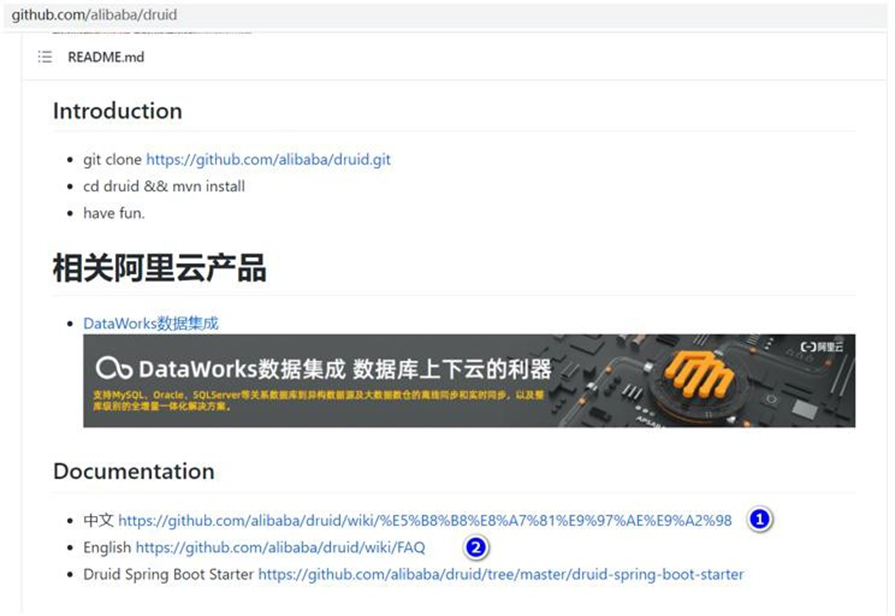
# 20.2.1.2 中文手册: https://github.com/alibaba/druid/wiki/%E5%B8%B8%E8%A7%81%E9%97%AE%E9%A2%98
# 20.2.2 基本介绍
HiKariCP: 目前市面上非常优秀的数据源, 是 springboot2 默认数据源
Druid: 性能优秀,Druid 提供性能卓越的连接池功能外【Java 基础】,还集成了 SQL 监
控,黑名单拦截等功能,强大的监控特性,通过 Druid 提供的监控功能,可以清楚知道连
接池和 SQL 的工作情况,所以根据项目需要,我们也要掌握 Druid 和 SpringBoot 整合
- 整合 Druid 到 Spring-Boot 方式
● 自定义方式
● 引入 starter 方式
# 20.2.3 Durid 基本使用
# 20.2.3.1 需求: 将 Spring-Boot 的数据源切换成 Druid
# 20.2.3.2 代码实现
- 修改 pom.xml , 引 入 druid 依赖
<!-- 引入druid 依赖-->
<dependency>
    <groupId>com.alibaba</groupId>
    <artifactId>druid</artifactId>
    <version>1.1.17</version>
</dependency>
2
3
4
5
6
- 创建 com/hspedu/usersys/config/DruidDataSourceConfig.java 配置类
package com.hspedu.usersys.config;
import com.alibaba.druid.pool.DruidDataSource;
import com.alibaba.druid.support.http.StatViewServlet;
import com.alibaba.druid.support.http.WebStatFilter;
import org.springframework.boot.context.properties.ConfigurationProperties;
import org.springframework.boot.web.servlet.FilterRegistrationBean;
import org.springframework.boot.web.servlet.ServletRegistrationBean;
import org.springframework.context.annotation.Bean;
import org.springframework.context.annotation.Configuration;
import javax.sql.DataSource;
import java.sql.SQLException;
import java.util.Arrays;
/**

* @author 韩顺平

* @version 1.0

*/
@Configuration
public class DruidDataSourceConfig {
    //  默 认 的 自 动 配 置 是 判 断 容 器 中 没 有 才 会 配
    @ConditionalOnMissingBean(DataSource.class)
    /**

    * 1. 默认的数据源配置是@ConditionalOnMissingBean(DataSource.class)

    * 2. 也就是当容器中没有DataSource 组件时,才会注入,如果我们这里配置了

    DataSource,

    就会使用我们配置的数据源

    * 3.  "spring.datasource"    会将druid 数据源的配置绑定到application.yml, 就不需要

    setXxx

    */
    @ConfigurationProperties("spring.datasource")
    @Bean
    public DataSource dataSource() throws SQLException {
        DruidDataSource druidDataSource = new DruidDataSource();
        // "spring.datasource" 会将druid 数据源的配置绑定到application.yml, 就不需要
        setXxx
        // druidDataSource.setUrl();
        // druidDataSource.setUsername();
        // druidDataSource.setPassword();
        return druidDataSource;
    }
}
2
3
4
5
6
7
8
9
10
11
12
13
14
15
16
17
18
19
20
21
22
23
24
25
26
27
28
29
30
31
32
33
34
35
36
37
38
39
40
41
42
43
44
45
46
47
48
49
50
51
- 完成测试,运行ApplicationTests.java , 观察数据源的运行类型
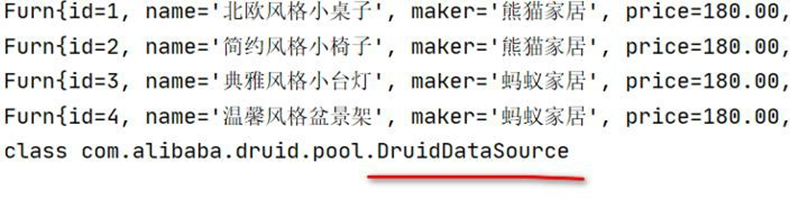
# 20.2.4 Durid 监控功能-SQL 监控
# 20.2.4.1 需求: 配置 Druid 的监控功能,包括 SQL 监控、SQL 防火墙、Web 应用、Session 监控等

# 20.2.4.2 SQL 监控数据
- 修改 com/hspedu/usersys/config/DruidDataSourceConfig.java , 增加 druid 监控功能地址:
https://github.com/alibaba/druid/wiki/%E9%85%8D%E7%BD%AE_StatViewServlet%E9%85%8D%E7%BD%AE
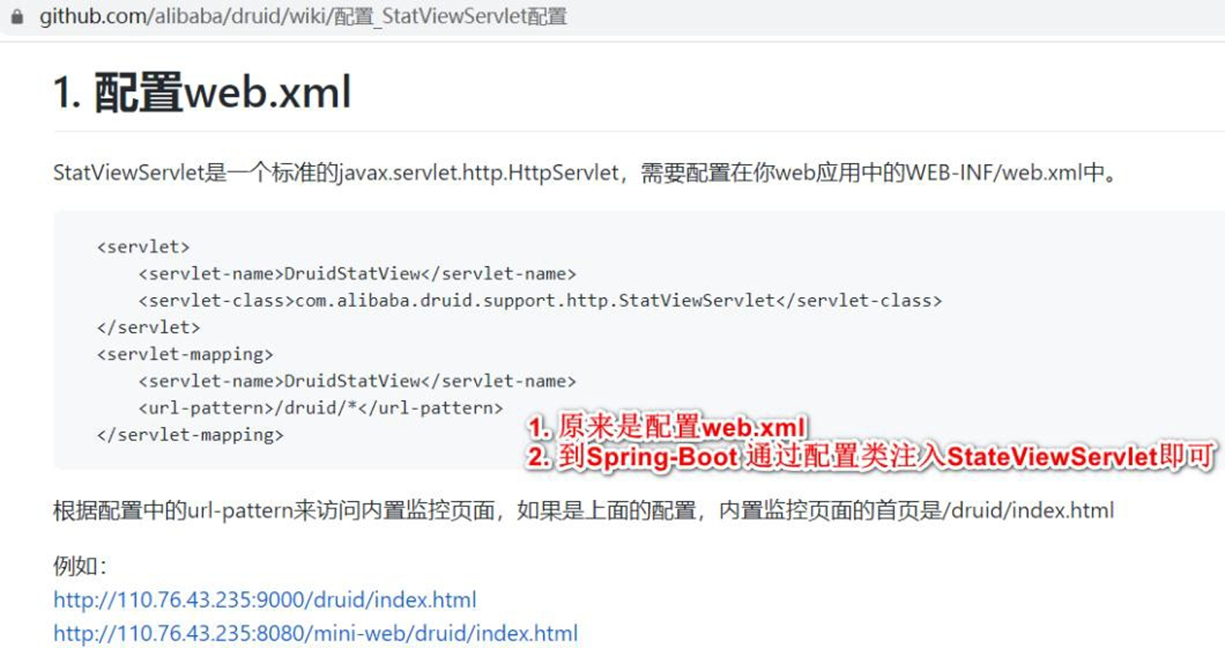
 @Configuration
 public class DruidDataSourceConfig {
     //  默 认 的 自 动 配 置 是 判 断 容 器 中 没 有 才 会 配
     @ConditionalOnMissingBean(DataSource.class)
     /**

     * 1. 默认的数据源配置是@ConditionalOnMissingBean(DataSource.class)

     * 2. 也就是当容器中没有DataSource 组件时,才会注入,如果我们这里配置了

     DataSource, 就会使用我们配置的数据源

     *  3. "spring.datasource" 会将druid 数据源的配置绑定到application.yml, 就不需要

     setXxx

     */
     @ConfigurationProperties("spring.datasource")
     @Bean
     public DataSource dataSource() throws SQLException {
         DruidDataSource druidDataSource = new DruidDataSource();
         // "spring.datasource" 会将druid 数据源的配置绑定到application.yml, 就不需要
         setXxx
         // druidDataSource.setUrl();
         // druidDataSource.setUsername();
         // druidDataSource.setPassword();
         return druidDataSource;
     }
     /**

     * 配置druid 的监控页功能

     * @return

     */
     @Bean
     public ServletRegistrationBean statViewServlet() {
         StatViewServlet statViewServlet = new StatViewServlet();
         ServletRegistrationBean < StatViewServlet > registrationBean =
             new ServletRegistrationBean < > (statViewServlet, "/druid/*");
         //配置登录监控页面用户名和密码
         registrationBean.addInitParameter("loginUsername", "hspedu");
         registrationBean.addInitParameter("loginPassword", "666666");
         return registrationBean;
     }
 }
2
3
4
5
6
7
8
9
10
11
12
13
14
15
16
17
18
19
20
21
22
23
24
25
26
27
28
29
30
31
32
33
34
35
36
37
38
39
40
41
42
43
44
45
46
47
- 完成测试: 访问 http://localhost:10000/druid/index.html 不会被拦截 , 如果没有问题,
小伙伴会看到这个页面
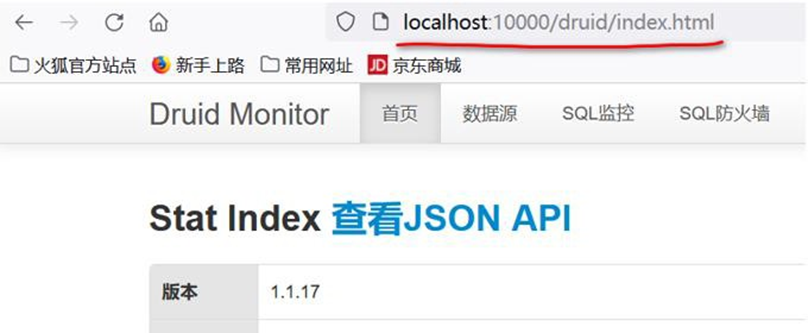
- 修改 com/hspedu/usersys/config/DruidDataSourceConfig.java,加入监控功能
参考: https://github.com/alibaba/druid/wiki/%E9%85%8D%E7%BD%AE_StatFilter
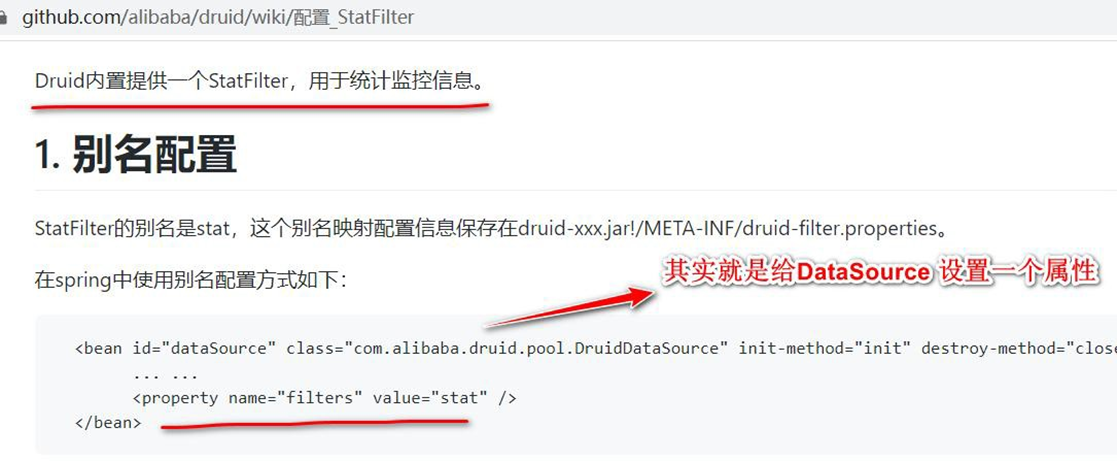
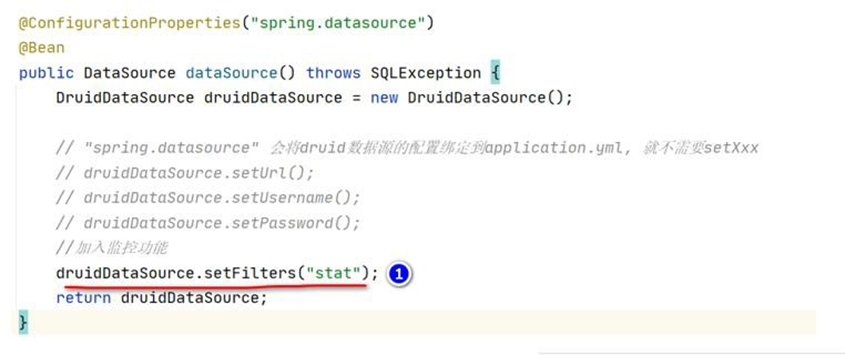
- 创建 com/hspedu/usersys/controller/DruidSqlController.java,模拟操作 DB 的请求
 package com.hspedu.usersys.controller;
 import com.hspedu.usersys.bean.Furn;
 import org.springframework.beans.factory.annotation.Autowired;
 import org.springframework.jdbc.core.BeanPropertyRowMapper;
 import org.springframework.jdbc.core.JdbcTemplate;
 import org.springframework.stereotype.Controller;
 import
 org.springframework.web.bind.annotation.GetMapping;
 import org.springframework.web.bind.annotation.ResponseBody;
 import java.util.List;
 /**

 * @author 韩顺平

 * @version 1.0

 */
 @Controller
 public class DruidSqlController {
     @Autowired
     JdbcTemplate jdbcTemplate;
     @ResponseBody
     @GetMapping("/sql")
     public List < Furn > crudDB() {
         BeanPropertyRowMapper < Furn > rowMapper =
             new BeanPropertyRowMapper < > (Furn.class);
         List < Furn > furns = jdbcTemplate.query("select * from furn", rowMapper);
         for (Furn furn: furns) {
             System.out.println(furn);
         }
         return furns;
     }
 }
2
3
4
5
6
7
8
9
10
11
12
13
14
15
16
17
18
19
20
21
22
23
24
25
26
27
28
29
30
31
32
33
34
# 20.2.4.3 SQL 监控数据-测试页面
● 完成测试, 观察 SQL 监控数据, 浏览器 http://localhost:10000/druid/sql.html
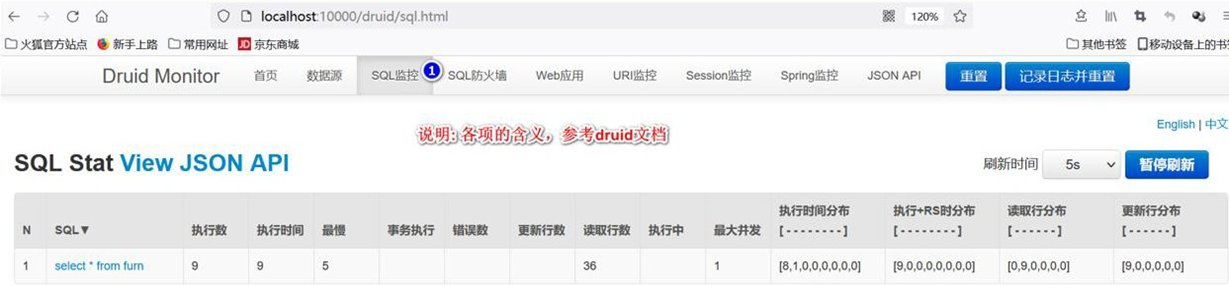
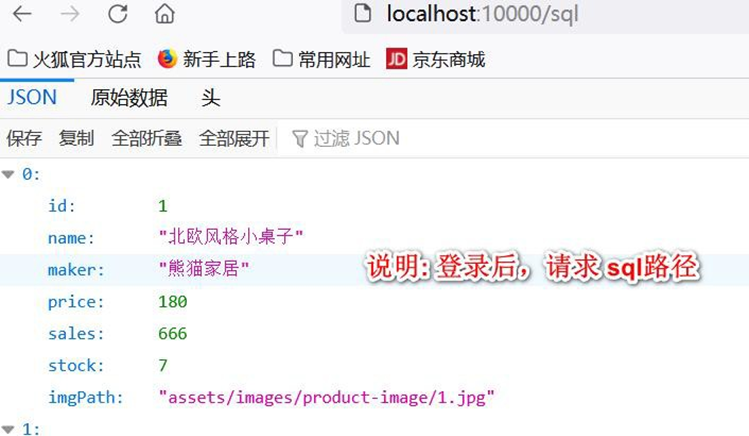
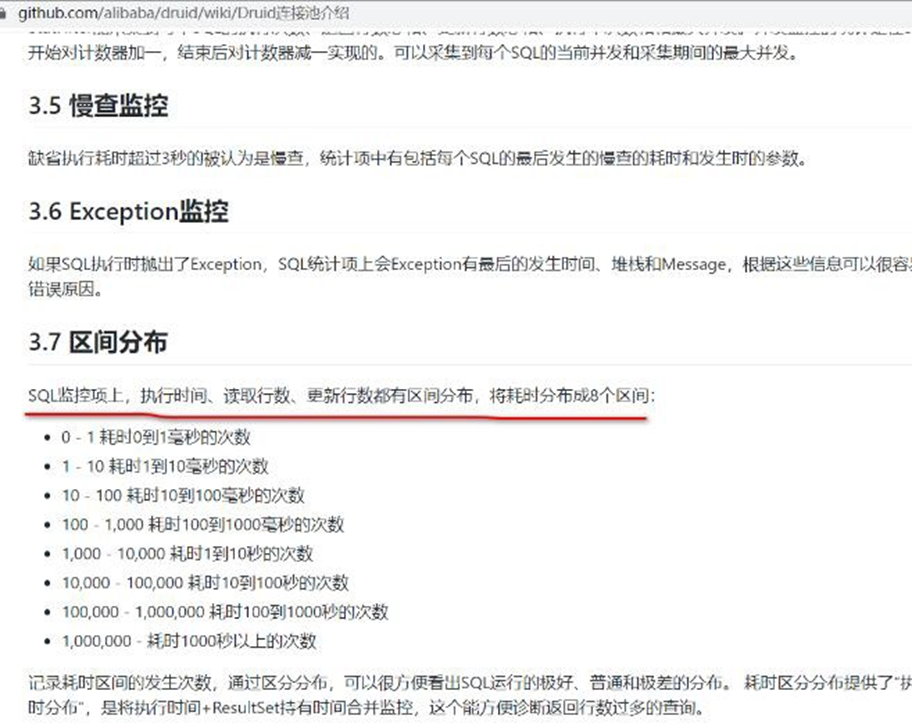
# 20.2.5 Durid 监控功能-Web 关联监控
# 20.2.5.1 需求: 配置 Web 关联监控配置:Web 应用、URI 监控
# 20.2.5.2 官方文档 https://github.com/alibaba/druid/wiki/%E5%B8%B8%E8%A7%81%E9%97%AE%E9%A2%98
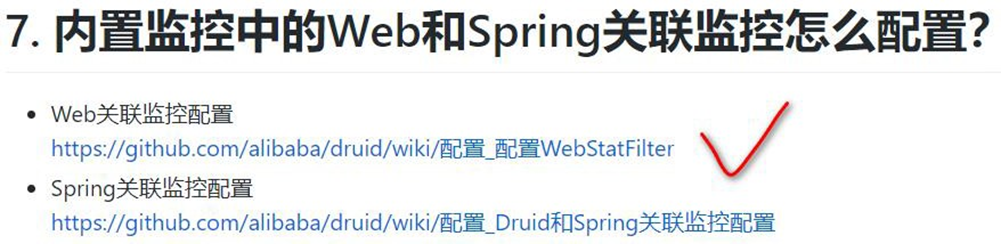

# 20.2.5.3 Web 关联监控配置-Web 应用、URI 监控
- 修改 com/hspedu/usersys/config/DruidDataSourceConfig.java,注入/增 加
WebStatFilter 用于采集 web-jdbc 关联监控的数据
 /**

 * WebStatFilter 用于采集web-jdbc 关联监控的数据。

 * @return

 */
 @Bean
 public FilterRegistrationBean webStatFilter() {
     WebStatFilter webStatFilter = new WebStatFilter();
     FilterRegistrationBean < WebStatFilter > filterRegistrationBean =
         new FilterRegistrationBean < > (webStatFilter);
     //默认对所有URL 请求监控
     filterRegistrationBean.setUrlPatterns(Arrays.asList("/*"));
     //排除URL
     filterRegistrationBean.addInitParameter("exclusions", "*.js,*.gif,*.jpg,*.png,*.css,*.ico,/druid/*");
     return filterRegistrationBean;
 }
2
3
4
5
6
7
8
9
10
11
12
13
14
15
16
17
18
19
- 为了测试方便,修改com/hspedu/usersys/config/WebConfig.java, 放行 /sql 请求
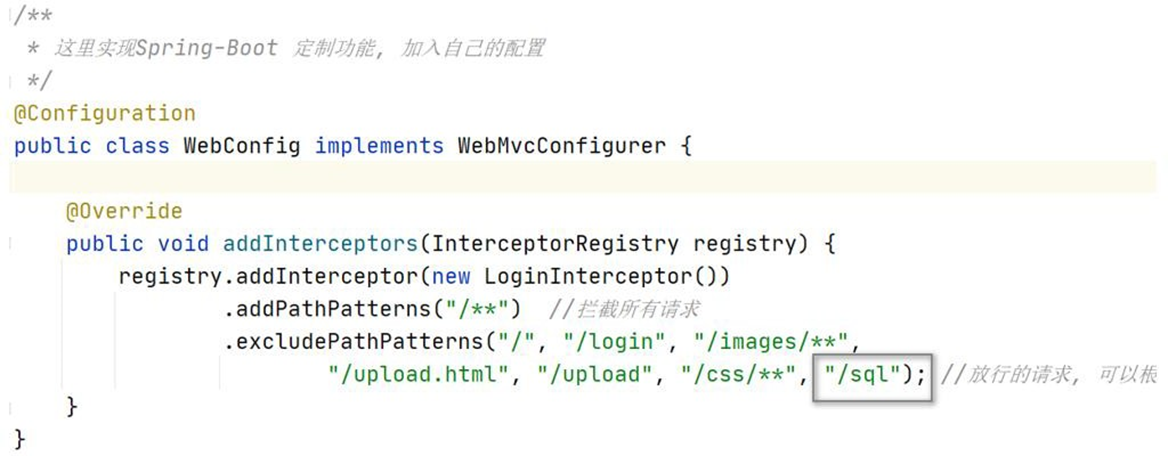
# 20.2.5.4 重启项目,看看 Web 应用和 URI 监控页面
● 完成测试,重启项目,看看 Web 应用和 URI 监控是否生效
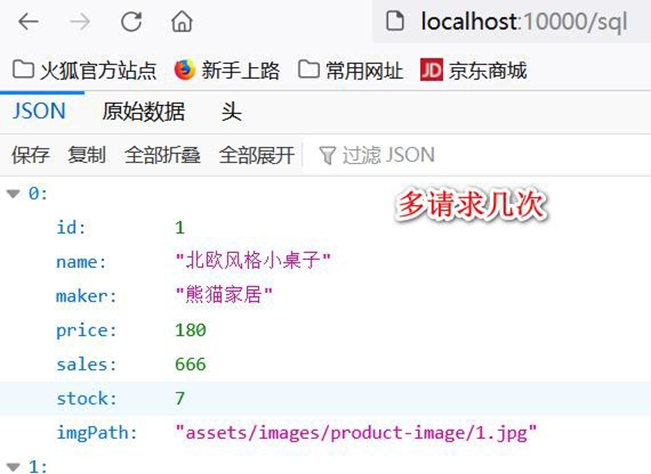
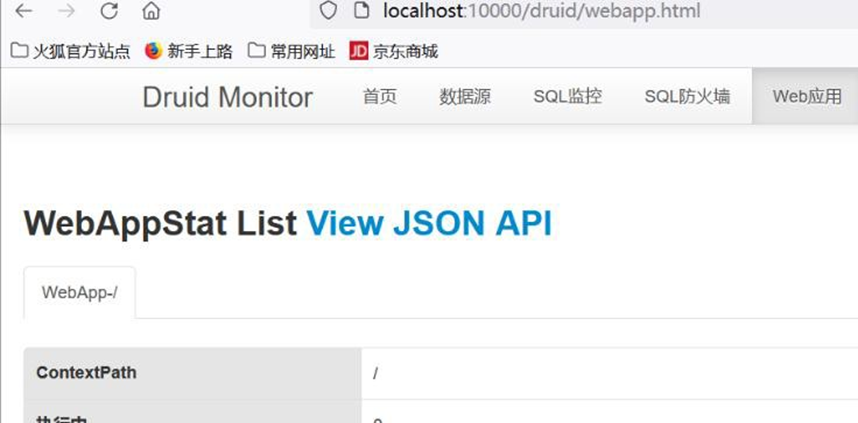

# 20.2.6 Durid 监控功能-SQL 防火墙
# 20.2.6.1 需求: 配置 SQL 防火墙
# 20.2.6.2 官方文档 https://github.com/alibaba/druid/wiki/%E5%B8%B8%E8%A7%81%E9%97%AE%E9%A2%98
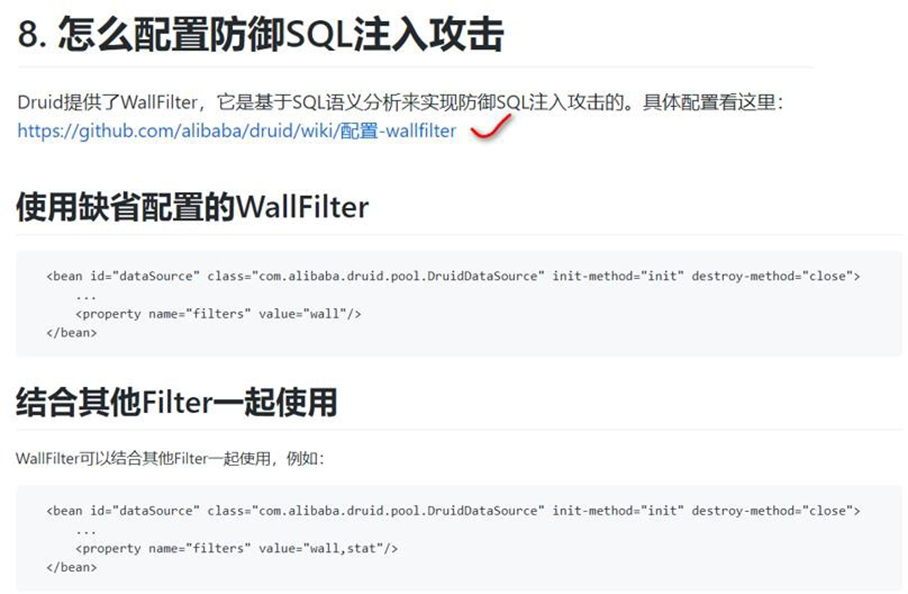
# 20.2.6.3 SQL 防火墙
- 修改 com/hspedu/usersys/config/DruidDataSourceConfig.java,加入防火墙监控
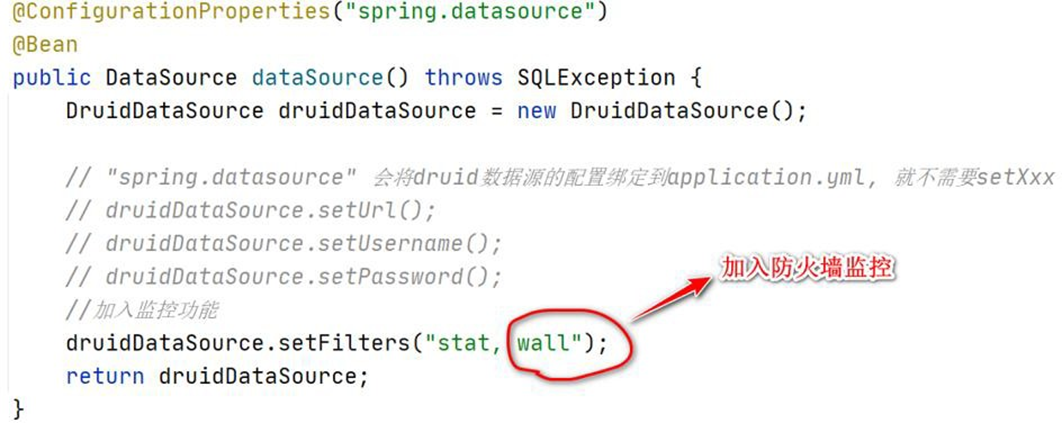
- 完成测试,重启项目,看看SQL 防火墙监控是否生效
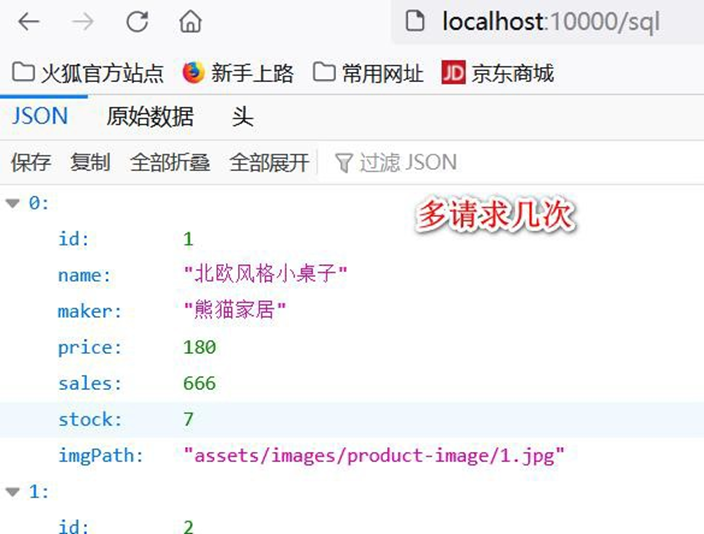
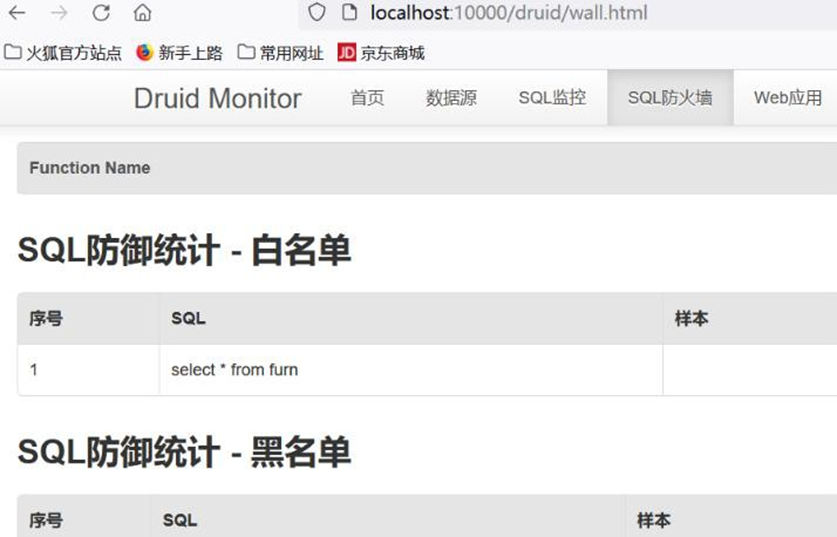
# 20.2.7 Durid 监控功能-Session 监控
# 20.2.7.1 需求: 配置 Session 监控
# 20.2.7.2 官方文档 https://github.com/alibaba/druid/wiki/%E5%B8%B8%E8%A7%81%E9%97%AE%E9%A2%98

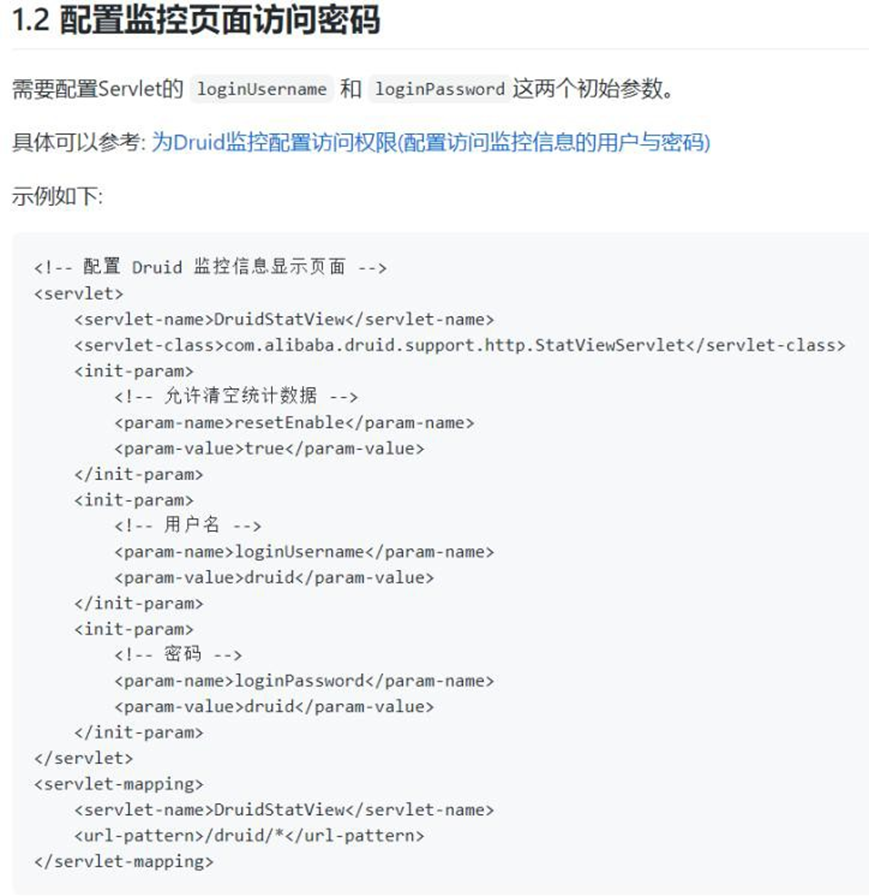
# 20.2.7.3 Session 监控
- 重启项目, 先登录管理系统
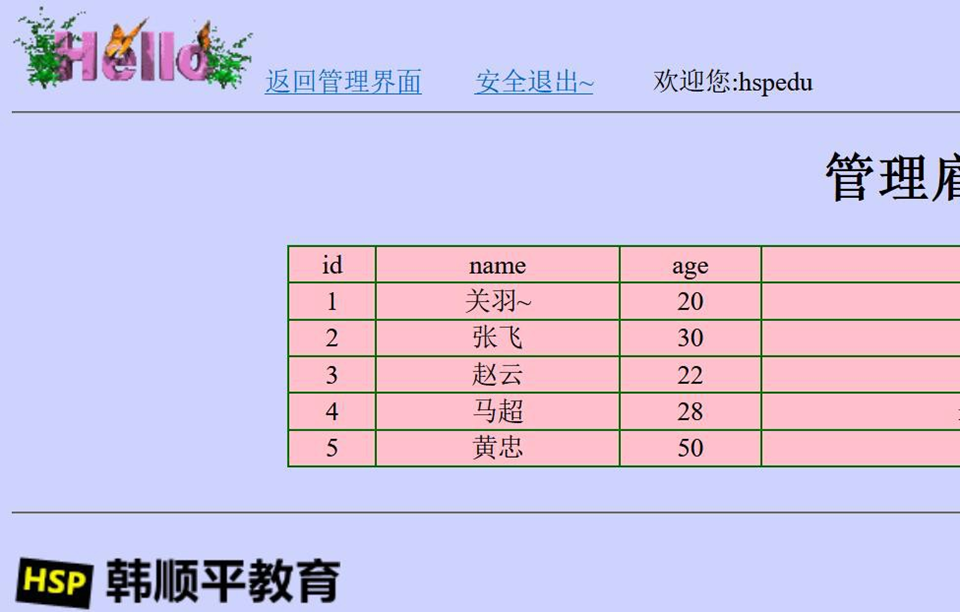
- 完成测试, 查看监控页需要输入用户名和密码, 点 击 Session 监控,可以看到相关信息
(注意要登录用户系统,才能看到Session 监控信息)
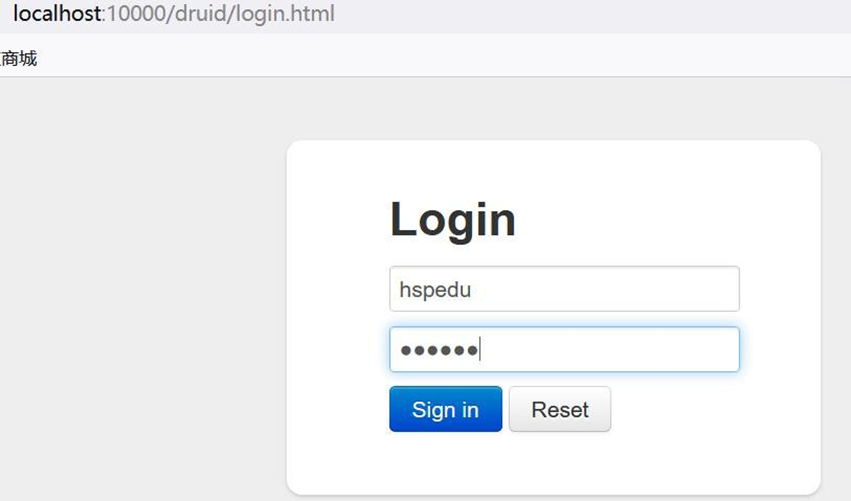
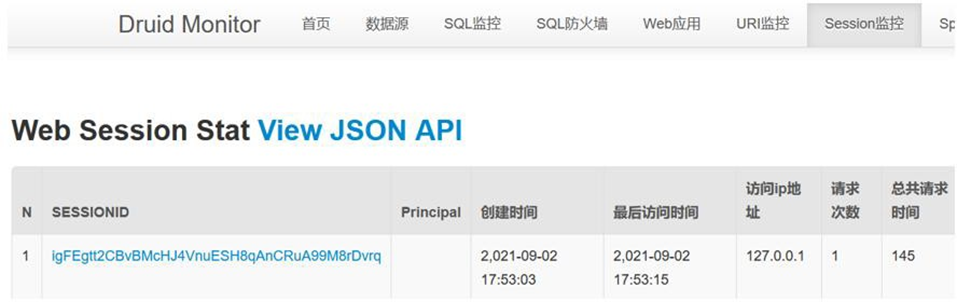
# 20.2.8 Druid Spring Boot Starter
# 20.2.8.1 基本介绍
前面我们使用的是自己引入 druid+配置类方式整合 Druid 和监控
Druid Spring Boot Starter 可以让程序员在 Spring Boot 项目中更加轻松集成 Druid 和监控
# 20.2.8.2 应用实例
# 20.2.8.2.1 需求: 使 用 Druid Spring Boot Starter 方式完成Druid 集成和监控
# 20.2.8.2.2 具体实现
- 修改 pom.xml 注销 druid 的依赖
- 注销 com/hspedu/usersys/config/DruidDataSourceConfig.java
- 这时测试,druid 失效
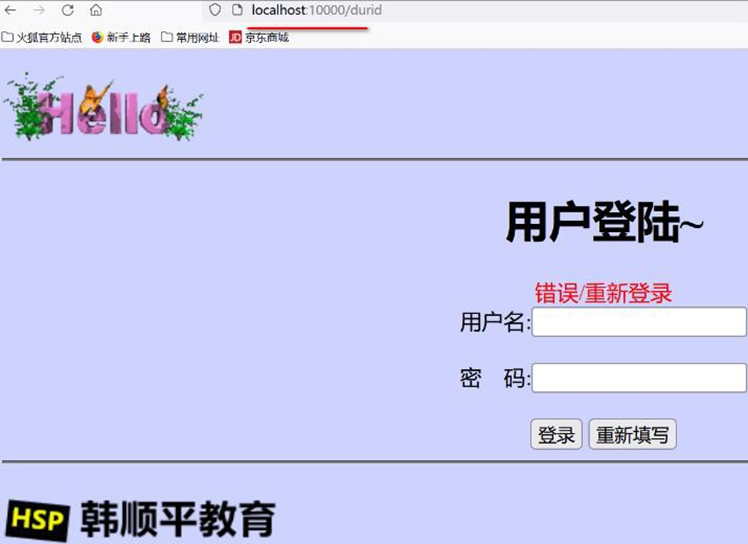
- 查看 druid 文档 https://github.com/alibaba/druid,引入 druid starter

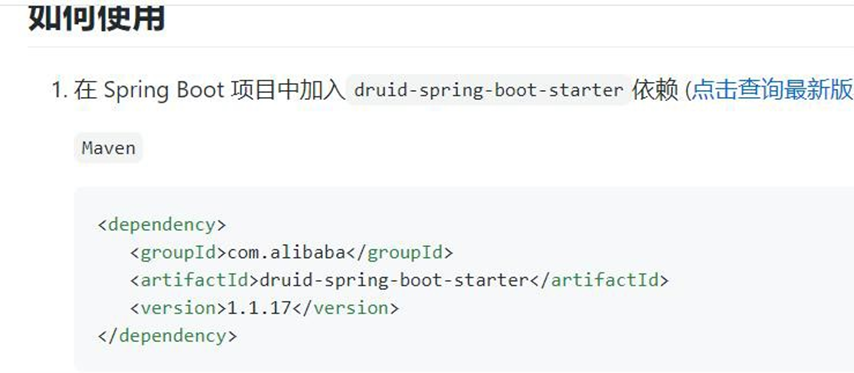
- 确认 druid starter 引入哪些依赖
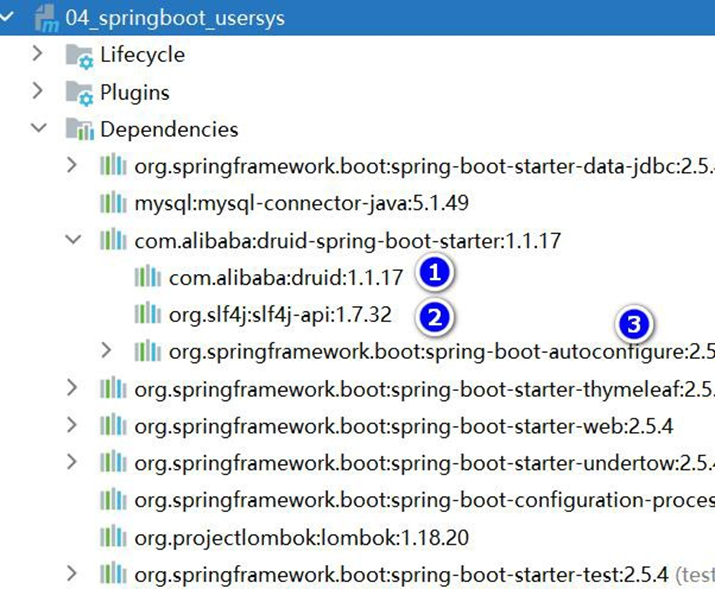
- 修改 resources/application.yml 增加配置参数
spring:
  servlet:
    multipart:
      max-file-size: 5MB
      max-request-size: 50MB
  #数据源配置
  datasource:
    #说明: 如果没有使用useSSL=true, 会报红警告
    url: jdbc:mysql://localhost:3306/spring_boot?useUnicode=true&characterEncoding=utf-8&useSSL=true
    username: root
    password: root
    driver-class-name: com.mysql.jdbc.Driver
    # druid配置
    druid:
      #filters: stat,wall,slf4j #所有开启的功能
      stat-view-servlet: #监控页配置
        enabled: true
        login-username: hspedu
        login-password: 888888
        reset-enable: false
      web-stat-filter: #web 监控
        enabled: true
        url-pattern: /*
        exclusions: '*.js,*.gif,*.jpg,*.png,*.css,*.ico,/druid/*'


      filter:
        stat: #sql 监控
          slow-sql-millis: 1000
          log-slow-sql: true
          enabled: true

        wall: #防火墙
          enabled: true
          config:
            drop-table-allow: false

    #druid 配置end
2
3
4
5
6
7
8
9
10
11
12
13
14
15
16
17
18
19
20
21
22
23
24
25
26
27
28
29
30
31
32
33
34
35
36
37
38
# 20.2.8.2.3 重启项目,完成测试
● 完成测试

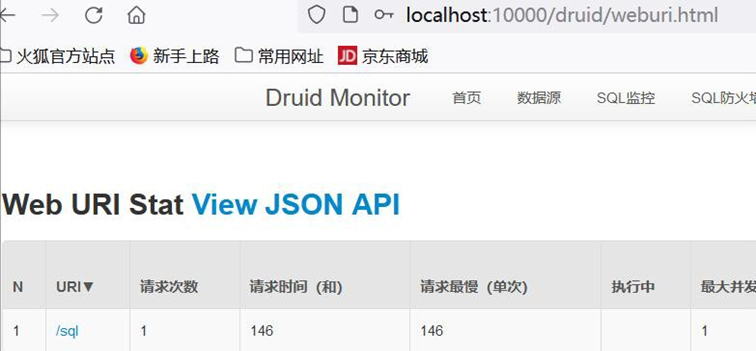
● 测试完成后,记得改回成原来的代码.(个人习惯)
# 20.3 作业布置
1、 把前面老师讲过的异常处理、注入 Servlet Filter Listener、Tomcat 切换、数据库操作
(HiKariDataSource 和 DruidDataSource), 相关代码和案例, 自己写一遍
一定要自己写一遍,否则没有印象, 理解不会深入
2、目前是一些比较散的知识点,同学们学习时,如果想不起来,一定要去回顾前面在哪个章
节中讲过, 做一个简单, 快速的巩固, 从而达到融合贯通效果
# 21 Spring Boot 整合 MyBatis
# 21.1 需求说明/图解
将 Spring Boot 和 MyBatis 整合
查询出一条数据
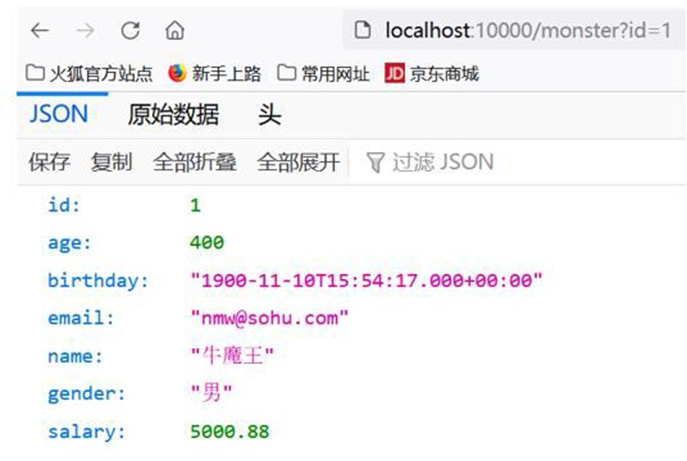
# 21.2 综合案例
# 21.2.1 代码+配置实现
- 创建数据库和表
CREATE DATABASE `springboot_mybatis` USE `springboot_mybatis` CREATE TABLE `monster` (
	`id` INT NOT NULL AUTO_INCREMENT,
	`age` INT NOT NULL,
	`birthday` DATE DEFAULT NULL,
	`email` VARCHAR ( 255 ) DEFAULT NULL,
	`gender` CHAR ( 1 ) DEFAULT NULL,
	`name` VARCHAR ( 255 ) DEFAULT NULL,
	`salary` DOUBLE NOT NULL,
	PRIMARY KEY ( `id` )
) CHARSET = utf8 SELECT
*
FROM
	`monster` INSERT INTO monster
VALUES
	( NULL, 20, '2000-11-11', '[email protected]', '男', '牛魔王', 5000.88 );
INSERT INTO monster
VALUES
	( NULL, 10, '2011-11-11', '[email protected]', '女', '白骨精', 8000.88 );
2
3
4
5
6
7
8
9
10
11
12
13
14
15
16
17
18
- 创建 05_springboot_mybatis 项目-使用灵活的方式创建 maven
- pom.xml 需要引入相关依赖.
<dependencies>
    <dependency>
        <groupId>org.springframework.boot</groupId>
        <artifactId>spring-boot-starter-web</artifactId>
    </dependency>
    <dependency>
        <groupId>org.mybatis.spring.boot</groupId>
        <artifactId>mybatis-spring-boot-starter</artifactId>
        <version>2.2.2</version>
    </dependency>
    <dependency>
        <groupId>mysql</groupId>
        <artifactId>mysql-connector-java</artifactId>
        <scope>runtime</scope>
    </dependency>
    <dependency>
        <groupId>org.springframework.boot</groupId>
        <artifactId>spring-boot-configuration-processor</artifactId>
        <optional>true</optional>
    </dependency>
    <dependency>
        <groupId>org.projectlombok</groupId>
        <artifactId>lombok</artifactId>
        <optional>true</optional>
    </dependency>
    <dependency>
        <groupId>org.springframework.boot</groupId>
        <artifactId>spring-boot-starter-test</artifactId>
        <scope>test</scope>
    </dependency>
    <!-- 引入 druid 依赖 -->
    <dependency>
        <groupId>com.alibaba</groupId>
        <artifactId>druid</artifactId>
        <version>1.1.17</version>
    </dependency>
</dependencies>
2
3
4
5
6
7
8
9
10
11
12
13
14
15
16
17
18
19
20
21
22
23
24
25
26
27
28
29
30
31
32
33
34
35
36
37
- 创建 resources/application.yml , 配置数据源参数, 并完成 Spring Boot 项目启动测试
server:
  port: 10000

spring:
  datasource:
    driver-class-name: com.mysql.cj.jdbc.Driver
    url: jdbc:mysql://localhost:3306/springboot_mybatis?useUnicode=true&characterEncoding=utf-8&useSSL=true
    username: root
    password: hsp
2
3
4
5
6
7
8
9
- 切换数据源为 druid , 修改 pom.xml(如果没有 mybatis-stater , 加入即可.) , 并加入
配置文件 com/hspedu/mybatis/config/DruidDataSourceConfig.java , 完成测试
<!-- 引入druid 依赖 -->
<dependency>
    <groupId>com.alibaba</groupId>
    <artifactId>druid</artifactId>
    <version>1.1.17</version>
</dependency>
2
3
4
5
6
package com.hspedu.mybatis.config;
import com.alibaba.druid.pool.DruidDataSource;
import org.springframework.boot.context.properties.ConfigurationProperties;
import org.springframework.context.annotation.Bean;
import org.springframework.context.annotation.Configuration;
import javax.sql.DataSource;
import java.sql.SQLException;
/**

* @author 韩顺平

* @version 1.0

*/
@Configuration
public class DruidDataSourceConfig {
    @ConfigurationProperties("spring.datasource")
    @Bean
    public DataSource dataSource() throws SQLException {
        DruidDataSource druidDataSource = new DruidDataSource();
        return druidDataSource;
    }
}
2
3
4
5
6
7
8
9
10
11
12
13
14
15
16
17
18
19
20
21
22
23
24
- 创建com/hspedu/mybatis/bean/Monster.java - 开始打开自己回忆-Mybatis 文档+SSM 整合
package com.hspedu.mybatis.bean;
import com.fasterxml.jackson.annotation.JsonFormat;
import lombok.Data;
import java.util.Date;
/**

* @author 韩顺平

* @version 1.0

*/
@Data
public class Monster {
    private Integer id;
    private Integer age;
    @JsonFormat(pattern = "yyyy-MM-dd HH:mm:ss", timezone = "GMT+8")
    private Date birthday;
    private String email;
    private String name;
    private String gender;
    private Double salary;
}
2
3
4
5
6
7
8
9
10
11
12
13
14
15
16
17
18
19
20
21
22
23
- 创建 com/hspedu/mybatis/mapper/MonsterMapper.java
 package com.hspedu.mybatis.mapper;
 import com.hspedu.mybatis.bean.Monster;
 import org.apache.ibatis.annotations.Mapper;
 /**

 * @author 韩顺平

 * @version 1.0

 */
 @Mapper
 public interface MonsterMapper {
     public Monster getMonsterById(Integer id);
 }
2
3
4
5
6
7
8
9
10
11
12
13
14
15
- 创建 05_springboot_mybatis\src\main\resources\mapper\MonsterMapper.xml,文件模板从 mybatis 官方文档拷贝
<!DOCTYPE mapper
PUBLIC "-//mybatis.org//DTD Mapper 3.0//EN"
"http://mybatis.org/dtd/mybatis-3-mapper.dtd">
<mapper namespace="com.hspedu.mybatis.mapper.MonsterMapper">
    <select id="getMonsterById" resultType="com.hspedu.mybatis.bean.Monster">

select * from monster where id=#{id}

</select>
</mapper>
2
3
4
5
6
7
8
9
10
11
12
- 创建 com/hspedu/mybatis/service/MonsterService.java 和 com/hspedu/mybatis/service/impl/MonsterServiceImpl.java
 package com.hspedu.mybatis.service;
 import com.hspedu.mybatis.bean.Monster;
 /**

 * @author 韩顺平

 * @version 1.0
 */
 public interface MonsterService {
     public Monster getMonsterById(Integer id);
 }
2
3
4
5
6
7
8
9
10
11
12
13
 package com.hspedu.mybatis.service.impl;
 import com.hspedu.mybatis.bean.Monster;
 import com.hspedu.mybatis.mapper.MonsterMapper;
 import com.hspedu.mybatis.service.MonsterService;
 import org.springframework.beans.factory.annotation.Autowired;
 import org.springframework.stereotype.Service;
 /**

 * @author 韩顺平

 * @version 1.0

 */
 @Service
 public class MonsterServiceImpl implements MonsterService {
     @Autowired
     MonsterMapper monsterMapper;
     @Override
     public Monster getMonsterById(Integer id) {
         return
         monsterMapper.getMonsterById(id);
     }
 }
2
3
4
5
6
7
8
9
10
11
12
13
14
15
16
17
18
19
20
21
22
23
- 创建 com/hspedu/mybatis/controller/MonsterController.java
 package com.hspedu.mybatis.controller;
 import com.hspedu.mybatis.bean.Monster;
 import com.hspedu.mybatis.service.MonsterService;
 import org.springframework.beans.factory.annotation.Autowired;
 import org.springframework.stereotype.Controller;
 import org.springframework.web.bind.annotation.GetMapping;
 import org.springframework.web.bind.annotation.RequestParam;
 import org.springframework.web.bind.annotation.ResponseBody;
 /**
 * @author 韩顺平
 * @version 1.0
 */
 @Controller
 public class MonsterController {
     @Autowired
     MonsterService monsterService;
     @ResponseBody
     @GetMapping("/monster")
     public Monster getByMonsterId(@RequestParam("id") Integer id) {
         return monsterService.getMonsterById(id);
     }
 }
2
3
4
5
6
7
8
9
10
11
12
13
14
15
16
17
18
19
20
21
22
23
- 修改 resources/application.yml , 指定 mybatis 的配置参数
server:
  port: 10000
spring:
  datasource:
    driver-class-name: com.mysql.cj.jdbc.Driver
    url: jdbc:mysql://localhost:3306/springboot_mybatis?useUnicode=true&characterEncoding=utf-8&useSSL=true
    username: root
    password: hsp


mybatis:
  # mapper-locations 指定Xxxmapper.xml 文件的位置
  mapper-locations: classpath:mapper/*.xml
  # 通过config-location 可以指定mybatis 传统的mybatis-config.xml,
  # 建议直接配置到application.yml, 如果确实有需要再单独写
  # config-location: classpath:mybatis/mybatis-config.xml
  # 在application.yml 直接配置mybatis, configuration 说明
  #1. 指定mybatis 全局配置文件中的相关配置项,
  # 也就是以前在mybatis-config.xml 配置的参数
  #2. 顶行输入mybatis 会看到更多配置, 我们讲解过
  #3. 这个configuration 和config-location 不要同时存在
  configuration:
    log-impl: org.apache.ibatis.logging.stdout.StdOutImpl
2
3
4
5
6
7
8
9
10
11
12
13
14
15
16
17
18
19
20
21
22
23
24
# 21.2.2 测试页面效果
● 完成测试, 浏览器: http://localhost:10000/monster?id=1
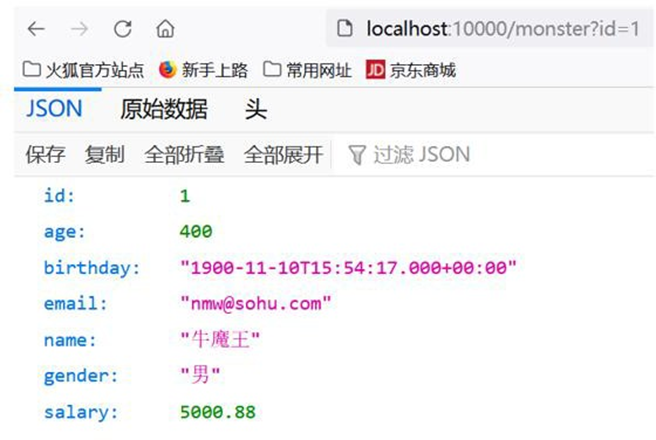
# 21.3 注意事项和细节说明
- spring boot 整合 mybatis 取出的日期, 出现 8 小时时差 解决方案
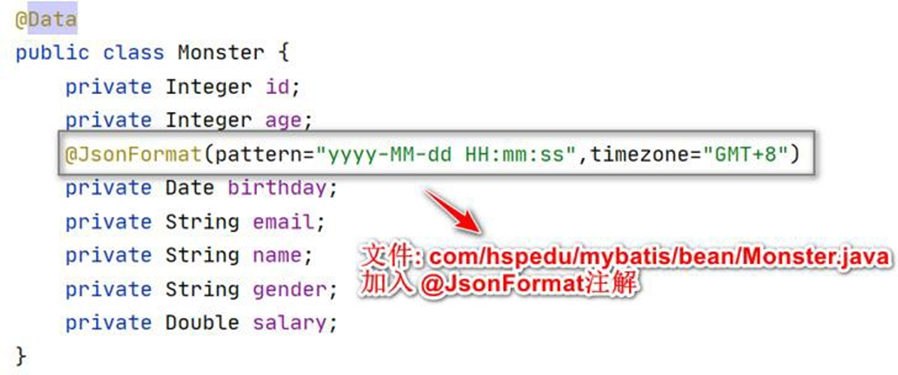
@JsonFormat(pattern="yyyy-MM-dd HH:mm:ss",timezone="GMT+8")

# 22 Spring Boot 整合 MyBatis-Plus
# 22.1 官方文档
# 22.1.1 MyBatis-Plus 官网 https://baomidou.com
# 22.2 基本介绍
- MyBatis-Plus (简称 MP)是一个 MyBatis 的增强工具,在 MyBatis 的基础上只做增强
不做改变,为简化开发、提高效率而生。

- 强大的 CRUD 操作:内置通用 Mapper、通用 Service,通过少量配置即可实现单表大部
分 CRUD 操作,更有强大的条件构造器,满足各类使用需求
# 22.3 整合 MyBatis-Plus 实例
# 22.3.1 需求说明/图解
将 Spring Boot 和 MyBatis-Plus 整合
查询数据,如图
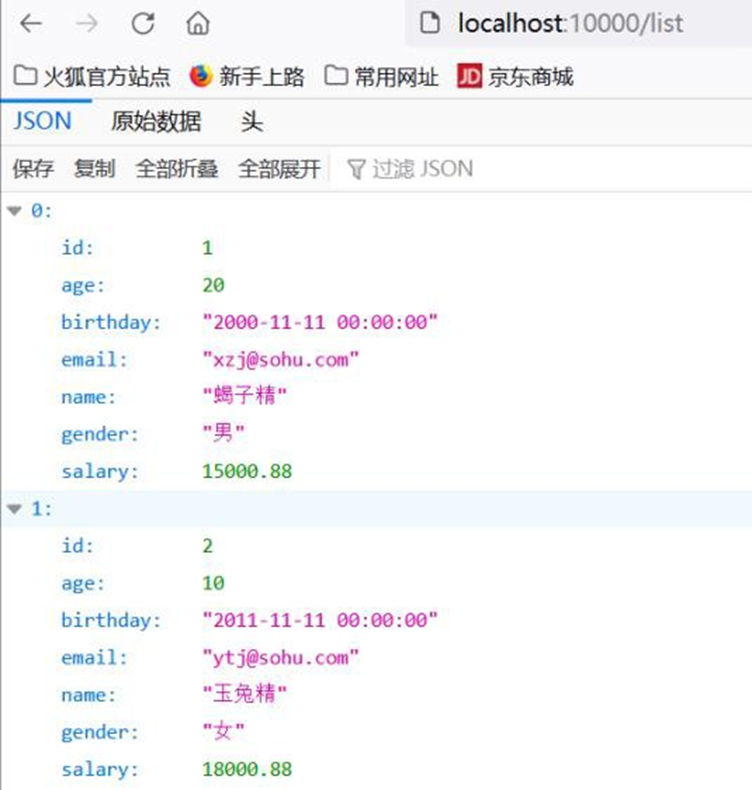
# 22.3.2 代码实现
- 创建数据库和表
CREATE DATABASE `springboot_mybatisplus` USE `springboot_mybatisplus` CREATE TABLE `monster` (
	`id` INT NOT NULL AUTO_INCREMENT,
	`age` INT NOT NULL,
	`birthday` DATE DEFAULT NULL,
	`email` VARCHAR ( 255 ) DEFAULT NULL,
	`gender` CHAR ( 1 ) DEFAULT NULL,
	`name` VARCHAR ( 255 ) DEFAULT NULL,
	`salary` DOUBLE NOT NULL,
	PRIMARY KEY ( `id` )
) CHARSET = utf8 SELECT
*
FROM
	`monster` INSERT INTO monster
VALUES
	( NULL, 20, '2000-11-11', '[email protected]', ' 男', ' 蝎子精', 15000.88 );
INSERT INTO monster
VALUES
	( NULL, 10, '2011-11-11', '[email protected]', ' 女', ' 玉兔精', 18000.88 );
2
3
4
5
6
7
8
9
10
11
12
13
14
15
16
17
18
- 创建 06_springboot_mybatisplus 项目 pom.xml 引入必要的依赖
<dependencies>
    <dependency>
        <groupId>org.springframework.boot</groupId>
        <artifactId>spring-boot-starter-web</artifactId>
    </dependency>
    <dependency>
        <groupId>mysql</groupId>
        <artifactId>mysql-connector-java</artifactId>
        <scope>runtime</scope>
    </dependency>
    <dependency>
        <groupId>org.springframework.boot</groupId>
        <artifactId>spring-boot-configuration-processor</artifactId>
        <optional>true</optional>
    </dependency>
    <dependency>
        <groupId>org.projectlombok</groupId>
        <artifactId>lombok</artifactId>
        <optional>true</optional>
    </dependency>
    <dependency>
        <groupId>org.springframework.boot</groupId>
        <artifactId>spring-boot-starter-test</artifactId>
        <scope>test</scope>
    </dependency>
</dependencies>
2
3
4
5
6
7
8
9
10
11
12
13
14
15
16
17
18
19
20
21
22
23
24
25
26
27
- 修改 pom.xml 引入 MyBatis-Plus starter
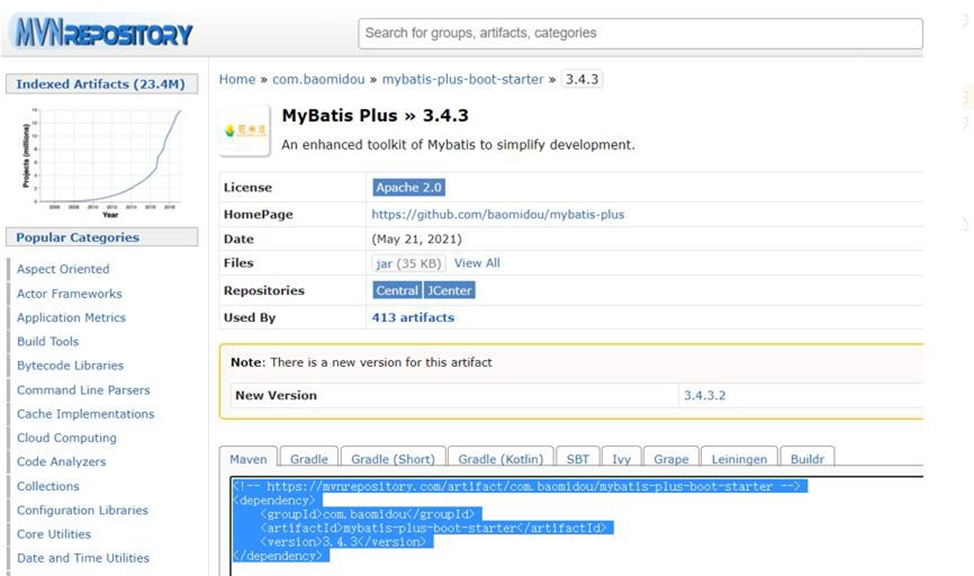
<dependency>
    <groupId>com.baomidou</groupId>
    <artifactId>mybatis-plus-boot-starter</artifactId>
    <version>3.4.3</version>
</dependency>
2
3
4
5
- 创建 resources/application.yml 配置数据源参数
server:
  port: 10000
spring:
  datasource:
    driver-class-name: com.mysql.cj.jdbc.Driver
    url: jdbc:mysql://localhost:3306/springboot_mybatis?useUnicode=true&characterEncoding=utf-8&useSSL=true
    username: root
    password: hsp
2
3
4
5
6
7
8
- 切 换 数 据 源 为 druid , 修 改 pom.xml 和 创 建 配 置 文 件
com/hspedu/mybatisplus/config/DruidDataSourceConfig.java
<!-- 引入druid 依赖-->
<dependency>
    <groupId>com.alibaba</groupId>
    <artifactId>druid</artifactId>
    <version>1.1.17</version>
</dependency>
2
3
4
5
6
package com.hspedu.mybatisplus.config;
import com.alibaba.druid.pool.DruidDataSource;
import lombok.extern.slf4j.Slf4j;
import org.springframework.boot.context.properties.ConfigurationProperties;
import org.springframework.context.annotation.Bean;
import org.springframework.context.annotation.Configuration;
import javax.sql.DataSource;
import java.sql.SQLException;
/**

* @author 韩顺平

* @version 1.0

*/
@Configuration
@Slf4j
public class DruidDataSourceConfig {
    @ConfigurationProperties("spring.datasource")
    @Bean
    public DataSource dataSource() throws SQLException {
        DruidDataSource druidDataSource = new DruidDataSource();
        log.info("数据源={}", druidDataSource.getClass());
        return druidDataSource;
    }
}
2
3
4
5
6
7
8
9
10
11
12
13
14
15
16
17
18
19
20
21
22
23
24
25
26
27
- 测试是否能正确启动项目, 注意观察 mybatis-plus 是否引入成功
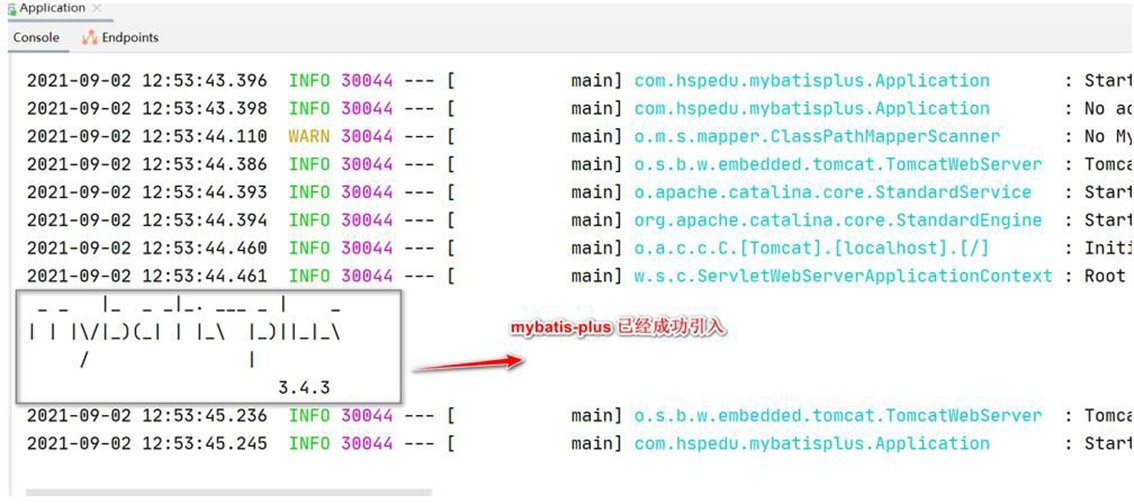
- 创建 com/hspedu/mybatisplus/bean/Monster.java
package com.hspedu.mybatisplus.bean;
import com.baomidou.mybatisplus.annotation.TableName;
import com.fasterxml.jackson.annotation.JsonFormat;
import lombok.Data;
import java.util.Date;
/**

* @author 韩顺平

* @version 1.0

*/
@Data
//说明:
//1. 如果这个类名Monster 和表名monster 一致,可以映射上,则@TableName 可以省略
//2. 如果这个类名Monster 和表名不一致,不能映射上,则@TableName 可以指定
@TableName("monster")
public class Monster {
    private Integer id;
    private Integer age;
    @JsonFormat(pattern = "yyyy-MM-dd HH:mm:ss", timezone = "GMT+8")
    private Date birthday;
    private String email;
    private String name;
    private String gender;
    private Double salary;
}
2
3
4
5
6
7
8
9
10
11
12
13
14
15
16
17
18
19
20
21
22
23
24
25
26
27
28
- 创建 com/hspedu/mybatisplus/mapper/MonsterMapper.java
 package com.hspedu.mybatisplus.mapper;
 import com.baomidou.mybatisplus.core.mapper.BaseMapper;
 import com.hspedu.mybatisplus.bean.Monster;
 import org.apache.ibatis.annotations.Mapper;
 /**
 * @author 韩顺平

 * @version 1.0

 * 说明

 * 1. BaseMapper 已经默认提供了很多crud 方法,可以直接用

 * 2. 如果BaseMapper 提供的方法不满足需要,可以再开发MonsterMapper.xml

 */
 public interface MonsterMapper extends BaseMapper < Monster > {}
2
3
4
5
6
7
8
9
10
11
12
13
14
15
16
17
18
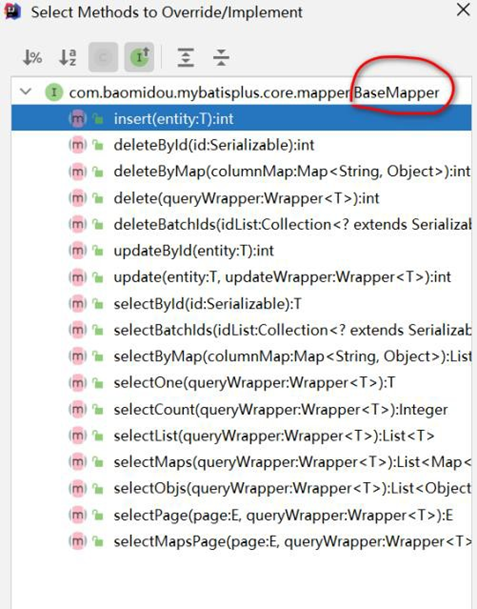
- 创建 com/hspedu/mybatisplus/service/MonsterService.java
 package com.hspedu.mybatisplus.service;
 import com.baomidou.mybatisplus.extension.service.IService;
 import com.hspedu.mybatisplus.bean.Monster;
 /**
 * 说明
 * 1. IService 提供了很多crud 方法, 底层调用的是BaseMapper 的方法
 * 2. 如果默认提供的方法,不能满足需求,再开发需要的方法即可
 */
 public interface MonsterService extends IService < Monster > {}
2
3
4
5
6
7
8
9
10
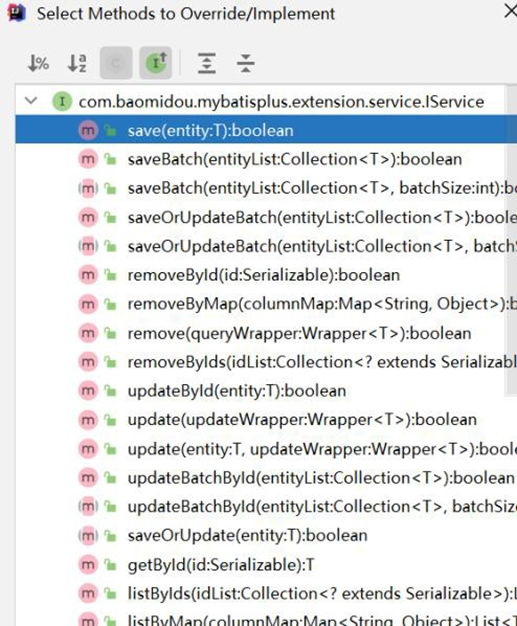
- 创建 com/hspedu/mybatisplus/service/impl/MonsterServiceImpl.java
 package com.hspedu.mybatisplus.service.impl;
 import com.baomidou.mybatisplus.extension.service.impl.ServiceImpl;
 import com.hspedu.mybatisplus.bean.Monster;
 import com.hspedu.mybatisplus.mapper.MonsterMapper;
 import com.hspedu.mybatisplus.service.MonsterService;
 import org.springframework.stereotype.Service;
 /**

 * @author 韩顺平

 * @version 1.0

 */
 @Service
 public class MonsterServiceImpl extends ServiceImpl < MonsterMapper, Monster >
     implements MonsterService {}
2
3
4
5
6
7
8
9
10
11
12
13
14
15
16
17
- 创建 com/hspedu/mybatisplus/controller/MonsterController.java
 package com.hspedu.mybatisplus.controller;
 import com.hspedu.mybatisplus.bean.Monster;
 import com.hspedu.mybatisplus.service.MonsterService;
 import org.springframework.beans.factory.annotation.Autowired;
 import org.springframework.stereotype.Controller;
 import org.springframework.web.bind.annotation.GetMapping;
 import org.springframework.web.bind.annotation.RequestParam;
 import org.springframework.web.bind.annotation.ResponseBody;
 import java.util.List;
 /**

 * @author 韩顺平

 * @version 1.0

 */
 @Controller
 public class MonsterController {
     @Autowired
     MonsterService monsterService;
     @ResponseBody
     @GetMapping("/monster")
     public Monster getByMonsterId(@RequestParam("id") Integer id) {
         return monsterService.getById(id);
     }
     /**

     * 后面老师会讲解分页查询

     * @return
     */
     @ResponseBody
     @GetMapping("/list")
     public List < Monster > listMonster() {
         return monsterService.list();
     }
 }
2
3
4
5
6
7
8
9
10
11
12
13
14
15
16
17
18
19
20
21
22
23
24
25
26
27
28
29
30
31
32
33
34
35
36
37
38
- 修改 com/hspedu/mybatisplus/Application.java , 加入对Mapper 的扫描
package com.hspedu.mybatisplus;
import org.mybatis.spring.annotation.MapperScan;
import org.springframework.boot.SpringApplication;
import org.springframework.boot.autoconfigure.SpringBootApplication;
@MapperScan("com.hspedu.mybatisplus.mapper")
@SpringBootApplication
public class Application {
    public static void main(String[] args) {
        SpringApplication.run(Application.class, args);
    }
}
2
3
4
5
6
7
8
9
10
11
12
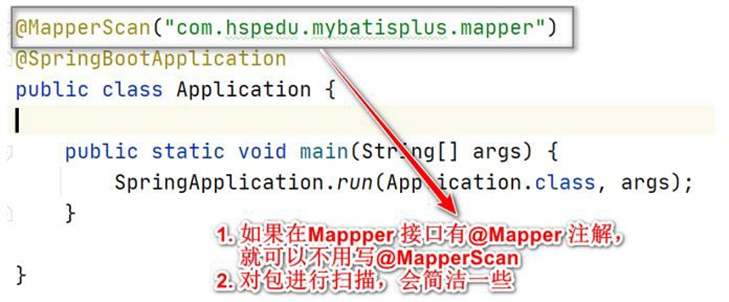
# 22.3.3 启动项目,完成测试
浏览器: http://localhost:10000/list http://localhost:10000/monster?id=1
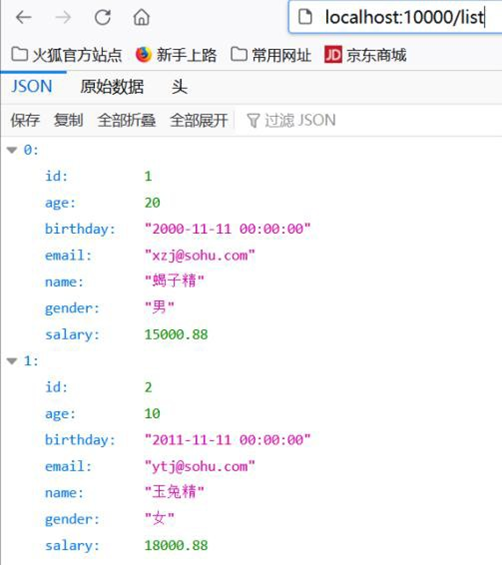
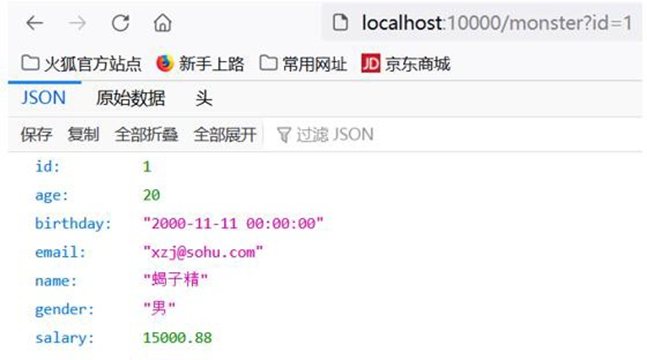
# 22.4 整合 MyBatis-Plus 注意事项和细节
- @TableName 作用
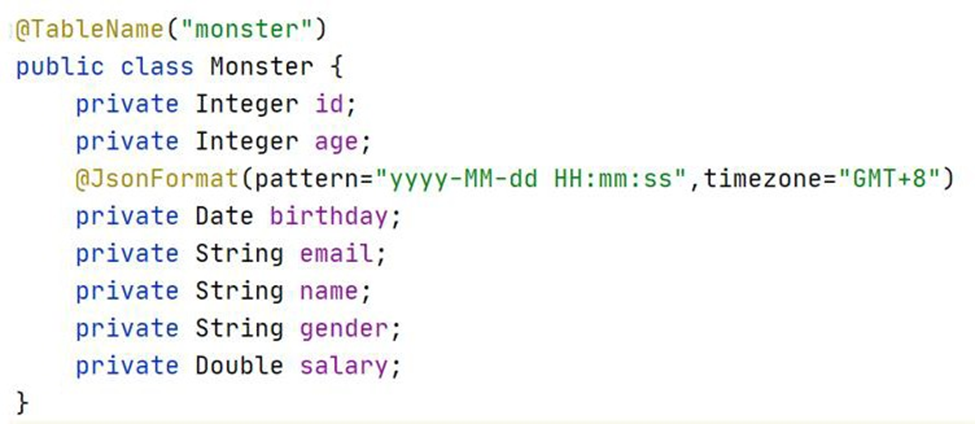
如果这个类名 Monster 和 表名 monster 一致, 可以映射上, 则
@TableName 可以省略
如果这个类名 Monster 和 表名 不一致,不能映射上,则可以通过
@TableName 指定
- MyBatis-Plus starter 到底引入了哪些依赖?
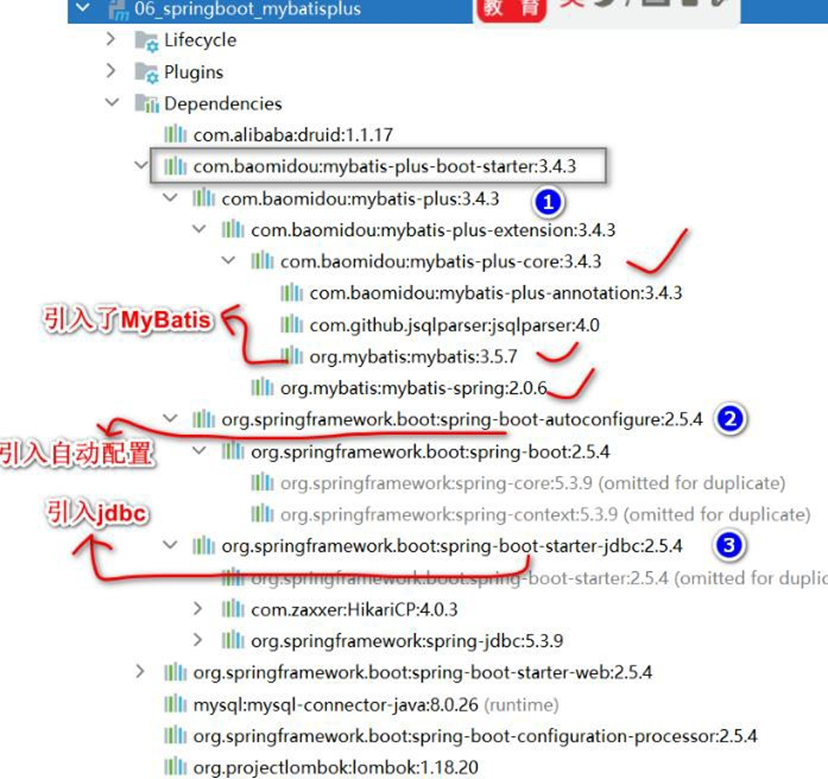
- 为 了 开 发 方 便 , 可 以 安 装 MyBatisX 插 件 , 参 考 文 档 :
https://baomidou.com/guide/mybatisx-idea-plugin.html