 谷粒商城—分布式基础第一部分
# 1. 整体介绍
# 1)安装vagrant
# 2)安装Centos7
$ vagrant init centos/7
A `Vagrantfile` has been placed in this directory. You are now
ready to `vagrant up` your first virtual environment! Please read
the comments in the Vagrantfile as well as documentation on
`vagrantup.com` for more information on using Vagrant.
2
3
4
5
执行完上面的命令后,会在用户的家目录下生成Vagrantfile文件。
$ vagrant up
Bringing machine 'default' up with 'virtualbox' provider...
==> default: Box 'centos/7' could not be found. Attempting to find and install...
    default: Box Provider: virtualbox
    default: Box Version: >= 0
==> default: Loading metadata for box 'centos/7'
    default: URL: https://vagrantcloud.com/centos/7
==> default: Adding box 'centos/7' (v1905.1) for provider: virtualbox
    default: Downloading: https://vagrantcloud.com/centos/boxes/7/versions/1905.1/providers/virtualbox.box
    default: Download redirected to host: cloud.centos.org
    default: Progress: 0% (Rate: 6717/s, Estimated time remaining: 7:33:42)
2
3
4
5
6
7
8
9
10
11
下载镜像过程比较漫长,也可以采用先用下载工具下载到本地后,然后使用“ vagrant box add ”添加,再“vagrant up”即可
#将下载的镜像添加到virtualBox中
$ vagrant box add centos/7 E:\迅雷下载\CentOS-7-x86_64-Vagrant-1905_01.VirtualBox.box
==> box: Box file was not detected as metadata. Adding it directly...
==> box: Adding box 'centos/7' (v0) for provider:
    box: Unpacking necessary files from: file:///E:/%D1%B8%C0%D7%CF%C2%D4%D8/CentOS-7-x86_64-Vagrant-1905_01.VirtualBox.box
    box:
==> box: Successfully added box 'centos/7' (v0) for 'virtualbox'!

#启动
$ vagrant up
Bringing machine 'default' up with 'virtualbox' provider...
==> default: Importing base box 'centos/7'...
==> default: Matching MAC address for NAT networking...
==> default: Setting the name of the VM: Administrator_default_1588497928070_24634
==> default: Clearing any previously set network interfaces...
==> default: Preparing network interfaces based on configuration...
    default: Adapter 1: nat
    default: Adapter 2: hostonly
==> default: Forwarding ports...
    default: 22 (guest) => 2222 (host) (adapter 1)
==> default: Booting VM...
==> default: Waiting for machine to boot. This may take a few minutes...
    default: SSH address: 127.0.0.1:2222
    default: SSH username: vagrant
    default: SSH auth method: private key
    default:
    default: Vagrant insecure key detected. Vagrant will automatically replace
    default: this with a newly generated keypair for better security.
    default:
    default: Inserting generated public key within guest...
    default: Removing insecure key from the guest if it's present...
    default: Key inserted! Disconnecting and reconnecting using new SSH key...
==> default: Machine booted and ready!
==> default: Checking for guest additions in VM...
    default: No guest additions were detected on the base box for this VM! Guest
    default: additions are required for forwarded ports, shared folders, host only
    default: networking, and more. If SSH fails on this machine, please install
    default: the guest additions and repackage the box to continue.
    default:
    default: This is not an error message; everything may continue to work properly,
    default: in which case you may ignore this message.
==> default: Configuring and enabling network interfaces...
==> default: Rsyncing folder: /cygdrive/c/Users/Administrator/ => /vagrant
2
3
4
5
6
7
8
9
10
11
12
13
14
15
16
17
18
19
20
21
22
23
24
25
26
27
28
29
30
31
32
33
34
35
36
37
38
39
40
41
42
43
44
45
vagrant ssh 开启SSH,并登陆到centos7
$ vagrant ssh
[vagrant@localhost ~]$ ip addr
1: lo: <LOOPBACK,UP,LOWER_UP> mtu 65536 qdisc noqueue state UNKNOWN group default qlen 1000
    link/loopback 00:00:00:00:00:00 brd 00:00:00:00:00:00
    inet 127.0.0.1/8 scope host lo
       valid_lft forever preferred_lft forever
    inet6 ::1/128 scope host
       valid_lft forever preferred_lft forever
2: eth0: <BROADCAST,MULTICAST,UP,LOWER_UP> mtu 1500 qdisc pfifo_fast state UP group default qlen 1000
    link/ether 52:54:00:8a:fe:e6 brd ff:ff:ff:ff:ff:ff
    inet 10.0.2.15/24 brd 10.0.2.255 scope global noprefixroute dynamic eth0
       valid_lft 86091sec preferred_lft 86091sec
    inet6 fe80::5054:ff:fe8a:fee6/64 scope link
       valid_lft forever preferred_lft forever
3: eth1: <BROADCAST,MULTICAST,UP,LOWER_UP> mtu 1500 qdisc pfifo_fast state UP group default qlen 1000
    link/ether 08:00:27:d1:76:f6 brd ff:ff:ff:ff:ff:ff
    inet 192.168.56.102/24 brd 192.168.56.255 scope global noprefixroute dynamic eth1
       valid_lft 892sec preferred_lft 892sec
    inet6 fe80::8c94:1942:ba09:2458/64 scope link noprefixroute
       valid_lft forever preferred_lft forever
[vagrant@localhost ~]$
2
3
4
5
6
7
8
9
10
11
12
13
14
15
16
17
18
19
20
21
C:\Users\Administrator>ipconfig

Windows IP 配置

以太网适配器 VirtualBox Host-Only Network:

   连接特定的 DNS 后缀 . . . . . . . :
   本地链接 IPv6 地址. . . . . . . . : fe80::a00c:1ffa:a39a:c8c2%16
   IPv4 地址 . . . . . . . . . . . . : 192.168.56.1
   子网掩码  . . . . . . . . . . . . : 255.255.255.0
   默认网关. . . . . . . . . . . . . :
2
3
4
5
6
7
8
9
10
11
配置网络信息,打开"Vagrantfile"文件:
config.vm.network "private_network", ip: "192.168.56.10"
修改完成后,重启启动vagrant
vagrant reload
检查宿主机和virtualBox之间的通信是否正常
[vagrant@localhost ~]$ ping 192.168.43.43                                                                                                         PING 192.168.43.43 (192.168.43.43) 56(84) bytes of data.
64 bytes from 192.168.43.43: icmp_seq=1 ttl=127 time=0.533 ms
64 bytes from 192.168.43.43: icmp_seq=2 ttl=127 time=0.659 ms

--- 192.168.43.43 ping statistics ---
2 packets transmitted, 2 received, 0% packet loss, time 999ms
rtt min/avg/max/mdev = 0.533/0.596/0.659/0.063 ms
[vagrant@localhost ~]$
[vagrant@localhost ~]$
[vagrant@localhost ~]$ ping www.baidu.com
PING www.a.shifen.com (112.80.248.76) 56(84) bytes of data.
64 bytes from 112.80.248.76 (112.80.248.76): icmp_seq=1 ttl=53 time=56.1 ms
64 bytes from 112.80.248.76 (112.80.248.76): icmp_seq=2 ttl=53 time=58.5 ms
64 bytes from 112.80.248.76 (112.80.248.76): icmp_seq=3 ttl=53 time=53.4 ms
2
3
4
5
6
7
8
9
10
11
12
13
14
15
开启远程登陆,修改“/etc/ssh/sshd_config”
PermitRootLogin yes
PasswordAuthentication yes
2
然后重启SSHD
systemctl restart sshd
使用Xshell或SecureCRT进行远程连接。

# 2. docker中安装mysql
[root@hadoop-104 module]# docker pull mysql:5.7
5.7: Pulling from library/mysql
123275d6e508: Already exists
27cddf5c7140: Pull complete
c17d442e14c9: Pull complete
2eb72ffed068: Pull complete
d4aa125eb616: Pull complete
52560afb169c: Pull complete
68190f37a1d2: Pull complete
3fd1dc6e2990: Pull complete
85a79b83df29: Pull complete
35e0b437fe88: Pull complete
992f6a10268c: Pull complete
Digest: sha256:82b72085b2fcff073a6616b84c7c3bcbb36e2d13af838cec11a9ed1d0b183f5e
Status: Downloaded newer image for mysql:5.7
docker.io/library/mysql:5.7
2
3
4
5
6
7
8
9
10
11
12
13
14
15
16
查看镜像
[root@hadoop-104 module]# docker images
REPOSITORY  TAG    IMAGE ID     CREATED       SIZE
mysql       5.7    f5829c0eee9e 2 hours ago   455MB
[root@hadoop-104 module]#
2
3
4
启动mysql
sudo docker run -p 3306:3306 --name mysql \
-v /mydata/mysql/log:/var/log/mysql \
-v /mydata/mysql/data:/var/lib/mysql \
-v /mydata/mysql/conf:/etc/mysql \
-e MYSQL_ROOT_PASSWORD=root \
-d mysql:5.7
2
3
4
5
6
修改配置
[root@hadoop-104 conf]# pwd
/mydata/mysql/conf


[root@hadoop-104 conf]# cat my.cnf
[client]
default-character-set=utf8
[mysql]
default-character-set=utf8
[mysqld]
init_connect='SET collation_connection = utf8_unicode_ci'
init_connect='SET NAMES utf8'
character-set-server=utf8
collation-server=utf8_unicode_ci
skip-character-set-client-handshake
skip-name-resolve
[root@hadoop-104 conf]#

[root@hadoop-104 conf]# docker restart mysql
mysql
[root@hadoop-104 conf]#
2
3
4
5
6
7
8
9
10
11
12
13
14
15
16
17
18
19
20
21
22
进入容器查看配置:
[root@hadoop-104 conf]# docker exec -it mysql /bin/bash
root@b3a74e031bd7:/# whereis mysql
mysql: /usr/bin/mysql /usr/lib/mysql /etc/mysql /usr/share/mysql

root@b3a74e031bd7:/# ls /etc/mysql
my.cnf
root@b3a74e031bd7:/# cat /etc/mysql/my.cnf
[client]
default-character-set=utf8
[mysql]
default-character-set=utf8
[mysqld]
init_connect='SET collation_connection = utf8_unicode_ci'
init_connect='SET NAMES utf8'
character-set-server=utf8
collation-server=utf8_unicode_ci
skip-character-set-client-handshake
skip-name-resolve
root@b3a74e031bd7:/#
2
3
4
5
6
7
8
9
10
11
12
13
14
15
16
17
18
19
设置启动docker时,即运行mysql
[root@hadoop-104 ~]# docker update mysql --restart=always
mysql
[root@hadoop-104 ~]#
2
3
# 3. docker中安装redis
下载docker
[root@hadoop-104 ~]# docker pull redis
Using default tag: latest
latest: Pulling from library/redis
123275d6e508: Already exists
f2edbd6a658e: Pull complete
66960bede47c: Pull complete
79dc0b596c90: Pull complete
de36df38e0b6: Pull complete
602cd484ff92: Pull complete
Digest: sha256:1d0b903e3770c2c3c79961b73a53e963f4fd4b2674c2c4911472e8a054cb5728
Status: Downloaded newer image for redis:latest
docker.io/library/redis:latest
2
3
4
5
6
7
8
9
10
11
12
启动docker
[root@hadoop-104 ~]# mkdir -p /mydata/redis/conf
[root@hadoop-104 ~]# touch /mydata/redis/conf/redis.conf
[root@hadoop-104 ~]# echo "appendonly yes"  >> /mydata/redis/conf/redis.conf
[root@hadoop-104 ~]# docker run -p 6379:6379 --name redis -v /mydata/redis/data:/data \
> -v /mydata/redis/conf/redis.conf:/etc/redis/redis.conf \
> -d redis redis-server /etc/redis/redis.conf
ce7ae709711986e3f90c9278b284fe6f51f1c1102ba05f3692f0e934ceca1565
[root@hadoop-104 ~]#
2
3
4
5
6
7
8
连接到docker的redis
[root@hadoop-104 ~]# docker exec -it redis redis-cli
127.0.0.1:6379> set key1 v1
OK
127.0.0.1:6379> get key1
"v1"
127.0.0.1:6379>
2
3
4
5
6
设置redis容器在docker启动的时候启动
[root@hadoop-104 ~]# docker update redis --restart=always
redis
[root@hadoop-104 ~]#
2
3
# 4. 创建maven工程
# 5. 执行sql脚本
gulimall_oms.sql gulimall_pms.sql gulimall_sms.sql gulimall_ums.sql gulimall_wms.sql pms_catelog.sql sys_menus.sql
# 6. clone 人人开源
https://gitee.com/renrenio (opens new window)
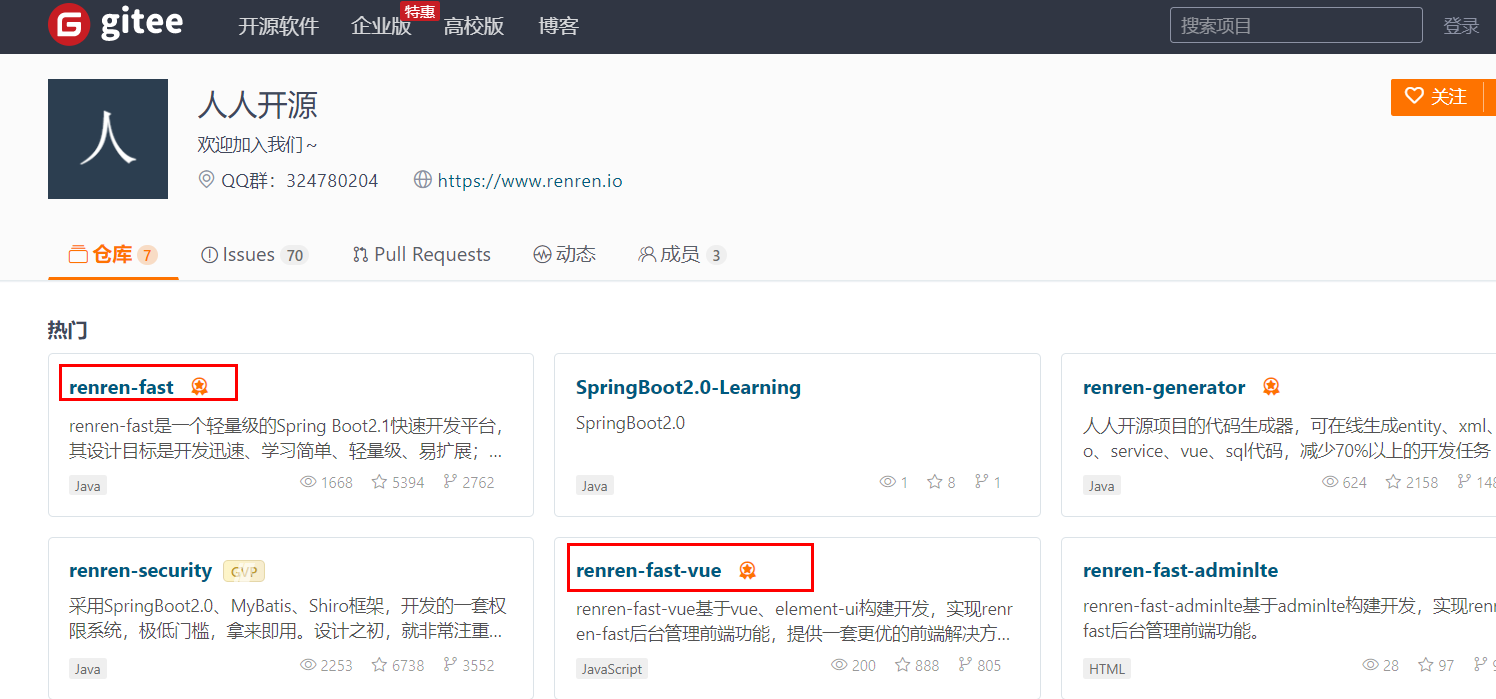
克隆到本地:
git clone https://gitee.com/renrenio/renren-fast-vue.git

git clone https://gitee.com/renrenio/renren-fast.git
2
3
将拷贝下来的“renren-fast”删除“.git”后,拷贝到“gulimall”工程根目录下,然后将它作为gulimall的一个module
创建“gulimall_admin”的数据库,然后执行“renren-fast/db/mysql.sql”中的SQl脚本
修改“application-dev.yml”文件,默认为dev环境,修改连接mysql的url和用户名密码
spring:
    datasource:
        type: com.alibaba.druid.pool.DruidDataSource
        druid:
            driver-class-name: com.mysql.cj.jdbc.Driver
            url: jdbc:mysql://192.168.137.14:3306/gulimall_admin?useUnicode=true&characterEncoding=UTF-8&serverTimezone=Asia/Shanghai
            username: root
            password: root
2
3
4
5
6
7
8
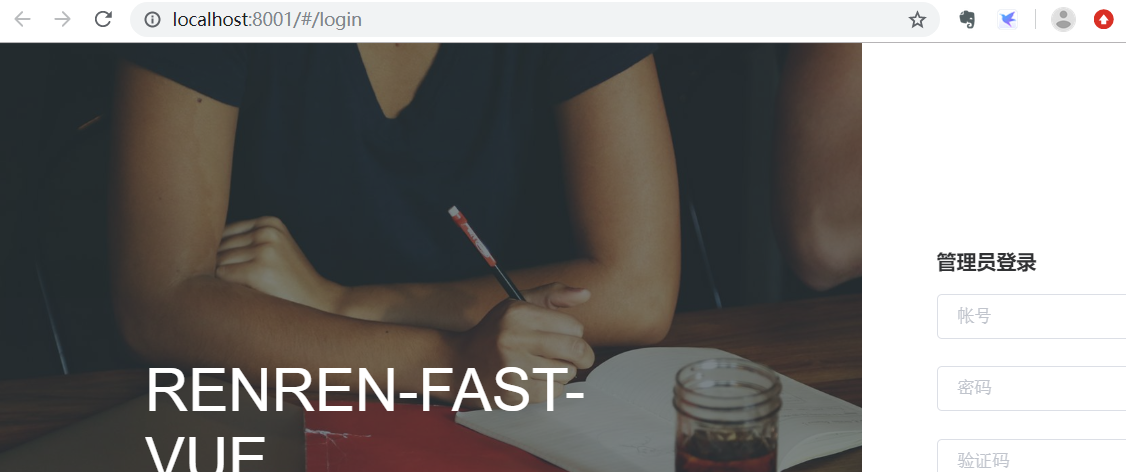
启动“gulimall_admin”,然后访问“http://localhost:8080/renren-fast/ (opens new window)”

安装node.js,并且安装仓库
npm config set registry http://registry.npm.taobao.org/
PS D:\tmp\renren-fast-vue> npm config set registry http://registry.npm.taobao.org/
PS D:\tmp\renren-fast-vue> npm install
npm WARN [email protected] requires a peer of ajv@>=4.10.0 but none is installed. You must install peer dependencies yourself.
npm WARN [email protected] requires a peer of node-sass@^4.0.0 but none is installed. You must install peer dependencies yourself.
npm WARN optional SKIPPING OPTIONAL DEPENDENCY: [email protected] (node_modules\fsevents):
npm WARN notsup SKIPPING OPTIONAL DEPENDENCY: Unsupported platform for [email protected]: wanted {"os":"darwin","arch":"any"} (current: {"os":"win32","arch":"x64"})

up to date in 17.227s
PS D:\tmp\renren-fast-vue>
2
3
4
5
6
7
8
9
PS D:\tmp\renren-fast-vue> npm run dev

> [email protected] dev D:\tmp\renren-fast-vue
> webpack-dev-server --inline --progress --config build/webpack.dev.conf.js

 10% building modules 5/10 modules 5 active ...-0!D:\tmp\renren-fast-vue\src\main.js(node:19864) Warning: Accessing non-existent property 'cat' of module exports inside circular dependency
(Use `node --trace-warnings ...` to show where the warning was created)
(node:19864) Warning: Accessing non-existent property 'cd' of module exports inside circular dependency
(node:19864) Warning: Accessing non-existent property 'chmod' of module exports inside circular dependency
(node:19864) Warning: Accessing non-existent property 'cp' of module exports inside circular dependency
(node:19864) Warning: Accessing non-existent property 'dirs' of module exports inside circular dependency
(node:19864) Warning: Accessing non-existent property 'pushd' of module exports inside circular dependency
(node:19864) Warning: Accessing non-existent property 'popd' of module exports inside circular dependency
(node:19864) Warning: Accessing non-existent property 'echo' of module exports inside circular dependency
(node:19864) Warning: Accessing non-existent property 'tempdir' of module exports inside circular dependency
(node:19864) Warning: Accessing non-existent property 'pwd' of module exports inside circular dependency
2
3
4
5
6
7
8
9
10
11
12
13
14
15
16
常见问题1:“Module build failed: Error: Cannot find module 'node-sass”
运行过程中,出现“Module build failed: Error: Cannot find module 'node-sass'报错问题”,解决方法
用npm install -g cnpm --registry=https://registry.npm.taobao.org ,从淘宝镜像那下载,然后cnpm下载成功。
最后输入cnpm install node-sass --save。npm run dev终于能跑起来了!!! ———————————————— 版权声明:本文为CSDN博主「夕阳下美了剪影」的原创文章,遵循CC 4.0 BY-SA版权协议,转载请附上原文出处链接及本声明。 原文链接:https://blog.csdn.net/qq_38401285/article/details/86483278
常见问题2:cnpm - 解决 " cnpm : 无法加载文件 C:\Users\93457\AppData\Roaming\npm\cnpm.ps1,因为在此系统上禁止运行脚本。有关详细信息 。。。 "
https://www.cnblogs.com/500m/p/11634969.html (opens new window)
所有问题的根源都在“node_modules”,npm install之前,应该将这个文件夹删除,然后再进行安装和运行。
再次运行npm run dev恢复正常:
# 7. clone renren-generator
# clone
https://gitee.com/renrenio/renren-generator.git
然后将该项目放置到“gulimall”的跟路径下,然后添加该Module,并且提交到github上
# 修改配置
renren-generator/src/main/resources/generator.properties
#代码生成器,配置信息

mainPath=com.bigdata
#包名
package=com.bigdata.gulimall
moduleName=product
#作者
author=cosmoswong
#Email
email=[email protected]
#表前缀(类名不会包含表前缀)
tablePrefix=pms_
2
3
4
5
6
7
8
9
10
11
12
# 运行“renren-generator”
访问:<http://localhost:80/
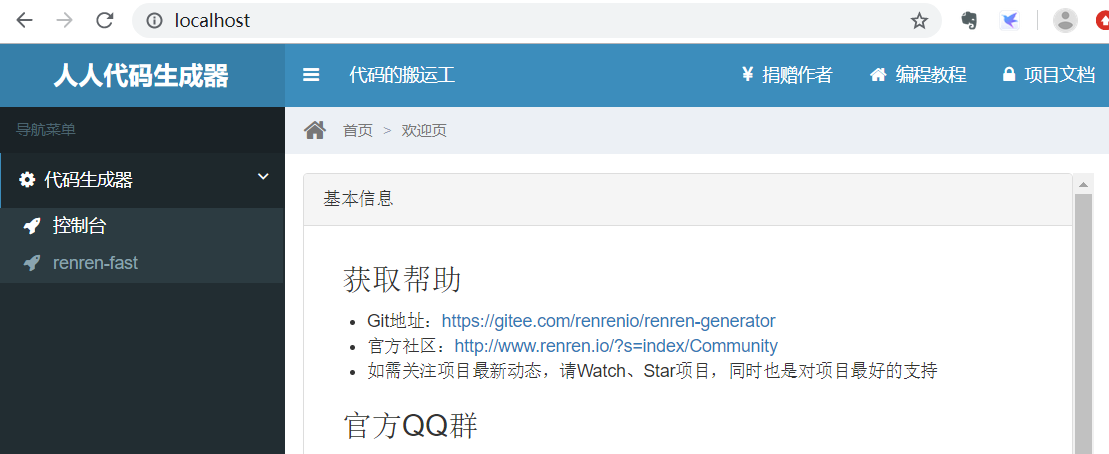
点击“renren-fast”,能够看到它将“renren-fast”的所有表都列举了出来:

选择所有的表,然后点击“生成代码”,将下载的“renren.zip”,解压后取出main文件夹,放置到“gulimall-product”项目的main目录中。
下面的几个module,也采用同样的方式来操作。
但是针对于“undo_log”,存在一个问题

它的数据类型是“longblob”类型,逆向工程后,对应的数据类型未知:

这个问题该要怎么解决?
# 8. 微服务注册中心
要注意nacos集群所在的server,一定要关闭防火墙,否则容易出现各种问题。
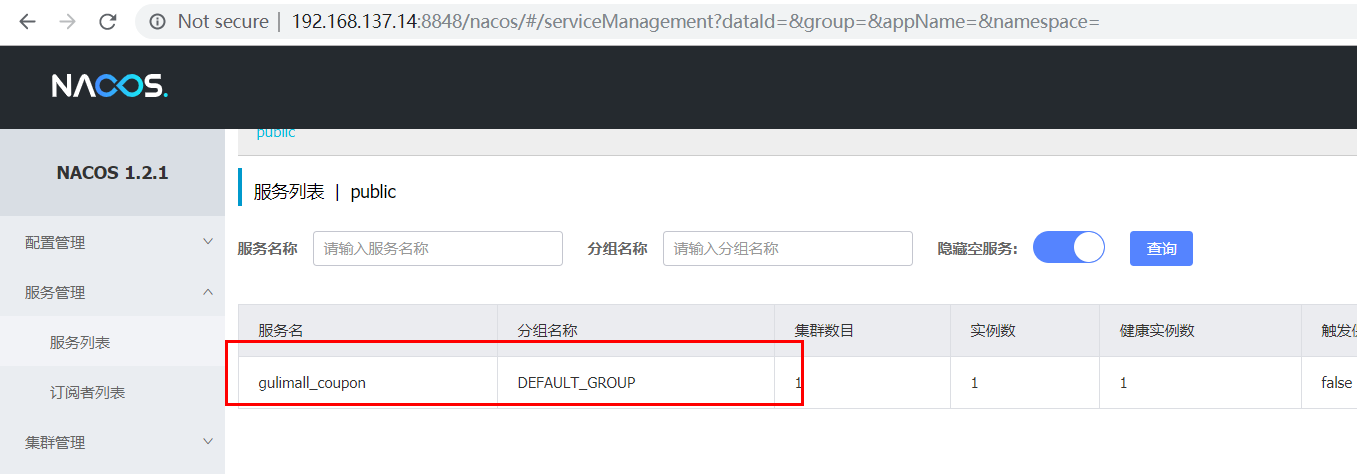
搭建nacos集群,然后分别启动各个微服务,将它们注册到Nacos中。
  application:
    name: gulimall-coupon
  cloud:
    nacos:
      discovery:
        server-addr: 192.168.137.14
2
3
4
5
6
查看注册情况:
# 9. 使用openfen
1)、引入open-feign
        <dependency>
            <groupId>org.springframework.cloud</groupId>
            <artifactId>spring-cloud-starter-openfeign</artifactId>
        </dependency>
2
3
4
2)、编写一个接口,告诉SpringCLoud这个接口需要调用远程服务
修改“com.bigdata.gulimall.coupon.controller.CouponController”,添加以下controller方法:
    @RequestMapping("/member/list")
    public R memberCoupons(){
        CouponEntity couponEntity = new CouponEntity();
        couponEntity.setCouponName("discount 20%");
        return R.ok().put("coupons",Arrays.asList(couponEntity));
    }
2
3
4
5
6
新建“com.bigdata.gulimall.member.feign.CouponFeignService”接口
@FeignClient("gulimall_coupon")
public interface CouponFeignService {
    @RequestMapping("/coupon/coupon/member/list")
    public R memberCoupons();
}
2
3
4
5
修改“com.bigdata.gulimall.member.GulimallMemberApplication”类,添加上"@EnableFeignClients":
@SpringBootApplication
@EnableDiscoveryClient
@EnableFeignClients(basePackages = "com.bigdata.gulimall.member.feign")
public class GulimallMemberApplication {

    public static void main(String[] args) {
        SpringApplication.run(GulimallMemberApplication.class, args);
    }
}
2
3
4
5
6
7
8
9
声明接口的每一个方法都是调用哪个远程服务的那个请求
3)、开启远程调用功能
com.bigdata.gulimall.member.controller.MemberController
    @RequestMapping("/coupons")
    public R test(){
        MemberEntity memberEntity=new MemberEntity();
        memberEntity.setNickname("zhangsan");
        R memberCoupons = couponFeignService.memberCoupons();

        return memberCoupons.put("member",memberEntity).put("coupons",memberCoupons.get("coupons"));
    }
2
3
4
5
6
7
8
9
(4)、访问http://localhost:8000/member/member/coupons (opens new window)

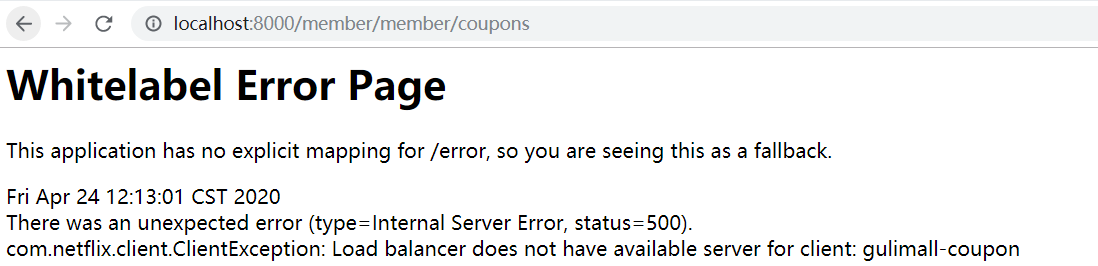
停止“gulimall-coupon”服务,能够看到注册中心显示该服务的健康值为0:
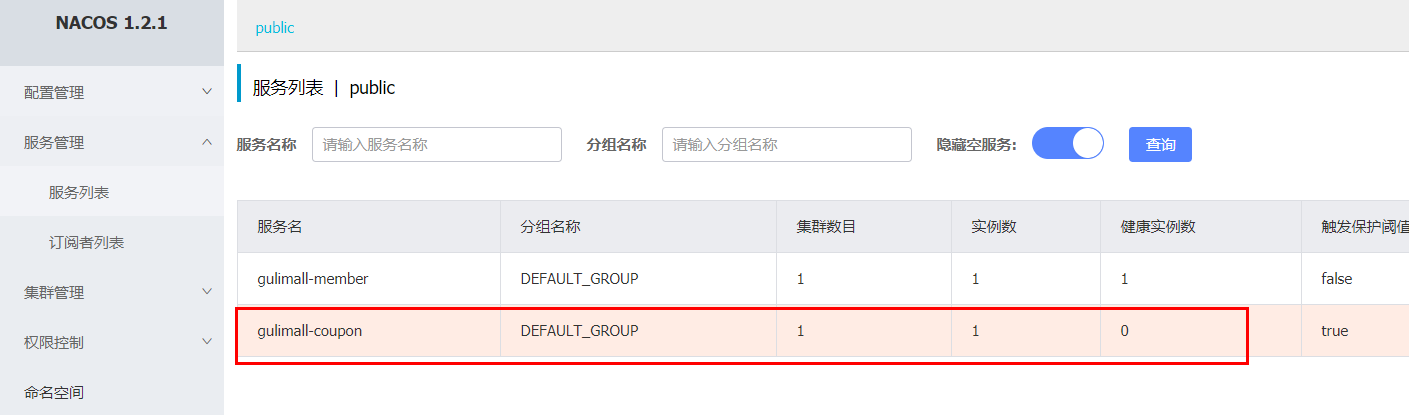
再次访问:http://localhost:8000/member/member/coupons
启动“gulimall-coupon”服务,再次访问,又恢复了正常。
# 10. 配置中心
# 1)修改“gulimall-coupon”模块
添加pom依赖:
<dependency>
    <groupId>com.alibaba.cloud</groupId>
    <artifactId>spring-cloud-starter-alibaba-nacos-config</artifactId>
</dependency>
2
3
4
创建bootstrap.properties文件,该配置文件会优先于“application.yml”加载。
spring.application.name=gulimall-coupon
spring.cloud.nacos.config.server-addr=192.168.137.14:8848
2
# 2)传统方式
为了详细说明config的使用方法,先来看原始的方式
创建“application.properties”配置文件,添加如下配置内容:
coupon.user.name="zhangsan"
coupon.user.age=30
2
修改“com.bigdata.gulimall.coupon.controller.CouponController”文件,添加如下内容:
    @Value("${coupon.user.name}")
    private String name;
    @Value("${coupon.user.age}")
    private Integer age;

    @RequestMapping("/test")
    public R getConfigInfo(){
       return R.ok().put("name",name).put("age",age);
    }
2
3
4
5
6
7
8
9
启动“gulimall-coupon”服务:
访问:http://localhost:7000/coupon/coupon/test>

这样做存在的一个问题,如果频繁的修改application.properties,在需要频繁重新打包部署。下面我们将采用Nacos的配置中心来解决这个问题。
# 3)nacos config
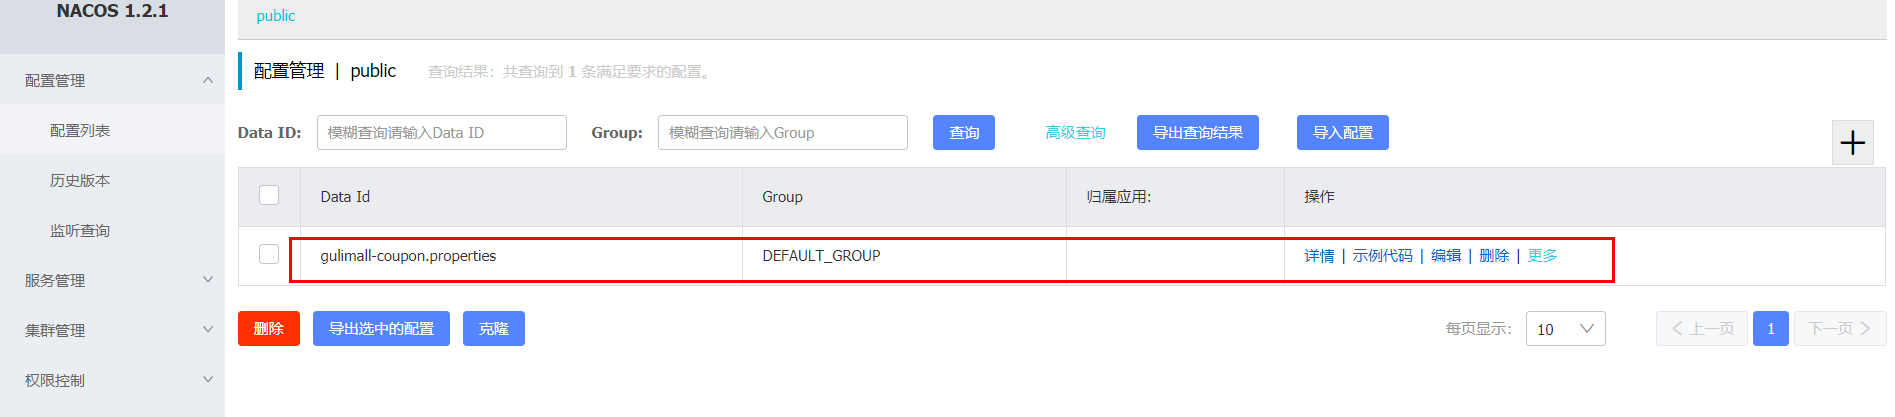
1、在Nacos注册中心中,点击“配置列表”,添加配置规则:

DataID:gulimall-coupon
配置格式:properties
文件的命名规则为:${spring.application.name}-${spring.profiles.active}.${spring.cloud.nacos.config.file-extension}
${spring.application.name}:为微服务名
${spring.profiles.active}:指明是哪种环境下的配置,如dev、test或info
${spring.cloud.nacos.config.file-extension}:配置文件的扩展名,可以为properties、yml等
2、查看配置:
3、修改“com.bigdata.gulimall.coupon.controller.CouponController”类,添加“@RefreshScope”注解
@RestController
@RequestMapping("coupon/coupon")
@RefreshScope
public class CouponController {
2
3
4
这样都会动态的从配置中心读取配置.
4、访问:http://localhost:7000/coupon/coupon/test (opens new window)

能够看到读取到了nacos 中的最新的配置信息,并且在指明了相同的配置信息时,配置中心中设置的值优先于本地配置。
# 4)Nacos支持三种配置加载方方案
Nacos支持“Namespace+group+data ID”的配置解决方案。
# Namespace方案
通过命名空间实现环境区分
下面是配置实例:
1、创建命名空间:
“命名空间”—>“创建命名空间”:
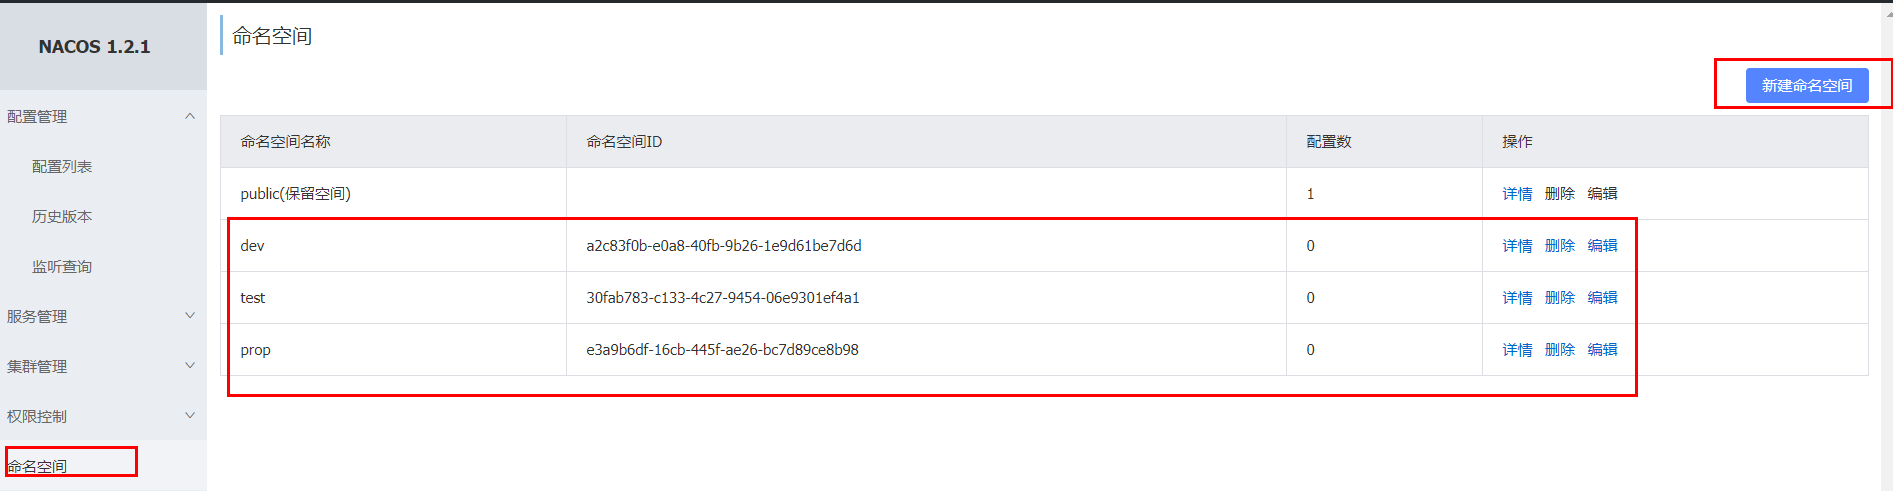
创建三个命名空间,分别为dev,test和prop
2、回到配置列表中,能够看到所创建的三个命名空间

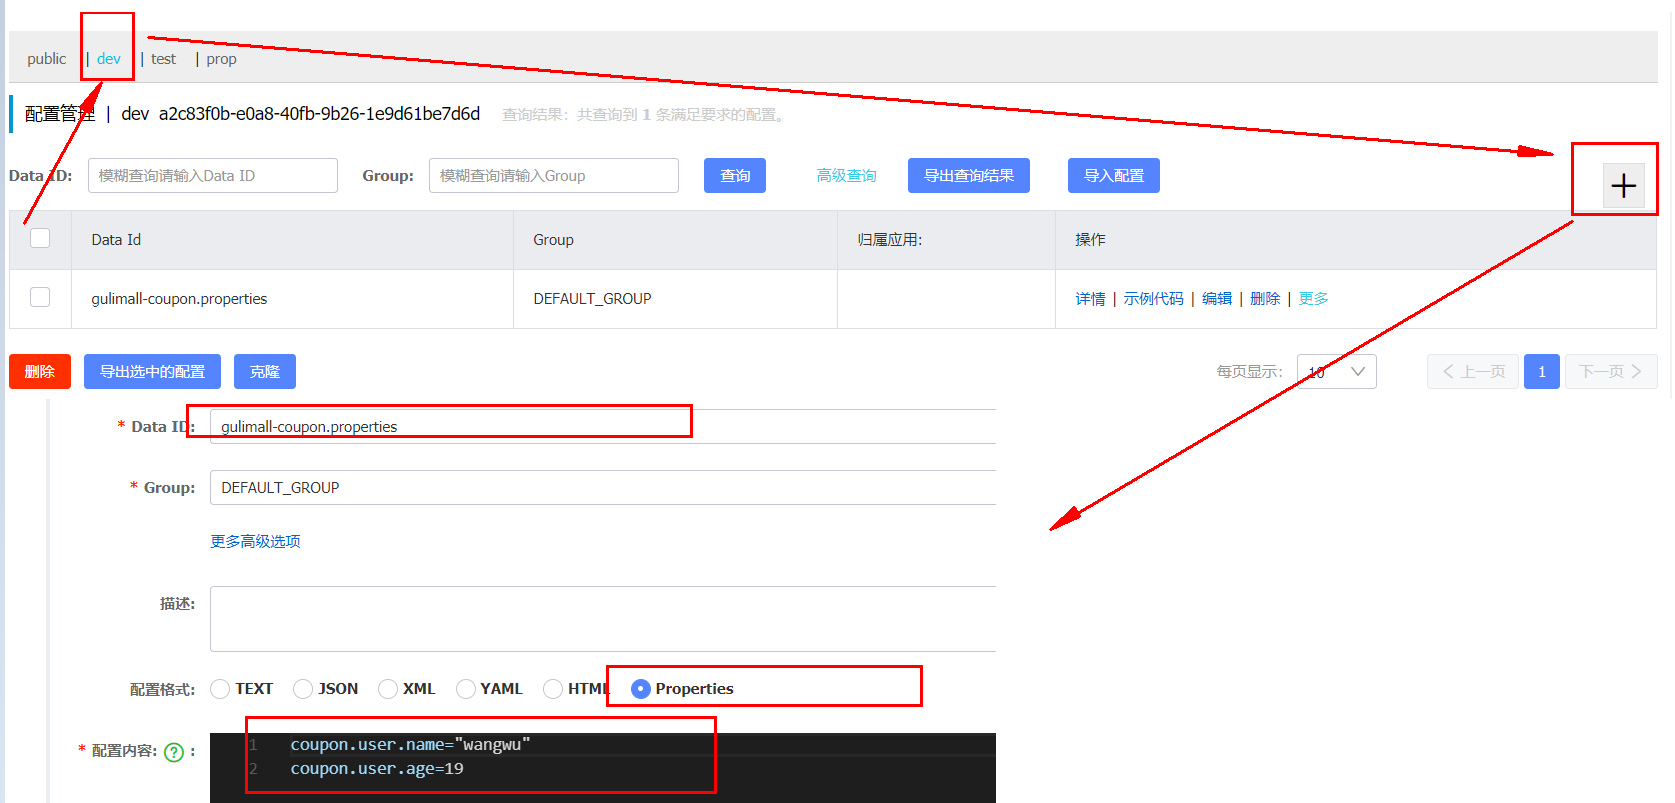
下面我们需要在dev命名空间下,创建“gulimall-coupon.properties”配置规则:
3、访问:http://localhost:7000/coupon/coupon/test (opens new window)

并没有使用我们在dev命名空间下所配置的规则,而是使用的是public命名空间下所配置的规则,这是怎么回事呢?
查看“gulimall-coupon”服务的启动日志:
2020-04-24 16:37:24.158  WARN 32792 --- [           main] c.a.c.n.c.NacosPropertySourceBuilder     : Ignore the empty nacos configuration and get it based on dataId[gulimall-coupon] & group[DEFAULT_GROUP]
2020-04-24 16:37:24.163  INFO 32792 --- [           main] c.a.nacos.client.config.utils.JVMUtil    : isMultiInstance:false
2020-04-24 16:37:24.169  INFO 32792 --- [           main] b.c.PropertySourceBootstrapConfiguration : Located property source: [BootstrapPropertySource {name='bootstrapProperties-gulimall-coupon.properties,DEFAULT_GROUP'}, BootstrapPropertySource {name='bootstrapProperties-gulimall-coupon,DEFAULT_GROUP'}]
2
3
4
"gulimall-coupon.properties",默认就是public命名空间中的内容中所配置的规则。
4、指定命名空间
如果想要使得我们自定义的命名空间生效,需要在“bootstrap.properties”文件中,指定使用哪个命名空间:
spring.cloud.nacos.config.namespace=a2c83f0b-e0a8-40fb-9b26-1e9d61be7d6d
这个命名空间ID来源于我们在第一步所创建的命名空间
5、重启“gulimall-coupon”,再次访问:http://localhost:7000/coupon/coupon/test

但是这种命名空间的粒度还是不够细化,对此我们可以为项目的每个微服务module创建一个命名空间。
6、为所有微服务创建命名空间

7、回到配置列表选项卡,克隆pulic的配置规则到coupon命名空间下

切换到coupon命名空间下,查看所克隆的规则:

8、修改“gulimall-coupon”下的bootstrap.properties文件,添加如下配置信息
spring.cloud.nacos.config.namespace=7905c915-64ad-4066-8ea9-ef63918e5f79
这里指明的是,读取时使用coupon命名空间下的配置。
9、重启“gulimall-coupon”,访问:http://localhost:7000/coupon/coupon/test (opens new window)
# DataID方案
通过指定spring.profile.active和配置文件的DataID,来使不同环境下读取不同的配置,读取配置时,使用的是默认命名空间public,默认分组(default_group)下的DataID。
默认情况,Namespace=public,Group=DEFAULT GROUP,默认Cluster是DEFAULT
# Group方案
通过Group实现环境区分
实例:通过使用不同的组,来读取不同的配置,还是以上面的gulimall-coupon微服务为例
1、新建“gulimall-coupon.properties”,将它置于“tmp”组下
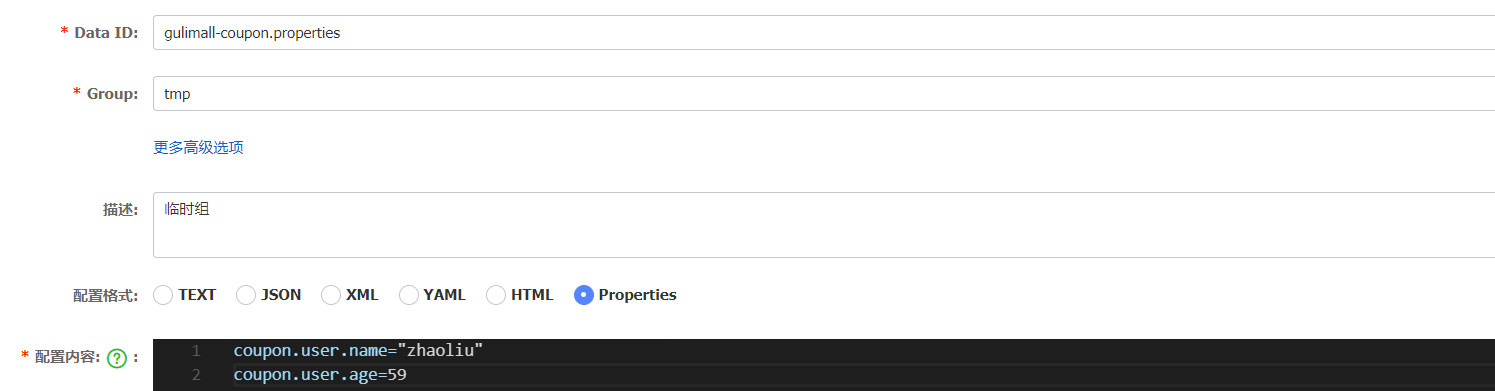
2、修改“bootstrap.properties”配置,添加如下的配置
spring.cloud.nacos.config.group=tmp
3、重启“gulimall-coupon”,访问:http://localhost:7000/coupon/coupon/test (opens new window)

# 5)同时加载多个配置集
当微服务数量很庞大时,将所有配置都书写到一个配置文件中,显然不是太合适。对此我们可以将配置按照功能的不同,拆分为不同的配置文件。
如下面的配置文件:
server:
  port: 7000

spring:
  datasource:
    #MySQL配置
    driverClassName: com.mysql.cj.jdbc.Driver
    url: jdbc:mysql://192.168.137.14:3306/gulimall_sms?useUnicode=true&characterEncoding=UTF-8&useSSL=false
    username: root
    password: root

  application:
    name: gulimall-coupon
  cloud:
    nacos:
      discovery:
        server-addr: 192.168.137.14:8848


mybatis-plus:
  global-config:
    db-config:
      id-type: auto
  mapper-locations: classpath:/mapper/**/*.xml
2
3
4
5
6
7
8
9
10
11
12
13
14
15
16
17
18
19
20
21
22
23
24
25
26
27
我们可以将,
数据源有关的配置写到一个配置文件中:
spring:
  datasource:
    #MySQL配置
    driverClassName: com.mysql.cj.jdbc.Driver
    url: jdbc:mysql://192.168.137.14:3306/gulimall_sms?useUnicode=true&characterEncoding=UTF-8&useSSL=false
    username: root
    password: root
2
3
4
5
6
7
和框架有关的写到另外一个配置文件中:
mybatis-plus:
  global-config:
    db-config:
      id-type: auto
  mapper-locations: classpath:/mapper/**/*.xml
2
3
4
5
也可以将上面的这些配置交给nacos来进行管理。
实例:将“gulimall-coupon”的“application.yml”文件拆分为多个配置,并放置到nacos配置中心
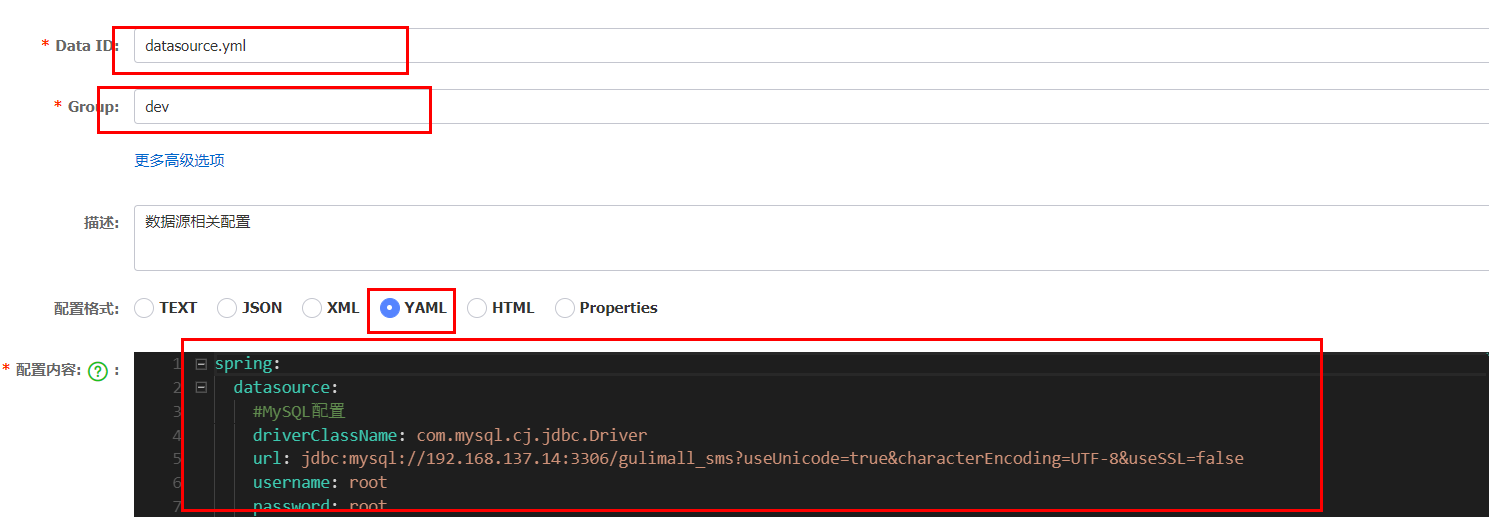
1、创建“datasource.yml”,用于存储和数据源有关的配置
spring:
  datasource:
    #MySQL配置
    driverClassName: com.mysql.cj.jdbc.Driver
    url: jdbc:mysql://192.168.137.14:3306/gulimall_sms?useUnicode=true&characterEncoding=UTF-8&useSSL=false
    username: root
    password: root
2
3
4
5
6
7
在coupon命名空间中,创建“datasource.yml”配置
2、将和mybatis相关的配置,放置到“mybatis.yml”中
mybatis-plus:
  global-config:
    db-config:
      id-type: auto
  mapper-locations: classpath:/mapper/**/*.xml
2
3
4
5

3、创建“other.yml”配置,保存其他的配置信息
server:
  port: 7000

spring:
  application:
    name: gulimall-coupon
  cloud:
    nacos:
      discovery:
        server-addr: 192.168.137.14:8848
2
3
4
5
6
7
8
9
10

现在“mybatis.yml”、“datasource.yml”和“other.yml”共同构成了微服务的配置。
4、修改“gulimall-coupon”的“bootstrap.properties”文件,加载“mybatis.yml”、“datasource.yml”和“other.yml”配置
spring.cloud.nacos.config.extension-configs[0].data-id=mybatis.yml
spring.cloud.nacos.config.extension-configs[0].group=dev
spring.cloud.nacos.config.extension-configs[0].refresh=true

spring.cloud.nacos.config.extension-configs[1].data-id=datasource.yml
spring.cloud.nacos.config.extension-configs[1].group=dev
spring.cloud.nacos.config.extension-configs[1].refresh=true


spring.cloud.nacos.config.extension-configs[2].data-id=other.yml
spring.cloud.nacos.config.extension-configs[2].group=dev
spring.cloud.nacos.config.extension-configs[2].refresh=true
2
3
4
5
6
7
8
9
10
11
12
"spring.cloud.nacos.config.ext-config"已经被废弃,建议使用“spring.cloud.nacos.config.extension-configs”
5、注释“application.yml”文件中的所有配置
6、重启“gulimall-coupon”服务,然后访问:http://localhost:7000/coupon/coupon/test (opens new window)

7、访问:http://localhost:7000/coupon/coupon/list (opens new window),查看是否能够正常的访问数据库

小结:
1)、微服务任何配置信息,任何配置文件都可以放在配置中心;
2)、只需要在bootstrap.properties中,说明加载配置中心的哪些配置文件即可;
3)、@Value, @ConfigurationProperties。都可以用来获取配置中心中所配置的信息;
4)、配置中心有的优先使用配置中心中的,没有则使用本地的配置。
# 11. 网关
# 1、注册“gulimall-gateway”到Nacos
# 1)创建“gulimall-gateway”
SpringCloud gateway
# 2)添加“gulimall-common”依赖和“spring-cloud-starter-gateway”依赖
        <dependency>
            <groupId>com.bigdata.gulimall</groupId>
            <artifactId>gulimall-common</artifactId>
            <version>1.0-SNAPSHOT</version>
        </dependency>
        <dependency>
            <groupId>org.springframework.cloud</groupId>
            <artifactId>spring-cloud-starter-gateway</artifactId>
        </dependency>
2
3
4
5
6
7
8
9
# 3)“com.bigdata.gulimall.gulimallgateway.GulimallGatewayApplication”类上加上“@EnableDiscoveryClient”注解
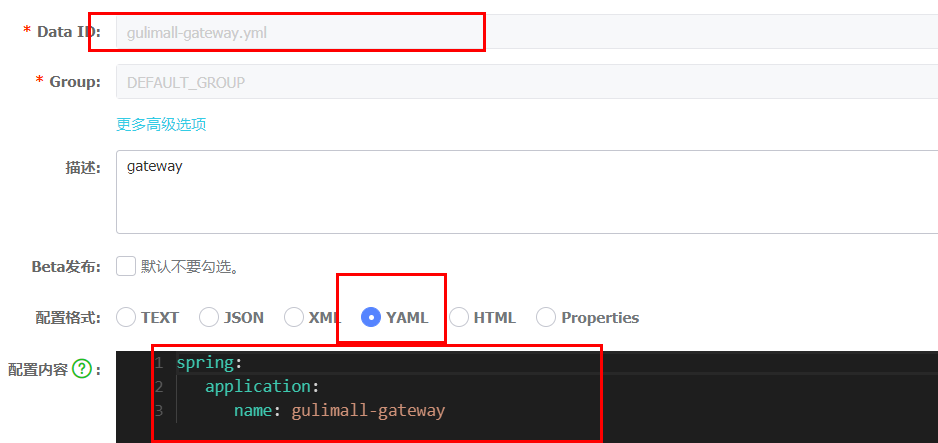
# 4)在Nacos中创建“gateway”命名空间,同时在该命名空间中创建“gulimall-gateway.yml”
# 5)创建“bootstrap.properties”文件,添加如下配置,指明配置中心地址和所属命名空间
spring.application.name=gulimall-gateway
spring.cloud.nacos.config.server-addr=192.168.137.14:8848
spring.cloud.nacos.config.namespace=1c82552e-1af0-4ced-9a48-26f19c2d315f
2
3
# 6)创建“application.properties”文件,指定服务名和注册中心地址
spring.application.name=gulimall-gateway
spring.cloud.nacos.discovery.server-addr=192.168.137.14:8848
server.port=88
2
3
# 7)启动“gulimall-gateway”
启动报错:
Description:

Failed to configure a DataSource: 'url' attribute is not specified and no embedded datasource could be configured.

Reason: Failed to determine a suitable driver class
2
3
4
5
解决方法:在“com.bigdata.gulimall.gulimallgateway.GulimallGatewayApplication”中排除和数据源相关的配置
@SpringBootApplication(exclude = {DataSourceAutoConfiguration.class})
重新启动
访问:http://192.168.137.14:8848/nacos/# (opens new window),查看到该服务已经注册到了Nacos中

# 2、案例
现在想要实现针对于“http://localhost:88/hello?url=baidu”,转发到“https://www.baidu.com”,针对于“http://localhost:88/hello?url=qq”的请求,转发到“https://www.qq.com/”
# 1)创建“application.yml”
spring:
  cloud:
    gateway:
      routes:
        - id: baidu_route
          uri: https://www.baidu.com
          predicates:
            - Query=url, baidu
        - id: qq_route
          uri: https://www.qq.com/
          predicates:
            - Query=url, qq
2
3
4
5
6
7
8
9
10
11
12