 数据访问
数据访问
# 1、SQL
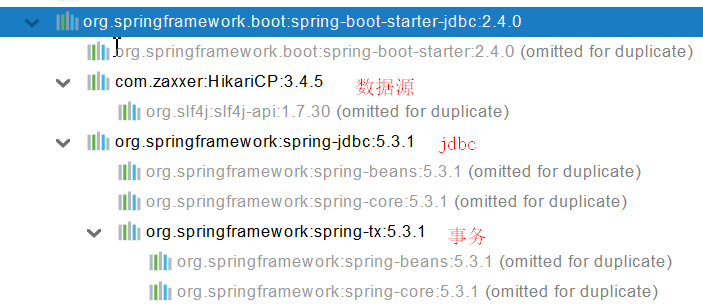
# 1、数据源的自动配置-HikariDataSource
# 1、导入JDBC场景
        <dependency>
            <groupId>org.springframework.boot</groupId>
            <artifactId>spring-boot-starter-data-jdbc</artifactId>
        </dependency>
2
3
4
5
数据库驱动? 为什么导入JDBC场景,官方不导入驱动?官方不知道我们接下要操作什么数据库。 数据库版本和驱动版本对应
默认版本:<mysql.version>8.0.22</mysql.version>

        <dependency>
            <groupId>mysql</groupId>
            <artifactId>mysql-connector-java</artifactId>
<!--            <version>5.1.49</version>-->
        </dependency>
想要修改版本
1、直接依赖引入具体版本(maven的就近依赖原则)
2、重新声明版本(maven的属性的就近优先原则)
    <properties>
        <java.version>1.8</java.version>
        <mysql.version>5.1.49</mysql.version>
    </properties>
2
3
4
5
6
7
8
9
10
11
12
13
14
# 2、分析自动配置
# 1、自动配置的类
- DataSourceAutoConfiguration : 数据源的自动配置
- 修改数据源相关的配置:spring.datasource
- 数据库连接池的配置,是自己容器中没有DataSource才自动配置的
- 底层配置好的连接池是:HikariDataSource
	@Configuration(proxyBeanMethods = false)
	@Conditional(PooledDataSourceCondition.class)
	@ConditionalOnMissingBean({ DataSource.class, XADataSource.class })
	@Import({ DataSourceConfiguration.Hikari.class, DataSourceConfiguration.Tomcat.class,
			DataSourceConfiguration.Dbcp2.class, DataSourceConfiguration.OracleUcp.class,
			DataSourceConfiguration.Generic.class, DataSourceJmxConfiguration.class })
	protected static class PooledDataSourceConfiguration
2
3
4
5
6
7
**
- DataSourceTransactionManagerAutoConfiguration: 事务管理器的自动配置
- JdbcTemplateAutoConfiguration: JdbcTemplate的自动配置,可以来对数据库进行crud
- 可以修改这个配置项@ConfigurationProperties(prefix = "spring.jdbc") 来修改JdbcTemplate
- @Bean@Primary JdbcTemplate;容器中有这个组件
- JndiDataSourceAutoConfiguration: jndi的自动配置
- XADataSourceAutoConfiguration: 分布式事务相关的
# 3、修改配置项
spring:
  datasource:
    url: jdbc:mysql://localhost:3306/db_account
    username: root
    password: 123456
    driver-class-name: com.mysql.jdbc.Driver
2
3
4
5
6
# 4、测试
@Slf4j
@SpringBootTest
class Boot05WebAdminApplicationTests {

    @Autowired
    JdbcTemplate jdbcTemplate;


    @Test
    void contextLoads() {

//        jdbcTemplate.queryForObject("select * from account_tbl")
//        jdbcTemplate.queryForList("select * from account_tbl",)
        Long aLong = jdbcTemplate.queryForObject("select count(*) from account_tbl", Long.class);
        log.info("记录总数:{}",aLong);
    }

}
2
3
4
5
6
7
8
9
10
11
12
13
14
15
16
17
18
# 2、使用Druid数据源
# 1、druid官方github地址
https://github.com/alibaba/druid (opens new window)
整合第三方技术的两种方式
- 自定义
- 找starter
# 2、自定义方式
# 1、创建数据源
        <dependency>
            <groupId>com.alibaba</groupId>
            <artifactId>druid</artifactId>
            <version>1.1.17</version>
        </dependency>

<bean id="dataSource" class="com.alibaba.druid.pool.DruidDataSource"
		destroy-method="close">
		<property name="url" value="${jdbc.url}" />
		<property name="username" value="${jdbc.username}" />
		<property name="password" value="${jdbc.password}" />
		<property name="maxActive" value="20" />
		<property name="initialSize" value="1" />
		<property name="maxWait" value="60000" />
		<property name="minIdle" value="1" />
		<property name="timeBetweenEvictionRunsMillis" value="60000" />
		<property name="minEvictableIdleTimeMillis" value="300000" />
		<property name="testWhileIdle" value="true" />
		<property name="testOnBorrow" value="false" />
		<property name="testOnReturn" value="false" />
		<property name="poolPreparedStatements" value="true" />
		<property name="maxOpenPreparedStatements" value="20" />
2
3
4
5
6
7
8
9
10
11
12
13
14
15
16
17
18
19
20
21
22
23
# 2、StatViewServlet
StatViewServlet的用途包括:
- 提供监控信息展示的html页面
- 提供监控信息的JSON API
	<servlet>
		<servlet-name>DruidStatView</servlet-name>
		<servlet-class>com.alibaba.druid.support.http.StatViewServlet</servlet-class>
	</servlet>
	<servlet-mapping>
		<servlet-name>DruidStatView</servlet-name>
		<url-pattern>/druid/*</url-pattern>
	</servlet-mapping>
2
3
4
5
6
7
8
# 3、StatFilter
用于统计监控信息;如SQL监控、URI监控
需要给数据源中配置如下属性;可以允许多个filter,多个用,分割;如:

<property name="filters" value="stat,slf4j" />
2
3
系统中所有filter:
| 别名 | Filter类名 |
|---|---|
| default | com.alibaba.druid.filter.stat.StatFilter |
| stat | com.alibaba.druid.filter.stat.StatFilter |
| mergeStat | com.alibaba.druid.filter.stat.MergeStatFilter |
| encoding | com.alibaba.druid.filter.encoding.EncodingConvertFilter |
| log4j | com.alibaba.druid.filter.logging.Log4jFilter |
| log4j2 | com.alibaba.druid.filter.logging.Log4j2Filter |
| slf4j | com.alibaba.druid.filter.logging.Slf4jLogFilter |
| commonlogging | com.alibaba.druid.filter.logging.CommonsLogFilter |
慢SQL记录配置
<bean id="stat-filter" class="com.alibaba.druid.filter.stat.StatFilter">
    <property name="slowSqlMillis" value="10000" />
    <property name="logSlowSql" value="true" />
</bean>

使用 slowSqlMillis 定义慢SQL的时长
2
3
4
5
6
# 3、使用官方starter方式
# 1、引入druid-starter
        <dependency>
            <groupId>com.alibaba</groupId>
            <artifactId>druid-spring-boot-starter</artifactId>
            <version>1.1.17</version>
        </dependency>
2
3
4
5
# 2、分析自动配置
- 扩展配置项 spring.datasource.druid
- DruidSpringAopConfiguration.class, 监控SpringBean的;配置项:spring.datasource.druid.aop-patterns
- DruidStatViewServletConfiguration.class, 监控页的配置:spring.datasource.druid.stat-view-servlet;默认开启
- DruidWebStatFilterConfiguration.class, web监控配置;spring.datasource.druid.web-stat-filter;默认开启
- DruidFilterConfiguration.class}) 所有Druid自己filter的配置
    private static final String FILTER_STAT_PREFIX = "spring.datasource.druid.filter.stat";
    private static final String FILTER_CONFIG_PREFIX = "spring.datasource.druid.filter.config";
    private static final String FILTER_ENCODING_PREFIX = "spring.datasource.druid.filter.encoding";
    private static final String FILTER_SLF4J_PREFIX = "spring.datasource.druid.filter.slf4j";
    private static final String FILTER_LOG4J_PREFIX = "spring.datasource.druid.filter.log4j";
    private static final String FILTER_LOG4J2_PREFIX = "spring.datasource.druid.filter.log4j2";
    private static final String FILTER_COMMONS_LOG_PREFIX = "spring.datasource.druid.filter.commons-log";
    private static final String FILTER_WALL_PREFIX = "spring.datasource.druid.filter.wall";
2
3
4
5
6
7
8
# 3、配置示例
spring:
  datasource:
    url: jdbc:mysql://localhost:3306/db_account
    username: root
    password: 123456
    driver-class-name: com.mysql.jdbc.Driver

    druid:
      aop-patterns: com.atguigu.admin.*  #监控SpringBean
      filters: stat,wall     # 底层开启功能,stat(sql监控),wall(防火墙)

      stat-view-servlet:   # 配置监控页功能
        enabled: true
        login-username: admin
        login-password: admin
        resetEnable: false

      web-stat-filter:  # 监控web
        enabled: true
        urlPattern: /*
        exclusions: '*.js,*.gif,*.jpg,*.png,*.css,*.ico,/druid/*'


      filter:
        stat:    # 对上面filters里面的stat的详细配置
          slow-sql-millis: 1000
          logSlowSql: true
          enabled: true
        wall:
          enabled: true
          config:
            drop-table-allow: false
2
3
4
5
6
7
8
9
10
11
12
13
14
15
16
17
18
19
20
21
22
23
24
25
26
27
28
29
30
31
32
33
SpringBoot配置示例 https://github.com/alibaba/druid/tree/master/druid-spring-boot-starter (opens new window)
# 3、整合MyBatis操作
https://github.com/mybatis (opens new window) starter SpringBoot官方的Starter:spring-boot-starter-* 第三方的: *-spring-boot-starter
        <dependency>
            <groupId>org.mybatis.spring.boot</groupId>
            <artifactId>mybatis-spring-boot-starter</artifactId>
            <version>2.1.4</version>
        </dependency>
2
3
4
5
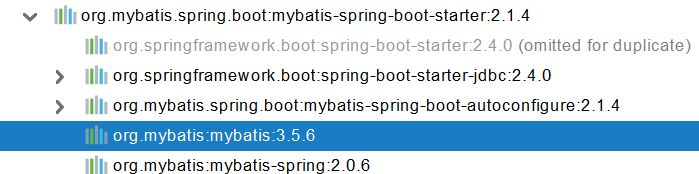
# 1、配置模式
- 全局配置文件
- SqlSessionFactory: 自动配置好了
- SqlSession:自动配置了 SqlSessionTemplate 组合了SqlSession
- @Import(AutoConfiguredMapperScannerRegistrar.class);
- Mapper: 只要我们写的操作MyBatis的接口标准了 @Mapper 就会被自动扫描进来
@EnableConfigurationProperties(MybatisProperties.class) : MyBatis配置项绑定类。
@AutoConfigureAfter({ DataSourceAutoConfiguration.class, MybatisLanguageDriverAutoConfiguration.class })
public class MybatisAutoConfiguration{}

@ConfigurationProperties(prefix = "mybatis")
public class MybatisProperties
2
3
4
5
6
可以修改配置文件中 mybatis 开始的所有;
# 配置mybatis规则
mybatis:
  config-location: classpath:mybatis/mybatis-config.xml  #全局配置文件位置
  mapper-locations: classpath:mybatis/mapper/*.xml  #sql映射文件位置

Mapper接口--->绑定Xml
<?xml version="1.0" encoding="UTF-8" ?>
<!DOCTYPE mapper
        PUBLIC "-//mybatis.org//DTD Mapper 3.0//EN"
        "http://mybatis.org/dtd/mybatis-3-mapper.dtd">
<mapper namespace="com.atguigu.admin.mapper.AccountMapper">
<!--    public Account getAcct(Long id); -->
    <select id="getAcct" resultType="com.atguigu.admin.bean.Account">
        select * from  account_tbl where  id=#{id}
    </select>
</mapper>
2
3
4
5
6
7
8
9
10
11
12
13
14
15
16
配置 **private **Configuration configuration; mybatis.configuration下面的所有,就是相当于改mybatis全局配置文件中的值 **
# 配置mybatis规则
mybatis:
#  config-location: classpath:mybatis/mybatis-config.xml
  mapper-locations: classpath:mybatis/mapper/*.xml
  configuration:
    map-underscore-to-camel-case: true

 可以不写全局;配置文件,所有全局配置文件的配置都放在configuration配置项中即可
2
3
4
5
6
7
8
- 导入mybatis官方starter
- 编写mapper接口。标准@Mapper注解
- 编写sql映射文件并绑定mapper接口
- 在application.yaml中指定Mapper配置文件的位置,以及指定全局配置文件的信息 (建议;配置在mybatis.configuration)
# 2、注解模式
@Mapper
public interface CityMapper {

    @Select("select * from city where id=#{id}")
    public City getById(Long id);

    public void insert(City city);

}
2
3
4
5
6
7
8
9
10
# 3、混合模式
@Mapper
public interface CityMapper {

    @Select("select * from city where id=#{id}")
    public City getById(Long id);

    public void insert(City city);

}
2
3
4
5
6
7
8
9
10
最佳实战:
- 引入mybatis-starter
- 配置application.yaml中,指定mapper-location位置即可
- 编写Mapper接口并标注@Mapper注解
- 简单方法直接注解方式
- 复杂方法编写mapper.xml进行绑定映射
- @MapperScan("com.atguigu.admin.mapper") 简化,其他的接口就可以不用标注@Mapper注解
# 4、整合 MyBatis-Plus 完成CRUD
# 1、什么是MyBatis-Plus
MyBatis-Plus (opens new window)(简称 MP)是一个 MyBatis (opens new window) 的增强工具,在 MyBatis 的基础上只做增强不做改变,为简化开发、提高效率而生。 mybatis plus 官网 (opens new window) 建议安装 **MybatisX **插件
# 2、整合MyBatis-Plus
        <dependency>
            <groupId>com.baomidou</groupId>
            <artifactId>mybatis-plus-boot-starter</artifactId>
            <version>3.4.1</version>
        </dependency>
2
3
4
5
自动配置
- MybatisPlusAutoConfiguration 配置类,MybatisPlusProperties 配置项绑定。mybatis-plus:xxx 就是对mybatis-plus的定制
- SqlSessionFactory 自动配置好。底层是容器中默认的数据源
- mapperLocations 自动配置好的。有默认值。classpath:/mapper//*.xml;任意包的类路径下的所有mapper文件夹下任意路径下的所有xml都是sql映射文件。 建议以后sql映射文件,放在 mapper下*
- 容器中也自动配置好了 SqlSessionTemplate
- @Mapper 标注的接口也会被自动扫描;建议直接 @MapperScan("com.atguigu.admin.mapper") 批量扫描就行
优点:
- 只需要我们的Mapper继承 **BaseMapper **就可以拥有crud能力
# 3、CRUD功能
    @GetMapping("/user/delete/{id}")
    public String deleteUser(@PathVariable("id") Long id,
                             @RequestParam(value = "pn",defaultValue = "1")Integer pn,
                             RedirectAttributes ra){

        userService.removeById(id);

        ra.addAttribute("pn",pn);
        return "redirect:/dynamic_table";
    }


    @GetMapping("/dynamic_table")
    public String dynamic_table(@RequestParam(value="pn",defaultValue = "1") Integer pn,Model model){
        //表格内容的遍历
//        response.sendError
//     List<User> users = Arrays.asList(new User("zhangsan", "123456"),
//                new User("lisi", "123444"),
//                new User("haha", "aaaaa"),
//                new User("hehe ", "aaddd"));
//        model.addAttribute("users",users);
//
//        if(users.size()>3){
//            throw new UserTooManyException();
//        }
        //从数据库中查出user表中的用户进行展示

        //构造分页参数
        Page<User> page = new Page<>(pn, 2);
        //调用page进行分页
        Page<User> userPage = userService.page(page, null);


//        userPage.getRecords()
//        userPage.getCurrent()
//        userPage.getPages()


        model.addAttribute("users",userPage);

        return "table/dynamic_table";
    }
2
3
4
5
6
7
8
9
10
11
12
13
14
15
16
17
18
19
20
21
22
23
24
25
26
27
28
29
30
31
32
33
34
35
36
37
38
39
40
41
42
@Service
public class UserServiceImpl extends ServiceImpl<UserMapper,User> implements UserService {


}

public interface UserService extends IService<User> {

}
2
3
4
5
6
7
8
9
# 2、NoSQL
Redis 是一个开源(BSD许可)的,内存中的数据结构存储系统,它可以用作数据库、缓存和消息中间件。 它支持多种类型的数据结构,如 字符串(strings) (opens new window), 散列(hashes) (opens new window), 列表(lists) (opens new window), 集合(sets) (opens new window), 有序集合(sorted sets) (opens new window) 与范围查询, bitmaps (opens new window), hyperloglogs (opens new window) 和 地理空间(geospatial) (opens new window) 索引半径查询。 Redis 内置了 复制(replication) (opens new window),LUA脚本(Lua scripting) (opens new window), LRU驱动事件(LRU eviction) (opens new window),事务(transactions) (opens new window) 和不同级别的 磁盘持久化(persistence) (opens new window), 并通过 Redis哨兵(Sentinel) (opens new window)和自动 分区(Cluster) (opens new window)提供高可用性(high availability)。
# 1、Redis自动配置
        <dependency>
            <groupId>org.springframework.boot</groupId>
            <artifactId>spring-boot-starter-data-redis</artifactId>
        </dependency>
2
3
4
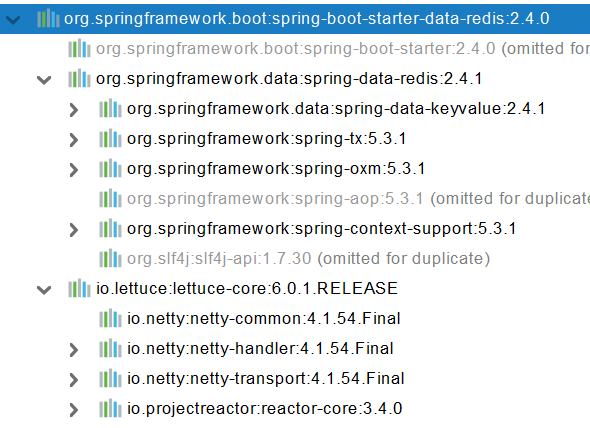
自动配置:
- RedisAutoConfiguration 自动配置类。RedisProperties 属性类 --> spring.redis.xxx是对redis的配置
- 连接工厂是准备好的。LettuceConnectionConfiguration、JedisConnectionConfiguration
- 自动注入了RedisTemplate<Object, Object> : xxxTemplate;
- 自动注入了StringRedisTemplate;k:v都是String
- key:value
- 底层只要我们使用 StringRedisTemplate、RedisTemplate就可以操作redis
** ** redis环境搭建 1、阿里云按量付费redis。经典网络 2、申请redis的公网连接地址 3、修改白名单 允许0.0.0.0/0 访问 ** **
# 2、RedisTemplate与Lettuce
**
    @Test
    void testRedis(){
        ValueOperations<String, String> operations = redisTemplate.opsForValue();

        operations.set("hello","world");

        String hello = operations.get("hello");
        System.out.println(hello);
    }
2
3
4
5
6
7
8
9
# 3、切换至jedis
        <dependency>
            <groupId>org.springframework.boot</groupId>
            <artifactId>spring-boot-starter-data-redis</artifactId>
        </dependency>

<!--        导入jedis-->
        <dependency>
            <groupId>redis.clients</groupId>
            <artifactId>jedis</artifactId>
        </dependency>
2
3
4
5
6
7
8
9
10
spring:
  redis:
      host: r-bp1nc7reqesxisgxpipd.redis.rds.aliyuncs.com
      port: 6379
      password: lfy:Lfy123456
      client-type: jedis
      jedis:
        pool:
          max-active: 10
2
3
4
5
6
7
8
9