 网络编程
网络编程
# InetAddress类的使用
一、实现网络通信需要解决的两个问题
- 如何准确地定位网络上一台或多台主机;定位主机上的特定的应用
- 找到主机后如何可靠高效地进行数据传输
二、网络通信的两个要素:
- 对应问题一:IP和端口号
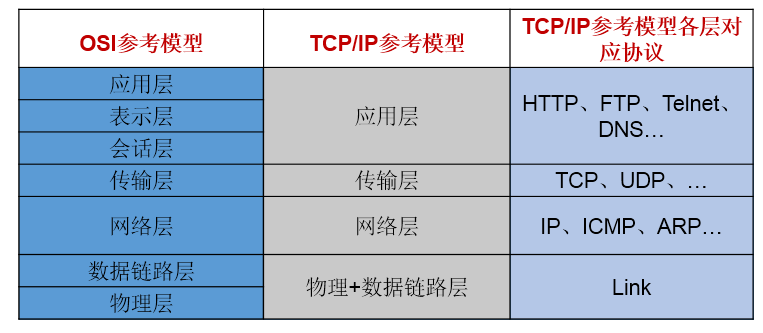
- 对应问题二:提供网络通信协议:TCP/IP参考模型(应用层、传输层、网络层、物理+数据链路层)
三、通信要素一:IP和端口号
IP的理解
- 1.IP:唯一的标识 Internet 上的计算机(通信实体)
- 2.在Java中使用InetAddress类代表IP
- 3.IP分类:IPv4 和 IPv6 ; 万维网 和 局域网
- 4.域名:
www.baidu.comwww.mi.comwww.sina.comwww.jd.com域名解析:域名容易记忆,当在连接网络时输入一个主机的域名后,域名服务器(DNS)负责将域名转化成IP地址,这样才能和主机建立连接。 -------域名解析 - 5.本地回路地址:127.0.0.1 对应着:localhost
InetAddress类:此类的一个对象就代表着一个具体的IP地址- 2.1实例化
getByName(String host)、getLocalHost() - 2.2常用方法
getHostName()/getHostAddress()
- 2.1实例化
端口号:正在计算机上运行的进程。 要求:不同的进程不同的端口号 范围:被规定为一个 16 位的整数 0~65535。 端口号与IP地址的组合得出一个网络套接字:Socket
四、通信要素二:网络通信协议
- 分型模型
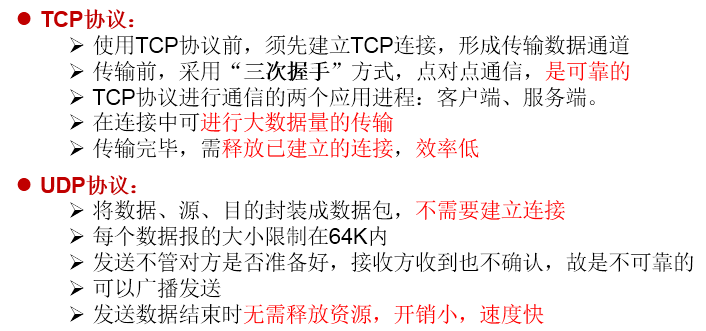
- TCP和UDP的区别
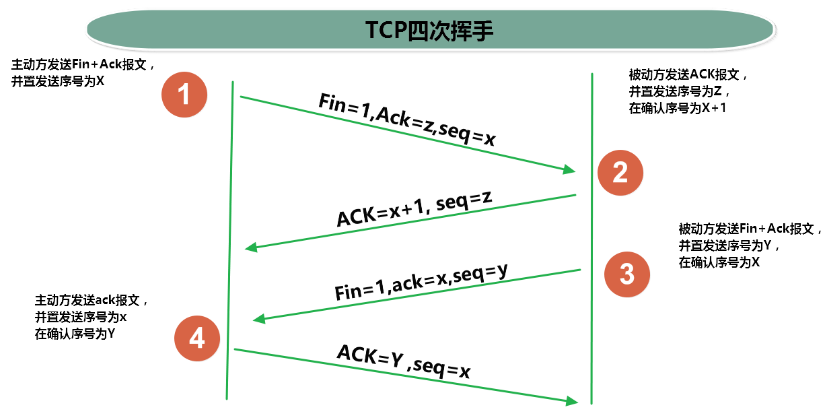
- TCP三次握手和四次挥手

# TCP网络编程
代码示例1: 客户端发送信息给服务端,服务端将数据显示在控制台上
	//客户端
    @Test
    public void client()  {
        Socket socket = null;
        OutputStream os = null;
        try {
            //1.创建Socket对象,指明服务器端的ip和端口号
            InetAddress inet = InetAddress.getByName("192.168.14.100");
            socket = new Socket(inet,8899);
            //2.获取一个输出流,用于输出数据
            os = socket.getOutputStream();
            //3.写出数据的操作
            os.write("你好,我是客户端mm".getBytes());
        } catch (IOException e) {
            e.printStackTrace();
        } finally {
            //4.资源的关闭
            if(os != null){
                try {
                    os.close();
                } catch (IOException e) {
                    e.printStackTrace();
                }

            }
            if(socket != null){
                try {
                    socket.close();
                } catch (IOException e) {
                    e.printStackTrace();
                }

            }
        }


    }
    //服务端
    @Test
    public void server()  {

        ServerSocket ss = null;
        Socket socket = null;
        InputStream is = null;
        ByteArrayOutputStream baos = null;
        try {
            //1.创建服务器端的ServerSocket,指明自己的端口号
            ss = new ServerSocket(8899);
            //2.调用accept()表示接收来自于客户端的socket
            socket = ss.accept();
            //3.获取输入流
            is = socket.getInputStream();

            //不建议这样写,可能会乱码
//        byte[] buffer = new byte[1024];
//        int len;
//        while((len = is.read(buffer)) != -1){
//            String str = new String(buffer,0,len);
//            System.out.print(str);
//        }
            //4.读取输入流中的数据
            baos = new ByteArrayOutputStream();
            byte[] buffer = new byte[5];
            int len;
            while((len = is.read(buffer)) != -1){
                baos.write(buffer,0,len);
            }

            System.out.println(baos.toString());

            System.out.println("收到了来自于:" + socket.getInetAddress().getHostAddress() + "的数据");

        } catch (IOException e) {
            e.printStackTrace();
        } finally {
            if(baos != null){
                //5.关闭资源
                try {
                    baos.close();
                } catch (IOException e) {
                    e.printStackTrace();
                }
            }
            if(is != null){
                try {
                    is.close();
                } catch (IOException e) {
                    e.printStackTrace();
                }
            }
            if(socket != null){
                try {
                    socket.close();
                } catch (IOException e) {
                    e.printStackTrace();
                }
            }
            if(ss != null){
                try {
                    ss.close();
                } catch (IOException e) {
                    e.printStackTrace();
                }
            }

        }

    }
1
2
3
4
5
6
7
8
9
10
11
12
13
14
15
16
17
18
19
20
21
22
23
24
25
26
27
28
29
30
31
32
33
34
35
36
37
38
39
40
41
42
43
44
45
46
47
48
49
50
51
52
53
54
55
56
57
58
59
60
61
62
63
64
65
66
67
68
69
70
71
72
73
74
75
76
77
78
79
80
81
82
83
84
85
86
87
88
89
90
91
92
93
94
95
96
97
98
99
100
101
102
103
104
105
106
107
108
109
代码示例2: 客户端发送文件给服务端,服务端将文件保存在本地。
/*
这里涉及到的异常,应该使用try-catch-finally处理
 */
@Test
public void client() throws IOException {
    //1.
    Socket socket = new Socket(InetAddress.getByName("127.0.0.1"),9090);
    //2.
    OutputStream os = socket.getOutputStream();
    //3.
    FileInputStream fis = new FileInputStream(new File("beauty.jpg"));
    //4.
    byte[] buffer = new byte[1024];
    int len;
    while((len = fis.read(buffer)) != -1){
        os.write(buffer,0,len);
    }
    //5.
    fis.close();
    os.close();
    socket.close();
}

/*
这里涉及到的异常,应该使用try-catch-finally处理
 */
@Test
public void server() throws IOException {
    //1.
    ServerSocket ss = new ServerSocket(9090);
    //2.
    Socket socket = ss.accept();
    //3.
    InputStream is = socket.getInputStream();
    //4.
    FileOutputStream fos = new FileOutputStream(new File("beauty1.jpg"));
    //5.
    byte[] buffer = new byte[1024];
    int len;
    while((len = is.read(buffer)) != -1){
        fos.write(buffer,0,len);
    }
    //6.
    fos.close();
    is.close();
    socket.close();
    ss.close();

}
1
2
3
4
5
6
7
8
9
10
11
12
13
14
15
16
17
18
19
20
21
22
23
24
25
26
27
28
29
30
31
32
33
34
35
36
37
38
39
40
41
42
43
44
45
46
47
48
49
2
3
4
5
6
7
8
9
10
11
12
13
14
15
16
17
18
19
20
21
22
23
24
25
26
27
28
29
30
31
32
33
34
35
36
37
38
39
40
41
42
43
44
45
46
47
48
49
代码示例3: 从客户端发送文件给服务端,服务端保存到本地。并返回“发送成功”给客户端。并关闭相应的连接。
/*
    这里涉及到的异常,应该使用try-catch-finally处理
     */
@Test
public void client() throws IOException {
    //1.
    Socket socket = new Socket(InetAddress.getByName("127.0.0.1"),9090);
    //2.
    OutputStream os = socket.getOutputStream();
    //3.
    FileInputStream fis = new FileInputStream(new File("beauty.jpg"));
    //4.
    byte[] buffer = new byte[1024];
    int len;
    while((len = fis.read(buffer)) != -1){
        os.write(buffer,0,len);
    }
    //关闭数据的输出
    socket.shutdownOutput();

    //5.接收来自于服务器端的数据,并显示到控制台上
    InputStream is = socket.getInputStream();
    ByteArrayOutputStream baos = new ByteArrayOutputStream();
    byte[] bufferr = new byte[20];
    int len1;
    while((len1 = is.read(buffer)) != -1){
        baos.write(buffer,0,len1);
    }

    System.out.println(baos.toString());

    //6.
    fis.close();
    os.close();
    socket.close();
    baos.close();
}

/*
这里涉及到的异常,应该使用try-catch-finally处理
 */
@Test
public void server() throws IOException {
    //1.
    ServerSocket ss = new ServerSocket(9090);
    //2.
    Socket socket = ss.accept();
    //3.
    InputStream is = socket.getInputStream();
    //4.
    FileOutputStream fos = new FileOutputStream(new File("beauty2.jpg"));
    //5.
    byte[] buffer = new byte[1024];
    int len;
    while((len = is.read(buffer)) != -1){
        fos.write(buffer,0,len);
    }

    System.out.println("图片传输完成");

    //6.服务器端给予客户端反馈
    OutputStream os = socket.getOutputStream();
    os.write("你好,美女,照片我已收到,非常漂亮!".getBytes());

    //7.
    fos.close();
    is.close();
    socket.close();
    ss.close();
    os.close();

}
1
2
3
4
5
6
7
8
9
10
11
12
13
14
15
16
17
18
19
20
21
22
23
24
25
26
27
28
29
30
31
32
33
34
35
36
37
38
39
40
41
42
43
44
45
46
47
48
49
50
51
52
53
54
55
56
57
58
59
60
61
62
63
64
65
66
67
68
69
70
71
72
2
3
4
5
6
7
8
9
10
11
12
13
14
15
16
17
18
19
20
21
22
23
24
25
26
27
28
29
30
31
32
33
34
35
36
37
38
39
40
41
42
43
44
45
46
47
48
49
50
51
52
53
54
55
56
57
58
59
60
61
62
63
64
65
66
67
68
69
70
71
72
# UDP网络编程
代码示例:
//发送端
@Test
public void sender() throws IOException {

    DatagramSocket socket = new DatagramSocket();


    String str = "我是UDP方式发送的导弹";
    byte[] data = str.getBytes();
    InetAddress inet = InetAddress.getLocalHost();
    DatagramPacket packet = new DatagramPacket(data,0,data.length,inet,9090);

    socket.send(packet);

    socket.close();

}
//接收端
@Test
public void receiver() throws IOException {

    DatagramSocket socket = new DatagramSocket(9090);

    byte[] buffer = new byte[100];
    DatagramPacket packet = new DatagramPacket(buffer,0,buffer.length);

    socket.receive(packet);

    System.out.println(new String(packet.getData(),0,packet.getLength()));

    socket.close();
}
1
2
3
4
5
6
7
8
9
10
11
12
13
14
15
16
17
18
19
20
21
22
23
24
25
26
27
28
29
30
31
32
33
2
3
4
5
6
7
8
9
10
11
12
13
14
15
16
17
18
19
20
21
22
23
24
25
26
27
28
29
30
31
32
33
# URL编程
URL(Uniform Resource Locator)的理解: 统一资源定位符,对应着互联网的某一资源地址
URL的5个基本结构:
http://localhost:8080/examples/beauty.jpg?username=Tom协议 主机名 端口号 资源地址 参数列表如何实例化:
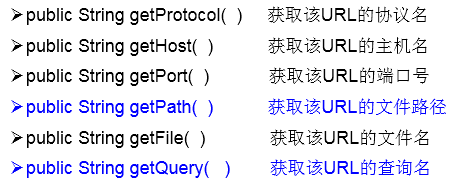
URL url = new URL("http://localhost:8080/examples/beauty.jpg?username=Tom");常用方法:
可以读取、下载对应的url资源:
public static void main(String[] args) {

    HttpURLConnection urlConnection = null;
    InputStream is = null;
    FileOutputStream fos = null;
    try {
        URL url = new URL("http://localhost:8080/examples/beauty.jpg");

        urlConnection = (HttpURLConnection) url.openConnection();

        urlConnection.connect();

        is = urlConnection.getInputStream();
        fos = new FileOutputStream("day10\\beauty3.jpg");

        byte[] buffer = new byte[1024];
        int len;
        while((len = is.read(buffer)) != -1){
            fos.write(buffer,0,len);
        }

        System.out.println("下载完成");
    } catch (IOException e) {
        e.printStackTrace();
    } finally {
        //关闭资源
        if(is != null){
            try {
                is.close();
            } catch (IOException e) {
                e.printStackTrace();
            }
        }
        if(fos != null){
            try {
                fos.close();
            } catch (IOException e) {
                e.printStackTrace();
            }
        }
        if(urlConnection != null){
            urlConnection.disconnect();
        }
    }
}
1
2
3
4
5
6
7
8
9
10
11
12
13
14
15
16
17
18
19
20
21
22
23
24
25
26
27
28
29
30
31
32
33
34
35
36
37
38
39
40
41
42
43
44
45
2
3
4
5
6
7
8
9
10
11
12
13
14
15
16
17
18
19
20
21
22
23
24
25
26
27
28
29
30
31
32
33
34
35
36
37
38
39
40
41
42
43
44
45
编辑 (opens new window)
上次更新: 2024/06/15, 15:12:25